

User Manual
Page 1
...Inserting the Remote Control Batteries ...16 Setup and Operation...17 Connecting Input Devices...17 Starting and Shutting down the Projector ...19 Setting an Access Password (Security Lock) ...21 Adjusting the Projector Level ...23 Adjusting the Zoom, Focus and Keystone...24 Adjusting the Volume ...24 OSD Menu Controls ...25 ...setting Menu ...35 Language Menu ...36 Management Menu ...37 Appendices...39 Replacing the Projection Lamp ...39 Resetting the Lamp ...42 Cleaning the Projector...43 Using the Kensington® Lock ...43 Common problems and solutions...44 Tips for Troubleshooting ...44 1
...Inserting the Remote Control Batteries ...16 Setup and Operation...17 Connecting Input Devices...17 Starting and Shutting down the Projector ...19 Setting an Access Password (Security Lock) ...21 Adjusting the Projector Level ...23 Adjusting the Zoom, Focus and Keystone...24 Adjusting the Volume ...24 OSD Menu Controls ...25 ...setting Menu ...35 Language Menu ...36 Management Menu ...37 Appendices...39 Replacing the Projection Lamp ...39 Resetting the Lamp ...42 Cleaning the Projector...43 Using the Kensington® Lock ...43 Common problems and solutions...44 Tips for Troubleshooting ...44 1

User Manual
Page 2
Projection Size...49 Timing Mode Table...50 Projector Dimensions ...51 Regulatory Compliance...52 FCC Warning...52 Canada...52 Safety Certifications...52 EN 55022 Warning ...52 RoHS Compliant ...52 2 Table of Contents LED Error Messages ...45 Image Problems ...46 Lamp Problems...46 Remote Control Problems...47 Audio Problems ...47 Having the Projector Serviced...48 Specifications...49 Projection Distance V.S.
Projection Size...49 Timing Mode Table...50 Projector Dimensions ...51 Regulatory Compliance...52 FCC Warning...52 Canada...52 Safety Certifications...52 EN 55022 Warning ...52 RoHS Compliant ...52 2 Table of Contents LED Error Messages ...45 Image Problems ...46 Lamp Problems...46 Remote Control Problems...47 Audio Problems ...47 Having the Projector Serviced...48 Specifications...49 Projection Distance V.S.

User Manual
Page 3
... this manual to alert you to alert you read this manual for pointing out items on Optoma product. The projection lamp is an XGA single chip 0.7 inch DLP ® projector! Precautions Warning symbols are used in this manual, component parts and items in the OSD menus...eyes. Doing so can damage the eyes permanently. Note: Provides additional information on . Important: Provides additional information that you of the projector. To avoid damage to open the unit case. This product is extremely bright by design. For servicing, contact qualified service personnel. Avoid...
... this manual to alert you to alert you read this manual for pointing out items on Optoma product. The projection lamp is an XGA single chip 0.7 inch DLP ® projector! Precautions Warning symbols are used in this manual, component parts and items in the OSD menus...eyes. Doing so can damage the eyes permanently. Note: Provides additional information on . Important: Provides additional information that you of the projector. To avoid damage to open the unit case. This product is extremely bright by design. For servicing, contact qualified service personnel. Avoid...

User Manual
Page 4
...Important Recycle Instructions: Lamp(s) inside this procedure. Do not place anything on page 52. 4 Regulatory Warnings Before installing and using the projector, read the regulatory notices in the way of properly. Remove the batteries from the remote control when storing or not in accordance with..."Replacing the Projection Lamp" on page 43. Before replacing the lamp: Unplug the power cord. Allow the lamp to "Cleaning the Projector" on page 39 for clear and safe instructions for a prolonged period. This product may contain other electronic waste that can be hazardous ...
...Important Recycle Instructions: Lamp(s) inside this procedure. Do not place anything on page 52. 4 Regulatory Warnings Before installing and using the projector, read the regulatory notices in the way of properly. Remove the batteries from the remote control when storing or not in accordance with..."Replacing the Projection Lamp" on page 43. Before replacing the lamp: Unplug the power cord. Allow the lamp to "Cleaning the Projector" on page 39 for clear and safe instructions for a prolonged period. This product may contain other electronic waste that can be hazardous ...
User Manual
Page 5
... This manual is intended for your needs. 5 This printer-friendly format is both for end users and describes how to install and operate the EP771 projector.
... This manual is intended for your needs. 5 This printer-friendly format is both for end users and describes how to install and operate the EP771 projector.
User Manual
Page 6
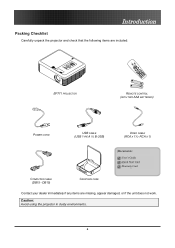
DB15) CARRYING CASE Contact your dealer immediately if any items are included: EP771 PROJECTOR REMOTE CONTROL (WITH TWO AAA BATTERIES) POWER CORD USB CABLE (USB TYPE A TO B USB) VIDEO CABLE (RCA X 1TO RCA X 1) Documents: User's Guide Quick Start Card Warranty Card COMPUTER CABLE (DB15 - Caution: Avoid using the projector in dusty environments. 6 Introduction Packing Checklist Introduction Carefully unpack the projector and check that the following items are missing, appear damaged, or if the unit does not work.
DB15) CARRYING CASE Contact your dealer immediately if any items are included: EP771 PROJECTOR REMOTE CONTROL (WITH TWO AAA BATTERIES) POWER CORD USB CABLE (USB TYPE A TO B USB) VIDEO CABLE (RCA X 1TO RCA X 1) Documents: User's Guide Quick Start Card Warranty Card COMPUTER CABLE (DB15 - Caution: Avoid using the projector in dusty environments. 6 Introduction Packing Checklist Introduction Carefully unpack the projector and check that the following items are missing, appear damaged, or if the unit does not work.
User Manual
Page 7
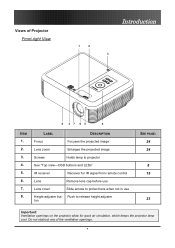
... release height adjuster ton SEE PAGE: 24 24 8 15 23 Important: Ventilation openings on the projector allow for IR signal from remote control Lens Remove lens cap before use Height-adjuster but- Do not obstruct any of Projector Front-right View Introduction 1 2 3 8 37 65 4 ITEM 1. 2. 3. 4. 5. 6. 7. 8. Views of the ventilation openings. 7 LABEL DESCRIPTION...
... release height adjuster ton SEE PAGE: 24 24 8 15 23 Important: Ventilation openings on the projector allow for IR signal from remote control Lens Remove lens cap before use Height-adjuster but- Do not obstruct any of Projector Front-right View Introduction 1 2 3 8 37 65 4 ITEM 1. 2. 3. 4. 5. 6. 7. 8. Views of the ventilation openings. 7 LABEL DESCRIPTION...
User Manual
Page 8
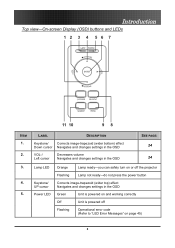
... in the OSD SEE PAGE: 24 24 Lamp LED Keystone/ UP cursor Power LED Orange Lamp ready-you can safely turn on or off the projector Flashing Lamp not ready-do not press the power button Corrects image-trapezoid (wider top) effect Navigates and changes settings in the OSD Green Unit...
... in the OSD SEE PAGE: 24 24 Lamp LED Keystone/ UP cursor Power LED Orange Lamp ready-you can safely turn on or off the projector Flashing Lamp not ready-do not press the power button Corrects image-trapezoid (wider top) effect Navigates and changes settings in the OSD Green Unit...
User Manual
Page 9
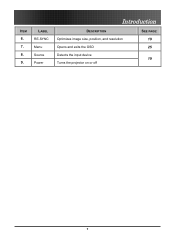
LABEL RE-SYNC Menu Source Power Introduction DESCRIPTION Optimizes image size, position, and resolution Opens and exits the OSD Detects the input device Turns the projector on or off SEE PAGE: 19 25 19 9 ITEM 6. 7. 8. 9.
LABEL RE-SYNC Menu Source Power Introduction DESCRIPTION Optimizes image size, position, and resolution Opens and exits the OSD Detects the input device Turns the projector on or off SEE PAGE: 19 25 19 9 ITEM 6. 7. 8. 9.
User Manual
Page 12
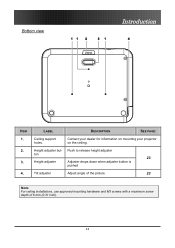
Push to release height adjuster ton 23 Height adjuster Adjuster drops down when adjuster button is pushed Tilt adjuster Adjust angle of the picture 23 Note: For ceiling installations, use approved mounting hardware and M3 screws with a maximum screw depth of 8 mm (0.31 inch). 12 Bottom view Introduction ITEM 1. 2. 3. 4. Height adjuster but- Contact your dealer for information on mounting your projector on the ceiling. LABEL DESCRIPTION SEE PAGE: Ceiling support holes.
Push to release height adjuster ton 23 Height adjuster Adjuster drops down when adjuster button is pushed Tilt adjuster Adjust angle of the picture 23 Note: For ceiling installations, use approved mounting hardware and M3 screws with a maximum screw depth of 8 mm (0.31 inch). 12 Bottom view Introduction ITEM 1. 2. 3. 4. Height adjuster but- Contact your dealer for information on mounting your projector on the ceiling. LABEL DESCRIPTION SEE PAGE: Ceiling support holes.
User Manual
Page 13
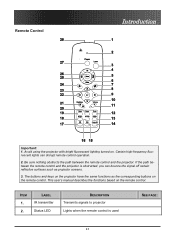
... can disrupt remote control operation. 2. Be sure nothing obstructs the path between the remote control and the projector is used SEE PAGE: 13 The buttons and keys on the projector have the same functions as projector screens. 3. This user's manual describes the functions based on the remote control. Certain high-frequency fluorescent lights...
... can disrupt remote control operation. 2. Be sure nothing obstructs the path between the remote control and the projector is used SEE PAGE: 13 The buttons and keys on the projector have the same functions as projector screens. 3. This user's manual describes the functions based on the remote control. Certain high-frequency fluorescent lights...
User Manual
Page 15
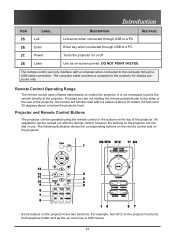
...PAGE: Left arrow when connected through USB to the sides or the rear of the projector, the remote will function well within a radius of the projector. The computer cable connects a computer to control the projector. Provided you are limited in OSD menus. 15 however the buttons on -screen pointer....or off Use as the up cursor key in use. The following illustration shows the corresponding buttons on the remote control and on the projector have two functions. DO NOT POINT IN EYES. All operations can be carried out with a computer when connected to the computer through...
...PAGE: Left arrow when connected through USB to the sides or the rear of the projector, the remote will function well within a radius of the projector. The computer cable connects a computer to control the projector. Provided you are limited in OSD menus. 15 however the buttons on -screen pointer....or off Use as the up cursor key in use. The following illustration shows the corresponding buttons on the remote control and on the projector have two functions. DO NOT POINT IN EYES. All operations can be carried out with a computer when connected to the computer through...
User Manual
Page 16
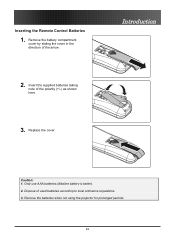
Replace the cover. Remove the battery compartment cover by sliding the cover in the direction of the polarity (+/-) as shown here. 3. Introduction Caution: 1. Insert the supplied batteries taking note of the arrow. 2. Only use AAA batteries.(Alkaline battery is better). 2. Remove the batteries when not using the projector for prolonged periods. 16 Inserting the Remote Control Batteries 1. Dispose of used batteries according to local ordinance regulations. 3.
Replace the cover. Remove the battery compartment cover by sliding the cover in the direction of the polarity (+/-) as shown here. 3. Introduction Caution: 1. Insert the supplied batteries taking note of the arrow. 2. Only use AAA batteries.(Alkaline battery is better). 2. Remove the batteries when not using the projector for prolonged periods. 16 Inserting the Remote Control Batteries 1. Dispose of used batteries according to local ordinance regulations. 3.

User Manual
Page 17
... supported. Audio-out Audio loop-through 17 Video devices include DVD, VCD, and VHS players, as well as video devices can be connected to the projector at the same time. S-video Connect the supplied S-video cable (not supplied) from remote control. Setup and Operation Connecting Input Devices Setup and Operation A PC...
... supported. Audio-out Audio loop-through 17 Video devices include DVD, VCD, and VHS players, as well as video devices can be connected to the projector at the same time. S-video Connect the supplied S-video cable (not supplied) from remote control. Setup and Operation Connecting Input Devices Setup and Operation A PC...

User Manual
Page 18
ITEM LABEL USB 12V RS-232 Setup and Operation DESCRIPTION Connect the supplied USB cable from the screen to the projector and connecting devices before making connections. 18 Reserved for USB mouse function and firmware upgrades. Warning: As a safety precaution, disconnect all power to this connector. Connect a 12-volt trigger cable from a computer for installation control. When connected, the screen automatically adjusts vertically to match the screen aspect ratio.
ITEM LABEL USB 12V RS-232 Setup and Operation DESCRIPTION Connect the supplied USB cable from the screen to the projector and connecting devices before making connections. 18 Reserved for USB mouse function and firmware upgrades. Warning: As a safety precaution, disconnect all power to this connector. Connect a 12-volt trigger cable from a computer for installation control. When connected, the screen automatically adjusts vertically to match the screen aspect ratio.

User Manual
Page 19
.... 4. If more than one input device is connected, press the Source button repeatedly to a wall outlet. message appears. 19 Connect the power cord to the projector [A] Connect the other end to switch among devices. (DVD and HDTV are detected. Ensure the LAMP LED is on a steady (not flashing) orange and then... (Security Lock)" on page 21 if Security Lock is a PC, press the appropriate keys on the computer keyboard to switch the display output to the projector. (Check the user manual of the PC to determine the appropriate Fn key combination to turn off (O) to on the...
.... 4. If more than one input device is connected, press the Source button repeatedly to a wall outlet. message appears. 19 Connect the power cord to the projector [A] Connect the other end to switch among devices. (DVD and HDTV are detected. Ensure the LAMP LED is on a steady (not flashing) orange and then... (Security Lock)" on page 21 if Security Lock is a PC, press the appropriate keys on the computer keyboard to switch the display output to the projector. (Check the user manual of the PC to determine the appropriate Fn key combination to turn off (O) to on the...
User Manual
Page 20
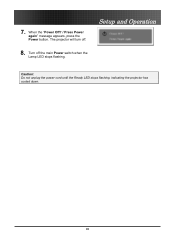
The projector will turn off the main Power switch when the Lamp LED stops flashing. Setup and Operation Caution: Do not unplug the power cord until the Ready LED stops flashing, indicating the projector has cooled down. 20 7. Turn off . 8. When the "Power Off? / Press Power again" message appears, press the Power button.
The projector will turn off the main Power switch when the Lamp LED stops flashing. Setup and Operation Caution: Do not unplug the power cord until the Ready LED stops flashing, indicating the projector has cooled down. 20 7. Turn off . 8. When the "Power Off? / Press Power again" message appears, press the Power button.
User Manual
Page 21
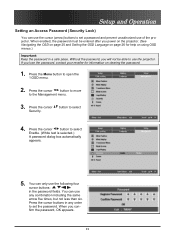
... OK appears. 21 Press the cursor button to move to select 4. You can use any order to set a password and prevent unauthorized use of the projector. Press the cursor buttons in any combination including the same arrow five times, but not less than six. You can only use the following four... cursor buttons: in a safe place. When enabled, the password must be able to use the projector. If you power on the projector. (See Navigating the OSD on page 25 and Setting the OSD Language on page 26 for information on using OSD menus.) Important: Keep...
... OK appears. 21 Press the cursor button to move to select 4. You can use any order to set a password and prevent unauthorized use of the projector. Press the cursor buttons in any combination including the same arrow five times, but not less than six. You can only use the following four... cursor buttons: in a safe place. When enabled, the password must be able to use the projector. If you power on the projector. (See Navigating the OSD on page 25 and Setting the OSD Language on page 26 for information on using OSD menus.) Important: Keep...

User Manual
Page 22
6. Every time you enter the wrong password.) Setup and Operation 22 Enter the password in the order you set it on step 5. (Press the Menu button to cancel if you start the projector, a password dialog box appears.
6. Every time you enter the wrong password.) Setup and Operation 22 Enter the password in the order you set it on step 5. (Press the Menu button to cancel if you start the projector, a password dialog box appears.
User Manual
Page 23
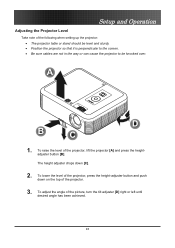
... 23 To lower the level of the projector, press the height-adjuster button and push down [C]. 2. To adjust the angle of the projector. 3. Setup and Operation Adjusting the Projector Level Take note of the projector, lift the projector [A] and press the heightadjuster button [B]. To... raise the level of the following when setting up the projector: • The projector table or stand should be level ...
... 23 To lower the level of the projector, press the height-adjuster button and push down [C]. 2. To adjust the angle of the projector. 3. Setup and Operation Adjusting the Projector Level Take note of the projector, lift the projector [A] and press the heightadjuster button [B]. To... raise the level of the following when setting up the projector: • The projector table or stand should be level ...


