Optoma H55 Support and Manuals
Get Help and Manuals for this Optoma item

Popular Optoma H55 Manual Pages
User Manual - Page 1
... 12
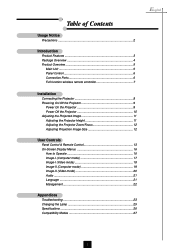
User Controls
Panel Control & Remote Control 13 On-Screen Display Menus 16
How to Operate 16 Image-I (Computer mode 17 Image-I (Video mode 18 Image-II (Computer mode 19 Image-II (Video mode 20 Audio 21 Language 21 Management 22
Appendices
Troubleshooting 23 Changing the Lamp 25 Specifications 26 Compatibility Modes 27
English
1
User Manual - Page 2

...risk of your eyes. Don't:
v Block the slots and openings on the
projector first. v Use abrasive cleaners, waxes or solvents to cool down, and follow the procedures...instructions. Warning- Warning- This remote control is not being
used for a long period of the lamp itself.
Warning- This product will burn out and may cause
electric shock. Warning- Warning- To replace the lamp...
User Manual - Page 3

... film
materials. English
Introduction
Product Features
This product is an XGA single chip 0.7" DLPTM projector. The outstanding features of it are listed as follows:
u True XGA, 1024 x 768... PureProgressiveTM processing technology for digital and analog video
connectivity u Full function wireless remote controller u Multimedia audio integration u User friendly multilingual on-screen display menu ...
User Manual - Page 4
... items shown below. English
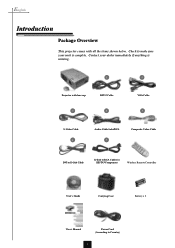
Introduction
Package Overview
This projector comes with lens cap 3
RS232 Cable 4
VGA Cable 5
S-Video Cable 6
Audio Cable Jack/RCA 7
Composite Video Cable
DVI to D-Sub Cable
D-Sub to RCA Cable for HDTV/Component
Wireless Remote Controller
User's Guide
Carrying Case
Battery x 2
User's Manual
Power Cord (According to make sure your...
User Manual - Page 9
... detect your source automatically.
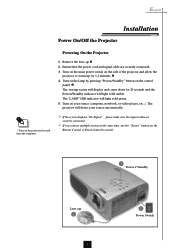
The "LAMP" LED indicator will light solid amber. Powering On the Projector
1. Turn on the control
panel. Ž The startup screen will display and count down for 1-2 minutes. 4.
Turn on the main power switch on the
Remote Control or Panel Control to warm up for 20 seconds and...
User Manual - Page 10

... it indicates the projector
has been overheated. If the problem persists, you will light solid amber for about 10 seconds, you should contact your local dealer or Optoma service center.
10 "...for about 30 seconds. v When the "LAMP" indicator flashs green for your local dealer or Optoma service center. English
Installation
Powering Off the Projector
1. Press the "Power/Standby" button to...
User Manual - Page 13

..., press the "Menu" button again. Panel Control
Remote Control
Use the Remote Control
Backlit
4 When you to control the functions: Remote Control and Panel Control. Power
4 Refer to the input source.
13 Re-Sync
4 Automatically synchronizes the projector to the "Power On/Off the Projector" section on remote controller will save any change you made automatically...
User Manual - Page 15

... Select Keys
4 Use
to select items or make adjustments for your selection of the image.
The projector will save any change you press "Zoom" button, the zoom icon appears on the screen. Volume.... Menu
4 Press "Menu" to open the on page 9~10. Re-Sync
4 Automatically synchronizes the projector to choose RGB, DVI-Digital, DVI-Analog, S-Video, Composite,
Component and HDTV sources. To exit ...
User Manual - Page 16
...Remote Control or
Panel Control.
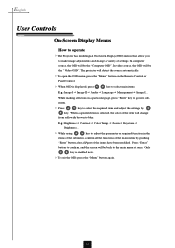
4 When OSD is displayed, press
key to the main menu at once. E.g.: Brightnessg Contrastg Color Temp.g Zoomg Keystoneg Brightness...
4 While using
key to select the required item and adjust the settings... and change a variety of the items have been modified. The projector will be the "Computer OSD". Press "Enter"
button to confirm...part of settings.
User Manual - Page 18
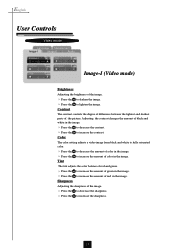
...the contrast. 4 Press the u to increase the amount of red in the image. Color
The color setting adjusts a video image from black and white to fully saturated color.
4 Press the to decrease the...u to lighten the image. Contrast
The contrast controls the degree of difference between the lightest and darkest parts of the image.
4 Press the to darken the image. 4 Press the u to increase the ...
User Manual - Page 19

..., use this function to correct it.
16 : 9 / 4 : 3
You can use this function to make an adjustment.
English
Computer mode
Language Management
Image-I and Image-II settings. Reset
Choose "Yes" to return the display parameters back to factory default.
19
User Manual - Page 22
... default setting.
4
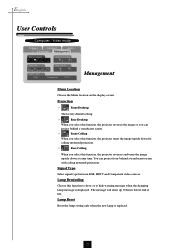
Rear-Desktop
When you select this function, the projector reverses the image so you can project from behind a translucent screen.
4
Front-Ceiling
When you select this function, the projector turns the image upside down for
ceiling-mounted projection.
4
Rear-Ceiling
When you select this function to show up 30 hours before end of life.
Lamp Reminding...
User Manual - Page 23
..., you will find the resolution setting. Problem : Partial, scrolling or incorrectly displayed image. 4 Press the "Re-Sync" button on the "Advanced Properties" button. 5. English
Appendices
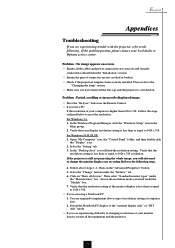
Troubleshooting
If you are not crooked or broken. 4 Check if the projection lamp has been securely installed. In the Windows Program Manager, click the "Windows Setup" icon in changing resolutions or...
User Manual - Page 24

... sure the projection screen is in the "Changing the Lamp".
24
Each of the projector for your computer's documentation for detailed information.
4 If you can not select 4:3 aspect ratio type on until the lamp module has been replaced. To replace the lamp, follow the procedures in use. Problem : Image is still outstretched, you will not turn back...
User Manual - Page 25
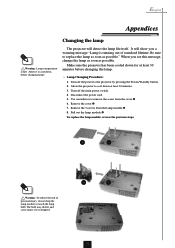
... replace the lamp as soon as possible. Pull out the lamp module.
To replace the lamp module, reverse the previous steps.
2
1
Warning : To reduce the risk of standard lifetime. English
Appendices
Changing the lamp
Warning : Lamp compartment is dropped.
4
3
25 It will detect the lamp life itself. The bulb may shatter and cause injury if it to the projector...
Optoma H55 Reviews
We have not received any reviews for Optoma yet.