
User Manual
Page 1
...Notice Precautions 2 Introduction Product Features 3 Package Overview 4 Product Overview 5 Main Unit 5 Panel Control 6 Connection Ports 6 Full function wireless remote controller 7 Installation Connecting the Projector 8 Powering On/Off the Projector 9 Power On the Projector 9 Power Off the Projector 10 Adjusting the... 11 Adjusting the Projector Height 11 Adjusting the Projector Zoom/Focus 12 Adjusting Projection Image Size 12 User Controls Panel Control & Remote Control 13 On-Screen Display Menus 16 How to Operate 16 Image-I (Computer mode 17 Image-I (Video mode 18 Image-II...
...Notice Precautions 2 Introduction Product Features 3 Package Overview 4 Product Overview 5 Main Unit 5 Panel Control 6 Connection Ports 6 Full function wireless remote controller 7 Installation Connecting the Projector 8 Powering On/Off the Projector 9 Power On the Projector 9 Power Off the Projector 10 Adjusting the... 11 Adjusting the Projector Height 11 Adjusting the Projector Zoom/Focus 12 Adjusting Projection Image Size 12 User Controls Panel Control & Remote Control 13 On-Screen Display Menus 16 How to Operate 16 Image-I (Computer mode 17 Image-I (Video mode 18 Image-II...

User Manual
Page 2
... and dirt. - v Use under "Changing the Lamp". Warning- Warning- Warning- v Disconnect the power plug from OSD menu. Don't: v Block the slots and openings on the remote control and do not point the laser light into anyone's eyes. Warning- When the lamp reaches the end of time. To replace the lamp, follow... or moisture. Please do not open or disassemble the product as recommended in direct sunlight. 2 English Usage Notice Precautions Follow all changing instructions. Warning- This remote control is not being used for ventilation.
... and dirt. - v Use under "Changing the Lamp". Warning- Warning- Warning- v Disconnect the power plug from OSD menu. Don't: v Block the slots and openings on the remote control and do not point the laser light into anyone's eyes. Warning- When the lamp reaches the end of time. To replace the lamp, follow... or moisture. Please do not open or disassemble the product as recommended in direct sunlight. 2 English Usage Notice Precautions Follow all changing instructions. Warning- This remote control is not being used for ventilation.

User Manual
Page 3
... u 1000 ANSI Lumens high brightness u High contrast ratio 1000 : 1 u Single chip DLPTM technology u PureProgressiveTM processing technology for digital and analog video connectivity u Full function wireless remote controller u Multimedia audio integration u User friendly multilingual on-screen display menu u Advanced electronic keystone correction u User friendly control panel u Luxurious carrying case included u SXGA compression...
... u 1000 ANSI Lumens high brightness u High contrast ratio 1000 : 1 u Single chip DLPTM technology u PureProgressiveTM processing technology for digital and analog video connectivity u Full function wireless remote controller u Multimedia audio integration u User friendly multilingual on-screen display menu u Advanced electronic keystone correction u User friendly control panel u Luxurious carrying case included u SXGA compression...
User Manual
Page 4
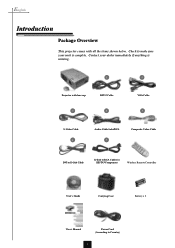
English Introduction Package Overview This projector comes with lens cap 3 RS232 Cable 4 VGA Cable 5 S-Video Cable 6 Audio Cable Jack/RCA 7 Composite Video Cable DVI to D-Sub Cable D-Sub to RCA Cable for HDTV/Component Wireless Remote Controller User's Guide Carrying Case Battery x 2 User's Manual Power Cord (According to make sure your dealer immediately if anything is complete. Check to Country) 4 Contact your unit is missing. 1 2 Projector with all the items shown below.
English Introduction Package Overview This projector comes with lens cap 3 RS232 Cable 4 VGA Cable 5 S-Video Cable 6 Audio Cable Jack/RCA 7 Composite Video Cable DVI to D-Sub Cable D-Sub to RCA Cable for HDTV/Component Wireless Remote Controller User's Guide Carrying Case Battery x 2 User's Manual Power Cord (According to make sure your dealer immediately if anything is complete. Check to Country) 4 Contact your unit is missing. 1 2 Projector with all the items shown below.

User Manual
Page 5
Elevator Button 10. Connection Ports 4. Zoom Ring 7. Remote Control Receiver 9. Elevator Foot 5 Speaker 8. English Product Overview Main Unit 7 Introduction 1 2 6 3 5 4 8 9 10 1. Panel Control 2. Zoom Lens 6. Power Connector & Power Switch 3. Focus Ring 5.
Elevator Button 10. Connection Ports 4. Zoom Ring 7. Remote Control Receiver 9. Elevator Foot 5 Speaker 8. English Product Overview Main Unit 7 Introduction 1 2 6 3 5 4 8 9 10 1. Panel Control 2. Zoom Lens 6. Power Connector & Power Switch 3. Focus Ring 5.

User Manual
Page 7
English Introduction Full Function Wireless Remote Controller Backlight Enter Menu Computer Source HDTV Source Brightness Contrast Keystone Correction Zoom Power Four Directional Select Keys Re-sync 16:9/4:3 Aspect Ratio Video Source S-Video Source Freeze Color Temperature Mute Volume 7
English Introduction Full Function Wireless Remote Controller Backlight Enter Menu Computer Source HDTV Source Brightness Contrast Keystone Correction Zoom Power Four Directional Select Keys Re-sync 16:9/4:3 Aspect Ratio Video Source S-Video Source Freeze Color Temperature Mute Volume 7
User Manual
Page 9
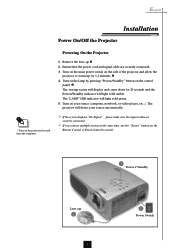
... the main power switch on the side of the projector and allow the projector to switch. 3 Power / Standby Lens cap 1 9 2 Power Switch Turn on the Remote Control or Panel Control to warm up for 20 seconds and the Power/Standby indicator will display and count down for 1-2 minutes. 4. v If the...
... the main power switch on the side of the projector and allow the projector to switch. 3 Power / Standby Lens cap 1 9 2 Power Switch Turn on the Remote Control or Panel Control to warm up for 20 seconds and the Power/Standby indicator will display and count down for 1-2 minutes. 4. v If the...

User Manual
Page 13
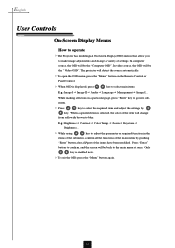
...and press key to fit your selection. Enter 4 Confirm your selection of items. Menu 4 Press "Menu" to open the on remote controller will save any change you made automatically. 16:9 / 4:3 4 You can use this function to select menu items . English User Controls ...Panel Control & Remote Control There are two ways for your desired aspect ratio type. Panel Control Remote Control Use the Remote Control Backlit 4 When you to normal mode, press "Backlit" button again. The projector will ...
...and press key to fit your selection. Enter 4 Confirm your selection of items. Menu 4 Press "Menu" to open the on remote controller will save any change you made automatically. 16:9 / 4:3 4 You can use this function to select menu items . English User Controls ...Panel Control & Remote Control There are two ways for your desired aspect ratio type. Panel Control Remote Control Use the Remote Control Backlit 4 When you to normal mode, press "Backlit" button again. The projector will ...
User Manual
Page 16
While making selection on the Remote Control or Panel Control. 4 When OSD is enabled now. 4To exit the OSD, press the "Menu" button again. 16 Only key is displayed, press key ...
While making selection on the Remote Control or Panel Control. 4 When OSD is enabled now. 4To exit the OSD, press the "Menu" button again. 16 Only key is displayed, press key ...
User Manual
Page 23
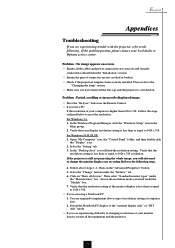
...correctly and securely connected as described in the "Installation" section. 4 Ensure the pins of your display resolution setting is switched on. Click on the Remote Control. 4 If you use a PC: If the resolution of connectors are not crooked or broken. 4 Check if the projection lamp has been ...equipment and the projector. 23 In the Windows Program Manager, click the "Windows Setup" icon in changing resolutions or your local dealer or Optoma service center. For Windows 95,98,2K,XP: 1. Verify that your computer is still not projecting the whole image, you will find the...
...correctly and securely connected as described in the "Installation" section. 4 Ensure the pins of your display resolution setting is switched on. Click on the Remote Control. 4 If you use a PC: If the resolution of connectors are not crooked or broken. 4 Check if the projection lamp has been ...equipment and the projector. 23 In the Windows Program Manager, click the "Windows Setup" icon in changing resolutions or your local dealer or Optoma service center. For Windows 95,98,2K,XP: 1. Verify that your computer is still not projecting the whole image, you will find the...


