
User Guide
Page 3
... - Wireless-G PrintServer Table of Contents Chapter 1: Introduction 1 Welcome 1 What's in this Guide? 2 Chapter 2: Getting to Know the PrintServer 4 The Bottom Panel 4 The Front Panel 5 Chapter 3: Connecting the PrintServer 6 Overview 6 Connecting the PrintServer to Your Network 6 Placement Options 7 Chapter 4: Configuring the PrintServer Using the Setup Wizard 8 Installation 8 Chapter 5: Windows Driver Installation 13 Overview 13 Installation 13 Starting the Print...
... - Wireless-G PrintServer Table of Contents Chapter 1: Introduction 1 Welcome 1 What's in this Guide? 2 Chapter 2: Getting to Know the PrintServer 4 The Bottom Panel 4 The Front Panel 5 Chapter 3: Connecting the PrintServer 6 Overview 6 Connecting the PrintServer to Your Network 6 Placement Options 7 Chapter 4: Configuring the PrintServer Using the Setup Wizard 8 Installation 8 Chapter 5: Windows Driver Installation 13 Overview 13 Installation 13 Starting the Print...
User Guide
Page 4
Wireless-G PrintServer Chapter 7: Bi-Admin Management 30 Overview 30 Bi-Admin Installation 30 Starting the Bi-Admin Management Utility 32 The Bi-Admin Management Utility 33 Chapter 8: Internet Printing Protocol (IPP) 44 Overview 44 Windows IPP Client Setup 44 Appendix A: Troubleshooting 49 Common Problems and Solutions 49 Appendix B: Wireless Security 51 Security Precautions 51 Security Threats...
Wireless-G PrintServer Chapter 7: Bi-Admin Management 30 Overview 30 Bi-Admin Installation 30 Starting the Bi-Admin Management Utility 32 The Bi-Admin Management Utility 33 Chapter 8: Internet Printing Protocol (IPP) 44 Overview 44 Windows IPP Client Setup 44 Appendix A: Troubleshooting 49 Common Problems and Solutions 49 Appendix B: Wireless Security 51 Security Precautions 51 Security Threats...
User Guide
Page 5
... (Pre-Shared Key) 25 NetBEUI 22 Figure 6-5: Protocol Tab - Wireless-G PrintServer List of Figures Figure 2-1: PrintServer's Bottom Panel 4 Figure 2-2: PrintServer's Front Panel 5 Figure 3-1: Connect to the Ethernet Port 6 Figure 3-2: Connect to the USB Port 6 Figure 3-3: Connect to the Power Port 6 Figure 3-4: Desktop Placement 7 Figure 4-1: Welcome 8 Figure 4-2: Wireless-G PrintServer Setup 8 Figure 4-3: Basic Settings 9 Figure 4-4: IP Settings 9 Figure 4-5: Set...
... (Pre-Shared Key) 25 NetBEUI 22 Figure 6-5: Protocol Tab - Wireless-G PrintServer List of Figures Figure 2-1: PrintServer's Bottom Panel 4 Figure 2-2: PrintServer's Front Panel 5 Figure 3-1: Connect to the Ethernet Port 6 Figure 3-2: Connect to the USB Port 6 Figure 3-3: Connect to the Power Port 6 Figure 3-4: Desktop Placement 7 Figure 4-1: Welcome 8 Figure 4-2: Wireless-G PrintServer Setup 8 Figure 4-3: Basic Settings 9 Figure 4-4: IP Settings 9 Figure 4-5: Set...
User Guide
Page 6
...Setup Welcome 30 Figure 7-3: Choose Destination Location 31 Figure 7-4: Select Program Folder 31 Figure 7-5: Connected Protocol 32 Figure 7-6: Searching for Device 32 Figure 7-7: Bi-Admin Management Utility 33 Figure 7-8: Device Information 33 Figure 7-9: Printer Status 34 Figure 7-10: Configuration - System 35 Figure 7-11: Configuration - Wireless... 7-13: Configuration - Wireless-G PrintServer Figure 6-8: Wireless Tab - Device 55 Figure D-2: Firmware Upgrade 55 Specify a Printer 47 Figure 8-3: Windows 2000 - Internet Printing 39 Figure 7-15: ...
...Setup Welcome 30 Figure 7-3: Choose Destination Location 31 Figure 7-4: Select Program Folder 31 Figure 7-5: Connected Protocol 32 Figure 7-6: Searching for Device 32 Figure 7-7: Bi-Admin Management Utility 33 Figure 7-8: Device Information 33 Figure 7-9: Printer Status 34 Figure 7-10: Configuration - System 35 Figure 7-11: Configuration - Wireless... 7-13: Configuration - Wireless-G PrintServer Figure 6-8: Wireless Tab - Device 55 Figure D-2: Firmware Upgrade 55 Specify a Printer 47 Figure 8-3: Windows 2000 - Internet Printing 39 Figure 7-15: ...
User Guide
Page 7
...cables. A print server is a device that provides a way to look at up your home or office ethernet: an IEEE standard network protocol that specifies a maximum data transfer rate of 54Mbps, an operating frequency of the Wireless-G PrintServer. Using the PrintServer, you ...which is sometimes called "wired". Wireless-G PrintServer Chapter 1: Introduction Welcome Thank you for sharing Internet access and computer resources. Networks are connected with all of this User Guide. They are useful tools for choosing the Linksys Wireless-G PrintServer. But what does all the ...
...cables. A print server is a device that provides a way to look at up your home or office ethernet: an IEEE standard network protocol that specifies a maximum data transfer rate of 54Mbps, an operating frequency of the Wireless-G PrintServer. Using the PrintServer, you ...which is sometimes called "wired". Wireless-G PrintServer Chapter 1: Introduction Welcome Thank you for sharing Internet access and computer resources. Networks are connected with all of this User Guide. They are useful tools for choosing the Linksys Wireless-G PrintServer. But what does all the ...
User Guide
Page 8
...wireless networking and how you can help protect your network • Appendix C: About Bi-Directional Printing This appendix describes bi-directional printing. • Appendix D: Upgrading Firmware This appendix instructs you on how to upgrade the firmware on how to use the PrintServer as an IPP server so you can run remote print... PrintServer This chapter describes the physical features of the PrintServer. • Chapter 3: Connecting the PrintServer This chapter instructs you on how to connect the PrintServer to your network. • Chapter 4: Configuring the PrintServer using the Setup ...
...wireless networking and how you can help protect your network • Appendix C: About Bi-Directional Printing This appendix describes bi-directional printing. • Appendix D: Upgrading Firmware This appendix instructs you on how to upgrade the firmware on how to use the PrintServer as an IPP server so you can run remote print... PrintServer This chapter describes the physical features of the PrintServer. • Chapter 3: Connecting the PrintServer This chapter instructs you on how to connect the PrintServer to your network. • Chapter 4: Configuring the PrintServer using the Setup ...
User Guide
Page 13
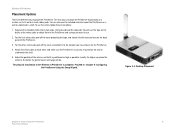
... is securely mounted on the back panel of the antenna so that it to "Chapter 4: Configuring the PrintServer Using the Setup Wizard." Attach the velcro sides to mount the PrintServer on the backs of the Wireless-G PrintServer is positioned as high as possible. You can also use the included velcro to each other velcro side...
... is securely mounted on the back panel of the antenna so that it to "Chapter 4: Configuring the PrintServer Using the Setup Wizard." Attach the velcro sides to mount the PrintServer on the backs of the Wireless-G PrintServer is positioned as high as possible. You can also use the included velcro to each other velcro side...
User Guide
Page 14
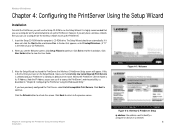
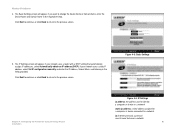
.... 3. It is highly recommended that List only new (unconfigured) Print Servers is its default server name. After the Setup Wizard has found the PrintServer, the Wireless-G PrintServer Setup screen will use a computer on the wired network to set up the PrintServer. 1. Click Next to continue. If it to the PrintServer's Server Name is selected and your CD-ROM drive). 2. Next to...
.... 3. It is highly recommended that List only new (unconfigured) Print Servers is its default server name. After the Setup Wizard has found the PrintServer, the Wireless-G PrintServer Setup screen will use a computer on the wired network to set up the PrintServer. 1. Click Next to continue. If it to the PrintServer's Server Name is selected and your CD-ROM drive). 2. Next to...
User Guide
Page 15
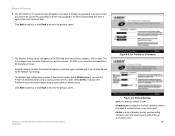
Figure 4-3: Basic Settings Chapter 4: Configuring the PrintServer Using the Setup Wizard Installation Figure 4-4: IP Settings ip address: the address used to send data over a network 9 Click Next to continue, or click Back to return to ... a DHCP setting that automatically assigns IP addresses, select Automatically obtain an IP address (DHCP). The Basic Settings screen will appear. If you want to a network. Wireless-G PrintServer 4.
Figure 4-3: Basic Settings Chapter 4: Configuring the PrintServer Using the Setup Wizard Installation Figure 4-4: IP Settings ip address: the address used to send data over a network 9 Click Next to continue, or click Back to return to ... a DHCP setting that automatically assigns IP addresses, select Automatically obtain an IP address (DHCP). The Basic Settings screen will appear. If you want to a network. Wireless-G PrintServer 4.
User Guide
Page 16
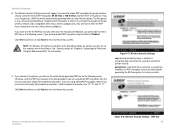
Wireless-G PrintServer 6. The SSID is bridged to communicate using an access point or wireless router. infrastructure: configuration in the Current Password field. Click Next to continue, or click Back to return...Type setting). Figure 4-5: Set PrintServer's Password Chapter 4: Configuring the PrintServer Using the Setup Wizard Installation Figure 4-6: Wireless Settings ssid: your wireless network's SSID or name. The Set PrintServer's Password screen will appear. The Wireless Settings screen will appear. Select the channel at which a wireless network is case-sensitive and ...
Wireless-G PrintServer 6. The SSID is bridged to communicate using an access point or wireless router. infrastructure: configuration in the Current Password field. Click Next to continue, or click Back to return...Type setting). Figure 4-5: Set PrintServer's Password Chapter 4: Configuring the PrintServer Using the Setup Wizard Installation Figure 4-6: Wireless Settings ssid: your wireless network's SSID or name. The Set PrintServer's Password screen will appear. The Wireless Settings screen will appear. Select the channel at which a wireless network is case-sensitive and ...
User Guide
Page 17
...to enter the WEP key(s) manually on any non-Linksys wireless products.) If you will see the automatically generated WEP key on the following screen. NOTE: The Wireless-G PrintServer also offers a Pre-Shared Key option for Linksys products. Otherwise, enter the WEP key manually in...fewer. Chapter 4: Configuring the PrintServer Using the Setup Wizard Installation Figure 4-8: Wireless Security Settings - Click Next to continue, or click Back to return to the previous screen. WEP Key 11 To use a Passphrase, a WEP key will appear. Wireless-G PrintServer 8. If you click the Next...
...to enter the WEP key(s) manually on any non-Linksys wireless products.) If you will see the automatically generated WEP key on the following screen. NOTE: The Wireless-G PrintServer also offers a Pre-Shared Key option for Linksys products. Otherwise, enter the WEP key manually in...fewer. Chapter 4: Configuring the PrintServer Using the Setup Wizard Installation Figure 4-8: Wireless Security Settings - Click Next to continue, or click Back to return to the previous screen. WEP Key 11 To use a Passphrase, a WEP key will appear. Wireless-G PrintServer 8. If you click the Next...
User Guide
Page 18
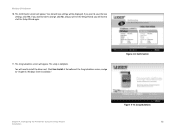
If you want to "Chapter 5: Windows Driver Installation." you will have to install the driver next. Wireless-G PrintServer 10. Figure 4-9: Confirmation Chapter 4: Configuring the PrintServer Using the Setup Wizard Installation Figure 4-10: Congratulations 12 Click User Install at the bottom of the Congratulations screen, and go to save the new settings, click Yes. ...
If you want to "Chapter 5: Windows Driver Installation." you will have to install the driver next. Wireless-G PrintServer 10. Figure 4-9: Confirmation Chapter 4: Configuring the PrintServer Using the Setup Wizard Installation Figure 4-10: Congratulations 12 Click User Install at the bottom of the Congratulations screen, and go to save the new settings, click Yes. ...
User Guide
Page 19
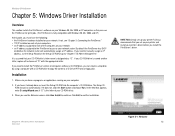
...Figure 5-1: Welcome 13 Wireless-G PrintServer Chapter 5: Windows Driver Installation Overview This section installs the PrintServer's software on your Windows 98, Me, 2000, or XP computers so they can create a setup disk by you have the following: • the PrintServer hardware installed on the Setup CD-ROM or go ...PrintServer for print jobs. (The PrintServer is fully compatible with Windows 98, Me, 2000, and XP.) At this point, you must have no programs or applications running on your network. • an IP address assigned to manually assign an IP address, run automatically. Linksys...
...Figure 5-1: Welcome 13 Wireless-G PrintServer Chapter 5: Windows Driver Installation Overview This section installs the PrintServer's software on your Windows 98, Me, 2000, or XP computers so they can create a setup disk by you have the following: • the PrintServer hardware installed on the Setup CD-ROM or go ...PrintServer for print jobs. (The PrintServer is fully compatible with Windows 98, Me, 2000, and XP.) At this point, you must have no programs or applications running on your network. • an IP address assigned to manually assign an IP address, run automatically. Linksys...
User Guide
Page 20
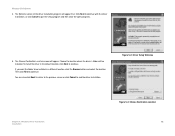
... screen of the driver installation program will be installed in the default location, click Next to continue. If you want the folder to be installed. Wireless-G PrintServer 4. The Choose Destination Location screen will appear. Figure 5-2: Driver Setup Welcome Chapter 5: Windows Driver Installation Installation Figure 5-3: Choose Destination Location 14
... screen of the driver installation program will be installed in the default location, click Next to continue. If you want the folder to be installed. Wireless-G PrintServer 4. The Choose Destination Location screen will appear. Figure 5-2: Driver Setup Welcome Chapter 5: Windows Driver Installation Installation Figure 5-3: Choose Destination Location 14
User Guide
Page 21
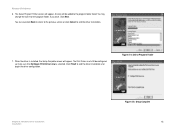
Click Next. The Print Driver must still be added to the program folder listed. When the driver is selected. Figure 5-4: Select Program Folder Chapter 5: Windows Driver Installation Installation Figure 5-5: Setup Complete 15 Wireless-G PrintServer 6. Click Finish to end the driver installation. 7. You may change the name for the program folder, if you wish... and begin the driver configuration. The Select Program Folder screen will appear. An icon will be configured, so make sure that Configure Print Driver now is installed, the Setup Complete screen will appear.
Click Next. The Print Driver must still be added to the program folder listed. When the driver is selected. Figure 5-4: Select Program Folder Chapter 5: Windows Driver Installation Installation Figure 5-5: Setup Complete 15 Wireless-G PrintServer 6. Click Finish to end the driver installation. 7. You may change the name for the program folder, if you wish... and begin the driver configuration. The Select Program Folder screen will appear. An icon will be configured, so make sure that Configure Print Driver now is installed, the Setup Complete screen will appear.
User Guide
Page 22
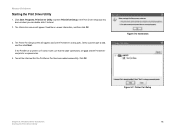
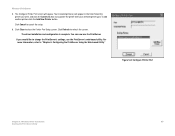
..., and then click Next. Click Start, Programs, Print Server Utility, and then Print Driver Setup. Click OK. The Printer Port Setup screen will appear. You will be informed that the cable connections are good and the PrintServer and printer are powered on -screen information, and ...then click OK. 3. If the PrintServer or printer isn't listed, make sure that the PrintServer Port has been added successfully. The Information screen will appear and list the PrintServer and its ports. Wireless-G PrintServer Starting the Print...
..., and then click Next. Click Start, Programs, Print Server Utility, and then Print Driver Setup. Click OK. The Printer Port Setup screen will appear. You will be informed that the cable connections are good and the PrintServer and printer are powered on -screen information, and ...then click OK. 3. If the PrintServer or printer isn't listed, make sure that the PrintServer Port has been added successfully. The Information screen will appear and list the PrintServer and its ports. Wireless-G PrintServer Starting the Print...
User Guide
Page 23
...Print Driver Utility Your installed printer(s) will appear. To add another printer, click the Add New Printer button. If you want, and click the Connect button to change the PrintServer's settings, use the PrintServer. Click Close to refresh the screen. Click Refresh to close the Printer Port Setup... screen. The driver installation and configuration is complete. Wireless-G PrintServer 5. Click Cancel to "Chapter 6: Configuring the PrintServer Using ...
...Print Driver Utility Your installed printer(s) will appear. To add another printer, click the Add New Printer button. If you want, and click the Connect button to change the PrintServer's settings, use the PrintServer. Click Close to refresh the screen. Click Refresh to close the Printer Port Setup... screen. The driver installation and configuration is complete. Wireless-G PrintServer 5. Click Cancel to "Chapter 6: Configuring the PrintServer Using ...
User Guide
Page 24
... each page's key functions. Follow the instructions until you reach the Welcome screen. Then press Enter. Wireless-G PrintServer Chapter 6: Configuring the PrintServer Using the Web-based Utility Overview After setting up the PrintServer with the Setup Wizard, the PrintServer will be available after you click one of the main tabs, except for use. To access the...
... each page's key functions. Follow the instructions until you reach the Welcome screen. Then press Enter. Wireless-G PrintServer Chapter 6: Configuring the PrintServer Using the Web-based Utility Overview After setting up the PrintServer with the Setup Wizard, the PrintServer will be available after you click one of the main tabs, except for use. To access the...
User Guide
Page 25
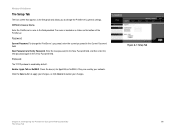
... in the Current Password field. WPS54G Device Name Enter the PrintServer's name in the Verify Password field. The name is enabled by your changes. Check the box(es) for AppleTalk or NetBEUI, if they are used by default. Wireless-G PrintServer The Setup Tab The first screen that appears is the Setup tab and allows you to...
... in the Current Password field. WPS54G Device Name Enter the PrintServer's name in the Verify Password field. The name is enabled by your changes. Check the box(es) for AppleTalk or NetBEUI, if they are used by default. Wireless-G PrintServer The Setup Tab The first screen that appears is the Setup tab and allows you to...

User Guide
Page 29
.... From the following drop-down menu, select the desired level of access for details on the Setup CD-ROM. SNMP Figure 6-5: Protocol Tab - Check your changes. Access. Select the number of...the trap messages or notifications. Trap Receivers Receiver No. SysLocation. IP Address. Chapter 6: Configuring the PrintServer Using the Web-based Utility The Protocol Tab - SNMP Use this procedure. Community. General SysContact....1 meaning least severe. SNMP 23 Wireless-G PrintServer The Protocol Tab - Enter the location of the management station running the SNMP program.
.... From the following drop-down menu, select the desired level of access for details on the Setup CD-ROM. SNMP Figure 6-5: Protocol Tab - Check your changes. Access. Select the number of...the trap messages or notifications. Trap Receivers Receiver No. SysLocation. IP Address. Chapter 6: Configuring the PrintServer Using the Web-based Utility The Protocol Tab - SNMP Use this procedure. Community. General SysContact....1 meaning least severe. SNMP 23 Wireless-G PrintServer The Protocol Tab - Enter the location of the management station running the SNMP program.


