
User Guide
Page 2
... of California to Use this : word: definition. WPS54G-UG-40915NC JL and certain other image) is provided with a figure number and description, like this User Guide The user guide to the Wireless-G PrintServer has been designed to make understanding networking with a reminder... about something that are subject to while using the PrintServer. Also, each figure (diagram, screenshot, or other countries. Wash hands after handling. Linksys is something you should pay...
... of California to Use this : word: definition. WPS54G-UG-40915NC JL and certain other image) is provided with a figure number and description, like this User Guide The user guide to the Wireless-G PrintServer has been designed to make understanding networking with a reminder... about something that are subject to while using the PrintServer. Also, each figure (diagram, screenshot, or other countries. Wash hands after handling. Linksys is something you should pay...
User Guide
Page 3
... - Logical Port 27 The Status Tab - SNMP 23 The Wireless Tab - Printer 29 The Status Tab - Wireless-G PrintServer Table of Contents Chapter 1: Introduction 1 Welcome 1 What's in this Guide? 2 Chapter 2: Getting to Know the PrintServer 4 The Bottom Panel 4 The Front Panel 5 Chapter 3: Connecting the PrintServer 6 Overview 6 Connecting the PrintServer to Your Network 6 Placement Options 7 Chapter 4: Configuring the...
... - Logical Port 27 The Status Tab - SNMP 23 The Wireless Tab - Printer 29 The Status Tab - Wireless-G PrintServer Table of Contents Chapter 1: Introduction 1 Welcome 1 What's in this Guide? 2 Chapter 2: Getting to Know the PrintServer 4 The Bottom Panel 4 The Front Panel 5 Chapter 3: Connecting the PrintServer 6 Overview 6 Connecting the PrintServer to Your Network 6 Placement Options 7 Chapter 4: Configuring the...

User Guide
Page 4
Wireless-G PrintServer Chapter 7: Bi-Admin Management 30 Overview 30 Bi-Admin Installation 30 Starting the Bi-Admin Management Utility 32 The Bi-Admin Management Utility 33 Chapter 8: Internet Printing Protocol (IPP) 44 Overview 44 Windows IPP Client Setup 44 Appendix A: Troubleshooting 49 Common Problems and Solutions 49 Appendix B: Wireless... Security 51 Security Precautions 51 Security Threats Facing Wireless Networks 51 Appendix C: About Bi-Directional Printing 54 Appendix D: Upgrading Firmware 55 Appendix...
Wireless-G PrintServer Chapter 7: Bi-Admin Management 30 Overview 30 Bi-Admin Installation 30 Starting the Bi-Admin Management Utility 32 The Bi-Admin Management Utility 33 Chapter 8: Internet Printing Protocol (IPP) 44 Overview 44 Windows IPP Client Setup 44 Appendix A: Troubleshooting 49 Common Problems and Solutions 49 Appendix B: Wireless... Security 51 Security Precautions 51 Security Threats Facing Wireless Networks 51 Appendix C: About Bi-Directional Printing 54 Appendix D: Upgrading Firmware 55 Appendix...
User Guide
Page 5
... the USB Port 6 Figure 3-3: Connect to the Power Port 6 Figure 3-4: Desktop Placement 7 Figure 4-1: Welcome 8 Figure 4-2: Wireless-G PrintServer Setup 8 Figure 4-3: Basic Settings 9 Figure 4-4: IP Settings 9 Figure 4-5: Set PrintServer's Password 10 Figure 4-6: Wireless Settings 10 Figure 4-7: Wireless Security Settings 11 Figure 4-8: Wireless Security Settings - AppleTalk 21 Figure 6-4: Protocol Tab - Security (Pre-Shared Key) 25 TCP/IP 20 Figure...
... the USB Port 6 Figure 3-3: Connect to the Power Port 6 Figure 3-4: Desktop Placement 7 Figure 4-1: Welcome 8 Figure 4-2: Wireless-G PrintServer Setup 8 Figure 4-3: Basic Settings 9 Figure 4-4: IP Settings 9 Figure 4-5: Set PrintServer's Password 10 Figure 4-6: Wireless Settings 10 Figure 4-7: Wireless Security Settings 11 Figure 4-8: Wireless Security Settings - AppleTalk 21 Figure 6-4: Protocol Tab - Security (Pre-Shared Key) 25 TCP/IP 20 Figure...
User Guide
Page 6
... Management Utility 33 Figure 7-8: Device Information 33 Figure 7-9: Printer Status 34 Figure 7-10: Configuration - Wireless 41 Figure 7-17: Configuration - Specify a Printer 47 Figure 8-3: Windows 2000 - Locate Your Printer ...Printing 26 Figure 6-10: Printer - AppleTalk 37 Figure 7-13: Configuration - Internet Printing 39 Figure 7-15: Configuration - Device 28 Figure 6-12: Firmware Upgrade 28 Figure 6-13: Status Tab - Logical Port 27 Figure 6-11: Status Tab - TCP/IP 36 Figure 7-12: Configuration - Wireless-G PrintServer Figure 6-8: Wireless...
... Management Utility 33 Figure 7-8: Device Information 33 Figure 7-9: Printer Status 34 Figure 7-10: Configuration - Wireless 41 Figure 7-17: Configuration - Specify a Printer 47 Figure 8-3: Windows 2000 - Locate Your Printer ...Printing 26 Figure 6-10: Printer - AppleTalk 37 Figure 7-13: Configuration - Internet Printing 39 Figure 7-15: Configuration - Device 28 Figure 6-12: Firmware Upgrade 28 Figure 6-13: Status Tab - Logical Port 27 Figure 6-11: Status Tab - TCP/IP 36 Figure 7-12: Configuration - Wireless-G PrintServer Figure 6-8: Wireless...
User Guide
Page 7
...print server is a device that allows multiple computers to communicate with USB 1.1 printers, as well as printers that support the new high-speed USB 2.0 specification for sharing Internet access and computer resources. Using the PrintServer, you don't need more useful work. By sharing the same wireless... User Guide to get the most out of measurement for choosing the Linksys Wireless-G PrintServer. Plus, you want to, without cumbersome cables. a unit of the Wireless-G PrintServer. Whichever way the PrintServer is attached to your network, both 802.11b and 802.11g standards...
...print server is a device that allows multiple computers to communicate with USB 1.1 printers, as well as printers that support the new high-speed USB 2.0 specification for sharing Internet access and computer resources. Using the PrintServer, you don't need more useful work. By sharing the same wireless... User Guide to get the most out of measurement for choosing the Linksys Wireless-G PrintServer. Plus, you want to, without cumbersome cables. a unit of the Wireless-G PrintServer. Whichever way the PrintServer is attached to your network, both 802.11b and 802.11g standards...
User Guide
Page 8
... only. • Chapter 8: Internet Printing Protocol (IPP) This chapter instruct you on how to use the PrintServer as an IPP server so you can run remote print jobs. • Appendix A: Troubleshooting ...PrintServer to your network. • Chapter 4: Configuring the PrintServer using the PrintServer. • Chapter 1: Introduction This chapter describes the PrintServer's applications and this Guide? Wireless-G PrintServer What's in wireless networking and how you can help protect your network • Appendix C: About Bi-Directional Printing This appendix describes bi-directional printing...
... only. • Chapter 8: Internet Printing Protocol (IPP) This chapter instruct you on how to use the PrintServer as an IPP server so you can run remote print jobs. • Appendix A: Troubleshooting ...PrintServer to your network. • Chapter 4: Configuring the PrintServer using the PrintServer. • Chapter 1: Introduction This chapter describes the PrintServer's applications and this Guide? Wireless-G PrintServer What's in wireless networking and how you can help protect your network • Appendix C: About Bi-Directional Printing This appendix describes bi-directional printing...

User Guide
Page 9
... appendix provides contact information for instructions about networking, such as installing the TCP/IP protocol. • Appendix F: Glossary This appendix gives a brief glossary of Linksys resources, including Technical Support. Wireless-G PrintServer • Appendix E: Windows Help This appendix describes how you can use Windows Help for a variety of terms frequently used in this Guide?
... appendix provides contact information for instructions about networking, such as installing the TCP/IP protocol. • Appendix F: Glossary This appendix gives a brief glossary of Linksys resources, including Technical Support. Wireless-G PrintServer • Appendix E: Windows Help This appendix describes how you can use Windows Help for a variety of terms frequently used in this Guide?
User Guide
Page 10
...To generate a diagnostic print-out 1. The USB icon (right) designates a USB port. The PrintServer comes with the factory defaults. Do not reset the PrintServer if you will connect the power adapter. Wireless-G PrintServer Chapter 2: Getting to Know the PrintServer The Bottom Panel The PrintServer's ports and Reset ...a square connector called Type A. The Ethernet port is where you will be reset to print this page. Press and hold it in the PrintServer. 3. Ensure that both the PrintServer and the printer attached to the Printer port are unable to factory defaults.
...To generate a diagnostic print-out 1. The USB icon (right) designates a USB port. The PrintServer comes with the factory defaults. Do not reset the PrintServer if you will connect the power adapter. Wireless-G PrintServer Chapter 2: Getting to Know the PrintServer The Bottom Panel The PrintServer's ports and Reset ...a square connector called Type A. The Ethernet port is where you will be reset to print this page. Press and hold it in the PrintServer. 3. Ensure that both the PrintServer and the printer attached to the Printer port are unable to factory defaults.
User Guide
Page 11
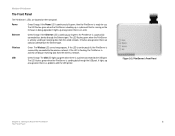
... actively sending or receiving data from the wired network. Figure 2-2: PrintServer's Front Panel Chapter 2: Getting to a device through the USB port. Wireless-G PrintServer The Front Panel The PrintServer's LEDs are collisions detected on the front panel. Ethernet Green/Orange. Wireless Green. The Wireless LED serves two purposes. USB Green/Orange. If the LED is flashing, the...
... actively sending or receiving data from the wired network. Figure 2-2: PrintServer's Front Panel Chapter 2: Getting to a device through the USB port. Wireless-G PrintServer The Front Panel The PrintServer's LEDs are collisions detected on the front panel. Ethernet Green/Orange. Wireless Green. The Wireless LED serves two purposes. USB Green/Orange. If the LED is flashing, the...
User Guide
Page 12
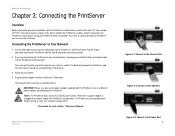
... its power adapter is plugged into a power supply, the PrintServer is powered on . Wireless-G PrintServer Chapter 3: Connecting the PrintServer Overview Before starting the physical installation, note the PrintServer's default name, which is used to the PrintServer's USB Printer port. The default name is shown in the Server field on the PrintServer's back panel. If you are connecting the...
... its power adapter is plugged into a power supply, the PrintServer is powered on . Wireless-G PrintServer Chapter 3: Connecting the PrintServer Overview Before starting the physical installation, note the PrintServer's default name, which is used to the PrintServer's USB Printer port. The default name is shown in the Server field on the PrintServer's back panel. If you are connecting the...
User Guide
Page 13
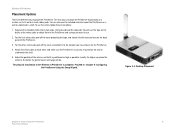
Wireless-G PrintServer Placement Options There are different ways to the location you have chosen for the PrintServer. 4. For the first velcro side, peel off the cover, and attach it to use the tape on the backs of the antenna so that it ... want to the recessed area on a wall or underneath a shelf. Attach the velcro sides to "Chapter 4: Configuring the PrintServer Using the Setup Wizard." The first way is to mount the PrintServer on the back panel of the Wireless-G PrintServer is positioned as high as possible. You can also use the velcro, follow these instructions: 1.
Wireless-G PrintServer Placement Options There are different ways to the location you have chosen for the PrintServer. 4. For the first velcro side, peel off the cover, and attach it to use the tape on the backs of the antenna so that it ... want to the recessed area on a wall or underneath a shelf. Attach the velcro sides to "Chapter 4: Configuring the PrintServer Using the Setup Wizard." The first way is to mount the PrintServer on the back panel of the Wireless-G PrintServer is positioned as high as possible. You can also use the velcro, follow these instructions: 1.
User Guide
Page 14
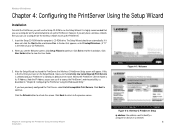
... only have previously configured the Print Server, select List all compatible Print Servers. In the box that List only new (unconfigured) Print Servers is its default server name. Click Exit to the previous screen. Next to continue. Click Next to the PrintServer's Server Name is selected and your CD-ROM drive). 2. Wireless-G PrintServer Chapter 4: Configuring the PrintServer Using the Setup Wizard Installation...
... only have previously configured the Print Server, select List all compatible Print Servers. In the box that List only new (unconfigured) Print Servers is its default server name. Click Exit to the previous screen. Next to continue. Click Next to the PrintServer's Server Name is selected and your CD-ROM drive). 2. Wireless-G PrintServer Chapter 4: Configuring the PrintServer Using the Setup Wizard Installation...
User Guide
Page 15
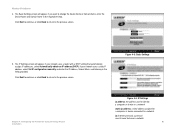
... Automatically obtain an IP address (DHCP). Click Next to continue, or click Back to return to the previous screen. 5. Figure 4-3: Basic Settings Chapter 4: Configuring the PrintServer Using the Setup Wizard Installation Figure 4-4: IP Settings ip address: the address used to send data over a network 9 If you want to a network. If your... to change the Device Name or Domain Name, enter the Device Name and Domain Name in the fields provided. The Basic Settings screen will appear. Wireless-G PrintServer 4.
... Automatically obtain an IP address (DHCP). Click Next to continue, or click Back to return to the previous screen. 5. Figure 4-3: Basic Settings Chapter 4: Configuring the PrintServer Using the Setup Wizard Installation Figure 4-4: IP Settings ip address: the address used to send data over a network 9 If you want to a network. If your... to change the Device Name or Domain Name, enter the Device Name and Domain Name in the fields provided. The Basic Settings screen will appear. Wireless-G PrintServer 4.
User Guide
Page 16
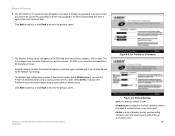
... unique name shared by all devices in the Verify Password field. The Set PrintServer's Password screen will appear. Click Next to continue, or click Back to return to communicate without the use of an access point. 10 Wireless-G PrintServer 6. The Wireless Settings screen will appear. Select Infrastructure if you want to change your password...
... unique name shared by all devices in the Verify Password field. The Set PrintServer's Password screen will appear. Click Next to continue, or click Back to return to communicate without the use of an access point. 10 Wireless-G PrintServer 6. The Wireless Settings screen will appear. Select Infrastructure if you want to change your password...
User Guide
Page 17
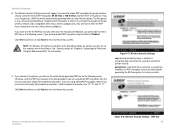
... hexadecimal characters. Click Next to continue, or click Back to return to disable WEP encryption, keep the default, Disabled. NOTE: The Wireless-G PrintServer also offers a Pre-Shared Key option for Linksys products. Valid hexadecimal characters are using 128-bit WEP encryption, then the key must consist of encrypting data transmitted on any non...
... hexadecimal characters. Click Next to continue, or click Back to return to disable WEP encryption, keep the default, Disabled. NOTE: The Wireless-G PrintServer also offers a Pre-Shared Key option for Linksys products. Valid hexadecimal characters are using 128-bit WEP encryption, then the key must consist of encrypting data transmitted on any non...
User Guide
Page 18
Wireless-G PrintServer 10. Click User Install at the bottom of the Congratulations screen, and go to save the new settings, click Yes. The setup is complete. You ... Setup Wizard again. 11. If you want to make a change, click No, and you want to "Chapter 5: Windows Driver Installation." Figure 4-9: Confirmation Chapter 4: Configuring the PrintServer Using the Setup Wizard Installation Figure 4-10: Congratulations 12 Your old and new settings will appear. The Confirmation screen will be displayed. you will exit...
Wireless-G PrintServer 10. Click User Install at the bottom of the Congratulations screen, and go to save the new settings, click Yes. The setup is complete. You ... Setup Wizard again. 11. If you want to make a change, click No, and you want to "Chapter 5: Windows Driver Installation." Figure 4-9: Confirmation Chapter 4: Configuring the PrintServer Using the Setup Wizard Installation Figure 4-10: Congratulations 12 Your old and new settings will appear. The Confirmation screen will be displayed. you will exit...
User Guide
Page 19
...Driver\PTP onto a floppy disk. If you install the PrintServer's driver. If you need to install the PrintServer's driver on computers without a CD-ROM drive, you can use the PrintServer for print jobs. (The PrintServer is assumed that you set up your printer and install... Overview Figure 5-1: Welcome 13 Click Exit to continue. Linksys recommends that your computer. 2. If it does not, click the Start button and choose Run. Wireless-G PrintServer Chapter 5: Windows Driver Installation Overview This section installs the PrintServer's software on your Windows 98, Me, 2000, or...
...Driver\PTP onto a floppy disk. If you install the PrintServer's driver. If you need to install the PrintServer's driver on computers without a CD-ROM drive, you can use the PrintServer for print jobs. (The PrintServer is assumed that you set up your printer and install... Overview Figure 5-1: Welcome 13 Click Exit to continue. Linksys recommends that your computer. 2. If it does not, click the Start button and choose Run. Wireless-G PrintServer Chapter 5: Windows Driver Installation Overview This section installs the PrintServer's software on your Windows 98, Me, 2000, or...
User Guide
Page 20
... default location, click Next to end the driver installation. You can also click Back to return to the previous screen or click Cancel to continue. Wireless-G PrintServer 4. To install the driver in a different location, click the Browse button and select the location. The Welcome screen of the driver installation program will appear...
... default location, click Next to end the driver installation. You can also click Back to return to the previous screen or click Cancel to continue. Wireless-G PrintServer 4. To install the driver in a different location, click the Browse button and select the location. The Welcome screen of the driver installation program will appear...
User Guide
Page 21
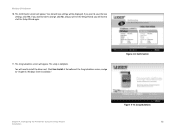
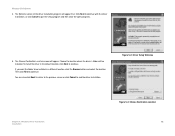
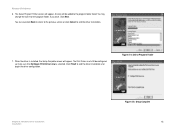
An icon will be configured, so make sure that Configure Print Driver now is installed, the Setup Complete screen will appear. Figure 5-4: Select Program Folder Chapter 5: Windows Driver Installation Installation Figure 5-5: Setup Complete 15 You may .... Click Finish to end the driver installation and begin the driver configuration. When the driver is selected. The Select Program Folder screen will appear. The Print Driver must still be added to end the driver installation. 7. Wireless-G PrintServer 6.
An icon will be configured, so make sure that Configure Print Driver now is installed, the Setup Complete screen will appear. Figure 5-4: Select Program Folder Chapter 5: Windows Driver Installation Installation Figure 5-5: Setup Complete 15 You may .... Click Finish to end the driver installation and begin the driver configuration. When the driver is selected. The Select Program Folder screen will appear. The Print Driver must still be added to end the driver installation. 7. Wireless-G PrintServer 6.


