
User Guide
Page 6
...System 35 Figure 7-11: Configuration - Internet Printing 39 Figure 7-15: Configuration - SNMP 42 Figure 7-18: Upgrade 43 Figure 7-19: Detected LAN Cards 43 Figure 7-20: BIN File Information 43 Figure 7-21: Add Cross Segment PrintServer 43 Figure 8-1: Windows XP - Locate ...Your Printer 47 Figure D-1: Status Tab - Internet Printing 26 Figure 6-10: Printer - Logical Port 27 Figure 6-11: Status Tab - AppleTalk 37 Figure 7-13: Configuration - Wireless 41...
...System 35 Figure 7-11: Configuration - Internet Printing 39 Figure 7-15: Configuration - SNMP 42 Figure 7-18: Upgrade 43 Figure 7-19: Detected LAN Cards 43 Figure 7-20: BIN File Information 43 Figure 7-21: Add Cross Segment PrintServer 43 Figure 8-1: Windows XP - Locate ...Your Printer 47 Figure D-1: Status Tab - Internet Printing 26 Figure 6-10: Printer - Logical Port 27 Figure 6-11: Status Tab - AppleTalk 37 Figure 7-13: Configuration - Wireless 41...
User Guide
Page 49
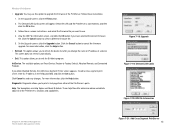
... button to , and then click the OK button. 3. This option allows you have selected the correct firmware file. Diagnostic. View the BIN File Information screen, and click the OK button if you to exit the Bi-Admin program. On the Upgrade screen, click the Upgrade ...Remote, and Connected Protocol. You may use . 4. For more information, click the Help button. Wireless-G PrintServer • Upgrade. On the Upgrade screen, click the Files button. 2. To add a cross segment print server, enter its IP address in the fields provided, and click the Set button. Click Cancel to cancel...
... button to , and then click the OK button. 3. This option allows you have selected the correct firmware file. Diagnostic. View the BIN File Information screen, and click the OK button if you to exit the Bi-Admin program. On the Upgrade screen, click the Upgrade ...Remote, and Connected Protocol. You may use . 4. For more information, click the Help button. Wireless-G PrintServer • Upgrade. On the Upgrade screen, click the Files button. 2. To add a cross segment print server, enter its IP address in the fields provided, and click the Set button. Click Cancel to cancel...
