
User Guide
Page 3
Wireless-G PrintServer Table of Contents Chapter 1: Introduction 1 Welcome 1 What's in this Guide? 2 Chapter 2: Getting to Know the PrintServer 4 The Bottom Panel 4 The Front Panel 5 Chapter 3: Connecting the PrintServer 6 Overview 6 Connecting the PrintServer to Your Network 6 Placement Options 7 Chapter 4: Configuring the PrintServer Using the Setup Wizard 8 Installation 8 Chapter 5: Windows Driver Installation 13 Overview 13 Installation 13 Starting the Print Driver...
Wireless-G PrintServer Table of Contents Chapter 1: Introduction 1 Welcome 1 What's in this Guide? 2 Chapter 2: Getting to Know the PrintServer 4 The Bottom Panel 4 The Front Panel 5 Chapter 3: Connecting the PrintServer 6 Overview 6 Connecting the PrintServer to Your Network 6 Placement Options 7 Chapter 4: Configuring the PrintServer Using the Setup Wizard 8 Installation 8 Chapter 5: Windows Driver Installation 13 Overview 13 Installation 13 Starting the Print Driver...
User Guide
Page 4
Wireless-G PrintServer Chapter 7: Bi-Admin Management 30 Overview 30 Bi-Admin Installation 30 Starting the Bi-Admin Management Utility 32 The Bi-Admin Management Utility 33 Chapter 8: Internet Printing Protocol (IPP) 44 Overview 44 Windows IPP Client Setup 44 Appendix A: Troubleshooting 49 Common Problems and Solutions 49 Appendix B: Wireless Security 51 Security Precautions 51 Security Threats...
Wireless-G PrintServer Chapter 7: Bi-Admin Management 30 Overview 30 Bi-Admin Installation 30 Starting the Bi-Admin Management Utility 32 The Bi-Admin Management Utility 33 Chapter 8: Internet Printing Protocol (IPP) 44 Overview 44 Windows IPP Client Setup 44 Appendix A: Troubleshooting 49 Common Problems and Solutions 49 Appendix B: Wireless Security 51 Security Precautions 51 Security Threats...
User Guide
Page 5
... to the USB Port 6 Figure 3-3: Connect to the Power Port 6 Figure 3-4: Desktop Placement 7 Figure 4-1: Welcome 8 Figure 4-2: Wireless-G PrintServer Setup 8 Figure 4-3: Basic Settings 9 Figure 4-4: IP Settings 9 Figure 4-5: Set PrintServer's Password 10 Figure 4-6: Wireless Settings 10 Figure 4-7: Wireless Security Settings 11 Figure 4-8: Wireless Security Settings - WEP Key 11 Figure 4-9: Confirmation 12 Figure 4-10: Congratulations 12 Figure 5-1: Welcome 13 Figure...
... to the USB Port 6 Figure 3-3: Connect to the Power Port 6 Figure 3-4: Desktop Placement 7 Figure 4-1: Welcome 8 Figure 4-2: Wireless-G PrintServer Setup 8 Figure 4-3: Basic Settings 9 Figure 4-4: IP Settings 9 Figure 4-5: Set PrintServer's Password 10 Figure 4-6: Wireless Settings 10 Figure 4-7: Wireless Security Settings 11 Figure 4-8: Wireless Security Settings - WEP Key 11 Figure 4-9: Confirmation 12 Figure 4-10: Congratulations 12 Figure 5-1: Welcome 13 Figure...
User Guide
Page 6
Wireless-G PrintServer Figure 6-8: Wireless Tab - Port 40 Figure 7-16: Configuration - SNMP 42 Figure 7-18: Upgrade 43 Figure 7-19: Detected LAN Cards 43 Figure 7-20: BIN File Information 43 Figure 7-21: Add Cross Segment PrintServer 43 Figure 8-1: Windows XP - Device 28 ... 7-12: Configuration - Internet Printing 39 Figure 7-15: Configuration - Locate Your Printer 47 Figure D-1: Status Tab - Device 55 Figure D-2: Firmware Upgrade 55 Wireless 29 Figure 6-15: Exit 29 Figure 7-1: Welcome 30 Figure 7-2: Bi-Admin Setup Welcome 30 Figure 7-3: Choose...
Wireless-G PrintServer Figure 6-8: Wireless Tab - Port 40 Figure 7-16: Configuration - SNMP 42 Figure 7-18: Upgrade 43 Figure 7-19: Detected LAN Cards 43 Figure 7-20: BIN File Information 43 Figure 7-21: Add Cross Segment PrintServer 43 Figure 8-1: Windows XP - Device 28 ... 7-12: Configuration - Internet Printing 39 Figure 7-15: Configuration - Locate Your Printer 47 Figure D-1: Status Tab - Device 55 Figure D-2: Firmware Upgrade 55 Wireless 29 Figure 6-15: Exit 29 Figure 7-1: Welcome 30 Figure 7-2: Bi-Admin Setup Welcome 30 Figure 7-3: Choose...
User Guide
Page 7
... useful work. A print server is compatible with all the time. Your network router bridges wireless networks of both your PC free to , without cumbersome cables. So, networks not only are useful tools for even faster throughput. But what does all you want to do all of measurement for choosing the Linksys Wireless-G PrintServer. The PrintServer lets you...
... useful work. A print server is compatible with all the time. Your network router bridges wireless networks of both your PC free to , without cumbersome cables. So, networks not only are useful tools for even faster throughput. But what does all you want to do all of measurement for choosing the Linksys Wireless-G PrintServer. The PrintServer lets you...
User Guide
Page 8
... to Know the PrintServer This chapter describes the physical features of the PrintServer. • Chapter 3: Connecting the PrintServer This chapter instructs you on how to connect the PrintServer to your network. • Chapter 4: Configuring the PrintServer using the Setup Wizard This chapter ...PrintServer as an IPP server so you can help protect your network • Appendix C: About Bi-Directional Printing This appendix describes bi-directional printing. • Appendix D: Upgrading Firmware This appendix instructs you on how to do so. Chapter 1: Introduction 2 What's in wireless...
... to Know the PrintServer This chapter describes the physical features of the PrintServer. • Chapter 3: Connecting the PrintServer This chapter instructs you on how to connect the PrintServer to your network. • Chapter 4: Configuring the PrintServer using the Setup Wizard This chapter ...PrintServer as an IPP server so you can help protect your network • Appendix C: About Bi-Directional Printing This appendix describes bi-directional printing. • Appendix D: Upgrading Firmware This appendix instructs you on how to do so. Chapter 1: Introduction 2 What's in wireless...
User Guide
Page 13
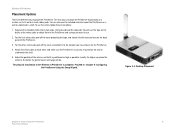
... also use the velcro, follow these instructions: 1. The physical installation of the Wireless-G PrintServer is positioned as high as possible. Figure 3-4: Desktop Placement Chapter 3: Connecting the PrintServer 7 Placement Options Adjust the position of the antenna so that it sits on ... the better the performance and range will use the tape on the backs of the PrintServer. 3. Wireless-G PrintServer Placement Options There are different ways to "Chapter 4: Configuring the PrintServer Using the Setup Wizard." The first way is securely mounted on a surface, so it is complete...
... also use the velcro, follow these instructions: 1. The physical installation of the Wireless-G PrintServer is positioned as high as possible. Figure 3-4: Desktop Placement Chapter 3: Connecting the PrintServer 7 Placement Options Adjust the position of the antenna so that it sits on ... the better the performance and range will use the tape on the backs of the PrintServer. 3. Wireless-G PrintServer Placement Options There are different ways to "Chapter 4: Configuring the PrintServer Using the Setup Wizard." The first way is securely mounted on a surface, so it is complete...
User Guide
Page 14
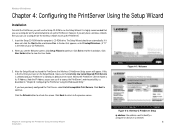
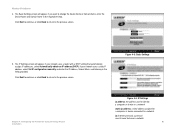
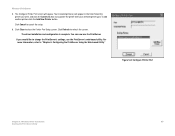
... the Print Server, select List all compatible Print Servers. When you see the Welcome screen, click Setup Wizard to the PrintServer's Server Name is highly recommended that you use the Setup CD-ROM to set up the PrintServer. After the Setup Wizard has found the PrintServer, the Wireless-G PrintServer Setup screen will use a computer on a network. 8 Next to continue. Wireless-G PrintServer Chapter 4: Configuring the PrintServer Using the Setup...
... the Print Server, select List all compatible Print Servers. When you see the Welcome screen, click Setup Wizard to the PrintServer's Server Name is highly recommended that you use the Setup CD-ROM to set up the PrintServer. After the Setup Wizard has found the PrintServer, the Wireless-G PrintServer Setup screen will use a computer on a network. 8 Next to continue. Wireless-G PrintServer Chapter 4: Configuring the PrintServer Using the Setup...
User Guide
Page 15
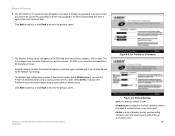
... address: a fixed address assigned to a computer or device connected to a network. Figure 4-3: Basic Settings Chapter 4: Configuring the PrintServer Using the Setup Wizard Installation Figure 4-4: IP Settings ip address: the address used to the previous screen. Wireless-G PrintServer 4. Click Next to continue, or click Back to return to change the Device Name or Domain Name...
... address: a fixed address assigned to a computer or device connected to a network. Figure 4-3: Basic Settings Chapter 4: Configuring the PrintServer Using the Setup Wizard Installation Figure 4-4: IP Settings ip address: the address used to the previous screen. Wireless-G PrintServer 4. Click Next to continue, or click Back to return to change the Device Name or Domain Name...
User Guide
Page 16
.... This is the unique name shared by all devices in the Verify Password field. Figure 4-5: Set PrintServer's Password Chapter 4: Configuring the PrintServer Using the Setup Wizard Installation Figure 4-6: Wireless Settings ssid: your wireless network's SSID or name. Wireless-G PrintServer 6. The Wireless Settings screen will appear. Click Next to continue, or click Back to return to the previous screen...
.... This is the unique name shared by all devices in the Verify Password field. Figure 4-5: Set PrintServer's Password Chapter 4: Configuring the PrintServer Using the Setup Wizard Installation Figure 4-6: Wireless Settings ssid: your wireless network's SSID or name. Wireless-G PrintServer 6. The Wireless Settings screen will appear. Click Next to continue, or click Back to return to the previous screen...
User Guide
Page 17
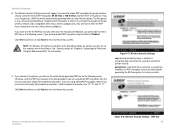
... 4: Configuring the PrintServer Using the Setup Wizard Installation Figure 4-8: Wireless Security Settings - WEP Key 11 If you use this method, refer to the previous screen. It must consist of exactly 26 hexadecimal characters. If you click the Next button. NOTE: The Wireless-G PrintServer also offers a Pre-Shared Key option for Linksys products. Figure 4-7: Wireless Security Settings wep...
... 4: Configuring the PrintServer Using the Setup Wizard Installation Figure 4-8: Wireless Security Settings - WEP Key 11 If you use this method, refer to the previous screen. It must consist of exactly 26 hexadecimal characters. If you click the Next button. NOTE: The Wireless-G PrintServer also offers a Pre-Shared Key option for Linksys products. Figure 4-7: Wireless Security Settings wep...
User Guide
Page 18
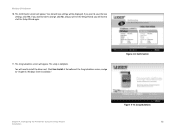
... to make a change, click No, and you will exit the Setup Wizard; You will appear. Figure 4-9: Confirmation Chapter 4: Configuring the PrintServer Using the Setup Wizard Installation Figure 4-10: Congratulations 12 Your old and new settings will appear. The Congratulations screen will be displayed. Wireless-G PrintServer 10. you will have to install the driver next. If...
... to make a change, click No, and you will exit the Setup Wizard; You will appear. Figure 4-9: Confirmation Chapter 4: Configuring the PrintServer Using the Setup Wizard Installation Figure 4-10: Congratulations 12 Your old and new settings will appear. The Congratulations screen will be displayed. Wireless-G PrintServer 10. you will have to install the driver next. If...
User Guide
Page 19
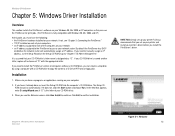
... your network router. When you can use the PrintServer for print jobs. (The PrintServer is the letter of "D" with the appropriate letter. HAVE YOU: already set up your CD-ROM drive is designated as "D". Linksys recommends that you set up your printer and install... click User Install to "Chapter 7: Bi-Admin Management." Wireless-G PrintServer Chapter 5: Windows Driver Installation Overview This section installs the PrintServer's software on your Windows 98, Me, 2000, or XP computers so they can create a setup disk by you must have no programs or applications running ...
... your network router. When you can use the PrintServer for print jobs. (The PrintServer is the letter of "D" with the appropriate letter. HAVE YOU: already set up your CD-ROM drive is designated as "D". Linksys recommends that you set up your printer and install... click User Install to "Chapter 7: Bi-Admin Management." Wireless-G PrintServer Chapter 5: Windows Driver Installation Overview This section installs the PrintServer's software on your Windows 98, Me, 2000, or XP computers so they can create a setup disk by you must have no programs or applications running ...
User Guide
Page 20
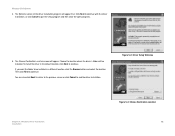
... 5: Windows Driver Installation Installation Figure 5-3: Choose Destination Location 14 Choose the location where the driver's folder will appear. Then click Next to quit the setup program and then close the open programs. 5. Click Next to continue with the driver installation, or click Cancel to continue. The Choose Destination Location screen...location. You can also click Back to return to the previous screen or click Cancel to continue. If you want the folder to be installed. Wireless-G PrintServer 4. The Welcome screen of the driver installation program will appear first.
... 5: Windows Driver Installation Installation Figure 5-3: Choose Destination Location 14 Choose the location where the driver's folder will appear. Then click Next to quit the setup program and then close the open programs. 5. Click Next to continue with the driver installation, or click Cancel to continue. The Choose Destination Location screen...location. You can also click Back to return to the previous screen or click Cancel to continue. If you want the folder to be installed. Wireless-G PrintServer 4. The Welcome screen of the driver installation program will appear first.
User Guide
Page 21
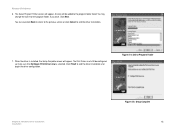
... configured, so make sure that Configure Print Driver now is installed, the Setup Complete screen will appear. The Print Driver must still be added to the program folder listed. The Select Program Folder screen will appear. Figure 5-4: Select Program Folder Chapter 5: Windows Driver Installation Installation Figure 5-5: Setup Complete 15 When the driver is selected. Wireless-G PrintServer 6.
... configured, so make sure that Configure Print Driver now is installed, the Setup Complete screen will appear. The Print Driver must still be added to the program folder listed. The Select Program Folder screen will appear. Figure 5-4: Select Program Folder Chapter 5: Windows Driver Installation Installation Figure 5-5: Setup Complete 15 When the driver is selected. Wireless-G PrintServer 6.
User Guide
Page 22
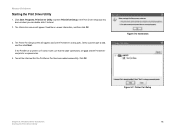
.... You will appear and list the PrintServer and its ports. Wireless-G PrintServer Starting the Print Driver Utility 1. The Printer Port Setup screen will be informed that the cable connections are good and the PrintServer and printer are powered on -screen information... If the Print Driver Setup icon has been created, you can double-click it instead. 2. Figure 5-6: Information Figure 5-7: Printer Port Setup Chapter 5: Windows Driver Installation 16 Starting the Print Driver Utility Click Start, Programs, Print Server Utility, and then Print Driver Setup. Click OK....
.... You will appear and list the PrintServer and its ports. Wireless-G PrintServer Starting the Print Driver Utility 1. The Printer Port Setup screen will be informed that the cable connections are good and the PrintServer and printer are powered on -screen information... If the Print Driver Setup icon has been created, you can double-click it instead. 2. Figure 5-6: Information Figure 5-7: Printer Port Setup Chapter 5: Windows Driver Installation 16 Starting the Print Driver Utility Click Start, Programs, Print Server Utility, and then Print Driver Setup. Click OK....
User Guide
Page 23
...Print Driver Utility Select the printer you would like to refresh the screen. The driver installation and configuration is complete. For more information, refer to associate the printer with your selected printer port. Wireless-G PrintServer 5. Click Cancel to close the Printer Port Setup... screen. Click Close to cancel the setup. 6. Click Refresh to change the PrintServer's settings, use the PrintServer. Your installed printer(s) will appear. The ...
...Print Driver Utility Select the printer you would like to refresh the screen. The driver installation and configuration is complete. For more information, refer to associate the printer with your selected printer port. Wireless-G PrintServer 5. Click Cancel to close the Printer Port Setup... screen. Click Close to cancel the setup. 6. Click Refresh to change the PrintServer's settings, use the PrintServer. Your installed printer(s) will appear. The ...
User Guide
Page 24
... you'd like to change its settings, use of the utility and each page's key functions. There are six main tabs: Setup, Protocol, Wireless, Printer, Status, and Exit. NOTE: Use the PrintServer's IP address that you noted when you reach the Wireless-G PrintServer Setup screen. Note the IP address, and then click Back until you ran the...
... you'd like to change its settings, use of the utility and each page's key functions. There are six main tabs: Setup, Protocol, Wireless, Printer, Status, and Exit. NOTE: Use the PrintServer's IP address that you noted when you reach the Wireless-G PrintServer Setup screen. Note the IP address, and then click Back until you ran the...
User Guide
Page 25
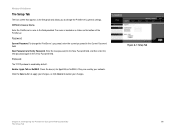
Wireless-G PrintServer The Setup Tab The first screen that appears is located on a sticker on the bottom of the PrintServer. Protocols The TCP/IP protocol is enabled by your changes. To change the PrintServer's general settings. Enter the new password in the New Password field, and ... the field provided. Figure 6-1: Setup Tab Chapter 6: Configuring the PrintServer Using the Web-based Utility 19 The Setup Tab Enable: Apple Talk or NetBEUI. WPS54G Device Name Enter the PrintServer's name in the Verify Password field. The name is the Setup tab and allows you to cancel...
Wireless-G PrintServer The Setup Tab The first screen that appears is located on a sticker on the bottom of the PrintServer. Protocols The TCP/IP protocol is enabled by your changes. To change the PrintServer's general settings. Enter the new password in the New Password field, and ... the field provided. Figure 6-1: Setup Tab Chapter 6: Configuring the PrintServer Using the Web-based Utility 19 The Setup Tab Enable: Apple Talk or NetBEUI. WPS54G Device Name Enter the PrintServer's name in the Verify Password field. The name is the Setup tab and allows you to cancel...

User Guide
Page 29
... - Community. IP Address. Community. From the following drop-down menu, select the desired level of access for details on the Setup CD-ROM. The appropriate MIB file must be sent the trap messages or notifications. Select the number of the management station running ... receiver from the Station No. To designate a severity level, click the checkbox next to display the information for the selected station. Wireless-G PrintServer The Protocol Tab - SNMP Use this management station, Not Accessible, Read-only, or Read/Write. Management Stations Station No. Enable ...
... - Community. IP Address. Community. From the following drop-down menu, select the desired level of access for details on the Setup CD-ROM. The appropriate MIB file must be sent the trap messages or notifications. Select the number of the management station running ... receiver from the Station No. To designate a severity level, click the checkbox next to display the information for the selected station. Wireless-G PrintServer The Protocol Tab - SNMP Use this management station, Not Accessible, Read-only, or Read/Write. Management Stations Station No. Enable ...


