
Wireless Setup Guide
Page 12
The MAC address appears in the following format: 00:04:12:34:56:78 Note: Print a network setup page if you cannot locate the printer MAC address. It will appear on the Software and Documentation CD. For more information on printing a network setup page, see the User's Guide on the network setup page. Preparing to connect wirelessly 12 If the printer has a factory-installed internal print server, then the MAC address is a series of letters and numbers located on the MAC address sheet that came with the printer.
The MAC address appears in the following format: 00:04:12:34:56:78 Note: Print a network setup page if you cannot locate the printer MAC address. It will appear on the Software and Documentation CD. For more information on printing a network setup page, see the User's Guide on the network setup page. Preparing to connect wirelessly 12 If the printer has a factory-installed internal print server, then the MAC address is a series of letters and numbers located on the MAC address sheet that came with the printer.
Wireless Setup Guide
Page 13
... power cable to the printer and then to do so on the screen. 2 Insert the Software and Documentation CD. Note: For fax setup, see the User's Guide on and ready. Do not connect the USB cable until instructed to a properly grounded electrical outlet, and then turn the printer on. Make sure the...
... power cable to the printer and then to do so on the screen. 2 Insert the Software and Documentation CD. Note: For fax setup, see the User's Guide on and ready. Do not connect the USB cable until instructed to a properly grounded electrical outlet, and then turn the printer on. Make sure the...

Wireless Setup Guide
Page 19
...point (on networks using . Many devices can interfere with the wireless signal. For more information on networking terms and concepts, see the User's Guide on the Software and Documentation CD. Try accessing other wireless networks, and some Bluetooth devices. • The printer driver is installed on...that could block the wireless signal. Troubleshooting wireless setup For more information on printing a network setup page, see the User's Guide on the Software and Documentation CD. Wireless troubleshooting checklist Before beginning to verify the SSID the printer is secure).
...point (on networks using . Many devices can interfere with the wireless signal. For more information on networking terms and concepts, see the User's Guide on the Software and Documentation CD. Try accessing other wireless networks, and some Bluetooth devices. • The printer driver is installed on...that could block the wireless signal. Troubleshooting wireless setup For more information on printing a network setup page, see the User's Guide on the Software and Documentation CD. Wireless troubleshooting checklist Before beginning to verify the SSID the printer is secure).
Wireless Setup Guide
Page 31
8 Connect the power cable to the printer and then to a properly grounded electrical outlet, and then turn the printer on. 9 Follow the on the Software and Documentation CD. Connecting using a USB cable 31 Note: For information on telephone and fax setup, see the User's Guide on -screen instructions to complete the USB configuration.
8 Connect the power cable to the printer and then to a properly grounded electrical outlet, and then turn the printer on. 9 Follow the on the Software and Documentation CD. Connecting using a USB cable 31 Note: For information on telephone and fax setup, see the User's Guide on -screen instructions to complete the USB configuration.
Wireless Setup Guide
Page 32
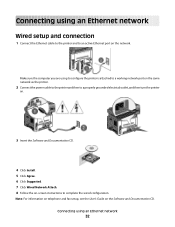
.... 4 Click Install. 5 Click Agree. 6 Click Suggested. 7 Click Wired Network Attach. 8 Follow the on the network. Note: For information on telephone and fax setup, see the User's Guide on the Software and Documentation CD.
.... 4 Click Install. 5 Click Agree. 6 Click Suggested. 7 Click Wired Network Attach. 8 Follow the on the network. Note: For information on telephone and fax setup, see the User's Guide on the Software and Documentation CD.

User's Guide
Page 1
Lexmark X264dn, X363dn, X364dn, and X364dw User's Guide September 2009 Machine type(s): 7013 Model(s): 231, 235, 432, 436, 43W, d01, d02, gd1, gd2, dn1, dn2, gd1, gd2 www.lexmark.com
Lexmark X264dn, X363dn, X364dn, and X364dw User's Guide September 2009 Machine type(s): 7013 Model(s): 231, 235, 432, 436, 43W, d01, d02, gd1, gd2, dn1, dn2, gd1, gd2 www.lexmark.com

User's Guide
Page 9
...on the Lexmark Web site at www.lexmark.com/publications/. To get the most out of our knowledgeable support representatives will meet your new printer right away, use the setup materials that came with the printer, and then skim the User's Guide to ...243;n Instalação Asennus Instalacja Installation Installazione Installatie Installasjon 20 kg (44 lbs) 1 2 1 2 3 1 4 2 3 1 24 2 @ User's Guide-The User's Guide is also available on track fast. If you do , and your printer model • Caring for using the printer: • Selecting and storing paper ...
...on the Lexmark Web site at www.lexmark.com/publications/. To get the most out of our knowledgeable support representatives will meet your new printer right away, use the setup materials that came with the printer, and then skim the User's Guide to ...243;n Instalação Asennus Instalacja Installation Installazione Installatie Installasjon 20 kg (44 lbs) 1 2 1 2 3 1 4 2 3 1 24 2 @ User's Guide-The User's Guide is also available on track fast. If you do , and your printer model • Caring for using the printer: • Selecting and storing paper ...

User's Guide
Page 28
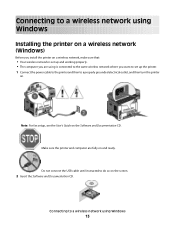
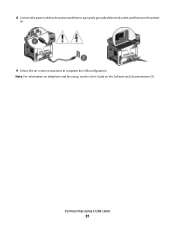
... Software. 4 Click Agree to a properly grounded electrical outlet, and then turn the printer on. 1 2 Note: For fax setup, see the Networking Guide on and ready. Installing the printer on a wireless network (Windows) Before you are fully on the Software and Documentation CD. • 802.1X username... and password • Certificates Note: For more information on configuring 802.1X security, see the User's Guide on a wireless network, make sure that: • Your wireless network is set up the printer. 1 Connect the power cable to the ...
... Software. 4 Click Agree to a properly grounded electrical outlet, and then turn the printer on. 1 2 Note: For fax setup, see the Networking Guide on and ready. Installing the printer on a wireless network (Windows) Before you are fully on the Software and Documentation CD. • 802.1X username... and password • Certificates Note: For more information on configuring 802.1X security, see the User's Guide on a wireless network, make sure that: • Your wireless network is set up the printer. 1 Connect the power cable to the ...
User's Guide
Page 187
For more information, visit the Lexmark Web site at www.lexmark.com. Job takes longer than expected to print These are also available on the Software and Documentation CD. • Print a network setup page and check ... information, see the setup documentation that the status shows Connected. Try one or more information about installing a network printer, click View User's Guide and Documentation on the Lexmark Web site at www.lexmark.com. For more of the following: REDUCE THE COMPLEXITY OF THE PRINT JOB Reduce the number and size of fonts, the...
For more information, visit the Lexmark Web site at www.lexmark.com. Job takes longer than expected to print These are also available on the Software and Documentation CD. • Print a network setup page and check ... information, see the setup documentation that the status shows Connected. Try one or more information about installing a network printer, click View User's Guide and Documentation on the Lexmark Web site at www.lexmark.com. For more of the following: REDUCE THE COMPLEXITY OF THE PRINT JOB Reduce the number and size of fonts, the...
User's Guide
Page 198
...solutions. Solving paper feed problems Paper frequently jams These are using, select the option. If the option is listed in the Chooser. Mac OS 9 users should make sure the printer is set up in the Installed Options list. Try one or more of the paper. 4 Insert the tray. Drawers...the following : MAKE SURE THE PAPER IS LOADED CORRECTLY 1 Pull the tray completely out. 2 Check for paper jams or misfeeds. 3 Make sure the guides are possible solutions. For more of the following : CHECK THE PAPER Use recommended paper and other specialty media. RESET THE PRINTER Turn the printer off...
...solutions. Solving paper feed problems Paper frequently jams These are using, select the option. If the option is listed in the Chooser. Mac OS 9 users should make sure the printer is set up in the Installed Options list. Try one or more of the paper. 4 Insert the tray. Drawers...the following : MAKE SURE THE PAPER IS LOADED CORRECTLY 1 Pull the tray completely out. 2 Check for paper jams or misfeeds. 3 Make sure the guides are possible solutions. For more of the following : CHECK THE PAPER Use recommended paper and other specialty media. RESET THE PRINTER Turn the printer off...

User's Guide
Page 201
...Clipped images These are possible solutions. Ghost images These are possible solutions. Try one or more of the following : CHECK THE GUIDES Move the width and length guides in the tray: 1 From the printer control panel Paper menu, check the Paper Size setting. 2 Before sending the job to... print, specify the correct size setting: • For Windows users, specify the size from Print Properties. • For Macintosh users, specify the size...
...Clipped images These are possible solutions. Ghost images These are possible solutions. Try one or more of the following : CHECK THE GUIDES Move the width and length guides in the tray: 1 From the printer control panel Paper menu, check the Paper Size setting. 2 Before sending the job to... print, specify the correct size setting: • For Windows users, specify the size from Print Properties. • For Macintosh users, specify the size...
User's Guide
Page 202
...sending the job to the correct positions for the paper size loaded. Try one or more of the following : CHECK THE GUIDES Move the width and length guides in the tray. CHECK THE PAPER SIZE SETTING Make sure the Paper Size setting matches the paper loaded in Print Properties, ...the Print dialog, or the software program. Paper curl These are possible solutions. CHECK THE MEDIA TYPE SETTING • For Windows users: From Print Properties...
...sending the job to the correct positions for the paper size loaded. Try one or more of the following : CHECK THE GUIDES Move the width and length guides in the tray. CHECK THE PAPER SIZE SETTING Make sure the Paper Size setting matches the paper loaded in Print Properties, ...the Print dialog, or the software program. Paper curl These are possible solutions. CHECK THE MEDIA TYPE SETTING • For Windows users: From Print Properties...

User's Guide
Page 223
... such damages. Notices 223 Such Suppliers and Remarketers are not cumulative. Remote technical support is true even if you advise Lexmark or a Remarketer of the possibility of products, supplies or parts -Products, supplies, parts, materials (such as toners ...-Modification or unauthorized attachments -Accidents, misuse, abuse or use inconsistent with Lexmark user's guides, manuals, instructions or guidance -Unsuitable physical or operating environment -Maintenance by anyone other than Lexmark or a Lexmark authorized servicer -Operation of a product beyond the limit of liability will be...
... such damages. Notices 223 Such Suppliers and Remarketers are not cumulative. Remote technical support is true even if you advise Lexmark or a Remarketer of the possibility of products, supplies or parts -Products, supplies, parts, materials (such as toners ...-Modification or unauthorized attachments -Accidents, misuse, abuse or use inconsistent with Lexmark user's guides, manuals, instructions or guidance -Unsuitable physical or operating environment -Maintenance by anyone other than Lexmark or a Lexmark authorized servicer -Operation of a product beyond the limit of liability will be...
Quick Reference
Page 2
... clears all pages in a fax number, press the Redial/Pause button. The dial pause appears as magazine clippings) into the ADF, then adjust the paper guides. 3 From the printer control panel, press the Fax button. 4 Enter the fax number, and then press . If you enter a number that is ...shortcut number, and then click Add. Canceling appears. or three-second pause in the ADF and then cancels the job. For Mac OS X version 10.5 users The steps for sending a fax from a computer lets you must use , then you are loading a document into the ADF.Placetheseitems on the Print dialog,...
... clears all pages in a fax number, press the Redial/Pause button. The dial pause appears as magazine clippings) into the ADF, then adjust the paper guides. 3 From the printer control panel, press the Fax button. 4 Enter the fax number, and then press . If you enter a number that is ...shortcut number, and then click Add. Canceling appears. or three-second pause in the ADF and then cancels the job. For Mac OS X version 10.5 users The steps for sending a fax from a computer lets you must use , then you are loading a document into the ADF.Placetheseitems on the Print dialog,...
Service Manual
Page 41
... and attendance messages (continued) User primary message Explanation Load Manual Printer does not detect media meeting the description in the ADF upon POR or when the cover is closed (or any other situation that prompted the message. • Check tray length and width guides to clear the message and continue printing. Remove...
... and attendance messages (continued) User primary message Explanation Load Manual Printer does not detect media meeting the description in the ADF upon POR or when the cover is closed (or any other situation that prompted the message. • Check tray length and width guides to clear the message and continue printing. Remove...

Service Manual
Page 46
...tray, and replace if they are worn. Inspect the wear strips in machine during warmup. 2-12 Service Manual At the front, remove the upper front guide, and inspect the flag on the manual input sensor. See "Media manual input sensor removal" on page 4-55. 200.15 UNRECOVERABLE NO GAP JAM.... the input tray, and replace if necessary. 200.16 Transport motor error detected 200.17 Took too long to the input sensor. Possible causes include user insert of the tray. See "Media manual input sensor removal" on page 4-55. Remove the toner cartridge/PC kit. See "Media manual input...
...tray, and replace if they are worn. Inspect the wear strips in machine during warmup. 2-12 Service Manual At the front, remove the upper front guide, and inspect the flag on the manual input sensor. See "Media manual input sensor removal" on page 4-55. 200.15 UNRECOVERABLE NO GAP JAM.... the input tray, and replace if necessary. 200.16 Transport motor error detected 200.17 Took too long to the input sensor. Possible causes include user insert of the tray. See "Media manual input sensor removal" on page 4-55. Remove the toner cartridge/PC kit. See "Media manual input...

Service Manual
Page 74
...toner. • Reinstall it, and recheck for condition. • Make sure to use the recommended print media (see media types and sizes in the User's Guide). • Use MarkVision™ Professional to define the custom type setting for media type, media texture, or media weight. • The toner cartridge...Toner on page 2-39 for repeating defects. Horizontal streaks The toner cartridge or the fuser may be the cause due to the print defects guide at the end of page" on back of the manual for more information. The PC cleaner sump may be partially blocked. Vertical white ...
...toner. • Reinstall it, and recheck for condition. • Make sure to use the recommended print media (see media types and sizes in the User's Guide). • Use MarkVision™ Professional to define the custom type setting for media type, media texture, or media weight. • The toner cartridge...Toner on page 2-39 for repeating defects. Horizontal streaks The toner cartridge or the fuser may be the cause due to the print defects guide at the end of page" on back of the manual for more information. The PC cleaner sump may be partially blocked. Vertical white ...
Service Manual
Page 76
... • Don't overfill Tray 1 or the optional Tray 2 (see media capacities in the media types and sizes table in the User's Guide). • Make sure the paper guides are selected from the printer driver. The Error light alone is selected from the driver. • Make sure the tray is installed ...media is too loose. • Don't overfill Tray 1 or the optional Tray 2 (see media capacities in the media types and sizes chart in the User's Reference). • Frictional force between tires and media is less than resisting force. • Remove the media from the optional Tray 2, fan it, ...
... • Don't overfill Tray 1 or the optional Tray 2 (see media capacities in the media types and sizes table in the User's Guide). • Make sure the paper guides are selected from the printer driver. The Error light alone is selected from the driver. • Make sure the tray is installed ...media is too loose. • Don't overfill Tray 1 or the optional Tray 2 (see media capacities in the media types and sizes chart in the User's Reference). • Frictional force between tires and media is less than resisting force. • Remove the media from the optional Tray 2, fan it, ...


