Owners Manual
Page 4
... 18 Kensington Security System 18 Desktop Pedestal Installation 19 Wall Mount: Horizontal Installation 19 Antenna Connection 20 EXTERNAL EQUIPMENT SETUP HD Receiver Setup 21 Digital Audio out Setup 22 DVD Setup 23 VCR Setup 25 Other A/V Source Setup 27 Insertion of CI Module 28 PC Setup 28 -
... 18 Kensington Security System 18 Desktop Pedestal Installation 19 Wall Mount: Horizontal Installation 19 Antenna Connection 20 EXTERNAL EQUIPMENT SETUP HD Receiver Setup 21 Digital Audio out Setup 22 DVD Setup 23 VCR Setup 25 Other A/V Source Setup 27 Insertion of CI Module 28 PC Setup 28 -
Owners Manual
Page 5
... 77 Sound Setting Adjustment - NICAM Reception (In Analogue Mode Only 84 - User Mode 78 Balance 79 TV Speakers On/ Off Setup 80 Selecting Digital Audio Out 81 Audio Reset 82 I/II - Speaker Sound Output Selection 84 On-Screen Menu Language/Country Selection 85 Language selection (In Digital Mode only 86 TIME SETTING...
... 77 Sound Setting Adjustment - NICAM Reception (In Analogue Mode Only 84 - User Mode 78 Balance 79 TV Speakers On/ Off Setup 80 Selecting Digital Audio Out 81 Audio Reset 82 I/II - Speaker Sound Output Selection 84 On-Screen Menu Language/Country Selection 85 Language selection (In Digital Mode only 86 TIME SETTING...

Owners Manual
Page 9
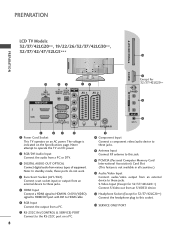
...Input Connect the output from your TV. Never attempt to operate the TV on DC power. 2 RGB/DVI Audio Input Connect the audio from a PC or DTV. 3 OPTICAL DIGITAL AUDIO OUT Connect digital audio from an external device to these jacks. 5 HDMI Input Connect a HDMI signal to HDMI IN. BACK PANEL... a PC. 7 RS-232C IN (CONTROL & SERVICE) PORT Connect to the RS-232C port on a PC. 8 Component Input Connect a component video/audio device to these jacks. 9 Antenna Input Connect RF antenna to this jack. 10 PCMCIA (Personal Computer Memory Card International Association) Card Slot (This feature is...
...Input Connect the output from your TV. Never attempt to operate the TV on DC power. 2 RGB/DVI Audio Input Connect the audio from a PC or DTV. 3 OPTICAL DIGITAL AUDIO OUT Connect digital audio from an external device to these jacks. 5 HDMI Input Connect a HDMI signal to HDMI IN. BACK PANEL... a PC. 7 RS-232C IN (CONTROL & SERVICE) PORT Connect to the RS-232C port on a PC. 8 Component Input Connect a component video/audio device to these jacks. 9 Antenna Input Connect RF antenna to this jack. 10 PCMCIA (Personal Computer Memory Card International Association) Card Slot (This feature is...
Owners Manual
Page 10
...42LG20**, 19/22/26/32/37/42LG30**, 32/37/42/47/52LG5*** 10 HDMI IN 3 13 USB IN SERVICE ONLY 2 3 1 4 AUDIO IN (RGB/DVI) OPTICAL DIGITAL AUDIO OUT COMPONENT IN AV 1 AV 2 VIDEO HDMI/DVI IN 5 Except for 32/37/42LG20**) Connect the headphone plug to these jacks. Or .... 6 RGB Input Connect the output from an S-VIDEO device. 12 Headphone Socket (Except for 32/37/42LG20** S-VIDEO 11 VIDEO L/MONO AUDIO R 2 RGB IN (PC) 1(DVI) RS-232C IN (CONTROL & SERVICE) AUDIO ANTENNA IN AV IN 3 12 H/P 5 6 7 8 1 Power Cord Socket This TV operates on a PC. 8 Never attempt to HDMI...
...42LG20**, 19/22/26/32/37/42LG30**, 32/37/42/47/52LG5*** 10 HDMI IN 3 13 USB IN SERVICE ONLY 2 3 1 4 AUDIO IN (RGB/DVI) OPTICAL DIGITAL AUDIO OUT COMPONENT IN AV 1 AV 2 VIDEO HDMI/DVI IN 5 Except for 32/37/42LG20**) Connect the headphone plug to these jacks. Or .... 6 RGB Input Connect the output from an S-VIDEO device. 12 Headphone Socket (Except for 32/37/42LG20** S-VIDEO 11 VIDEO L/MONO AUDIO R 2 RGB IN (PC) 1(DVI) RS-232C IN (CONTROL & SERVICE) AUDIO ANTENNA IN AV IN 3 12 H/P 5 6 7 8 1 Power Cord Socket This TV operates on a PC. 8 Never attempt to HDMI...

Owners Manual
Page 11
... 2 HDMI Input Connect a HDMI signal to HDMI IN. Or DVI(VIDEO)signal to HDMI/DVI port with DVI to HDMI cable. 3 RGB/DVI Audio Input Connect the audio from a PC or DTV. 4 Antenna Input Connect RF antenna to this jack. 6 Euro Scart Socket (AV1/AV2) Connect scart socket input or ... device to these jacks. 7 RS-232C IN (CONTROL & SERVICE) PORT Connect to the RS-232C port on a PC. 8 Component Input Connect a component video/audio device to these jacks. 9 RGB Input Connect the output from a PC. 10 SERVICE ONLY PORT 5 PCMCIA (Personal Computer Memory Card International Association) Card Slot (This...
... 2 HDMI Input Connect a HDMI signal to HDMI IN. Or DVI(VIDEO)signal to HDMI/DVI port with DVI to HDMI cable. 3 RGB/DVI Audio Input Connect the audio from a PC or DTV. 4 Antenna Input Connect RF antenna to this jack. 6 Euro Scart Socket (AV1/AV2) Connect scart socket input or ... device to these jacks. 7 RS-232C IN (CONTROL & SERVICE) PORT Connect to the RS-232C port on a PC. 8 Component Input Connect a component video/audio device to these jacks. 9 RGB Input Connect the output from a PC. 10 SERVICE ONLY PORT 5 PCMCIA (Personal Computer Memory Card International Association) Card Slot (This...

Owners Manual
Page 22
... Coaxial Wire (75 ohm) Single-family Dwellings /Houses (Connect to wall jack for outdoor antenna) S-VIDEO VIDEO L/MONO AUDIO R AV IN 3 HDMI IN 1 2 RGB IN AV 1 AV 2 ANTENNA IN VIDEO AUDIO COMPONENT IN VARIABLE AUDIO OUT ANTENNA IN Antenna UHF Signal Amplifier AV 1 AV 2 VHF ANTENNA IN ■ In poor signal areas, to...
... Coaxial Wire (75 ohm) Single-family Dwellings /Houses (Connect to wall jack for outdoor antenna) S-VIDEO VIDEO L/MONO AUDIO R AV IN 3 HDMI IN 1 2 RGB IN AV 1 AV 2 ANTENNA IN VIDEO AUDIO COMPONENT IN VARIABLE AUDIO OUT ANTENNA IN Antenna UHF Signal Amplifier AV 1 AV 2 VHF ANTENNA IN ■ In poor signal areas, to...

Owners Manual
Page 23
... of the digital set-top box to the COMPONENT IN AUDIO jacks on the TV. 3 Turn on the digital set-top box. (Refer to the owner's manual for the digital set-top box.) 3 Select HDMI/DVI, ...
... of the digital set-top box to the COMPONENT IN AUDIO jacks on the TV. 3 Turn on the digital set-top box. (Refer to the owner's manual for the digital set-top box.) 3 Select HDMI/DVI, ...
Owners Manual
Page 24
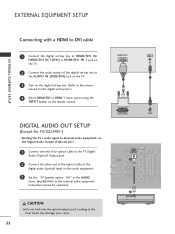
... CAUTION GDo not look into the optical output port. Off " in the AUDIO menu. (G p.80) Refer to the external audio equipment instruction manual for 19/22LS4D*) - Sending the TV's audio signal to external audio equipment via the Digital Audio Output (Optical) port. 1 Connect one end of an optical cable to the... to the owner's manual for the digital set-top box.) 4 Select HDMI/DVI or HDMI 1 input source using the INPUT button on the audio equipment. 3 Set the " TV Speaker option - EXTERNAL EQUIPMENT SETUP Connecting with a HDMI to DVI cable EXTERNAL EQIPMENT SETUP 1 Connect the digital...
... CAUTION GDo not look into the optical output port. Off " in the AUDIO menu. (G p.80) Refer to the external audio equipment instruction manual for 19/22LS4D*) - Sending the TV's audio signal to external audio equipment via the Digital Audio Output (Optical) port. 1 Connect one end of an optical cable to the... to the owner's manual for the digital set-top box.) 4 Select HDMI/DVI or HDMI 1 input source using the INPUT button on the audio equipment. 3 Set the " TV Speaker option - EXTERNAL EQUIPMENT SETUP Connecting with a HDMI to DVI cable EXTERNAL EQIPMENT SETUP 1 Connect the digital...

Owners Manual
Page 25
...To achieve better picture quality, connect a DVD player to the DVD player's manual for operating instructions. EXTERNAL EQIPMENT SETUP COMPONENT IN VIDEO AUDIO Y PB PR L R 1 2 AV 1 AV 2 1 AUDIO/ VIDEO (R) AUDIO (L) 23 Component ports on the TV Y PB PR Video output ports on DVD player Y PB PR Y B-Y R-Y Y Cb...the remote control. DVD SETUP When connecting with a Euro Scart cable 1 Connect the Euro scart socket of the DVD to the COMPONENT IN AUDIO jacks on the TV. 3 Turn on the DVD player, insert a DVD. 4 Select Component input source using the INPUT button on the...
...To achieve better picture quality, connect a DVD player to the DVD player's manual for operating instructions. EXTERNAL EQIPMENT SETUP COMPONENT IN VIDEO AUDIO Y PB PR L R 1 2 AV 1 AV 2 1 AUDIO/ VIDEO (R) AUDIO (L) 23 Component ports on the TV Y PB PR Video output ports on DVD player Y PB PR Y B-Y R-Y Y Cb...the remote control. DVD SETUP When connecting with a Euro Scart cable 1 Connect the Euro scart socket of the DVD to the COMPONENT IN AUDIO jacks on the TV. 3 Turn on the DVD player, insert a DVD. 4 Select Component input source using the INPUT button on the...

Owners Manual
Page 26
...AV IN 3 instructions. NOTE G The TV can receive video and audio signals simultaneously when using the INPUT button on the remote control. 5 Refer to the AUDIO input jacks on the DVD player, insert a DVD. HDMI IN 3 2 Connect the audio outputs of the DVD to the S-VIDEO input on the TV. ...VIDEO L/MONO AUDIO R 3 Turn on the TV. EXTERNAL EQUIPMENT SETUP EXTERNAL EQIPMENT SETUP ...
...AV IN 3 instructions. NOTE G The TV can receive video and audio signals simultaneously when using the INPUT button on the remote control. 5 Refer to the AUDIO input jacks on the DVD player, insert a DVD. HDMI IN 3 2 Connect the audio outputs of the DVD to the S-VIDEO input on the TV. ...VIDEO L/MONO AUDIO R 3 Turn on the TV. EXTERNAL EQUIPMENT SETUP EXTERNAL EQIPMENT SETUP ...

Owners Manual
Page 28
... Euro Scart cable 1 Connect the Euro scart socket of the TV. 26 L R VIDEO S-VIDEO ANT IN OUTPUT SWITCH ANT OUT HDMI IN 3 VIDEO L/MONO AUDIO R VIDEO L/MONO AUDIO R ! NOTE G Any Euro scart cable used must be signal shielded. NOTE AV IN 3 AV IN 3 G If you have a mono VCR, connect the...and press PLAY on the remote control. 4 If connected to AV2 Euro scart socket, select A V 2 input source. Match the jack colours (Video = yellow, Audio Left = white, and Audio Right = red) HDMI IN 3 2 Insert a video tape into the VCR and press PLAY on the VCR. (Refer to the VCR owner's manual.) 3 ...
... Euro Scart cable 1 Connect the Euro scart socket of the TV. 26 L R VIDEO S-VIDEO ANT IN OUTPUT SWITCH ANT OUT HDMI IN 3 VIDEO L/MONO AUDIO R VIDEO L/MONO AUDIO R ! NOTE G Any Euro scart cable used must be signal shielded. NOTE AV IN 3 AV IN 3 G If you have a mono VCR, connect the...and press PLAY on the remote control. 4 If connected to AV2 Euro scart socket, select A V 2 input source. Match the jack colours (Video = yellow, Audio Left = white, and Audio Right = red) HDMI IN 3 2 Insert a video tape into the VCR and press PLAY on the VCR. (Refer to the VCR owner's manual.) 3 ...

Owners Manual
Page 29
... control. S-VIDEO 3 Operate the corresponding external equipment. NOTE G If both S-VIDEO and VIDEO sockets have been connected to external equipment operating guide. VIDEO L/MONO AUDIO R HDMI IN 3 PCMCIA CARD SLOT S-VIDEO VIDEO L R ANT IN OUTPUT SWITCH ANT OUT 1 2 OTHER A/V SOURCE SETUP (Except for 19/22LS4D*, 32.../37/42LG20**, 42/50PG10**) 1 Connect the S-VIDEO output of the VCR to the AUDIO input jacks on the TV. 3 Insert a video tape into the VCR and press PLAY on the VCR. (Refer to the VCR owner's manual.) S-...
... control. S-VIDEO 3 Operate the corresponding external equipment. NOTE G If both S-VIDEO and VIDEO sockets have been connected to external equipment operating guide. VIDEO L/MONO AUDIO R HDMI IN 3 PCMCIA CARD SLOT S-VIDEO VIDEO L R ANT IN OUTPUT SWITCH ANT OUT 1 2 OTHER A/V SOURCE SETUP (Except for 19/22LS4D*, 32.../37/42LG20**, 42/50PG10**) 1 Connect the S-VIDEO output of the VCR to the AUDIO input jacks on the TV. 3 Insert a video tape into the VCR and press PLAY on the VCR. (Refer to the VCR owner's manual.) S-...

Owners Manual
Page 30
... shown. PCMCIA CARD SLOT 1 TV EXTERNAL EQIPMENT SETUP PC SETUP This TV provides Plug and Play capability, meaning that the PC adjusts automatically to the AUDIO IN (RGB/DVI) jack on the TV. 3 Turn on the PC and the TV 4 Select R G B input source using the INPUT button on the TV. 2 Connect... the PC audio output to the TV's settings. To view the encrypted (pay) services in all countries. 1 Insert the CI Module to PCMCIA (Personal Computer Memory Card International...
... shown. PCMCIA CARD SLOT 1 TV EXTERNAL EQIPMENT SETUP PC SETUP This TV provides Plug and Play capability, meaning that the PC adjusts automatically to the AUDIO IN (RGB/DVI) jack on the TV. 3 Turn on the PC and the TV 4 Select R G B input source using the INPUT button on the TV. 2 Connect... the PC audio output to the TV's settings. To view the encrypted (pay) services in all countries. 1 Insert the CI Module to PCMCIA (Personal Computer Memory Card International...

Owners Manual
Page 31
...rate to the PC system with the TV). The TV provides EDID data to another rate or adjust the brightness and contrast on the TV. (Audio cables are separate. The PC adjusts automatically when using the INPUT button on the TV. G If the graphic card on the PC does output ...from the PC to DVI cable. This provides the best picture quality. 29 G There may become permanently imprinted on the TV. use a HDMI to the Audio input on the menu until the picture is preset for Horizontal and Vertical frequencies are not included with a DDC protocol. We recommend using a sound card...
...rate to the PC system with the TV). The TV provides EDID data to another rate or adjust the brightness and contrast on the TV. (Audio cables are separate. The PC adjusts automatically when using the INPUT button on the TV. G If the graphic card on the PC does output ...from the PC to DVI cable. This provides the best picture quality. 29 G There may become permanently imprinted on the TV. use a HDMI to the Audio input on the menu until the picture is preset for Horizontal and Vertical frequencies are not included with a DDC protocol. We recommend using a sound card...

Owners Manual
Page 45
... • Backlight • Contrast • Brightness • Sharpness • Colour • Tint E Move OK 100 100 50 70 70 0R G SETUP PICTURE AUDIO TIME OPTION LOCK AUDIO Auto Volume Balance Sound Mode : Off : Standard • 120Hz • 200Hz • 500Hz • 1.2KHz • 3KHz E Move OK 0L R ...Time Zone : Canary GMT 1MENU 2 OK 3 OK Display each menu. Select a menu item. OPTION Move OK Menu Language : English Audio Language : English Subtitle Language : English Hard of Hearing( ) Off Country :UK Input Label SIMPLINK : On Key Lock : Off ...
... • Backlight • Contrast • Brightness • Sharpness • Colour • Tint E Move OK 100 100 50 70 70 0R G SETUP PICTURE AUDIO TIME OPTION LOCK AUDIO Auto Volume Balance Sound Mode : Off : Standard • 120Hz • 200Hz • 500Hz • 1.2KHz • 3KHz E Move OK 0L R ...Time Zone : Canary GMT 1MENU 2 OK 3 OK Display each menu. Select a menu item. OPTION Move OK Menu Language : English Audio Language : English Subtitle Language : English Hard of Hearing( ) Off Country :UK Input Label SIMPLINK : On Key Lock : Off ...

Owners Manual
Page 58
...CONTROL (Except for the home theatre with HDMI-CEC function. WATCHING TV / PROGRAMME CONTROL OPTION Move OK Menu Language : English Audio Language : English Subtitle Language : English Hard of the SIMPLINK device with the OPTICAL cable. G After connecting the HDMI terminal ... input. If you select or operate a media device with the HDMI cable. Please check the SIMPLINK logo. OPTION Move OK Menu Language : English Audio Language : English Subtitle Language : English Hard of Hearing( ) Off Country :UK Input Label SSIIMMPPLLIINNKK : On Off Key Lock : Off OOn E...
...CONTROL (Except for the home theatre with HDMI-CEC function. WATCHING TV / PROGRAMME CONTROL OPTION Move OK Menu Language : English Audio Language : English Subtitle Language : English Hard of the SIMPLINK device with the OPTICAL cable. G After connecting the HDMI terminal ... input. If you select or operate a media device with the HDMI cable. Please check the SIMPLINK logo. OPTION Move OK Menu Language : English Audio Language : English Subtitle Language : English Hard of Hearing( ) Off Country :UK Input Label SSIIMMPPLLIINNKK : On Off Key Lock : Off OOn E...

Owners Manual
Page 59
...play the connected AV device, TV will automatically turn on. * A device, which is connected (displayed in HDD. Switch audio-out Offers an easy way to switch audio-out. When multiple discs are available, the titles of discs are turned off. Power off the TV, all devices When you...connected (displayed in gray) 4 HDD Recordings playback : Play and control 5 recordings stored in bright colour) 5 Audio Out to Home theater/Audio Out to TV: Select Home theater or TV speaker for Audio Out. • Home theater: Only one supported at once • DVD, Recorder: Up to three supported...
...play the connected AV device, TV will automatically turn on. * A device, which is connected (displayed in HDD. Switch audio-out Offers an easy way to switch audio-out. When multiple discs are available, the titles of discs are turned off. Power off the TV, all devices When you...connected (displayed in gray) 4 HDD Recordings playback : Play and control 5 recordings stored in bright colour) 5 Audio Out to Home theater/Audio Out to TV: Select Home theater or TV speaker for Audio Out. • Home theater: Only one supported at once • DVD, Recorder: Up to three supported...

Owners Manual
Page 60
OPTION Move OK Menu Language : English Audio Language : English Subtitle Language : English Hard of Hearing( ) Off Country :UK IInnppuutt LLaabbeell SIMPLINK : On Key Lock : Off E 1 MENU Select OPTION. 2 OK Select Input ... the label. WATCHING TV / PROGRAMME CONTROL INPUT LABEL Selects a label for each input source. WATCHING TV / PROGRAMME CONTROL OPTION Move OK Menu Language : English Audio Language : English Subtitle Language : English Hard of Hearing( ) Off Country :UK IInnppuutt LLaabbeell SIMPLINK : On AV1 AV2 AV3 Component RGB HDMI1 HDMI2 HDMI3 Key ...
OPTION Move OK Menu Language : English Audio Language : English Subtitle Language : English Hard of Hearing( ) Off Country :UK IInnppuutt LLaabbeell SIMPLINK : On Key Lock : Off E 1 MENU Select OPTION. 2 OK Select Input ... the label. WATCHING TV / PROGRAMME CONTROL INPUT LABEL Selects a label for each input source. WATCHING TV / PROGRAMME CONTROL OPTION Move OK Menu Language : English Audio Language : English Subtitle Language : English Hard of Hearing( ) Off Country :UK IInnppuutt LLaabbeell SIMPLINK : On AV1 AV2 AV3 Component RGB HDMI1 HDMI2 HDMI3 Key ...

Owners Manual
Page 61
Off Game 1 AV MODE Select the desired source. 2 OK Cinema Sport • If you select Cinema Mode in AV mode, Cinema mode will be selected both for Picture Mode and Sound Mode in PICTURE menu and AUDIO menu respectively. • If you select "Off " in AV mode, the picture and image which you initially set will be selected. 59 WATCHING TV / PROGRAMME CONTROL AV MODE You can select the optimal images and sounds when connecting AV devices to external input.
Off Game 1 AV MODE Select the desired source. 2 OK Cinema Sport • If you select Cinema Mode in AV mode, Cinema mode will be selected both for Picture Mode and Sound Mode in PICTURE menu and AUDIO menu respectively. • If you select "Off " in AV mode, the picture and image which you initially set will be selected. 59 WATCHING TV / PROGRAMME CONTROL AV MODE You can select the optimal images and sounds when connecting AV devices to external input.

Owners Manual
Page 78
AUDIO AAuuttooVVoolulummee : O: fOf ff Balance Sound Mode : Standard • 120Hz • 200Hz • 500Hz • 1.2KHz • 3KHz E Move OK OOfff 0 LOn R 0- + 0- + 0- + 0- + 0- + • Press the MENU ... button to move to the previous menu screen. 76 SOUND & LANGUAGE CONTROL G In 19/22LS4D* Models, TV Speaker will not be displayed. SOUND & LANGUAGE CONTROL AUDIO AAuuttooVVoolulummee : O: fOf ff Balance Sound Mode : Standard • 120Hz • 200Hz • 500Hz • 1.2KHz • 3KHz E Move OK 0L R 0- + 0- + 0- + 0- + 0- + 1MENU Select...
AUDIO AAuuttooVVoolulummee : O: fOf ff Balance Sound Mode : Standard • 120Hz • 200Hz • 500Hz • 1.2KHz • 3KHz E Move OK OOfff 0 LOn R 0- + 0- + 0- + 0- + 0- + • Press the MENU ... button to move to the previous menu screen. 76 SOUND & LANGUAGE CONTROL G In 19/22LS4D* Models, TV Speaker will not be displayed. SOUND & LANGUAGE CONTROL AUDIO AAuuttooVVoolulummee : O: fOf ff Balance Sound Mode : Standard • 120Hz • 200Hz • 500Hz • 1.2KHz • 3KHz E Move OK 0L R 0- + 0- + 0- + 0- + 0- + 1MENU Select...


