
Owners Manual
Page 1
...-ZD 5389: 32LG5010-ZD 5391: 47LG5020-ZB 5393: 37LG5020-ZB 5395: 52LG5030-ZE 5397: 42LG5030-ZE 5399: 32LG5030-ZE 5721: 26LG3050-ZA LCD TV MODELS 19LS4D* 22LS4D* 32LG20* * 37LG20* * 42LG20* * 19LG30* * 22LG30* * 26LG30* * 3 2 L G 3 0* * 3 7 L G 3 0* * 42 L G 3 0* * 3 2 L G 5* * * 3 7 L G 5 0* * 4 2 L G 5 0* * 4 7 L G 5 0* * 5 2 L G 5 0* * PLASMA TV MODELS 42PG10** 50PG10** 42PG20** 50PG20** 42PG30** 50PG30** 60PG30** ... of the DVB Digital Video Broadcasting Project (1991 to the label on the back cover and quote this manual carefully before operating your dealer when requiring service.
...-ZD 5389: 32LG5010-ZD 5391: 47LG5020-ZB 5393: 37LG5020-ZB 5395: 52LG5030-ZE 5397: 42LG5030-ZE 5399: 32LG5030-ZE 5721: 26LG3050-ZA LCD TV MODELS 19LS4D* 22LS4D* 32LG20* * 37LG20* * 42LG20* * 19LG30* * 22LG30* * 26LG30* * 3 2 L G 3 0* * 3 7 L G 3 0* * 42 L G 3 0* * 3 2 L G 5* * * 3 7 L G 5 0* * 4 2 L G 5 0* * 4 7 L G 5 0* * 5 2 L G 5 0* * PLASMA TV MODELS 42PG10** 50PG10** 42PG20** 50PG20** 42PG30** 50PG30** 60PG30** ... of the DVB Digital Video Broadcasting Project (1991 to the label on the back cover and quote this manual carefully before operating your dealer when requiring service.

Owners Manual
Page 3
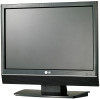
Owner's Manual Batteries Remote Control This feature is not available for stand fixing (Refer to the power plug, the better it is not available for all models.) ... screen. ACCESSORIES ACCESSORIES Ensure that the following accessories are included with the polishing cloth. If an accessory is not available for use excessive force. Owner's Manual Owner's manual D/ATV TV/RADIO TEXT 1 4 2 POWER I/II INPUT MUTE RATIO 7 5 3 MENU LIST 8 0 6 9 Q.VIEW INFO i OK AV MODE or VOL RETUERXNIT GUIDE * RATIO FAV PR INDEX...
Owner's Manual Batteries Remote Control This feature is not available for stand fixing (Refer to the power plug, the better it is not available for all models.) ... screen. ACCESSORIES ACCESSORIES Ensure that the following accessories are included with the polishing cloth. If an accessory is not available for use excessive force. Owner's Manual Owner's manual D/ATV TV/RADIO TEXT 1 4 2 POWER I/II INPUT MUTE RATIO 7 5 3 MENU LIST 8 0 6 9 Q.VIEW INFO i OK AV MODE or VOL RETUERXNIT GUIDE * RATIO FAV PR INDEX...
Owners Manual
Page 4
... Turning on the TV 42 Programme Selection 42 Volume Adjustment 42 On-Screen Menus Selection and Adjustment . . . . 43 Auto Programme Tuning 44 Manual Programme Tuning (In Digital Mode) . . . . 45 Manual Programme Tuning (In Analogue Mode) . . 46 Programme Edit 48 Booster 51 Software Update 52 Diagnostics 53 CI Information 54 Selecting the Programme...-Expert Control 68 Picture Improvement Technology 69 Advanced - Picture Mode-User option 67 - Film Mode 70 Advanced - Auto Colour Tone Control (Warm/Medium/Cool) . . . . 66 Manual Picture Adjustment -
... Turning on the TV 42 Programme Selection 42 Volume Adjustment 42 On-Screen Menus Selection and Adjustment . . . . 43 Auto Programme Tuning 44 Manual Programme Tuning (In Digital Mode) . . . . 45 Manual Programme Tuning (In Analogue Mode) . . 46 Programme Edit 48 Booster 51 Software Update 52 Diagnostics 53 CI Information 54 Selecting the Programme...-Expert Control 68 Picture Improvement Technology 69 Advanced - Picture Mode-User option 67 - Film Mode 70 Advanced - Auto Colour Tone Control (Warm/Medium/Cool) . . . . 66 Manual Picture Adjustment -

Owners Manual
Page 14
... Body into the TV until clicking sound. Cover Base Swivel Stand (Except for 19/22LS4D*, 50PG10**) After installing the TV, you can adjust the TV manually to the left or right direction by 20 degrees to protect the screen from your TV. 1 Carefully place the TV screen side down on a cushioned...
... Body into the TV until clicking sound. Cover Base Swivel Stand (Except for 19/22LS4D*, 50PG10**) After installing the TV, you can adjust the TV manually to the left or right direction by 20 degrees to protect the screen from your TV. 1 Carefully place the TV screen side down on a cushioned...

Owners Manual
Page 18
... is dropped, you may be injured or the TV may be damaged. 16 To connect additional equipment, see the External Equipment Setup section of the manual. CABLE MANAGEMENT CLIP 3 Fit the CABLE MANAGEMENT CLIP as necessary. PREPARATION PREPARATION LCD TV Models: 32/37/42LG20**, 26/32/37/ 42LG30**, 32/37/42...
... is dropped, you may be injured or the TV may be damaged. 16 To connect additional equipment, see the External Equipment Setup section of the manual. CABLE MANAGEMENT CLIP 3 Fit the CABLE MANAGEMENT CLIP as necessary. PREPARATION PREPARATION LCD TV Models: 32/37/42LG20**, 26/32/37/ 42LG30**, 32/37/42...

Owners Manual
Page 19
CABLE MANAGEMENT CLIP How to lift the TV. - If the TV is dropped, you may be injured or the TV may be damaged. 17 To connect additional equipment, see the External Equipment Setup section of the manual. 2 Install the CABLE MANAGEMENT CLIP as necessary. NOTE G Do not use the CABLE MANAGEMENT CLIP to remove the cable management clip G Hold the CABLE MANAGEMENT CLIP with both hands and pull it backward. ! PREPARATION LCD TV Models : 19/22LG30** 1 Connect the cables as shown.
CABLE MANAGEMENT CLIP How to lift the TV. - If the TV is dropped, you may be injured or the TV may be damaged. 17 To connect additional equipment, see the External Equipment Setup section of the manual. 2 Install the CABLE MANAGEMENT CLIP as necessary. NOTE G Do not use the CABLE MANAGEMENT CLIP to remove the cable management clip G Hold the CABLE MANAGEMENT CLIP with both hands and pull it backward. ! PREPARATION LCD TV Models : 19/22LG30** 1 Connect the cables as shown.

Owners Manual
Page 23
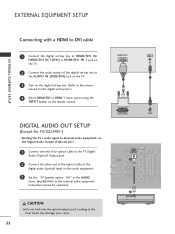
... the audio output of the digital set top box to the COMPONENT IN VIDEO jacks on the digital set-top box. 1 (Refer to the owner's manual for the 22LS4D* models. EXTERNAL EQIPMENT SETUP EXTERNAL EQUIPMENT SETUP ■ To avoid damaging any equipment, never plug in any power cords until you do... the digital set-top box to the COMPONENT IN AUDIO jacks on the TV. 3 Turn on the digital set-top box. (Refer to the owner's manual for the digital set -top box to the HDMI/DVI IN, HDMI/DVI IN 1, HDMI IN 2 or HDMI IN 3 jack on the TV. 2 Turn on...
... the audio output of the digital set top box to the COMPONENT IN VIDEO jacks on the digital set-top box. 1 (Refer to the owner's manual for the 22LS4D* models. EXTERNAL EQIPMENT SETUP EXTERNAL EQUIPMENT SETUP ■ To avoid damaging any equipment, never plug in any power cords until you do... the digital set-top box to the COMPONENT IN AUDIO jacks on the TV. 3 Turn on the digital set-top box. (Refer to the owner's manual for the digital set -top box to the HDMI/DVI IN, HDMI/DVI IN 1, HDMI IN 2 or HDMI IN 3 jack on the TV. 2 Turn on...
Owners Manual
Page 24
... the audio equipment. 3 Set the " TV Speaker option - Off " in the AUDIO menu. (G p.80) Refer to the owner's manual for the digital set -top box. (Refer to the external audio equipment instruction manual for 19/22LS4D*) - HDMI/DVI IN 1 AUDIO IN (RGB/DVI) 2 DVI-PC OUTPUT AUDIO DIGITAL AUDIO OUT SETUP (Except...
... the audio equipment. 3 Set the " TV Speaker option - Off " in the AUDIO menu. (G p.80) Refer to the owner's manual for the digital set -top box. (Refer to the external audio equipment instruction manual for 19/22LS4D*) - HDMI/DVI IN 1 AUDIO IN (RGB/DVI) 2 DVI-PC OUTPUT AUDIO DIGITAL AUDIO OUT SETUP (Except...

Owners Manual
Page 25
NOTE G Any Euro scart cable used must be signal shielded. Component Input ports To achieve better picture quality, connect a DVD player to the DVD player's manual for operating instructions. EXTERNAL EQIPMENT SETUP COMPONENT IN VIDEO AUDIO Y PB PR L R 1 2 AV 1 AV 2 1 AUDIO/ VIDEO (R) AUDIO (L) ...player, insert a DVD. 4 Select Component input source using the INPUT button on the remote control. 5 Refer to the DVD player's manual for operating instructions. ! If connected to A V 2 Euro scart socket, select A V 2 input source. 4 Refer to the component input ports as shown...
NOTE G Any Euro scart cable used must be signal shielded. Component Input ports To achieve better picture quality, connect a DVD player to the DVD player's manual for operating instructions. EXTERNAL EQIPMENT SETUP COMPONENT IN VIDEO AUDIO Y PB PR L R 1 2 AV 1 AV 2 1 AUDIO/ VIDEO (R) AUDIO (L) ...player, insert a DVD. 4 Select Component input source using the INPUT button on the remote control. 5 Refer to the DVD player's manual for operating instructions. ! If connected to A V 2 Euro scart socket, select A V 2 input source. 4 Refer to the component input ports as shown...

Owners Manual
Page 26
...the TV. 2 Select HDMI/DVI, HDMI1, HDMI2 or HDMI3 input source using the INPUT button on the remote control. 3 Refer to the DVD player's manual for operating AV IN 3 instructions. HDMI IN 3 2 Connect the audio outputs of the DVD to the S-VIDEO input on the TV. VIDEO L/MONO...NOTE G The TV can receive video and audio signals simultaneously when using the INPUT button on the remote control. 5 Refer to the DVD player's manual for operating instructions. ! HDMI/DVI IN 1 24 EXTERNAL EQUIPMENT SETUP EXTERNAL EQIPMENT SETUP Connecting with a S-Video cable (Except for 19/22LS4D*, 32...
...the TV. 2 Select HDMI/DVI, HDMI1, HDMI2 or HDMI3 input source using the INPUT button on the remote control. 3 Refer to the DVD player's manual for operating AV IN 3 instructions. HDMI IN 3 2 Connect the audio outputs of the DVD to the S-VIDEO input on the TV. VIDEO L/MONO...NOTE G The TV can receive video and audio signals simultaneously when using the INPUT button on the remote control. 5 Refer to the DVD player's manual for operating instructions. ! HDMI/DVI IN 1 24 EXTERNAL EQUIPMENT SETUP EXTERNAL EQIPMENT SETUP Connecting with a S-Video cable (Except for 19/22LS4D*, 32...

Owners Manual
Page 28
... 3 2 Insert a video tape into the VCR and press PLAY on the VCR. (Refer to the VCR owner's manual.) 3 Select A V 1 input source using the INPUT button on the remote control. 4 If connected to the VCR owner's manual.) S-VIDEO 3 Select AV3 input source using the I N P U T button on the VCR. (Refer to AV2 Euro scart...
... 3 2 Insert a video tape into the VCR and press PLAY on the VCR. (Refer to the VCR owner's manual.) 3 Select A V 1 input source using the INPUT button on the remote control. 4 If connected to the VCR owner's manual.) S-VIDEO 3 Select AV3 input source using the I N P U T button on the VCR. (Refer to AV2 Euro scart...

Owners Manual
Page 29
... to the AUDIO input jacks on the TV. 3 Insert a video tape into the VCR and press PLAY on the VCR. (Refer to the VCR owner's manual.) S-VIDEO 4 Select AV3 input source using the INPUT button on the remote control. Refer to the S-VHS VCR simultaneously, only the S-VIDEO can be received...
... to the AUDIO input jacks on the TV. 3 Insert a video tape into the VCR and press PLAY on the VCR. (Refer to the VCR owner's manual.) S-VIDEO 4 Select AV3 input source using the INPUT button on the remote control. Refer to the S-VHS VCR simultaneously, only the S-VIDEO can be received...
Owners Manual
Page 35
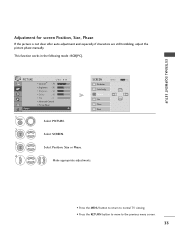
... for screen Position, Size, Phase If the picture is not clear after auto adjustment and especially if characters are still trembling, adjust the picture phase manually.
... for screen Position, Size, Phase If the picture is not clear after auto adjustment and especially if characters are still trembling, adjust the picture phase manually.

Owners Manual
Page 45
.../ PROGRAMME CONTROL ON SCREEN MENUS SELECTION AND ADJUSTMENT Your TV's OSD (On Screen Display) may differ slightly from what is shown in this manual. Select a menu item. OPTION Move OK Menu Language : English Audio Language : English Subtitle Language : English Hard of Hearing( ) Off ...• Press the RETURN button to move to the pop up menu. Move to the previous menu screen. 43 SETUP Move OK Auto tuning Manual tuning Programme Edit Booster : On Software Update : Off Diagnostics CI Information PICTURE Aspect Ratio Picture Mode : 16:9 : Vivid • Backlight ...
.../ PROGRAMME CONTROL ON SCREEN MENUS SELECTION AND ADJUSTMENT Your TV's OSD (On Screen Display) may differ slightly from what is shown in this manual. Select a menu item. OPTION Move OK Menu Language : English Audio Language : English Subtitle Language : English Hard of Hearing( ) Off ...• Press the RETURN button to move to the pop up menu. Move to the previous menu screen. 43 SETUP Move OK Auto tuning Manual tuning Programme Edit Booster : On Software Update : Off Diagnostics CI Information PICTURE Aspect Ratio Picture Mode : 16:9 : Vivid • Backlight ...

Owners Manual
Page 46
...AUTO PROGRAMME TUNING Use this to automatically find and store all previously stored service information will be deleted. SETUP Move OK AAuuttoottuunniningg Manual tuning Programme Edit Booster : On Software Update : Off Diagnostics CI Information 1MENU 2 OK 3 OK 4 OK Select SETUP...8226; Use NUMBER buttons to input a 4-digit password in digital mode, all available programmes. Select Yes. SETUP Move AAuuttoottuunniningg Manual tuning Programme Edit Booster : On Software Update : Off Diagnostics CI Information OK All service-information will be updated. Then,...
...AUTO PROGRAMME TUNING Use this to automatically find and store all previously stored service information will be deleted. SETUP Move OK AAuuttoottuunniningg Manual tuning Programme Edit Booster : On Software Update : Off Diagnostics CI Information 1MENU 2 OK 3 OK 4 OK Select SETUP...8226; Use NUMBER buttons to input a 4-digit password in digital mode, all available programmes. Select Yes. SETUP Move AAuuttoottuunniningg Manual tuning Programme Edit Booster : On Software Update : Off Diagnostics CI Information OK All service-information will be updated. Then,...

Owners Manual
Page 47
... Press the MENU button to return to normal TV viewing. • Press the RETURN button to move to your programme list. Select Manual Tuning. SETUP Move OK Auto tuning MMaannuuaallttuunniningg Programme Edit Booster : On Software Update : Off Diagnostics CI Information 1MENU 2 OK Select SETUP.... OK F DTV G Your receiver will add this channel to the previous menu screen. 45 WATCHING TV / PROGRAMME CONTROL MANUAL PROGRAMME TUNING (IN DIGITAL MODE) Manual Tuning lets you manually add a programme to input a 4-digit password in Lock System 'On'. 3 OK 4 Select DTV. UHF CH....
... Press the MENU button to return to normal TV viewing. • Press the RETURN button to move to your programme list. Select Manual Tuning. SETUP Move OK Auto tuning MMaannuuaallttuunniningg Programme Edit Booster : On Software Update : Off Diagnostics CI Information 1MENU 2 OK Select SETUP.... OK F DTV G Your receiver will add this channel to the previous menu screen. 45 WATCHING TV / PROGRAMME CONTROL MANUAL PROGRAMME TUNING (IN DIGITAL MODE) Manual Tuning lets you manually add a programme to input a 4-digit password in Lock System 'On'. 3 OK 4 Select DTV. UHF CH....

Owners Manual
Page 48
WATCHING TV / PROGRAMME CONTROL MANUAL PROGRAMME TUNING (IN ANALOGUE MODE) Manual Tuning lets you manually tune and arrange the stations in Lock System 'On'. • L : SECAM L/L' (France) BG : PAL B/G, SECAM B/G (Europe / East Europe / Asia / New Zealand / M.East / Africa / Australia) I : PAL I/... TV / PROGRAMME CONTROL SETUP Move OK Auto tuning MMaannuuaallttuunniningg Programme Edit Booster : On Software Update : Off Diagnostics CI Information 1MENU 2 OK 3 OK 4 5 Select SETUP. Select Manual Tuning.
WATCHING TV / PROGRAMME CONTROL MANUAL PROGRAMME TUNING (IN ANALOGUE MODE) Manual Tuning lets you manually tune and arrange the stations in Lock System 'On'. • L : SECAM L/L' (France) BG : PAL B/G, SECAM B/G (Europe / East Europe / Asia / New Zealand / M.East / Africa / Australia) I : PAL I/... TV / PROGRAMME CONTROL SETUP Move OK Auto tuning MMaannuuaallttuunniningg Programme Edit Booster : On Software Update : Off Diagnostics CI Information 1MENU 2 OK 3 OK 4 5 Select SETUP. Select Manual Tuning.

Owners Manual
Page 49
.... A Fine Tuning Normally fine tuning is only necessary if reception is poor. 1MENU Select SETUP. 4 2 5 OK Select Manual Tuning. 3 6 OK Select TV. OK Select Store. • Press the MENU button to return to normal TV viewing. • Press the RETURN button to move ...
.... A Fine Tuning Normally fine tuning is only necessary if reception is poor. 1MENU Select SETUP. 4 2 5 OK Select Manual Tuning. 3 6 OK Select TV. OK Select Store. • Press the MENU button to return to normal TV viewing. • Press the RETURN button to move ...

Owners Manual
Page 50
... TV viewing. • Press the RETURN button to move a programme number by using P ton during TV viewing. (or PR + / -) but- SETUP Move OK Auto tuning Manual tuning PPrrooggrraammmme eEdEidt it means that you to skip the stored programmes. If you wish to select the skipped programme, directly enter the programme number...
... TV viewing. • Press the RETURN button to move a programme number by using P ton during TV viewing. (or PR + / -) but- SETUP Move OK Auto tuning Manual tuning PPrrooggrraammmme eEdEidt it means that you to skip the stored programmes. If you wish to select the skipped programme, directly enter the programme number...

Owners Manual
Page 53
... • Press the MENU button to return to normal TV viewing. • Press the RETURN button to move to On. SETUP Move OK Auto tuning Manual tuning Programme Edit BBoooosstteer r :: OOnn Software Update : Off Diagnostics CI Information 1MENU Select SETUP. 2 OK Select Booster. 3 OK 4 OK Select On or Off. Save. When...
... • Press the MENU button to return to normal TV viewing. • Press the RETURN button to move to On. SETUP Move OK Auto tuning Manual tuning Programme Edit BBoooosstteer r :: OOnn Software Update : Off Diagnostics CI Information 1MENU Select SETUP. 2 OK Select Booster. 3 OK 4 OK Select On or Off. Save. When...


