
Owners Manual
Page 1
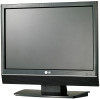
... Broadcasting Project (1991 to the label on the back cover and quote this manual carefully before operating your dealer when requiring service. Retain it for 19/22LS4D*) ENGLISH LCD TV PLASMA TV OWNER'S MANUAL Trade Mark of the TV. To your TV. Refer to 1996) ID Number(s): 5499: 22LS4D-...: 47LG5010-ZD 5388: 37LG5010-ZD 5390: 52LG5020-ZB 5392: 42LG5020-ZB 5394: 32LG5020-ZB 5396: 47LG5030-ZE 5398: 37LG5030-ZE 5671: 32LG5700-ZF 5507: 19LS4D-ZD 5106: 50PG1000-ZA 5569: 50PG2000-ZA 5108: 50PG3000-ZA 5629: 32LG2000-ZA 5631: 42LG2000-ZA 5090: 22LG3000-ZA 5089: 32LG3000-ZA 5086: 42LG3000-ZA...
... Broadcasting Project (1991 to the label on the back cover and quote this manual carefully before operating your dealer when requiring service. Retain it for 19/22LS4D*) ENGLISH LCD TV PLASMA TV OWNER'S MANUAL Trade Mark of the TV. To your TV. Refer to 1996) ID Number(s): 5499: 22LS4D-...: 47LG5010-ZD 5388: 37LG5010-ZD 5390: 52LG5020-ZB 5392: 42LG5020-ZB 5394: 32LG5020-ZB 5396: 47LG5030-ZE 5398: 37LG5030-ZE 5671: 32LG5700-ZF 5507: 19LS4D-ZD 5106: 50PG1000-ZA 5569: 50PG2000-ZA 5108: 50PG3000-ZA 5629: 32LG2000-ZA 5631: 42LG2000-ZA 5090: 22LG3000-ZA 5089: 32LG3000-ZA 5086: 42LG3000-ZA...

Owners Manual
Page 3
... for stand fixing (Refer to p.5) (Only 32/42LG20**, 26/32/42LG30**, 32/42LG5***) Cable management clip (Only 19/22LS4D*) Cable management clip (Only 19/22LG30**) Use of the ferrite core to reduce the electromagnetic wave when connecting the power cord. Owner's Manual Batteries Remote...TV. ■ Image shown may cause scratching or discolouration. If an accessory is . Power Cord or Protection Cover (Except for 19/22LS4D*) Polishing Cloth Polishing cloth for use excessive force. Lightly wipe any stains or fingerprints on the screen. ACCESSORIES ACCESSORIES Ensure ...
... for stand fixing (Refer to p.5) (Only 32/42LG20**, 26/32/42LG30**, 32/42LG5***) Cable management clip (Only 19/22LS4D*) Cable management clip (Only 19/22LG30**) Use of the ferrite core to reduce the electromagnetic wave when connecting the power cord. Owner's Manual Batteries Remote...TV. ■ Image shown may cause scratching or discolouration. If an accessory is . Power Cord or Protection Cover (Except for 19/22LS4D*) Polishing Cloth Polishing cloth for use excessive force. Lightly wipe any stains or fingerprints on the screen. ACCESSORIES ACCESSORIES Ensure ...
Owners Manual
Page 4
...) . . . . 66 Manual Picture Adjustment - Screen Setup for Wire Arrangement 15 Positioning Your Display 18 Location 18 Kensington Security System 18 Desktop Pedestal Installation 19 Wall Mount: Horizontal Installation 19 Antenna Connection 20 EXTERNAL EQUIPMENT SETUP HD Receiver Setup 21 Digital Audio out Setup 22 DVD Setup 23 VCR Setup 25 Other A/V Source...
...) . . . . 66 Manual Picture Adjustment - Screen Setup for Wire Arrangement 15 Positioning Your Display 18 Location 18 Kensington Security System 18 Desktop Pedestal Installation 19 Wall Mount: Horizontal Installation 19 Antenna Connection 20 EXTERNAL EQUIPMENT SETUP HD Receiver Setup 21 Digital Audio out Setup 22 DVD Setup 23 VCR Setup 25 Other A/V Source...

Owners Manual
Page 8
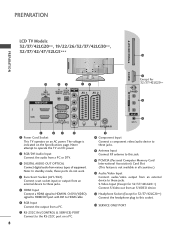
PREPARATION PREPARATION LCD TV Models : 19/22LG30** INPUT MENU OK VOLUME PROGRAMME INPUT MENU OK - + P POWER Remote Control Sensor Power/Standby Indicator • illuminates red in standby mode. • illuminates blue when the TV is switched on . LCD TV Models : 19/22LS4D* POWER INPUT MENU OK VOLUME PROGRAMME /I INPUT MENU OK VOL PR Remote Control Sensor Power/Standby Indicator • illuminates red in the OPTION menu. Note: You can adjust Power Indicator in standby mode. • illuminates green when the TV is switched on . 6
PREPARATION PREPARATION LCD TV Models : 19/22LG30** INPUT MENU OK VOLUME PROGRAMME INPUT MENU OK - + P POWER Remote Control Sensor Power/Standby Indicator • illuminates red in standby mode. • illuminates blue when the TV is switched on . LCD TV Models : 19/22LS4D* POWER INPUT MENU OK VOLUME PROGRAMME /I INPUT MENU OK VOL PR Remote Control Sensor Power/Standby Indicator • illuminates red in the OPTION menu. Note: You can adjust Power Indicator in standby mode. • illuminates green when the TV is switched on . 6
Owners Manual
Page 10
... the output from an external device to the RS-232C port on DC power. PREPARATION PREPARATION PCMCIA CARD SLOT LCD TV Models: 32/37/42LG20**, 19/22/26/32/37/42LG30**, 32/37/42/47/52LG5*** 10 HDMI IN 3 13 USB IN SERVICE ONLY 2 3 1 4 AUDIO IN (RGB/DVI) OPTICAL DIGITAL AUDIO...
... the output from an external device to the RS-232C port on DC power. PREPARATION PREPARATION PCMCIA CARD SLOT LCD TV Models: 32/37/42LG20**, 19/22/26/32/37/42LG30**, 32/37/42/47/52LG5*** 10 HDMI IN 3 13 USB IN SERVICE ONLY 2 3 1 4 AUDIO IN (RGB/DVI) OPTICAL DIGITAL AUDIO...

Owners Manual
Page 11
... on the Specifications page. The voltage is not available in all countries.) 9 Never attempt to operate the TV on an AC power. LCD TV Models : 19/22LS4D* PREPARATION 1 2 3 4 5 AV 1 AV 2 HDMI/DVI IN AUDIO IN (RGB/DVI) ANTENNA IN RS-232C IN (CONTROL & SERVICE) RGB (PC) IN PCMCIA CARD SLOT EJECT...
... on the Specifications page. The voltage is not available in all countries.) 9 Never attempt to operate the TV on an AC power. LCD TV Models : 19/22LS4D* PREPARATION 1 2 3 4 5 AV 1 AV 2 HDMI/DVI IN AUDIO IN (RGB/DVI) ANTENNA IN RS-232C IN (CONTROL & SERVICE) RGB (PC) IN PCMCIA CARD SLOT EJECT...

Owners Manual
Page 12
Stand Body Cover Base (Only 19/22LG30**) Stand Body Cover Base 1 Carefully place the TV screen side down on a cushioned surface to protect the screen from damage. 2 Assemble the parts of ...
Stand Body Cover Base (Only 19/22LG30**) Stand Body Cover Base 1 Carefully place the TV screen side down on a cushioned surface to protect the screen from damage. 2 Assemble the parts of ...

Owners Manual
Page 14
Stand Body 2 Hold the Hinge Body and bend it upward. Cover Base Swivel Stand (Except for 19/22LS4D*, 50PG10**) After installing the TV, you can adjust the TV manually to the left or right direction by 20 degrees to protect the screen ... your viewing position. 12 Hinge Body 4 Assemble the parts of the Stand Body with the Cover Base of the TV. PREPARATION PREPARATION STAND INSTALLATION (Only 19/22LS4D*) ■ Image shown may differ from damage. 3 Insert the Stand Body into the TV until clicking sound.
Stand Body 2 Hold the Hinge Body and bend it upward. Cover Base Swivel Stand (Except for 19/22LS4D*, 50PG10**) After installing the TV, you can adjust the TV manually to the left or right direction by 20 degrees to protect the screen ... your viewing position. 12 Hinge Body 4 Assemble the parts of the Stand Body with the Cover Base of the TV. PREPARATION PREPARATION STAND INSTALLATION (Only 19/22LS4D*) ■ Image shown may differ from damage. 3 Insert the Stand Body into the TV until clicking sound.
Owners Manual
Page 15
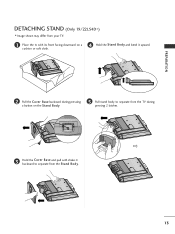
PREPARATION DETACHING STAND (Only 19/22LS4D*) ■ Image shown may differ from your TV. 1 Place the tv with its front facing downward on a cushion or soft cloth. 4 Hold the Stand Body and bend it upward. 2 Pull the Cover Base backward during pressing a button on the Stand Body. 5 Pull stand body to separate from the TV during pressing 2 latches. 3 Hold the Cover Base and pull with shake it backward to separate from the Stand Body. 13
PREPARATION DETACHING STAND (Only 19/22LS4D*) ■ Image shown may differ from your TV. 1 Place the tv with its front facing downward on a cushion or soft cloth. 4 Hold the Stand Body and bend it upward. 2 Pull the Cover Base backward during pressing a button on the Stand Body. 5 Pull stand body to separate from the TV during pressing 2 latches. 3 Hold the Cover Base and pull with shake it backward to separate from the Stand Body. 13

Owners Manual
Page 18
... or the TV may be damaged. 16 NOTE G Do not use the CABLE MANAGEMENT CLIP to remove the cable management clip (LCD TV Models : 19/22LS4D*) First, press the cable management. Hold the CABLE MANAGEMENT CLIP with both hands and pull it upward. ! How to lift the TV. -... LCD TV Models : 19/22LS4D* 1 Connect the cables as shown. To connect additional equipment, see the External Equipment Setup section. 2 Open the CABLE MANAGEMENT CLIP as shown and manage...
... or the TV may be damaged. 16 NOTE G Do not use the CABLE MANAGEMENT CLIP to remove the cable management clip (LCD TV Models : 19/22LS4D*) First, press the cable management. Hold the CABLE MANAGEMENT CLIP with both hands and pull it upward. ! How to lift the TV. -... LCD TV Models : 19/22LS4D* 1 Connect the cables as shown. To connect additional equipment, see the External Equipment Setup section. 2 Open the CABLE MANAGEMENT CLIP as shown and manage...

Owners Manual
Page 19
If the TV is dropped, you may be injured or the TV may be damaged. 17 To connect additional equipment, see the External Equipment Setup section of the manual. 2 Install the CABLE MANAGEMENT CLIP as necessary. NOTE G Do not use the CABLE MANAGEMENT CLIP to remove the cable management clip G Hold the CABLE MANAGEMENT CLIP with both hands and pull it backward. ! PREPARATION LCD TV Models : 19/22LG30** 1 Connect the cables as shown. CABLE MANAGEMENT CLIP How to lift the TV. -
If the TV is dropped, you may be injured or the TV may be damaged. 17 To connect additional equipment, see the External Equipment Setup section of the manual. 2 Install the CABLE MANAGEMENT CLIP as necessary. NOTE G Do not use the CABLE MANAGEMENT CLIP to remove the cable management clip G Hold the CABLE MANAGEMENT CLIP with both hands and pull it backward. ! PREPARATION LCD TV Models : 19/22LG30** 1 Connect the cables as shown. CABLE MANAGEMENT CLIP How to lift the TV. -

Owners Manual
Page 20
...TV. Doing so may be a small "flicker" when when it carefully so as notebook PCs and LCD projectors. PREPARATION POSITIONING YOUR DISPLAY (Only 19/22LG30**, 19/22LS4D*) • Tilt range ■ Image shown may differ from your TV. ■ Adjust the position of the panel in a position ... blue spots. NOTE - NOTES a. However, they have no bright light or sunlight falls directly onto the screen. KENSINGTON SECURITY SYSTEM (Only 19/22LG30**, 19/22LS4D*) The TV is nothing wrong with a Kensington Security System connector on the back panel. Care should be taken not to expose the ...
...TV. Doing so may be a small "flicker" when when it carefully so as notebook PCs and LCD projectors. PREPARATION POSITIONING YOUR DISPLAY (Only 19/22LG30**, 19/22LS4D*) • Tilt range ■ Image shown may differ from your TV. ■ Adjust the position of the panel in a position ... blue spots. NOTE - NOTES a. However, they have no bright light or sunlight falls directly onto the screen. KENSINGTON SECURITY SYSTEM (Only 19/22LG30**, 19/22LS4D*) The TV is nothing wrong with a Kensington Security System connector on the back panel. Care should be taken not to expose the ...

Owners Manual
Page 21
... INSTALLATION For adequate ventilation allow a clearance of 4" (10cm) all around the TV. We recommend that you use the protection cover for 19/22LS4D*) ■ Image shown may differ from your TV. PREPARATION ■ The TV can be mounted horizontally. When installing the wall-... (10cm) all around the TV. 4 inches 4 inches R 4 inches 4 inches WALL MOUNT: HORIZONTAL INSTALLATION For adequate ventilation allow a clearance of LG brand when mounting the TV to telephone wires, lightening rods or gas pipes. Insert the PROTECTION COVER into the TV until clicking sound. < PLASMA TV...
... INSTALLATION For adequate ventilation allow a clearance of 4" (10cm) all around the TV. We recommend that you use the protection cover for 19/22LS4D*) ■ Image shown may differ from your TV. PREPARATION ■ The TV can be mounted horizontally. When installing the wall-... (10cm) all around the TV. 4 inches 4 inches R 4 inches 4 inches WALL MOUNT: HORIZONTAL INSTALLATION For adequate ventilation allow a clearance of LG brand when mounting the TV to telephone wires, lightening rods or gas pipes. Insert the PROTECTION COVER into the TV until clicking sound. < PLASMA TV...
Owners Manual
Page 24
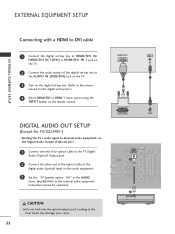
... TV Digital Audio (Optical) Output port. 2 Connect the other end of the digital set -top box. (Refer to the external audio equipment instruction manual for 19/22LS4D*) - Looking at the laser beam may damage your vision. 22 DVI IN AUDIO IN (RGB/DVI) OPTICAL DIGITAL AUDIO OUT COMPONENT IN AV 1 AV...
... TV Digital Audio (Optical) Output port. 2 Connect the other end of the digital set -top box. (Refer to the external audio equipment instruction manual for 19/22LS4D*) - Looking at the laser beam may damage your vision. 22 DVI IN AUDIO IN (RGB/DVI) OPTICAL DIGITAL AUDIO OUT COMPONENT IN AV 1 AV...

Owners Manual
Page 26
EXTERNAL EQUIPMENT SETUP EXTERNAL EQIPMENT SETUP Connecting with a S-Video cable (Except for 19/22LS4D*, 32/37/42LG20**, 42/50PG10**) PCMCIA CARD SLOT 1 Connect the S-VIDEO output of the DVD to the HDMI/DVI IN, HDMI/DVI IN 1, HDMI ...
EXTERNAL EQUIPMENT SETUP EXTERNAL EQIPMENT SETUP Connecting with a S-Video cable (Except for 19/22LS4D*, 32/37/42LG20**, 42/50PG10**) PCMCIA CARD SLOT 1 Connect the S-VIDEO output of the DVD to the HDMI/DVI IN, HDMI/DVI IN 1, HDMI ...

Owners Manual
Page 28
... jack of the TV. 26 L R VIDEO S-VIDEO ANT IN OUTPUT SWITCH ANT OUT EXTERNAL EQUIPMENT SETUP EXTERNAL EQIPMENT SETUP Connecting with a RCA cable (Except for 19/22LS4D*, 42/50PG10**) PCMCIA CARD SLOT 1 Connect the AUDIO/VIDEO jacks between TV and VCR. Match the jack colours (Video = yellow, Audio Left = white, and...
... jack of the TV. 26 L R VIDEO S-VIDEO ANT IN OUTPUT SWITCH ANT OUT EXTERNAL EQUIPMENT SETUP EXTERNAL EQIPMENT SETUP Connecting with a RCA cable (Except for 19/22LS4D*, 42/50PG10**) PCMCIA CARD SLOT 1 Connect the AUDIO/VIDEO jacks between TV and VCR. Match the jack colours (Video = yellow, Audio Left = white, and...

Owners Manual
Page 29
...IN 3 2 Select AV3 input source using the INPUT button on the remote control. EXTERNAL EQIPMENT SETUP Connecting with a S-Video cable (Except for 19/22LS4D*, 42/50PG10**) 1 Connect the AUDIO/VIDEO jacks between TV and external equipment. S-VIDEO 3 Operate the corresponding external equipment. AV IN 3...VIDEO L/MONO AUDIO R HDMI IN 3 PCMCIA CARD SLOT S-VIDEO VIDEO L R ANT IN OUTPUT SWITCH ANT OUT 1 2 OTHER A/V SOURCE SETUP (Except for 19/22LS4D*, 32/37/42LG20**, 42/50PG10**) 1 Connect the S-VIDEO output of the VCR to the AUDIO input jacks on the TV. 3 Insert a video tape ...
...IN 3 2 Select AV3 input source using the INPUT button on the remote control. EXTERNAL EQIPMENT SETUP Connecting with a S-Video cable (Except for 19/22LS4D*, 42/50PG10**) 1 Connect the AUDIO/VIDEO jacks between TV and external equipment. S-VIDEO 3 Operate the corresponding external equipment. AV IN 3...VIDEO L/MONO AUDIO R HDMI IN 3 PCMCIA CARD SLOT S-VIDEO VIDEO L R ANT IN OUTPUT SWITCH ANT OUT 1 2 OTHER A/V SOURCE SETUP (Except for 19/22LS4D*, 32/37/42LG20**, 42/50PG10**) 1 Connect the S-VIDEO output of the VCR to the AUDIO input jacks on the TV. 3 Insert a video tape ...

Owners Manual
Page 33
EXTERNAL EQIPMENT SETUP Supported Display Resolution (Only 19/22/26/32/37/42LG30**, 32/37/42LG20**, 32/37/42/47/52LG5***) RGB[PC], HDMI[PC] mode HDMI[DTV] mode Resolution 720x400 640x480 800x600 ...
EXTERNAL EQIPMENT SETUP Supported Display Resolution (Only 19/22/26/32/37/42LG30**, 32/37/42LG20**, 32/37/42/47/52LG5***) RGB[PC], HDMI[PC] mode HDMI[DTV] mode Resolution 720x400 640x480 800x600 ...

Owners Manual
Page 38
... / PROGRAMME CONTROL POWER TV INPUT D/A TV/RADIO TEXT I /II Selects the sound output. Programme Selects a programme. WATCHING TV / PROGRAMME CONTROL REMOTE CONTROL KEY FUNCTIONS (Only 19/22LS4D*) When using the remote control, aim it at the remote control sensor on from standby or off . 0~9 number Selects a programme. D/A INPUT Selects digital or...
... / PROGRAMME CONTROL POWER TV INPUT D/A TV/RADIO TEXT I /II Selects the sound output. Programme Selects a programme. WATCHING TV / PROGRAMME CONTROL REMOTE CONTROL KEY FUNCTIONS (Only 19/22LS4D*) When using the remote control, aim it at the remote control sensor on from standby or off . 0~9 number Selects a programme. D/A INPUT Selects digital or...

Owners Manual
Page 42
... subtitle in an interactive application, EPG or other user interaction function. INPUT External input mode rotate in regular sequence. Coloured These buttons are used for 19/22LS4D*, 42/50PG10**) RATIO 3 1 1 MODE Selects the remote operating modes.
... subtitle in an interactive application, EPG or other user interaction function. INPUT External input mode rotate in regular sequence. Coloured These buttons are used for 19/22LS4D*, 42/50PG10**) RATIO 3 1 1 MODE Selects the remote operating modes.