
Owners Manual
Page 1
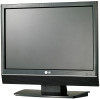
To your TV. Retain it for 19/22LS4D*) This feature is not available for all models. (Except for future reference. Record model number and ...ZD 5391: 47LG5020-ZB 5393: 37LG5020-ZB 5395: 52LG5030-ZE 5397: 42LG5030-ZE 5399: 32LG5030-ZE 5721: 26LG3050-ZA LCD TV MODELS 19LS4D* 22LS4D* 32LG20* * 37LG20* * 42LG20* * 19LG30* * 22LG30* * 26LG30* * 3 2 L G 3 0* * 3 7 L G 3 0* * 42 L G 3 0* * 3 2 L G 5* * * 3 7 L G 5 0* * 4 2 L G 5 0* * 4 7 L G 5 0* * 5 2 L G 5 0* * PLASMA TV MODELS 42PG10** 50PG10** 42PG20** 50PG20** 42PG30** 50PG30** 60PG30** Please read this information. ENGLISH...
To your TV. Retain it for 19/22LS4D*) This feature is not available for all models. (Except for future reference. Record model number and ...ZD 5391: 47LG5020-ZB 5393: 37LG5020-ZB 5395: 52LG5030-ZE 5397: 42LG5030-ZE 5399: 32LG5030-ZE 5721: 26LG3050-ZA LCD TV MODELS 19LS4D* 22LS4D* 32LG20* * 37LG20* * 42LG20* * 19LG30* * 22LG30* * 26LG30* * 3 2 L G 3 0* * 3 7 L G 3 0* * 42 L G 3 0* * 3 2 L G 5* * * 3 7 L G 5 0* * 4 2 L G 5 0* * 4 7 L G 5 0* * 5 2 L G 5 0* * PLASMA TV MODELS 42PG10** 50PG10** 42PG20** 50PG20** 42PG30** 50PG30** 60PG30** Please read this information. ENGLISH...

Owners Manual
Page 3
...Holder (42PG10**, 42PG20**, 42PG30**: 1EA, 50PG10**, 50PG20**, 50/60PG30**: 2EA) Cable management clip Ferrite Core (This feature is not available for all models.) LCD TV models x 4 x 4 Bolts for stand assembly (Refer to p.10) (Only 32/37/42LG5***, 32/37/42LG20**, 26/32/37/42LG30**) 1-screw ... used to p.5) (Only 32/42LG20**, 26/32/42LG30**, 32/42LG5***) Cable management clip (Only 19/22LS4D*) Cable management clip (Only 19/22LG30**) Use of the TV with your TV. Owner's Manual Batteries Remote Control This feature is missing, please contact the dealer where you purchased the...
...Holder (42PG10**, 42PG20**, 42PG30**: 1EA, 50PG10**, 50PG20**, 50/60PG30**: 2EA) Cable management clip Ferrite Core (This feature is not available for all models.) LCD TV models x 4 x 4 Bolts for stand assembly (Refer to p.10) (Only 32/37/42LG5***, 32/37/42LG20**, 26/32/37/42LG30**) 1-screw ... used to p.5) (Only 32/42LG20**, 26/32/42LG30**, 32/42LG5***) Cable management clip (Only 19/22LS4D*) Cable management clip (Only 19/22LG30**) Use of the TV with your TV. Owner's Manual Batteries Remote Control This feature is missing, please contact the dealer where you purchased the...

Owners Manual
Page 8
Note: You can adjust Power Indicator in standby mode. • illuminates green when the TV is switched on . 6 LCD TV Models : 19/22LS4D* POWER INPUT MENU OK VOLUME PROGRAMME /I INPUT MENU OK VOL PR Remote Control Sensor Power/Standby Indicator • illuminates red in the OPTION menu. PREPARATION PREPARATION LCD TV Models : 19/22LG30** INPUT MENU OK VOLUME PROGRAMME INPUT MENU OK - + P POWER Remote Control Sensor Power/Standby Indicator • illuminates red in standby mode. • illuminates blue when the TV is switched on .
Note: You can adjust Power Indicator in standby mode. • illuminates green when the TV is switched on . 6 LCD TV Models : 19/22LS4D* POWER INPUT MENU OK VOLUME PROGRAMME /I INPUT MENU OK VOL PR Remote Control Sensor Power/Standby Indicator • illuminates red in the OPTION menu. PREPARATION PREPARATION LCD TV Models : 19/22LG30** INPUT MENU OK VOLUME PROGRAMME INPUT MENU OK - + P POWER Remote Control Sensor Power/Standby Indicator • illuminates red in standby mode. • illuminates blue when the TV is switched on .
Owners Manual
Page 10
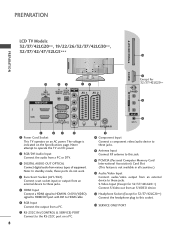
...**) Connect S-Video out from a PC. 9 8 Component Input Connect a component video/audio device to operate the TV on the Specifications page. PREPARATION PREPARATION PCMCIA CARD SLOT LCD TV Models: 32/37/42LG20**, 19/22/26/32/37/42LG30**, 32/37/42/47/52LG5*** 10 HDMI IN 3 13 USB IN SERVICE ONLY 2...AUDIO R 2 RGB IN (PC) 1(DVI) RS-232C IN (CONTROL & SERVICE) AUDIO ANTENNA IN AV IN 3 12 H/P 5 6 7 8 1 Power Cord Socket This TV operates on a PC. 8 Never attempt to these jacks. Note: In standby mode, these jacks. AV IN 3 5 HDMI Input H/P Connect a HDMI signal to the RS-232C...
...**) Connect S-Video out from a PC. 9 8 Component Input Connect a component video/audio device to operate the TV on the Specifications page. PREPARATION PREPARATION PCMCIA CARD SLOT LCD TV Models: 32/37/42LG20**, 19/22/26/32/37/42LG30**, 32/37/42/47/52LG5*** 10 HDMI IN 3 13 USB IN SERVICE ONLY 2...AUDIO R 2 RGB IN (PC) 1(DVI) RS-232C IN (CONTROL & SERVICE) AUDIO ANTENNA IN AV IN 3 12 H/P 5 6 7 8 1 Power Cord Socket This TV operates on a PC. 8 Never attempt to these jacks. Note: In standby mode, these jacks. AV IN 3 5 HDMI Input H/P Connect a HDMI signal to the RS-232C...

Owners Manual
Page 11
... to operate the TV on an AC power. LCD TV Models : 19/22LS4D* PREPARATION 1 2 3 4 5 AV 1 AV 2 HDMI/DVI IN AUDIO IN (RGB/DVI) ANTENNA IN RS-232C IN (CONTROL & SERVICE) RGB (PC) IN PCMCIA CARD SLOT EJECT COMPONENT IN VIDEO AUDIO Y PB PR L R SERVICE ONLY 6 7 8 9 10 1 Power Cord Socket This TV operates on DC power...
... to operate the TV on an AC power. LCD TV Models : 19/22LS4D* PREPARATION 1 2 3 4 5 AV 1 AV 2 HDMI/DVI IN AUDIO IN (RGB/DVI) ANTENNA IN RS-232C IN (CONTROL & SERVICE) RGB (PC) IN PCMCIA CARD SLOT EJECT COMPONENT IN VIDEO AUDIO Y PB PR L R SERVICE ONLY 6 7 8 9 10 1 Power Cord Socket This TV operates on DC power...

Owners Manual
Page 12
Insert the STAND BODY into a COVER BASE until clicking sound. 3 Assemble the TV as shown. PREPARATION STAND INSTALLATION (LCD TV Models: 32/37/42LG20**, 26/32/37/42LG30**, 32/37/42LG5***) A When assembling the desk type stand, check whether the bolt is fully tightened. (If ... product installation.) If you tighten the bolt with the Cover Base of the TV. 4 Fix the 4 bolts securely using the holes in the back of the TV. Stand Body Cover Base (Only 19/22LG30**) Stand Body Cover Base 1 Carefully place the TV screen side down on a cushioned surface to protect the screen from damage...
Insert the STAND BODY into a COVER BASE until clicking sound. 3 Assemble the TV as shown. PREPARATION STAND INSTALLATION (LCD TV Models: 32/37/42LG20**, 26/32/37/42LG30**, 32/37/42LG5***) A When assembling the desk type stand, check whether the bolt is fully tightened. (If ... product installation.) If you tighten the bolt with the Cover Base of the TV. 4 Fix the 4 bolts securely using the holes in the back of the TV. Stand Body Cover Base (Only 19/22LG30**) Stand Body Cover Base 1 Carefully place the TV screen side down on a cushioned surface to protect the screen from damage...

Owners Manual
Page 18
...MANAGEMENT CLIP 3 Fit the CABLE MANAGEMENT CLIP as necessary. NOTE G Do not use the CABLE MANAGEMENT CLIP to remove the cable management clip (LCD TV Models : 19/22LS4D*) First, press the cable management. To connect additional equipment, see the External Equipment Setup section of the manual. Hold the CABLE MANAGEMENT ... Setup section. 2 Open the CABLE MANAGEMENT CLIP as shown and manage the cables. 2 Install the CABLE MANAGEMENT CLIP as necessary. PREPARATION PREPARATION LCD TV Models: 32/37/42LG20**, 26/32/37/ 42LG30**, 32/37/42/47/52LG5*** 1 Connect the cables as shown.
...MANAGEMENT CLIP 3 Fit the CABLE MANAGEMENT CLIP as necessary. NOTE G Do not use the CABLE MANAGEMENT CLIP to remove the cable management clip (LCD TV Models : 19/22LS4D*) First, press the cable management. To connect additional equipment, see the External Equipment Setup section of the manual. Hold the CABLE MANAGEMENT ... Setup section. 2 Open the CABLE MANAGEMENT CLIP as shown and manage the cables. 2 Install the CABLE MANAGEMENT CLIP as necessary. PREPARATION PREPARATION LCD TV Models: 32/37/42LG20**, 26/32/37/ 42LG30**, 32/37/42/47/52LG5*** 1 Connect the cables as shown.

Owners Manual
Page 19
PREPARATION LCD TV Models : 19/22LG30** 1 Connect the cables as shown. CABLE MANAGEMENT CLIP How to lift the TV. - If the TV is dropped, you may be injured or the TV may be damaged. 17 NOTE G Do not use the CABLE MANAGEMENT CLIP to remove the cable management clip G Hold the CABLE MANAGEMENT CLIP with both hands and pull it backward. ! To connect additional equipment, see the External Equipment Setup section of the manual. 2 Install the CABLE MANAGEMENT CLIP as necessary.
PREPARATION LCD TV Models : 19/22LG30** 1 Connect the cables as shown. CABLE MANAGEMENT CLIP How to lift the TV. - If the TV is dropped, you may be injured or the TV may be damaged. 17 NOTE G Do not use the CABLE MANAGEMENT CLIP to remove the cable management clip G Hold the CABLE MANAGEMENT CLIP with both hands and pull it backward. ! To connect additional equipment, see the External Equipment Setup section of the manual. 2 Install the CABLE MANAGEMENT CLIP as necessary.

Owners Manual
Page 20
...may be taken not to expose the tv to the back of the TV. KENSINGTON SECURITY SYSTEM (Only 19/22LG30**, 19/22LS4D*) The TV is nothing wrong with the Kensington Security System. Avoid touching the LCD screen or holding your TV so that the TV is an optional accessory. The Kensington... Security System is placed in various ways for maximum comfort. 10~12 03 PREPARATION LOCATION (Only 19/22LG30**, 19/22LS4D*) Position your finger(s) against it...
...may be taken not to expose the tv to the back of the TV. KENSINGTON SECURITY SYSTEM (Only 19/22LG30**, 19/22LS4D*) The TV is nothing wrong with the Kensington Security System. Avoid touching the LCD screen or holding your TV so that the TV is an optional accessory. The Kensington... Security System is placed in various ways for maximum comfort. 10~12 03 PREPARATION LOCATION (Only 19/22LG30**, 19/22LS4D*) Position your finger(s) against it...

Owners Manual
Page 21
...inches 4 inches WALL MOUNT: HORIZONTAL INSTALLATION For adequate ventilation allow a clearance of LG brand when mounting the TV to be installed in various ways such as on a wall, or on a desktop etc. ■ The TV is designed to a wall. 4 inches 4 inches 4 inches 4 inches 4 .... Insert the PROTECTION COVER into the TV until clicking sound. < PLASMA TV > < LCD TV > 19 Power Supply Circuit breaker DESKTOP PEDESTAL INSTALLATION For adequate ventilation allow a clearance of 4" (10cm) all around the TV. PREPARATION ■ The TV can be mounted horizontally. We recommend that...
...inches 4 inches WALL MOUNT: HORIZONTAL INSTALLATION For adequate ventilation allow a clearance of LG brand when mounting the TV to be installed in various ways such as on a wall, or on a desktop etc. ■ The TV is designed to a wall. 4 inches 4 inches 4 inches 4 inches 4 .... Insert the PROTECTION COVER into the TV until clicking sound. < PLASMA TV > < LCD TV > 19 Power Supply Circuit breaker DESKTOP PEDESTAL INSTALLATION For adequate ventilation allow a clearance of 4" (10cm) all around the TV. PREPARATION ■ The TV can be mounted horizontally. We recommend that...

Owners Manual
Page 117
...(Command: x b) (Main Picture Input) G To select input source for the current Programme. Key (Command : m c) G To send IR remote key code. Control Back Light (LCD TV only) (Command: m g) G To Cont rol t he back light. Refer to following physical number. Transmission [m][g][ ][Set ID][ ][Data][Cr] Data : Min: 00 ~ Max:... ][Set ID][ ][OK/NG][Data][x] * Real data mapping 3 (Equalize) Step: OSD Step: OSD 00 : -24 16 : 1 01 : -23 17 : 3 02 : -21 18 : 4 03 : -20 19 : 6 04 : -18 20 : 7 05 : -16 21 : 9 06 : -15 22 : 10 07 : -13 23 : 12 08 : -12 24 : 13 09 : -10 25 : 15 10 ...
...(Command: x b) (Main Picture Input) G To select input source for the current Programme. Key (Command : m c) G To send IR remote key code. Control Back Light (LCD TV only) (Command: m g) G To Cont rol t he back light. Refer to following physical number. Transmission [m][g][ ][Set ID][ ][Data][Cr] Data : Min: 00 ~ Max:... ][Set ID][ ][OK/NG][Data][x] * Real data mapping 3 (Equalize) Step: OSD Step: OSD 00 : -24 16 : 1 01 : -23 17 : 3 02 : -21 18 : 4 03 : -20 19 : 6 04 : -18 20 : 7 05 : -16 21 : 9 06 : -15 22 : 10 07 : -13 23 : 12 08 : -12 24 : 13 09 : -10 25 : 15 10 ...


