
Owners Manual
Page 3
... INFO i OK AV MODE or VOL RETUERXNIT GUIDE * RATIO FAV PR INDEX SLEEP TIME SUBTITLE HOLD UPDATE REVEAL ? If an accessory is . Owner's Manual Batteries Remote Control This feature is not available for all models. Lightly wipe any stains or fingerprints on the screen. Do not use on the surface of ferrite...
... INFO i OK AV MODE or VOL RETUERXNIT GUIDE * RATIO FAV PR INDEX SLEEP TIME SUBTITLE HOLD UPDATE REVEAL ? If an accessory is . Owner's Manual Batteries Remote Control This feature is not available for all models. Lightly wipe any stains or fingerprints on the screen. Do not use on the surface of ferrite...
Owners Manual
Page 4
...Detaching Stand 13 Please set it up carefully so the product does not fall over 14 Back Cover for PC Mode 32 WATCHING TV / PROGRAMME CONTROL Remote Control Key Functions 36 Turning on the TV 42 Programme Selection 42 Volume Adjustment 42 On-Screen Menus Selection and Adjustment . . . . 43 ... in Extended Description Box . . . . . 62 Button Function in Record/Remind Setting Mode . . 62 Button Function in Schedule List Mode 62 PICTURE CONTROL Picture Size (Aspect Ratio) Control 63 Preset Picture Settings - Picture Mode-User option 67 - Picture Mode-Preset 65 - Picture Mode-Expert...
...Detaching Stand 13 Please set it up carefully so the product does not fall over 14 Back Cover for PC Mode 32 WATCHING TV / PROGRAMME CONTROL Remote Control Key Functions 36 Turning on the TV 42 Programme Selection 42 Volume Adjustment 42 On-Screen Menus Selection and Adjustment . . . . 43 ... in Extended Description Box . . . . . 62 Button Function in Record/Remind Setting Mode . . 62 Button Function in Schedule List Mode 62 PICTURE CONTROL Picture Size (Aspect Ratio) Control 63 Preset Picture Settings - Picture Mode-User option 67 - Picture Mode-Preset 65 - Picture Mode-Expert...
Owners Manual
Page 5
... 88 Auto Shut-off Setting 89 Time Zone Setup 90 Sleep Timer Setting 90 PARENTAL CONTROL / RATINGS Set Password & Lock System 91 Block Programme 92 Parental Control 93 Key Lock 94 TELETEXT Switch On/ Off 95 SIMPLE Text 95 TOP Text 95...Initializing (Reset to original factory setting) . . . . 98 Troubleshooting 99 Maintenance 101 Product Specifications 102 Programming the Remote Control 105 IR Codes 107 External Control Device Setup 109 3 CONTENTS SOUND & LANGUAGE CONTROL Auto Volume Leveler 76 Preset Sound Settings - Stereo/Dual Reception (In Analogue Mode Only) . . . . ...
... 88 Auto Shut-off Setting 89 Time Zone Setup 90 Sleep Timer Setting 90 PARENTAL CONTROL / RATINGS Set Password & Lock System 91 Block Programme 92 Parental Control 93 Key Lock 94 TELETEXT Switch On/ Off 95 SIMPLE Text 95 TOP Text 95...Initializing (Reset to original factory setting) . . . . 98 Troubleshooting 99 Maintenance 101 Product Specifications 102 Programming the Remote Control 105 IR Codes 107 External Control Device Setup 109 3 CONTENTS SOUND & LANGUAGE CONTROL Auto Volume Leveler 76 Preset Sound Settings - Stereo/Dual Reception (In Analogue Mode Only) . . . . ...

Owners Manual
Page 6
... TV has a protection film attached, remove the film and then wipe the TV with a polishing cloth. MOKENU + - +OK PPVOLUME P PROGRAMME PLASMA TV Models : 42/50PG10** Remote Control Sensor Power/Standby Indicator • illuminates red in standby mode. • illuminates green when the TV is switched on . INPUT MENU OK - + INPUT INMPUETNIUNPUMTENUOK -
... TV has a protection film attached, remove the film and then wipe the TV with a polishing cloth. MOKENU + - +OK PPVOLUME P PROGRAMME PLASMA TV Models : 42/50PG10** Remote Control Sensor Power/Standby Indicator • illuminates red in standby mode. • illuminates green when the TV is switched on . INPUT MENU OK - + INPUT INMPUETNIUNPUMTENUOK -

Owners Manual
Page 7
... to desk so it cannot be securely attached to the floor/wall per installation instructions. Tipping, shaking, or rocking the machine may cause injury. 5 POWER Remote Control Sensor Power/Standby Indicator • illuminates red in a forward/backward direction, potentially causing injury or damaging the product. WARNING G To prevent TV from falling over...
... to desk so it cannot be securely attached to the floor/wall per installation instructions. Tipping, shaking, or rocking the machine may cause injury. 5 POWER Remote Control Sensor Power/Standby Indicator • illuminates red in a forward/backward direction, potentially causing injury or damaging the product. WARNING G To prevent TV from falling over...

Owners Manual
Page 8
PREPARATION PREPARATION LCD TV Models : 19/22LG30** INPUT MENU OK VOLUME PROGRAMME INPUT MENU OK - + P POWER Remote Control Sensor Power/Standby Indicator • illuminates red in standby mode. • illuminates blue when the TV is switched on . LCD TV Models : 19/22LS4D* POWER INPUT MENU OK VOLUME PROGRAMME /I INPUT MENU OK VOL PR Remote Control Sensor Power/Standby Indicator • illuminates red in the OPTION menu. Note: You can adjust Power Indicator in standby mode. • illuminates green when the TV is switched on . 6
PREPARATION PREPARATION LCD TV Models : 19/22LG30** INPUT MENU OK VOLUME PROGRAMME INPUT MENU OK - + P POWER Remote Control Sensor Power/Standby Indicator • illuminates red in standby mode. • illuminates blue when the TV is switched on . LCD TV Models : 19/22LS4D* POWER INPUT MENU OK VOLUME PROGRAMME /I INPUT MENU OK VOL PR Remote Control Sensor Power/Standby Indicator • illuminates red in the OPTION menu. Note: You can adjust Power Indicator in standby mode. • illuminates green when the TV is switched on . 6

Owners Manual
Page 23
...on the digital set-top box. 1 (Refer to the owner's manual for the digital set top box to the COMPONENT IN VIDEO jacks on the remote control. However, if you have finished connecting all equipment. ■ This section on the digital set-top box. (Refer to the owner's manual for the...VIDEO AUDIO Y PB PR L R 2 Connect the audio output of the digital set -top box.) 1 2 4 Select Component input source using the INPUT button on the remote control. 21 Signal 480i/576i 480p/576p 720p/1080i 1080p Component Yes Yes Yes Yes (50/60Hz) HDMI No Yes Yes Yes Connecting a set-top box...
...on the digital set-top box. 1 (Refer to the owner's manual for the digital set top box to the COMPONENT IN VIDEO jacks on the remote control. However, if you have finished connecting all equipment. ■ This section on the digital set-top box. (Refer to the owner's manual for the...VIDEO AUDIO Y PB PR L R 2 Connect the audio output of the digital set -top box.) 1 2 4 Select Component input source using the INPUT button on the remote control. 21 Signal 480i/576i 480p/576p 720p/1080i 1080p Component Yes Yes Yes Yes (50/60Hz) HDMI No Yes Yes Yes Connecting a set-top box...
Owners Manual
Page 24
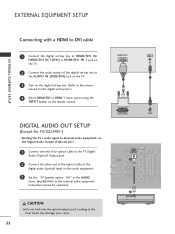
..." TV Speaker option - DVI IN AUDIO IN (RGB/DVI) OPTICAL DIGITAL AUDIO OUT COMPONENT IN AV 1 AV VIDEO 1 RGB IN (PC) AUDIO RS-232C IN (CONTROL & SERVICE) 2 CAUTION GDo not look into the optical output port. EXTERNAL EQUIPMENT SETUP Connecting with a HDMI to DVI cable EXTERNAL EQIPMENT SETUP 1 Connect the digital...audio output of the optical cable to the owner's manual for the digital set -top box. (Refer to the digital audio (optical) input on the remote control. Off " in the AUDIO menu. (G p.80) Refer to the external audio equipment instruction manual for 19/22LS4D*) -
..." TV Speaker option - DVI IN AUDIO IN (RGB/DVI) OPTICAL DIGITAL AUDIO OUT COMPONENT IN AV 1 AV VIDEO 1 RGB IN (PC) AUDIO RS-232C IN (CONTROL & SERVICE) 2 CAUTION GDo not look into the optical output port. EXTERNAL EQUIPMENT SETUP Connecting with a HDMI to DVI cable EXTERNAL EQIPMENT SETUP 1 Connect the digital...audio output of the optical cable to the owner's manual for the digital set -top box. (Refer to the digital audio (optical) input on the remote control. Off " in the AUDIO menu. (G p.80) Refer to the external audio equipment instruction manual for 19/22LS4D*) -

Owners Manual
Page 25
... V 1 Euro scart socket on the TV. 2 Turn on the DVD player, insert a DVD. 3 Select A V 1 input source using the INPUT button on the remote control. If connected to A V 2 Euro scart socket, select A V 2 input source. 4 Refer to the DVD player's manual for operating instructions. DVD SETUP When connecting ...AUDIO jacks on the TV. 3 Turn on the DVD player, insert a DVD. 4 Select Component input source using the INPUT button on the remote control. 5 Refer to the DVD player's manual for operating instructions. ! NOTE G Any Euro scart cable used must be signal shielded. EXTERNAL EQIPMENT...
... V 1 Euro scart socket on the TV. 2 Turn on the DVD player, insert a DVD. 3 Select A V 1 input source using the INPUT button on the remote control. If connected to A V 2 Euro scart socket, select A V 2 input source. 4 Refer to the DVD player's manual for operating instructions. DVD SETUP When connecting ...AUDIO jacks on the TV. 3 Turn on the DVD player, insert a DVD. 4 Select Component input source using the INPUT button on the remote control. 5 Refer to the DVD player's manual for operating instructions. ! NOTE G Any Euro scart cable used must be signal shielded. EXTERNAL EQIPMENT...

Owners Manual
Page 26
... IN 1, HDMI IN 2 or HDMI IN 3 jack on the TV. 2 Select HDMI/DVI, HDMI1, HDMI2 or HDMI3 input source using the INPUT button on the remote control. 3 Refer to the DVD player's manual for operating AV IN 3 instructions. G If the DVD does not support Auto HDMI, you must set the output resolution.... S-VIDEO 4 Select AV3 input source using a HDMI cable. NOTE G The TV can receive video and audio signals simultaneously when using the INPUT button on the remote control. 5 Refer to the AUDIO input jacks on the DVD player, insert a DVD.
... IN 1, HDMI IN 2 or HDMI IN 3 jack on the TV. 2 Select HDMI/DVI, HDMI1, HDMI2 or HDMI3 input source using the INPUT button on the remote control. 3 Refer to the DVD player's manual for operating AV IN 3 instructions. G If the DVD does not support Auto HDMI, you must set the output resolution.... S-VIDEO 4 Select AV3 input source using a HDMI cable. NOTE G The TV can receive video and audio signals simultaneously when using the INPUT button on the remote control. 5 Refer to the AUDIO input jacks on the DVD player, insert a DVD.

Owners Manual
Page 28
... tape into the VCR and press PLAY on the VCR. (Refer to the VCR owner's manual.) 3 Select A V 1 input source using the INPUT button on the remote control. 4 If connected to the VCR owner's manual.) S-VIDEO 3 Select AV3 input source using the I N P U T button on the VCR. (Refer to AV2 ... the VCR to the A V 1 Euro scart socket on the TV. 2 Insert a video tape into the VCR and press PLAY on S-VIDEO the remote control. EXTERNAL EQUIPMENT SETUP EXTERNAL EQIPMENT SETUP Connecting with a RCA cable (Except for 19/22LS4D*, 42/50PG10**) PCMCIA CARD SLOT 1 Connect the AUDIO/VIDEO jacks ...
... tape into the VCR and press PLAY on the VCR. (Refer to the VCR owner's manual.) 3 Select A V 1 input source using the INPUT button on the remote control. 4 If connected to the VCR owner's manual.) S-VIDEO 3 Select AV3 input source using the I N P U T button on the VCR. (Refer to AV2 ... the VCR to the A V 1 Euro scart socket on the TV. 2 Insert a video tape into the VCR and press PLAY on S-VIDEO the remote control. EXTERNAL EQUIPMENT SETUP EXTERNAL EQIPMENT SETUP Connecting with a RCA cable (Except for 19/22LS4D*, 42/50PG10**) PCMCIA CARD SLOT 1 Connect the AUDIO/VIDEO jacks ...

Owners Manual
Page 29
... cable) input. 2 Connect the audio outputs of the VCR to the VCR owner's manual.) S-VIDEO 4 Select AV3 input source using the INPUT button on the remote control. VIDEO L/MONO AUDIO R HDMI IN 3 PCMCIA CARD SLOT S-VIDEO VIDEO L R ANT IN OUTPUT SWITCH ANT OUT 1 2 OTHER A/V SOURCE SETUP (Except for... = white, and Audio Right = red) Camcorder Video Game Set PCMCIA CARD SLOT HDMI IN 3 2 Select AV3 input source using the INPUT button on the remote control. VIDEO input on the TV. AV IN 3 VIDEO L/MONO AUDIO R VIDEO L R 1 27 NOTE G If both S-VIDEO and VIDEO sockets have been...
... cable) input. 2 Connect the audio outputs of the VCR to the VCR owner's manual.) S-VIDEO 4 Select AV3 input source using the INPUT button on the remote control. VIDEO L/MONO AUDIO R HDMI IN 3 PCMCIA CARD SLOT S-VIDEO VIDEO L R ANT IN OUTPUT SWITCH ANT OUT 1 2 OTHER A/V SOURCE SETUP (Except for... = white, and Audio Right = red) Camcorder Video Game Set PCMCIA CARD SLOT HDMI IN 3 2 Select AV3 input source using the INPUT button on the remote control. VIDEO input on the TV. AV IN 3 VIDEO L/MONO AUDIO R VIDEO L R 1 27 NOTE G If both S-VIDEO and VIDEO sockets have been...

Owners Manual
Page 30
... the AUDIO IN (RGB/DVI) jack on the TV. 3 Turn on the PC and the TV 4 Select R G B input source using the INPUT button on the remote control. 1 2 28 RGB OUTPUT AUDIO Connecting with a D-sub 15 pin cable RGB (PC) IN AUDIO IN (RGB/DVI) 1 Connect the RGB output of TV as shown...
... the AUDIO IN (RGB/DVI) jack on the TV. 3 Turn on the PC and the TV 4 Select R G B input source using the INPUT button on the remote control. 1 2 28 RGB OUTPUT AUDIO Connecting with a D-sub 15 pin cable RGB (PC) IN AUDIO IN (RGB/DVI) 1 Connect the RGB output of TV as shown...

Owners Manual
Page 31
... adjust the brightness and contrast on the video card if you use too long an RGB-PC cable, there may become permanently imprinted on the remote control. The TV provides EDID data to the PC system with the TV). G DDC protocol is set to the TV. NOTE G To enjoy vivid picture and...
... adjust the brightness and contrast on the video card if you use too long an RGB-PC cable, there may become permanently imprinted on the remote control. The TV provides EDID data to the PC system with the TV). G DDC protocol is set to the TV. NOTE G To enjoy vivid picture and...

Owners Manual
Page 38
WATCHING TV / PROGRAMME CONTROL REMOTE CONTROL KEY FUNCTIONS (Only 19/22LS4D*) When using the remote control, aim it at the remote control sensor on or off to the previously viewed programme. Switches the TV on -screen menus and adjust (Up/Down/Left Right) the system ... a menu. VOLUME UP Adjusts the volume. /DOWN RETURN(EXIT) Allows the user to your selection or displays the current mode. WATCHING TV / PROGRAMME CONTROL POWER TV INPUT D/A TV/RADIO TEXT I /II Selects the sound output. INPUT External input mode rotate in an interactive application, EPG or other user interaction...
WATCHING TV / PROGRAMME CONTROL REMOTE CONTROL KEY FUNCTIONS (Only 19/22LS4D*) When using the remote control, aim it at the remote control sensor on or off to the previously viewed programme. Switches the TV on -screen menus and adjust (Up/Down/Left Right) the system ... a menu. VOLUME UP Adjusts the volume. /DOWN RETURN(EXIT) Allows the user to your selection or displays the current mode. WATCHING TV / PROGRAMME CONTROL POWER TV INPUT D/A TV/RADIO TEXT I /II Selects the sound output. INPUT External input mode rotate in an interactive application, EPG or other user interaction...

Owners Manual
Page 44
... image quality data, "In Store" mode initializes the product to the image quality set by executing Factory Reset in the OPTION menu. WATCHING TV / PROGRAMME CONTROL PROGRAMME SELECTION 1 Press the P (or (PR + - It will automatically disappear after turning on the TV or press the POWER, INPUT, D/A, P (or...." e. or P + -)) or NUMBER buttons to the previous OSD. When your TV is pressed. or P + -)) or NUMBER button on the remote control and the TV will be changed by us after a certain period of time. f. Note: a. You can adjust the Language, Select Mode, Country, Time...
... image quality data, "In Store" mode initializes the product to the image quality set by executing Factory Reset in the OPTION menu. WATCHING TV / PROGRAMME CONTROL PROGRAMME SELECTION 1 Press the P (or (PR + - It will automatically disappear after turning on the TV or press the POWER, INPUT, D/A, P (or...." e. or P + -)) or NUMBER buttons to the previous OSD. When your TV is pressed. or P + -)) or NUMBER button on the remote control and the TV will be changed by us after a certain period of time. f. Note: a. You can adjust the Language, Select Mode, Country, Time...

Owners Manual
Page 58
... with other AV devices connected to the previous menu screen. ! This TV might not function properly when using the INPUT button on the remote control. Please check the SIMPLINK logo. NOTE G Connect the HDMI/DVI IN or HDMI IN terminal of the TV to the rear terminal (...HDMI cable without additional cables and settings. G When operating an external device with SIMPLINK, press the TV button from the MODE buttons on the remote control, you select or operate a media device with the SIMPLINK logo. SIMPLINK function is not supported by SIMPLINK G When you can stop the ...
... with other AV devices connected to the previous menu screen. ! This TV might not function properly when using the INPUT button on the remote control. Please check the SIMPLINK logo. NOTE G Connect the HDMI/DVI IN or HDMI IN terminal of the TV to the rear terminal (...HDMI cable without additional cables and settings. G When operating an external device with SIMPLINK, press the TV button from the MODE buttons on the remote control, you select or operate a media device with the SIMPLINK logo. SIMPLINK function is not supported by SIMPLINK G When you can stop the ...

Owners Manual
Page 88
..." Audio for Audio Language and Subtitle Language are broadcast, you can select language in a simpler form with the SUBTITLE button on the remote control. G Press the button to the previous menu screen. < Audio Language Selection > G When two or more subtitle languages are broadcast,...be displayed. The audio/subtitles can select the subtitle language with 1 to 3 characters broadcast by the service provider. - SOUND & LANGUAGE CONTROL • Press the RETURN button to move to select a subtitle language. When you can be displayed in secondary category. 1MENU Select ...
..." Audio for Audio Language and Subtitle Language are broadcast, you can select language in a simpler form with the SUBTITLE button on the remote control. G Press the button to the previous menu screen. < Audio Language Selection > G When two or more subtitle languages are broadcast,...be displayed. The audio/subtitles can select the subtitle language with 1 to 3 characters broadcast by the service provider. - SOUND & LANGUAGE CONTROL • Press the RETURN button to move to select a subtitle language. When you can be displayed in secondary category. 1MENU Select ...

Owners Manual
Page 93
.... 91 Re-enter new password for confirm. • If you forget your password, press '7', '7', '7', '7' on the remote control handset. PARENTAL CONTROL / RATINGS LOCK Move OK LLoocckkSSyysstetemm : Off Set Password Block Programme Parental Guidance : Off LOCK Move OK LLoocckkSSyysstetemm Set Password .... 4 OK OK Set the password. 5 123 456 789 0 Input a 4-digit password. PARENTAL CONTROL / RATINGS SET PASSWORD & LOCK SYSTEM Enter the password, press '0', '0', '0', '0' on the remote control handset. • Press the MENU button to return to normal TV viewing. • Press the ...
.... 91 Re-enter new password for confirm. • If you forget your password, press '7', '7', '7', '7' on the remote control handset. PARENTAL CONTROL / RATINGS LOCK Move OK LLoocckkSSyysstetemm : Off Set Password Block Programme Parental Guidance : Off LOCK Move OK LLoocckkSSyysstetemm Set Password .... 4 OK OK Set the password. 5 123 456 789 0 Input a 4-digit password. PARENTAL CONTROL / RATINGS SET PASSWORD & LOCK SYSTEM Enter the password, press '0', '0', '0', '0' on the remote control handset. • Press the MENU button to return to normal TV viewing. • Press the ...

Owners Manual
Page 96
... KEY LOCK The TV can be set so that the remote control is pressed while viewing the TV. This feature can be used to control it. OPTION Move OK Menu Language : English Audio Language : English Subtitle Language : English Hard of Hearing( ) Off Country :UK Input Label SIMPLINK : On ...KKeeyyLLoocckk : Off E 1MENU Select OPTION. 2 OK Select Key Lock. 3 OK Select On or Off. 4 OK Save. or P + -)) or NUMBER buttons on the remote control. • With the Key Lock On, the display ' Key Lock On ' appears on the screen if any button on the TV or POWER, INPUT, D/A TV...
... KEY LOCK The TV can be set so that the remote control is pressed while viewing the TV. This feature can be used to control it. OPTION Move OK Menu Language : English Audio Language : English Subtitle Language : English Hard of Hearing( ) Off Country :UK Input Label SIMPLINK : On ...KKeeyyLLoocckk : Off E 1MENU Select OPTION. 2 OK Select Key Lock. 3 OK Select On or Off. 4 OK Save. or P + -)) or NUMBER buttons on the remote control. • With the Key Lock On, the display ' Key Lock On ' appears on the screen if any button on the TV or POWER, INPUT, D/A TV...

