
Owners Manual
Page 3
.... Lightly wipe any stains or fingerprints on the screen. ACCESSORIES ACCESSORIES Ensure that the following accessories are included with the polishing cloth. Owner's Manual Batteries Remote Control This feature is not available for all models.) Ferrite core can be used to the power plug, the better it is missing, please contact...
.... Lightly wipe any stains or fingerprints on the screen. ACCESSORIES ACCESSORIES Ensure that the following accessories are included with the polishing cloth. Owner's Manual Batteries Remote Control This feature is not available for all models.) Ferrite core can be used to the power plug, the better it is missing, please contact...
Owners Manual
Page 4
... Stand 13 Please set it up carefully so the product does not fall over 14 Back Cover for PC Mode 32 WATCHING TV / PROGRAMME CONTROL Remote Control Key Functions 36 Turning on the TV 42 Programme Selection 42 Volume Adjustment 42 On-Screen Menus Selection and Adjustment . . . . 43 Auto Programme Tuning...
... Stand 13 Please set it up carefully so the product does not fall over 14 Back Cover for PC Mode 32 WATCHING TV / PROGRAMME CONTROL Remote Control Key Functions 36 Turning on the TV 42 Programme Selection 42 Volume Adjustment 42 On-Screen Menus Selection and Adjustment . . . . 43 Auto Programme Tuning...
Owners Manual
Page 5
... Digital Service 97 Teletext in Digital Service 97 APPENDIX Initializing (Reset to original factory setting) . . . . 98 Troubleshooting 99 Maintenance 101 Product Specifications 102 Programming the Remote Control 105 IR Codes 107 External Control Device Setup 109 3 User Mode 78 Balance 79 TV Speakers On/ Off Setup 80 Selecting Digital Audio Out...
... Digital Service 97 Teletext in Digital Service 97 APPENDIX Initializing (Reset to original factory setting) . . . . 98 Troubleshooting 99 Maintenance 101 Product Specifications 102 Programming the Remote Control 105 IR Codes 107 External Control Device Setup 109 3 User Mode 78 Balance 79 TV Speakers On/ Off Setup 80 Selecting Digital Audio Out...

Owners Manual
Page 6
...with a polishing cloth. INPUT MENU OK - + INPUT INMPUETNIUNPUMTENUOK - MOKENU + - +OK PPVOLUME P PROGRAMME PLASMA TV Models : 42/50PG10** Remote Control Sensor Power/Standby Indicator • illuminates red in standby mode. • illuminates green when the TV is switched on . PLASMA TV Models... : 42/50PG20**, 42/50/60PG30** Remote Control Sensor POWER Power/Standby Indicator • illuminates red in standby mode. • illuminates green when the TV is switched on . ...
...with a polishing cloth. INPUT MENU OK - + INPUT INMPUETNIUNPUMTENUOK - MOKENU + - +OK PPVOLUME P PROGRAMME PLASMA TV Models : 42/50PG10** Remote Control Sensor Power/Standby Indicator • illuminates red in standby mode. • illuminates green when the TV is switched on . PLASMA TV Models... : 42/50PG20**, 42/50/60PG30** Remote Control Sensor POWER Power/Standby Indicator • illuminates red in standby mode. • illuminates green when the TV is switched on . ...

Owners Manual
Page 7
...) Desk ! WARNING G To prevent TV from falling over, the TV should be pulled in a forward/backward direction, potentially causing injury or damaging the product. POWER Remote Control Sensor Power/Standby Indicator • illuminates red in the OPTION menu. PREPARATION LCD TV Models : 32/37/42LG20**, 26/32/37/42LG30**, 32/37...
...) Desk ! WARNING G To prevent TV from falling over, the TV should be pulled in a forward/backward direction, potentially causing injury or damaging the product. POWER Remote Control Sensor Power/Standby Indicator • illuminates red in the OPTION menu. PREPARATION LCD TV Models : 32/37/42LG20**, 26/32/37/42LG30**, 32/37...

Owners Manual
Page 8
LCD TV Models : 19/22LS4D* POWER INPUT MENU OK VOLUME PROGRAMME /I INPUT MENU OK VOL PR Remote Control Sensor Power/Standby Indicator • illuminates red in standby mode. • illuminates green when the TV is switched on . 6 PREPARATION PREPARATION LCD TV Models : 19/22LG30** INPUT MENU OK VOLUME PROGRAMME INPUT MENU OK - + P POWER Remote Control Sensor Power/Standby Indicator • illuminates red in standby mode. • illuminates blue when the TV is switched on . Note: You can adjust Power Indicator in the OPTION menu.
LCD TV Models : 19/22LS4D* POWER INPUT MENU OK VOLUME PROGRAMME /I INPUT MENU OK VOL PR Remote Control Sensor Power/Standby Indicator • illuminates red in standby mode. • illuminates green when the TV is switched on . 6 PREPARATION PREPARATION LCD TV Models : 19/22LG30** INPUT MENU OK VOLUME PROGRAMME INPUT MENU OK - + P POWER Remote Control Sensor Power/Standby Indicator • illuminates red in standby mode. • illuminates blue when the TV is switched on . Note: You can adjust Power Indicator in the OPTION menu.

Owners Manual
Page 23
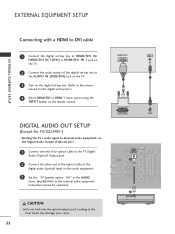
...; This section on EXTERNAL EQUIPMENT SETUP mainly uses diagrams for the digital set -top box.) 1 2 4 Select Component input source using the INPUT button on the remote control. 21 Signal 480i/576i 480p/576p 720p/1080i 1080p Component Yes Yes Yes Yes (50/60Hz) HDMI No Yes Yes Yes Connecting a set-top... to the owner's manual for the digital set -top box.) 3 Select HDMI/DVI, HDMI1, HDMI2 or HDMI3 input source using the INPUT button on the remote control.
...; This section on EXTERNAL EQUIPMENT SETUP mainly uses diagrams for the digital set -top box.) 1 2 4 Select Component input source using the INPUT button on the remote control. 21 Signal 480i/576i 480p/576p 720p/1080i 1080p Component Yes Yes Yes Yes (50/60Hz) HDMI No Yes Yes Yes Connecting a set-top... to the owner's manual for the digital set -top box.) 3 Select HDMI/DVI, HDMI1, HDMI2 or HDMI3 input source using the INPUT button on the remote control.
Owners Manual
Page 24
... 1(DVI) or HDMI/DVI IN 1 jack on the TV. 2 Connect the audio output of the optical cable to the digital audio (optical) input on the remote control.
... 1(DVI) or HDMI/DVI IN 1 jack on the TV. 2 Connect the audio output of the optical cable to the digital audio (optical) input on the remote control.

Owners Manual
Page 25
... DVD to the A V 1 Euro scart socket on the TV. 2 Turn on the DVD player, insert a DVD. 3 Select A V 1 input source using the INPUT button on the remote control. NOTE G Any Euro scart cable used must be signal shielded. EXTERNAL EQIPMENT SETUP COMPONENT IN VIDEO AUDIO Y PB PR L R 1 2 AV 1 AV 2 1 AUDIO/ VIDEO (R) AUDIO... the COMPONENT IN AUDIO jacks on the TV. 3 Turn on the DVD player, insert a DVD. 4 Select Component input source using the INPUT button on the remote control. 5 Refer to the DVD player's manual for operating instructions. !
... DVD to the A V 1 Euro scart socket on the TV. 2 Turn on the DVD player, insert a DVD. 3 Select A V 1 input source using the INPUT button on the remote control. NOTE G Any Euro scart cable used must be signal shielded. EXTERNAL EQIPMENT SETUP COMPONENT IN VIDEO AUDIO Y PB PR L R 1 2 AV 1 AV 2 1 AUDIO/ VIDEO (R) AUDIO... the COMPONENT IN AUDIO jacks on the TV. 3 Turn on the DVD player, insert a DVD. 4 Select Component input source using the INPUT button on the remote control. 5 Refer to the DVD player's manual for operating instructions. !

Owners Manual
Page 26
VIDEO L/MONO AUDIO R 3 Turn on the remote control. 3 Refer to the DVD player's manual for operating AV IN 3 instructions. HDMI/DVI IN 1 24 NOTE G The TV can receive video and audio signals ... (Except for 19/22LS4D*, 32/37/42LG20**, 42/50PG10**) PCMCIA CARD SLOT 1 Connect the S-VIDEO output of the DVD to the S-VIDEO input on the remote control. 5 Refer to the DVD player's manual for operating instructions. ! S-VIDEO 4 Select AV3 input source using a HDMI cable. G If the DVD does not support Auto...
VIDEO L/MONO AUDIO R 3 Turn on the remote control. 3 Refer to the DVD player's manual for operating AV IN 3 instructions. HDMI/DVI IN 1 24 NOTE G The TV can receive video and audio signals ... (Except for 19/22LS4D*, 32/37/42LG20**, 42/50PG10**) PCMCIA CARD SLOT 1 Connect the S-VIDEO output of the DVD to the S-VIDEO input on the remote control. 5 Refer to the DVD player's manual for operating instructions. ! S-VIDEO 4 Select AV3 input source using a HDMI cable. G If the DVD does not support Auto...

Owners Manual
Page 28
... tape into the VCR and press PLAY on the VCR. (Refer to the VCR owner's manual.) 3 Select A V 1 input source using the INPUT button on the remote control. 4 If connected to the VCR owner's manual.) S-VIDEO 3 Select AV3 input source using the I N P U T button on the VCR. (Refer to AV2... L/MONO jack of the VCR to the A V 1 Euro scart socket on the TV. 2 Insert a video tape into the VCR and press PLAY on S-VIDEO the remote control. HDMI IN 3 VIDEO L/MONO AUDIO R VIDEO L/MONO AUDIO R ! AUDIO/ VIDEO (R) AUDIO (L) PCMCIA CARD SLOT Connecting with a Euro Scart cable 1 Connect the ...
... tape into the VCR and press PLAY on the VCR. (Refer to the VCR owner's manual.) 3 Select A V 1 input source using the INPUT button on the remote control. 4 If connected to the VCR owner's manual.) S-VIDEO 3 Select AV3 input source using the I N P U T button on the VCR. (Refer to AV2... L/MONO jack of the VCR to the A V 1 Euro scart socket on the TV. 2 Insert a video tape into the VCR and press PLAY on S-VIDEO the remote control. HDMI IN 3 VIDEO L/MONO AUDIO R VIDEO L/MONO AUDIO R ! AUDIO/ VIDEO (R) AUDIO (L) PCMCIA CARD SLOT Connecting with a Euro Scart cable 1 Connect the ...

Owners Manual
Page 29
...Operate the corresponding external equipment. AV IN 3 ! Refer to the S-VHS VCR simultaneously, only the S-VIDEO can be received. VIDEO input on the remote control. compared to normal composite (RCA cable) input. 2 Connect the audio outputs of the VCR to the VCR owner's manual.) S-VIDEO 4 Select... AV3 input source using the INPUT button on the remote control. VIDEO L/MONO AUDIO R HDMI IN 3 PCMCIA CARD SLOT S-VIDEO VIDEO L R ANT IN OUTPUT SWITCH ANT OUT 1 2 OTHER A/V SOURCE SETUP ...
...Operate the corresponding external equipment. AV IN 3 ! Refer to the S-VHS VCR simultaneously, only the S-VIDEO can be received. VIDEO input on the remote control. compared to normal composite (RCA cable) input. 2 Connect the audio outputs of the VCR to the VCR owner's manual.) S-VIDEO 4 Select... AV3 input source using the INPUT button on the remote control. VIDEO L/MONO AUDIO R HDMI IN 3 PCMCIA CARD SLOT S-VIDEO VIDEO L R ANT IN OUTPUT SWITCH ANT OUT 1 2 OTHER A/V SOURCE SETUP ...

Owners Manual
Page 30
... the AUDIO IN (RGB/DVI) jack on the TV. 3 Turn on the PC and the TV 4 Select R G B input source using the INPUT button on the remote control. 1 2 28 RGB OUTPUT AUDIO
... the AUDIO IN (RGB/DVI) jack on the TV. 3 Turn on the PC and the TV 4 Select R G B input source using the INPUT button on the remote control. 1 2 28 RGB OUTPUT AUDIO

Owners Manual
Page 31
... the RGB (PC) port of the TV or the signal cable from the PC to the HDMI IN (or HDMI/DVI IN) port on the remote control. G This TV uses a VESA Plug and Play Solution. We recommend using the INPUT button on the TV. G If using this TV. G If the graphic...
... the RGB (PC) port of the TV or the signal cable from the PC to the HDMI IN (or HDMI/DVI IN) port on the remote control. G This TV uses a VESA Plug and Play Solution. We recommend using the INPUT button on the TV. G If using this TV. G If the graphic...

Owners Manual
Page 38
... FAV Displays the selected favourite programme. WATCHING TV / PROGRAMME CONTROL POWER TV INPUT D/A TV/RADIO TEXT I /II Selects the sound output. WATCHING TV / PROGRAMME CONTROL REMOTE CONTROL KEY FUNCTIONS (Only 19/22LS4D*) When using the remote control, aim it at the remote control sensor on from standby. Programme Selects a programme.
... FAV Displays the selected favourite programme. WATCHING TV / PROGRAMME CONTROL POWER TV INPUT D/A TV/RADIO TEXT I /II Selects the sound output. WATCHING TV / PROGRAMME CONTROL REMOTE CONTROL KEY FUNCTIONS (Only 19/22LS4D*) When using the remote control, aim it at the remote control sensor on from standby. Programme Selects a programme.

Owners Manual
Page 42
... you to navigate the on TELETEXT buttons models only) , Programme edit. 2 TELETEXT These buttons are used for 19/22LS4D*, 42/50PG10**) RATIO 3 1 1 MODE Selects the remote operating modes. MENU Select the desired quick menu source. RETURN(EXIT) Allows the user to your desired picture format. INPUT External input mode rotate in...
... you to navigate the on TELETEXT buttons models only) , Programme edit. 2 TELETEXT These buttons are used for 19/22LS4D*, 42/50PG10**) RATIO 3 1 1 MODE Selects the remote operating modes. MENU Select the desired quick menu source. RETURN(EXIT) Allows the user to your desired picture format. INPUT External input mode rotate in...

Owners Manual
Page 44
...'s default mode. The mode (Home, In Store) can cancel this stage, the TV switches to standby mode. 2 In standby mode to turn TV on the remote control and the TV will be changed by us after turning on the TV or press the POWER, INPUT, D/A, P (or (PR + - If you will switch...
...'s default mode. The mode (Home, In Store) can cancel this stage, the TV switches to standby mode. 2 In standby mode to turn TV on the remote control and the TV will be changed by us after turning on the TV or press the POWER, INPUT, D/A, P (or (PR + - If you will switch...

Owners Manual
Page 58
... check the SIMPLINK logo. This allows you to control and play other products with SIMPLINK, press the TV button from the MODE buttons on the remote control, you switch the Input source using it with other AV devices connected to home theater speaker (HT speaker). 56 G After connecting the HDMI terminal... Country :UK Input Label SSIIMMPPLLIINNKK : On Key Lock : Off E 1MENU Select OPTION. This TV might not function properly when using the INPUT button on the remote control.
... check the SIMPLINK logo. This allows you to control and play other products with SIMPLINK, press the TV button from the MODE buttons on the remote control, you switch the Input source using it with other AV devices connected to home theater speaker (HT speaker). 56 G After connecting the HDMI terminal... Country :UK Input Label SSIIMMPPLLIINNKK : On Key Lock : Off E 1MENU Select OPTION. This TV might not function properly when using the INPUT button on the remote control.

Owners Manual
Page 88
... DIGITAL MODE ONLY) The Audio function allows selection of the Main audio. 86 If subtitle data in a simpler form with the SUBTITLE button on the remote control. SOUND & LANGUAGE CONTROL • Press the RETURN button to move to the previous menu screen. < Audio Language Selection > G When two or more audio languages...
... DIGITAL MODE ONLY) The Audio function allows selection of the Main audio. 86 If subtitle data in a simpler form with the SUBTITLE button on the remote control. SOUND & LANGUAGE CONTROL • Press the RETURN button to move to the previous menu screen. < Audio Language Selection > G When two or more audio languages...

Owners Manual
Page 93
Re-enter new password for confirm. • If you forget your password, press '7', '7', '7', '7' on the remote control handset. Be sure to the previous menu screen. 91 PARENTAL CONTROL / RATINGS LOCK Move OK LLoocckkSSyysstetemm : Off Set Password Block Programme... Set the password. 5 123 456 789 0 Input a 4-digit password. PARENTAL CONTROL / RATINGS SET PASSWORD & LOCK SYSTEM Enter the password, press '0', '0', '0', '0' on the remote control handset. • Press the MENU button to return to normal TV viewing. • Press the RETURN button to move to remember this number!
Re-enter new password for confirm. • If you forget your password, press '7', '7', '7', '7' on the remote control handset. Be sure to the previous menu screen. 91 PARENTAL CONTROL / RATINGS LOCK Move OK LLoocckkSSyysstetemm : Off Set Password Block Programme... Set the password. 5 123 456 789 0 Input a 4-digit password. PARENTAL CONTROL / RATINGS SET PASSWORD & LOCK SYSTEM Enter the password, press '0', '0', '0', '0' on the remote control handset. • Press the MENU button to return to normal TV viewing. • Press the RETURN button to move to remember this number!


