Owners Manual
Page 5
... Speakers On/ Off Setup 80 Selecting Digital Audio Out 81 Audio Reset 82 I/II - CONTENTS SOUND & LANGUAGE CONTROL Auto Volume Leveler 76 Preset Sound Settings - Sound Mode 77 Sound Setting Adjustment - NICAM Reception (In Analogue Mode Only 84 - Speaker Sound Output Selection 84 On-Screen Menu Language/Country Selection 85 Language selection (In Digital Mode...
... Speakers On/ Off Setup 80 Selecting Digital Audio Out 81 Audio Reset 82 I/II - CONTENTS SOUND & LANGUAGE CONTROL Auto Volume Leveler 76 Preset Sound Settings - Sound Mode 77 Sound Setting Adjustment - NICAM Reception (In Analogue Mode Only 84 - Speaker Sound Output Selection 84 On-Screen Menu Language/Country Selection 85 Language selection (In Digital Mode...

Owners Manual
Page 12
... on a cushioned surface to protect the screen from abrasion of the tightening part of the TV. Insert the STAND BODY into a COVER BASE until clicking sound. 3 Assemble the TV as shown. PREPARATION 2 Assemble the parts of the Stand Body with COVER BASE of the bolt. 1 Carefully place the TV screen side...
... on a cushioned surface to protect the screen from abrasion of the tightening part of the TV. Insert the STAND BODY into a COVER BASE until clicking sound. 3 Assemble the TV as shown. PREPARATION 2 Assemble the parts of the Stand Body with COVER BASE of the bolt. 1 Carefully place the TV screen side...

Owners Manual
Page 14
... it upward. PREPARATION PREPARATION STAND INSTALLATION (Only 19/22LS4D*) ■ Image shown may differ from damage. 3 Insert the Stand Body into the TV until clicking sound.
... it upward. PREPARATION PREPARATION STAND INSTALLATION (Only 19/22LS4D*) ■ Image shown may differ from damage. 3 Insert the Stand Body into the TV until clicking sound.

Owners Manual
Page 21
... the wall-mounted unit, use a wall mounting bracket of 4" (10cm) all around the TV. Insert the PROTECTION COVER into the TV until clicking sound. < PLASMA TV > < LCD TV > 19 Power Supply Circuit breaker DESKTOP PEDESTAL INSTALLATION For adequate ventilation allow a clearance of 4" (10cm) all... around the TV. 4 inches 4 inches R 4 inches 4 inches WALL MOUNT: HORIZONTAL INSTALLATION For adequate ventilation allow a clearance of LG brand when mounting the TV to prevent possible electric shock. We recommend that you use the protection cover for 19/22LS4D*) ■ Image shown...
... the wall-mounted unit, use a wall mounting bracket of 4" (10cm) all around the TV. Insert the PROTECTION COVER into the TV until clicking sound. < PLASMA TV > < LCD TV > 19 Power Supply Circuit breaker DESKTOP PEDESTAL INSTALLATION For adequate ventilation allow a clearance of 4" (10cm) all... around the TV. 4 inches 4 inches R 4 inches 4 inches WALL MOUNT: HORIZONTAL INSTALLATION For adequate ventilation allow a clearance of LG brand when mounting the TV to prevent possible electric shock. We recommend that you use the protection cover for 19/22LS4D*) ■ Image shown...

Owners Manual
Page 31
... too long an RGB-PC cable, there may become permanently imprinted on the screen; G If using this TV. The PC adjusts automatically when using a sound card, adjust PC sound as required. G If required, adjust the settings for RGB (Analog RGB), HDMI (Digital RGB) mode. We recommend using the INPUT button on the... be interference on the PC does not output analogue and digital RGB simultaneously, connect only one of the TV; NOTE G To enjoy vivid picture and sound, connect a PC to the RGB (PC) or HDMI IN (or HDMI/DVI IN) port of either RGB or HDMI; (the other mode is preset ...
... too long an RGB-PC cable, there may become permanently imprinted on the screen; G If using this TV. The PC adjusts automatically when using a sound card, adjust PC sound as required. G If required, adjust the settings for RGB (Analog RGB), HDMI (Digital RGB) mode. We recommend using the INPUT button on the... be interference on the PC does not output analogue and digital RGB simultaneously, connect only one of the TV; NOTE G To enjoy vivid picture and sound, connect a PC to the RGB (PC) or HDMI IN (or HDMI/DVI IN) port of either RGB or HDMI; (the other mode is preset ...

Owners Manual
Page 38
...helps you to navigate the on the TV. D/A INPUT Selects digital or analogue mode. THUMBSTICK Allows you select and set images and sounds when connecting AV devices. button Selects numbered items in an interactive application, EPG or other user interaction function. * No function FAV ... Right) the system settings to your selection or displays the current mode. WATCHING TV / PROGRAMME CONTROL POWER TV INPUT D/A TV/RADIO TEXT I /II Selects the sound output. I /II MUTE 1 4 7 LIST MENU 2 3 5 6 8 9 0 Q.VIEW AV MODE OK INFO i GUIDE EXIT RETURN VOL * PR FAV ...
...helps you to navigate the on the TV. D/A INPUT Selects digital or analogue mode. THUMBSTICK Allows you select and set images and sounds when connecting AV devices. button Selects numbered items in an interactive application, EPG or other user interaction function. * No function FAV ... Right) the system settings to your selection or displays the current mode. WATCHING TV / PROGRAMME CONTROL POWER TV INPUT D/A TV/RADIO TEXT I /II Selects the sound output. I /II MUTE 1 4 7 LIST MENU 2 3 5 6 8 9 0 Q.VIEW AV MODE OK INFO i GUIDE EXIT RETURN VOL * PR FAV ...

Owners Manual
Page 40
... desired quick menu source. AV MODE It helps you to move back one step in regular sequence. THUMBSTICK Allows you select and set images and sounds when connecting AV devices. 0~9 number Selects a programme. INPUT External input mode rotate in an interactive application, EPG or other user interaction function. LIST Displays the...
... desired quick menu source. AV MODE It helps you to move back one step in regular sequence. THUMBSTICK Allows you select and set images and sounds when connecting AV devices. 0~9 number Selects a programme. INPUT External input mode rotate in an interactive application, EPG or other user interaction function. LIST Displays the...

Owners Manual
Page 41
... Q.MENU OK RETURN EXIT MARK FAV *MUTE RATIO P VOLUME UP Adjusts the volume. /DOWN FAV Displays the selected favourite programme. * No function MUTE Switches the sound on the back and install the batteries matching correct polarity (+with +,-with new ones. ■ Close cover. 39
... Q.MENU OK RETURN EXIT MARK FAV *MUTE RATIO P VOLUME UP Adjusts the volume. /DOWN FAV Displays the selected favourite programme. * No function MUTE Switches the sound on the back and install the batteries matching correct polarity (+with +,-with new ones. ■ Close cover. 39

Owners Manual
Page 42
.... Coloured These buttons are used for 19/22LS4D*, 42/50PG10**) RATIO 3 1 1 MODE Selects the remote operating modes. THUMBSTICK Allows you select and set images and sounds when connecting AV devices. SUBTITLE Recalls your preference. When you toggle this button, the Simplink menu appears at the screen. 2 40 RATIO Selects your selection...
.... Coloured These buttons are used for 19/22LS4D*, 42/50PG10**) RATIO 3 1 1 MODE Selects the remote operating modes. THUMBSTICK Allows you select and set images and sounds when connecting AV devices. SUBTITLE Recalls your preference. When you toggle this button, the Simplink menu appears at the screen. 2 40 RATIO Selects your selection...

Owners Manual
Page 43
... FAV Displays the selected favourite programme. SIMPLINK Controls simplink. control buttons Installing Batteries ■ Open the battery compartment cover on or off. MUTE Switches the sound on the back and install the batteries matching correct polarity (+with +,-with new ones. ■ Close cover. 41
... FAV Displays the selected favourite programme. SIMPLINK Controls simplink. control buttons Installing Batteries ■ Open the battery compartment cover on or off. MUTE Switches the sound on the back and install the batteries matching correct polarity (+with +,-with new ones. ■ Close cover. 41

Owners Manual
Page 44
... after approx. 40 seconds unless a button is turned on the TV or press the POWER, INPUT, D/A, P (or (PR + - or P + -)) or NUMBER buttons to switch the sound off, press the MUTE button. WATCHING TV / PROGRAMME CONTROL TURNING ON THE TV -
... after approx. 40 seconds unless a button is turned on the TV or press the POWER, INPUT, D/A, P (or (PR + - or P + -)) or NUMBER buttons to switch the sound off, press the MUTE button. WATCHING TV / PROGRAMME CONTROL TURNING ON THE TV -

Owners Manual
Page 45
...; Brightness • Sharpness • Colour • Tint E Move OK 100 100 50 70 70 0R G SETUP PICTURE AUDIO TIME OPTION LOCK AUDIO Auto Volume Balance Sound Mode : Off : Standard • 120Hz • 200Hz • 500Hz • 1.2KHz • 3KHz E Move OK 0L R 0- + 0- + 0- + 0- + 0- + TIME Move OK Clock Off Time : Off On Time...
...; Brightness • Sharpness • Colour • Tint E Move OK 100 100 50 70 70 0R G SETUP PICTURE AUDIO TIME OPTION LOCK AUDIO Auto Volume Balance Sound Mode : Off : Standard • 120Hz • 200Hz • 500Hz • 1.2KHz • 3KHz E Move OK 0L R 0- + 0- + 0- + 0- + 0- + TIME Move OK Clock Off Time : Off On Time...

Owners Manual
Page 49
... five characters to each programme number. 1MENU 2 OK 3 OK 4 Select SETUP. Select TV. Select Manual Tuning. Select Fine. Fine tune for the best picture and sound. OK Select Store. • Press the MENU button to return to normal TV viewing. • Press the RETURN button to move to the previous menu...
... five characters to each programme number. 1MENU 2 OK 3 OK 4 Select SETUP. Select TV. Select Manual Tuning. Select Fine. Fine tune for the best picture and sound. OK Select Store. • Press the MENU button to return to normal TV viewing. • Press the RETURN button to move to the previous menu...

Owners Manual
Page 56
... is only for illustration and the menu options and screen format will vary according to the previous menu screen. 54 This may not have any sound output. If you remove the CI Module, you cannot watch some encrypted services (pay services provider. • It is inserted into the CI slot, you...
... is only for illustration and the menu options and screen format will vary according to the previous menu screen. 54 This may not have any sound output. If you remove the CI Module, you cannot watch some encrypted services (pay services provider. • It is inserted into the CI slot, you...

Owners Manual
Page 61
Off Game 1 AV MODE Select the desired source. 2 OK Cinema Sport • If you select Cinema Mode in AV mode, Cinema mode will be selected both for Picture Mode and Sound Mode in PICTURE menu and AUDIO menu respectively. • If you select "Off " in AV mode, the picture and image which you initially set will be selected. 59 WATCHING TV / PROGRAMME CONTROL AV MODE You can select the optimal images and sounds when connecting AV devices to external input.
Off Game 1 AV MODE Select the desired source. 2 OK Cinema Sport • If you select Cinema Mode in AV mode, Cinema mode will be selected both for Picture Mode and Sound Mode in PICTURE menu and AUDIO menu respectively. • If you select "Off " in AV mode, the picture and image which you initially set will be selected. 59 WATCHING TV / PROGRAMME CONTROL AV MODE You can select the optimal images and sounds when connecting AV devices to external input.

Owners Manual
Page 78
...; 3KHz E Move OK 0L R 0- + 0- + 0- + 0- + 0- + 1MENU Select AUDIO. 2 OK Select Auto Volume. 3 OK Select On or Off. SOUND & LANGUAGE CONTROL G In 19/22LS4D* Models, TV Speaker will not be displayed. AUDIO AAuuttooVVoolulummee : O: fOf ff Balance Sound Mode : Standard • 120Hz • 200Hz • 500Hz • 1.2KHz • 3KHz E Move OK OOfff 0 LOn R 0- + 0- + 0- + 0- + 0- + •...
...; 3KHz E Move OK 0L R 0- + 0- + 0- + 0- + 0- + 1MENU Select AUDIO. 2 OK Select Auto Volume. 3 OK Select On or Off. SOUND & LANGUAGE CONTROL G In 19/22LS4D* Models, TV Speaker will not be displayed. AUDIO AAuuttooVVoolulummee : O: fOf ff Balance Sound Mode : Standard • 120Hz • 200Hz • 500Hz • 1.2KHz • 3KHz E Move OK OOfff 0 LOn R 0- + 0- + 0- + 0- + 0- + •...
Owners Manual
Page 79
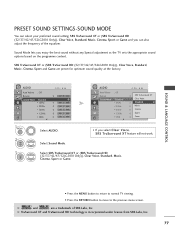
...8226; 120Hz • 200Hz • 500Hz • 1.2KHz • 3KHz E Move OK 0L R 0- + 0- + 0- + 0- + 0- + 1MENU Select AUDIO. 2 OK Select Sound Mode. AUDIO Auto Volume Balance SSoouunnddMMooddee : Off : : SSttaannddaarrd • 120Hz • 200Hz • 500Hz • 1.2KHz • 3KHz E Move OK 0 SRS TruSurround XT Clear Voice...to normal TV viewing. • Press the RETURN button to move to the previous menu screen. SOUND & LANGUAGE CONTROL PRESET SOUND SETTINGS-SOUND MODE You can also adjust the frequency of SRS Labs, Inc. G and are preset for optimum...
...8226; 120Hz • 200Hz • 500Hz • 1.2KHz • 3KHz E Move OK 0L R 0- + 0- + 0- + 0- + 0- + 1MENU Select AUDIO. 2 OK Select Sound Mode. AUDIO Auto Volume Balance SSoouunnddMMooddee : Off : : SSttaannddaarrd • 120Hz • 200Hz • 500Hz • 1.2KHz • 3KHz E Move OK 0 SRS TruSurround XT Clear Voice...to normal TV viewing. • Press the RETURN button to move to the previous menu screen. SOUND & LANGUAGE CONTROL PRESET SOUND SETTINGS-SOUND MODE You can also adjust the frequency of SRS Labs, Inc. G and are preset for optimum...

Owners Manual
Page 80
...• 500Hz 0 • 1.2KHz 0 • 3KHz 0 E SRS TruSurround XT Clear Voice LSSttaannddaardrd (URser) Music Cinema Sport Game 1MENU Select AUDIO. 2 OK Select Sound Mode. 3 OK 4 OK Select SRS TruSurround XT or (SRS TruSurround HD (32/37/42/47/52LG5010 Only)), Clear Voice, Standard, Music, Cinema, Sport or Game.... Select a frequency band. 5 OK Set the desired sound level. • Press the MENU button to return to normal TV viewing. • Press the RETURN button to move to the previous menu ...
...• 500Hz 0 • 1.2KHz 0 • 3KHz 0 E SRS TruSurround XT Clear Voice LSSttaannddaardrd (URser) Music Cinema Sport Game 1MENU Select AUDIO. 2 OK Select Sound Mode. 3 OK 4 OK Select SRS TruSurround XT or (SRS TruSurround HD (32/37/42/47/52LG5010 Only)), Clear Voice, Standard, Music, Cinema, Sport or Game.... Select a frequency band. 5 OK Set the desired sound level. • Press the MENU button to return to normal TV viewing. • Press the RETURN button to move to the previous menu ...

Owners Manual
Page 81
...AUDIO Move OK Auto Volume : Off BBaallaannccee • Bala0nce 0 F L RG Sound Mode : Standard Close • 120Hz 0 • 200Hz 0- + • 500Hz 0- + • 1.2KHz 0- + • 3KHz 0- + E SOUND & LANGUAGE CONTROL • Press the MENU button to return to normal TV ...viewing. • Press the RETURN button to move to preferred levels. AUDIO Auto Volume BBaallaannccee Sound Mode : Off : Standard • 120Hz • 200Hz • 500Hz • 1.2KHz • 3KHz E Move OK 0L R 0- + 0- + 0- + ...
...AUDIO Move OK Auto Volume : Off BBaallaannccee • Bala0nce 0 F L RG Sound Mode : Standard Close • 120Hz 0 • 200Hz 0- + • 500Hz 0- + • 1.2KHz 0- + • 3KHz 0- + E SOUND & LANGUAGE CONTROL • Press the MENU button to return to normal TV ...viewing. • Press the RETURN button to move to preferred levels. AUDIO Auto Volume BBaallaannccee Sound Mode : Off : Standard • 120Hz • 200Hz • 500Hz • 1.2KHz • 3KHz E Move OK 0L R 0- + 0- + 0- + ...

Owners Manual
Page 82
OK + + + + + 1MENU Select AUDIO. 2 OK 3 OK Select TV Speaker. OK + + + + + OOfff On SOUND & LANGUAGE CONTROL • Press the MENU button to return to normal TV viewing. • Press the RETURN button to move to use an external Hi-... and HDMI1 with HDMI to DVI cable, the TV speaker can adjust the internal speaker status. If you wish to the previous menu screen. 80 SOUND & LANGUAGE CONTROL TV SPEAKERS ON/ OFF SETUP (Except for 19/22LS4D*) You can be operational even when there is no video signal.
OK + + + + + 1MENU Select AUDIO. 2 OK 3 OK Select TV Speaker. OK + + + + + OOfff On SOUND & LANGUAGE CONTROL • Press the MENU button to return to normal TV viewing. • Press the RETURN button to move to use an external Hi-... and HDMI1 with HDMI to DVI cable, the TV speaker can adjust the internal speaker status. If you wish to the previous menu screen. 80 SOUND & LANGUAGE CONTROL TV SPEAKERS ON/ OFF SETUP (Except for 19/22LS4D*) You can be operational even when there is no video signal.


