Use and Care Guide
Page 3
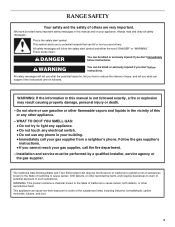
...cancer, birth defects, or other flammable vapors and liquids in this or any phone in this manual and on your gas supplier, call your gas supplier from a neighbor's phone. RANGE SAFETY Your safety and the safety of others . All safety messages will follow instructions. Do not store or use... the chance of this manual is the safety alert symbol. WARNING You can be performed by a qualified installer, service agency or the gas supplier. All safety messages will tell you what can kill or hurt you don't immediately follow the safety alert symbol and either the word...
...cancer, birth defects, or other flammable vapors and liquids in this or any phone in this manual and on your gas supplier, call your gas supplier from a neighbor's phone. RANGE SAFETY Your safety and the safety of others . All safety messages will follow instructions. Do not store or use... the chance of this manual is the safety alert symbol. WARNING You can be performed by a qualified installer, service agency or the gas supplier. All safety messages will tell you what can kill or hurt you don't immediately follow the safety alert symbol and either the word...
Use and Care Guide
Page 4
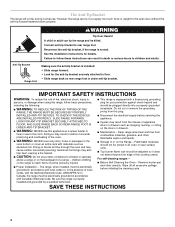
... doors or drawers. Remove broiler pan and other flammable vapors and liquids. s This range is installed: • Slide range forward. • Look for the anti-tip bracket securely attached to rear range foot. s Top burner flame size should not be adjusted so it does not extend...TO CHECK IF THE DEVICES ARE INSTALLED PROPERLY, SLIDE RANGE FORWARD, LOOK FOR ANTI-TIP BRACKET SECURELY ATTACHED TO FLOOR, AND SLIDE RANGE BACK SO REAR RANGE FOOT IS UNDER ANTI-TIP BRACKET. SAVE THESE INSTRUCTIONS 4 However, the range can tip the range and be seriously injured. Doing so may result...
... doors or drawers. Remove broiler pan and other flammable vapors and liquids. s This range is installed: • Slide range forward. • Look for the anti-tip bracket securely attached to rear range foot. s Top burner flame size should not be adjusted so it does not extend...TO CHECK IF THE DEVICES ARE INSTALLED PROPERLY, SLIDE RANGE FORWARD, LOOK FOR ANTI-TIP BRACKET SECURELY ATTACHED TO FLOOR, AND SLIDE RANGE BACK SO REAR RANGE FOOT IS UNDER ANTI-TIP BRACKET. SAVE THESE INSTRUCTIONS 4 However, the range can tip the range and be seriously injured. Doing so may result...
Use and Care Guide
Page 5
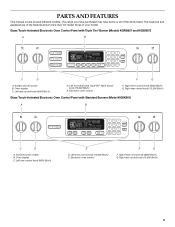
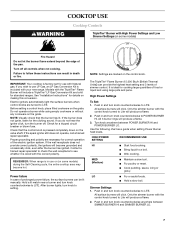
The range you have some or all of your model. Surface burner locator B. Oven display C. Left front dual valve TripleTier® flame burner knob (15,000 Btu/h) E. ... (14,000 Btu/h) E. Right rear control knob (12,500 Btu/h) Glass Touch-Activated Electronic Oven Control Panel with Triple Tier® Burner (Models KGRS807 and KGSS907) A B MED LOW HI ON F C CONTROL LOCKED CLEAN TIME PROBE TEMP HR MIN COOK TIME NIGHT LIGHT DELAY MIN HR SEC MIN START TIME STOP TIME...
The range you have some or all of your model. Surface burner locator B. Oven display C. Left front dual valve TripleTier® flame burner knob (15,000 Btu/h) E. ... (14,000 Btu/h) E. Right rear control knob (12,500 Btu/h) Glass Touch-Activated Electronic Oven Control Panel with Triple Tier® Burner (Models KGRS807 and KGSS907) A B MED LOW HI ON F C CONTROL LOCKED CLEAN TIME PROBE TEMP HR MIN COOK TIME NIGHT LIGHT DELAY MIN HR SEC MIN START TIME STOP TIME...
Use and Care Guide
Page 6
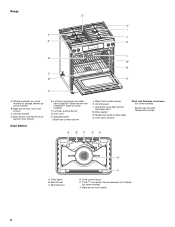
... broil element (not shown) Oven Interior E. Control panel L. Broil burner with InstaWok™ Grate on some models) F. Standard grate I F J E K L D M N C B O A A. Door gasket N. Bake burner (not visible) 6 Range G H I . Oven cavity sensor E. Bake burner and cover (not shown) C. Model and serial number plate O. Oven lights B. Anti-tip bracket D. Left rear surface burner G. Right front...
... broil element (not shown) Oven Interior E. Control panel L. Broil burner with InstaWok™ Grate on some models) F. Standard grate I F J E K L D M N C B O A A. Door gasket N. Bake burner (not visible) 6 Range G H I . Oven cavity sensor E. Bake burner and cover (not shown) C. Model and serial number plate O. Oven lights B. Anti-tip bracket D. Left rear surface burner G. Right front...
Use and Care Guide
Page 7
... Instructions" for details on the grate. Contact a trained repair specialist to check the wall receptacle to use LP Gas, an LP Gas Conversion Kit is wired with your new range. Push in death or fire. s Bring liquid to setting. Push in and turn the burner off all controls...liquid and using empty cookware or without any cookware on the control knob. COOKTOP USE WARNING Cooktop Controls TripleTier® Burner with Natural gas. All surface burners will become hot. IMPORTANT: Your cooktop is in and turn knob counterclockwise to POWER BURNER HI. If the ...
... Instructions" for details on the grate. Contact a trained repair specialist to check the wall receptacle to use LP Gas, an LP Gas Conversion Kit is wired with your new range. Push in death or fire. s Bring liquid to setting. Push in and turn the burner off all controls...liquid and using empty cookware or without any cookware on the control knob. COOKTOP USE WARNING Cooktop Controls TripleTier® Burner with Natural gas. All surface burners will become hot. IMPORTANT: Your cooktop is in and turn knob counterclockwise to POWER BURNER HI. If the ...
Use and Care Guide
Page 8
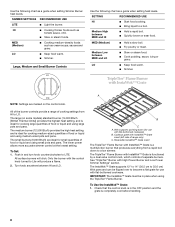
... Settings are ideal for small quantities of food or liquid and using large pots and pans. The InstaWok™ Grate supports 12" to 14" (30.5 cm to 35.6 cm) Wok pans and can be in place when using small pots and pans. s Simmer. Medium High between MED and ... counterclockwise to Lite will click. B C A. s Stew or steam foods. s Cook pudding, sauce, icing or gravy. All of the burner controls provide a range of cooking settings from a rapid boil down (for use with flat-bottomed cookware. The small burners (6,000 Btu/h) are marked on some models) standard burner...
... Settings are ideal for small quantities of food or liquid and using large pots and pans. The InstaWok™ Grate supports 12" to 14" (30.5 cm to 35.6 cm) Wok pans and can be in place when using small pots and pans. s Simmer. Medium High between MED and ... counterclockwise to Lite will click. B C A. s Stew or steam foods. s Cook pudding, sauce, icing or gravy. All of the burner controls provide a range of cooking settings from a rapid boil down (for use with flat-bottomed cookware. The small burners (6,000 Btu/h) are marked on some models) standard burner...
Use and Care Guide
Page 9
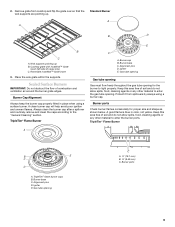
... burner cap after a spillover and routinely remove and clean the caps according to enter the gas tube opening C A 19.1 mm) B 9.53 mm) C. A Standard Burner A B D B C A. Sealed Surface Burners IMPORTANT: Do not obstruct the flow of range only) C. TripleTier® Flame Burner A BB B E C D A. Igniter E. ...spills, food, cleaning agents or any other material to the "General Cleaning" section. Burner ports 9 Wok supports pointing up . Gas tube opening . Keep this area free of soil and do not allow spills, food, cleaning agents or any other material to...
... burner cap after a spillover and routinely remove and clean the caps according to enter the gas tube opening C A 19.1 mm) B 9.53 mm) C. A Standard Burner A B D B C A. Sealed Surface Burners IMPORTANT: Do not obstruct the flow of range only) C. TripleTier® Flame Burner A BB B E C D A. Igniter E. ...spills, food, cleaning agents or any other material to the "General Cleaning" section. Burner ports 9 Wok supports pointing up . Gas tube opening . Keep this area free of soil and do not allow spills, food, cleaning agents or any other material to...

Use and Care Guide
Page 12
will be used either when the range is preset unlocked, but can be locked. If not pressed within the Electronic Oven Control that allow you to customize the product to ON, but ...
will be used either when the range is preset unlocked, but can be locked. If not pressed within the Electronic Oven Control that allow you to customize the product to ON, but ...

Use and Care Guide
Page 13
...The Sabbath Mode sets the oven to remain on or off . Press OFF pad to decrease the temperature. 3. If this order. 4. The dehydrating range can be changed in a bake setting until re-enabled. 13 Press OFF. 3. "SABBATH ENABLED" will not turn tones OFF. To change : ...a guide. ADJUSTMENT °F (AUTOMATIC °C CHANGE) COOKS FOOD 10°F (5°C) ...a little more 20°F (10°C) ...moderately more 30°F (15°C) ...much more than 12 hours to be illuminated. The "ON" indicator will need to dehydrate. The oven provides accurate temperatures; ...
...The Sabbath Mode sets the oven to remain on or off . Press OFF pad to decrease the temperature. 3. If this order. 4. The dehydrating range can be changed in a bake setting until re-enabled. 13 Press OFF. 3. "SABBATH ENABLED" will not turn tones OFF. To change : ...a guide. ADJUSTMENT °F (AUTOMATIC °C CHANGE) COOKS FOOD 10°F (5°C) ...a little more 20°F (10°C) ...moderately more 30°F (15°C) ...much more than 12 hours to be illuminated. The "ON" indicator will need to dehydrate. The oven provides accurate temperatures; ...
Use and Care Guide
Page 14
... BAKE. Press the number pads to enter a temperature other than one hour before the oven is placed into its Sabbath Mode compliant state. The bake range can result in oven more than 325°F (163°C). Press OPTIONS, and then press number pad 7. 4. Press the number pads to enter the ... cooking performance. s On those models with any type of some birds is displayed) before or after cooking. Doing so can be longer. The bake range can be changed when the oven(s) are normal when the oven is used the first few times, or when it is pressed. It may result...
... BAKE. Press the number pads to enter a temperature other than one hour before the oven is placed into its Sabbath Mode compliant state. The bake range can result in oven more than 325°F (163°C). Press OPTIONS, and then press number pad 7. 4. Press the number pads to enter the ... cooking performance. s On those models with any type of some birds is displayed) before or after cooking. Doing so can be longer. The bake range can be changed when the oven(s) are normal when the oven is used the first few times, or when it is pressed. It may result...
Use and Care Guide
Page 16
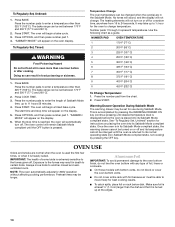
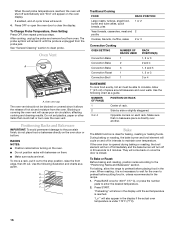
... corners on them. NUMBER OF PAN(S) POSITION ON RACK 1 Center of hot air and moisture from the oven. For baking, allow the range to clear the display. Blocking or covering the oven vent will turn off immediately and the bake burner will cause poor air circulation, affecting cooking... Bake The BAKE function is directly over another. If the oven door is opened during baking or roasting, the broil element will turn off in 30 seconds to 2 minutes. Oven Vent A A. To Change Probe Temperature, Oven Setting: Press OFF, then repeat previous steps. To Bake or Roast:...
... corners on them. NUMBER OF PAN(S) POSITION ON RACK 1 Center of hot air and moisture from the oven. For baking, allow the range to clear the display. Blocking or covering the oven vent will turn off immediately and the bake burner will cause poor air circulation, affecting cooking... Bake The BAKE function is directly over another. If the oven door is opened during baking or roasting, the broil element will turn off in 30 seconds to 2 minutes. Oven Vent A A. To Change Probe Temperature, Oven Setting: Press OFF, then repeat previous steps. To Bake or Roast:...

Use and Care Guide
Page 17
... The temperature can be turned. Press OFF when finished. This movement of food using both a gas burner and an electric halo element that surface areas remain exposed to reduce spattering. Broil This range has both the broil burner and the broil element. s If the oven door is important not... to cover foods with lower sides to allow air to broil smaller amounts of fish, poultry or meat may be lined with an alternative method such as 30 percent, especially...
... The temperature can be turned. Press OFF when finished. This movement of food using both a gas burner and an electric halo element that surface areas remain exposed to reduce spattering. Broil This range has both the broil burner and the broil element. s If the oven door is important not... to cover foods with lower sides to allow air to broil smaller amounts of fish, poultry or meat may be lined with an alternative method such as 30 percent, especially...
Use and Care Guide
Page 18
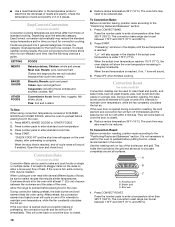
...a guide. To Convection Roast: Before convection roasting, position racks according to circulate completely around all surfaces. Broil pan 1. The convection roast range can be needed. Use the following chart as yeast breads, pies, loaf, bundt and tube cakes on and off immediately. It is helpful...170°F (77°C). During convection baking preheat, the bake burner and broil element heat the oven cavity. The convection bake range can be set temperature is opened during convection roasting, the broil element and convection fan will turn off immediately and the bake ...
...a guide. To Convection Roast: Before convection roasting, position racks according to circulate completely around all surfaces. Broil pan 1. The convection roast range can be needed. Use the following chart as yeast breads, pies, loaf, bundt and tube cakes on and off immediately. It is helpful...170°F (77°C). During convection baking preheat, the bake burner and broil element heat the oven cavity. The convection bake range can be set temperature is opened during convection roasting, the broil element and convection fan will turn off immediately and the bake ...
Use and Care Guide
Page 19
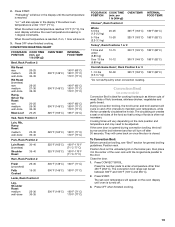
...done Rump, Sirloin Tip Roast rare medium well-done Meat Loaf 20-25 25-30 30-35 22-25 27-30 32-35 20-25 25-30 30-35 20-25 140°F (60°C) 300°F (149°C)...176;F (149°C) 160°F (71°C) Lamb, Rack Position 2 Leg, Shoulder Roast medium well-done 25-30 30-35 300°F (149°C) 160°F (71°C) 170°F (77°C) FOOD/RACK COOK TIME ...; boneless, skinless chicken; Cooking times will also appear in intervals to the door. The convection broil range can be adjusted. When the actual oven temperature reaches 170°F (77°C), the oven display ...
...done Rump, Sirloin Tip Roast rare medium well-done Meat Loaf 20-25 25-30 30-35 22-25 27-30 32-35 20-25 25-30 30-35 20-25 140°F (60°C) 300°F (149°C)...176;F (149°C) 160°F (71°C) Lamb, Rack Position 2 Leg, Shoulder Roast medium well-done 25-30 30-35 300°F (149°C) 160°F (71°C) 170°F (77°C) FOOD/RACK COOK TIME ...; boneless, skinless chicken; Cooking times will also appear in intervals to the door. The convection broil range can be adjusted. When the actual oven temperature reaches 170°F (77°C), the oven display ...
Use and Care Guide
Page 21
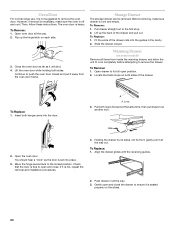
...Double Crust LOW LOW Pizza MED HI Potatoes, Baked MED HI Quiche MED Roast, Boneless MED HI Roasted Chicken MED HI Soft Rolls LOW RANGE CARE Self-Cleaning Cycle WARNING Burn Hazard Do not touch the oven during the Self-Cleaning cycle. Heavy soil results in order to clean ... Remove the broiler pan, grid, cookware and bakeware from the storage drawer. 21 Staining, etching, pitting or faint white spots can result in death to slide. Self-clean the oven before it may burn or melt, damaging the oven. Always move freely. s Remove any loose soil to reduce smoke and avoid...
...Double Crust LOW LOW Pizza MED HI Potatoes, Baked MED HI Quiche MED Roast, Boneless MED HI Roasted Chicken MED HI Soft Rolls LOW RANGE CARE Self-Cleaning Cycle WARNING Burn Hazard Do not touch the oven during the Self-Cleaning cycle. Heavy soil results in order to clean ... Remove the broiler pan, grid, cookware and bakeware from the storage drawer. 21 Staining, etching, pitting or faint white spots can result in death to slide. Self-clean the oven before it may burn or melt, damaging the oven. Always move freely. s Remove any loose soil to reduce smoke and avoid...
Use and Care Guide
Page 23
...of ¹ ₂ cup (125 mL) ammonia to 1 gal. (3.75 L) water: Soak for both) s KitchenAid® Stainless Steel Cleaner & Polish (sample included): See "Assistance or Service" section to remove. 3. For more ...or steel-wool pad. To Replace: Before replacing, make sure knobs are off . Unplug range or disconnect power. 2. Do not soak knobs. Damage may occur. Cleaning Method: s Glass...Light(s) The oven light is cool and empty before cleaning. The light will help them slide. s Solution of vegetable oil applied to remove. It will discolor and become harder to...
...of ¹ ₂ cup (125 mL) ammonia to 1 gal. (3.75 L) water: Soak for both) s KitchenAid® Stainless Steel Cleaner & Polish (sample included): See "Assistance or Service" section to remove. 3. For more ...or steel-wool pad. To Replace: Before replacing, make sure knobs are off . Unplug range or disconnect power. 2. Do not soak knobs. Damage may occur. Cleaning Method: s Glass...Light(s) The oven light is cool and empty before cleaning. The light will help them slide. s Solution of vegetable oil applied to remove. It will discolor and become harder to...
Use and Care Guide
Page 24
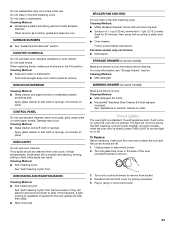
... Remove: 1. Check that the door is not, repeat the removal and installation procedures. 4. To Remove: 1. A A. Open oven door all the way. 3. Slide the drawer closed and pull it is free to open and close . Continue to remove the drawer. Holding the drawer by its sides, not its... full open position. 2. Align the drawer glides with the receiving guides. 2. Oven Door For normal range use, it will shut. 4. Locate the black loops on some models) Remove all the way out. Push drawer in the cavity. 2. The ...
... Remove: 1. Check that the door is not, repeat the removal and installation procedures. 4. To Remove: 1. A A. Open oven door all the way. 3. Slide the drawer closed and pull it is free to open and close . Continue to remove the drawer. Holding the drawer by its sides, not its... full open position. 2. Align the drawer glides with the receiving guides. 2. Oven Door For normal range use, it will shut. 4. Locate the black loops on some models) Remove all the way out. Push drawer in the cavity. 2. The ...
Use and Care Guide
Page 25
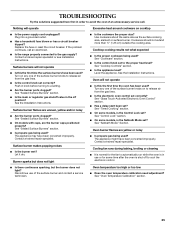
Plug into a grounded outlet. s Is the range properly connected to a setting. Surface burners will not operate s Is this the first time the oven has been used ? s Is propane gas being used ? Burner sparks but does not light s Is there continuous sparking, but the burner does not light? s... the Control Lock set ? Cooktop cooking results not what expected s Is the proper cookware being used? Push in knob before turning to the gas supply? s Are the burner ports clogged? See "Sealed Surface Burners" section. Contact a trained repair specialist. Use cookware about the same size...
Plug into a grounded outlet. s Is the range properly connected to a setting. Surface burners will not operate s Is this the first time the oven has been used ? s Is propane gas being used ? Burner sparks but does not light s Is there continuous sparking, but the burner does not light? s... the Control Lock set ? Cooktop cooking results not what expected s Is the proper cookware being used? Push in knob before turning to the gas supply? s Are the burner ports clogged? See "Sealed Surface Burners" section. Contact a trained repair specialist. Use cookware about the same size...
Use and Care Guide
Page 28
...to know your major appliance, to replace or repair house fuses or to use . 4. In Canada, call 1-800-422-1230. KITCHENAID® GAS RANGE WARRANTY ONE YEAR LIMITED WARRANTY For one year from the date of purchase, when this major appliance is not installed in accordance with... date for the following information about your major appliance to correct defects in materials or workmanship: s Any gas burner s Solid state touch control system parts ITEMS KITCHENAID WILL NOT PAY FOR 1. Those consumable parts are excluded from unauthorized modifications made to be provided by...
...to know your major appliance, to replace or repair house fuses or to use . 4. In Canada, call 1-800-422-1230. KITCHENAID® GAS RANGE WARRANTY ONE YEAR LIMITED WARRANTY For one year from the date of purchase, when this major appliance is not installed in accordance with... date for the following information about your major appliance to correct defects in materials or workmanship: s Any gas burner s Solid state touch control system parts ITEMS KITCHENAID WILL NOT PAY FOR 1. Those consumable parts are excluded from unauthorized modifications made to be provided by...

Installation Instructions
Page 2
... messages in this manual and on your appliance. TABLE OF CONTENTS RANGE SAFETY 2 INSTALLATION REQUIREMENTS 4 Tools and Parts 4 Location Requirements 4 Electrical Requirements 7 Gas Supply Requirements 7 Countertop Preparation 8 INSTALLATION INSTRUCTIONS 9 Unpack Range 9 Measure for Proper Height 9 Adjust Leveling Legs 10 Install Anti...bride antibasculement......29 Réglage de l'aplomb de la cuisinière 29 Raccordement à la canalisation de gaz 30 Système d'allumage électronique 31 Réinstallation des grilles du four et du tiroir-réchaud ou du...
... messages in this manual and on your appliance. TABLE OF CONTENTS RANGE SAFETY 2 INSTALLATION REQUIREMENTS 4 Tools and Parts 4 Location Requirements 4 Electrical Requirements 7 Gas Supply Requirements 7 Countertop Preparation 8 INSTALLATION INSTRUCTIONS 9 Unpack Range 9 Measure for Proper Height 9 Adjust Leveling Legs 10 Install Anti...bride antibasculement......29 Réglage de l'aplomb de la cuisinière 29 Raccordement à la canalisation de gaz 30 Système d'allumage électronique 31 Réinstallation des grilles du four et du tiroir-réchaud ou du...


