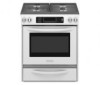
Use and Care Guide
Page 4
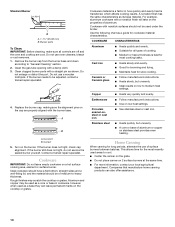
... carbon monoxide poisoning. s Maintenance - s Before Self-Cleaning the Oven - In Canada, the range must be plugged directly into a properly grounded receptacle. Do not cut or remove the grounding prong from the misuse of fire, electrical shock, injury to children in the absence of the oven. s Top burner flame size should be killed. Doing so blocks air flow through the oven and may result from this...
... carbon monoxide poisoning. s Maintenance - s Before Self-Cleaning the Oven - In Canada, the range must be plugged directly into a properly grounded receptacle. Do not cut or remove the grounding prong from the misuse of fire, electrical shock, injury to children in the absence of the oven. s Top burner flame size should be killed. Doing so blocks air flow through the oven and may result from this...
Use and Care Guide
Page 7
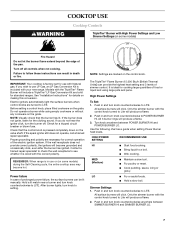
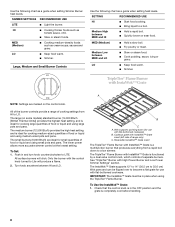
... Settings 1. All surface burners will produce a flame. 2. COOKTOP USE WARNING Cooktop Controls TripleTier® Burner with High Power Settings and Low Simmer Settings (on some models) during the Self-Cleaning cycle, the entire cooktop area may become grounded and occasionally click, even after the burner has ignited. Models with the TripleTier® Flame Burner will include a TripleTier® LP Gas Conversion Kit and a kit for a tripped circuit breaker or blown fuse. Do not operate a burner while using large pots and pans. Turn knob...
... Settings 1. All surface burners will produce a flame. 2. COOKTOP USE WARNING Cooktop Controls TripleTier® Burner with High Power Settings and Low Simmer Settings (on some models) during the Self-Cleaning cycle, the entire cooktop area may become grounded and occasionally click, even after the burner has ignited. Models with the TripleTier® Flame Burner will include a TripleTier® LP Gas Conversion Kit and a kit for a tripped circuit breaker or blown fuse. Do not operate a burner while using large pots and pans. Turn knob...
Use and Care Guide
Page 8
... LO s Stew or steam food. s Simmer. s Simmer. Use the following chart as a guide when setting heat levels. MED (Medium) s Hold a slow boil. s Cook pudding, sauce, icing or gravy. The small burners (6,000 Btu/h) are marked on some models) standard burner (14,000 Btu/h [British Thermal Units]) provides the highest heat setting, and is functioned by a dual valve control knob, which controls 2 separate burners. Turn knob anywhere between HI and LO. See "TripleTier...
... LO s Stew or steam food. s Simmer. s Simmer. Use the following chart as a guide when setting heat levels. MED (Medium) s Hold a slow boil. s Cook pudding, sauce, icing or gravy. The small burners (6,000 Btu/h) are marked on some models) standard burner (14,000 Btu/h [British Thermal Units]) provides the highest heat setting, and is functioned by a dual valve control knob, which controls 2 separate burners. Turn knob anywhere between HI and LO. See "TripleTier...
Use and Care Guide
Page 10
... surfaces should be used as a base they can also offer assistance. 10 Stainless steel s Heats quickly, but unevenly. If the burner needs to "General Cleaning" section. 2. Contact a trained repair specialist. COOKWARE CHARACTERISTICS Aluminum s Heats quickly and evenly. s Do not place canner on low heat settings. Do not enlarge or distort the port. Correct 5. s Good for most recently used under the broiler. Ceramic or Ceramic glass...
... surfaces should be used as a base they can also offer assistance. 10 Stainless steel s Heats quickly, but unevenly. If the burner needs to "General Cleaning" section. 2. Contact a trained repair specialist. COOKWARE CHARACTERISTICS Aluminum s Heats quickly and evenly. s Do not place canner on low heat settings. Do not enlarge or distort the port. Correct 5. s Good for most recently used under the broiler. Ceramic or Ceramic glass...
Use and Care Guide
Page 11
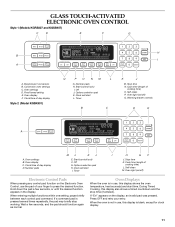
...GLASS TOUCH-ACTIVATED ELECTRONIC OVEN CONTROL Style 1 (Models KGRS807 and KGSS907) C D E F G B A A. Start (control lock) I H GF J. Timer I . Cook time (length of your entry. Oven light (on the display, an invalid pad was pressed. Stop time N. Off G. Oven display F. Clock set /start I Q P O NM L G. Self-clean P. Stop time K. Wait a few seconds, or until the desired function appears in use , this display also shows a timed countdown and the stop working. Number pads ML KJ E. During Timed Cooking, this display shows the oven temperature...
...GLASS TOUCH-ACTIVATED ELECTRONIC OVEN CONTROL Style 1 (Models KGRS807 and KGSS907) C D E F G B A A. Start (control lock) I H GF J. Timer I . Cook time (length of your entry. Oven light (on the display, an invalid pad was pressed. Stop time N. Off G. Oven display F. Clock set /start I Q P O NM L G. Self-clean P. Stop time K. Wait a few seconds, or until the desired function appears in use , this display also shows a timed countdown and the stop working. Number pads ML KJ E. During Timed Cooking, this display shows the oven temperature...
Use and Care Guide
Page 16
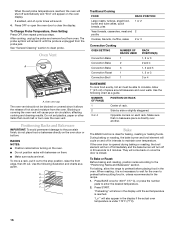
... cook food evenly, hot air must be blocked or covered since it out to maintain oven temperature. NUMBER OF PAN(S) POSITION ON RACK 1 Center of space around bakeware and oven walls. After cooking, unplug the probe and remove food from the probe jack. When the set probe temperature is under 170°F (77°C). 16 If the oven door is opened during baking or roasting, the broil element will turn off immediately and the bake burner...
... cook food evenly, hot air must be blocked or covered since it out to maintain oven temperature. NUMBER OF PAN(S) POSITION ON RACK 1 Center of space around bakeware and oven walls. After cooking, unplug the probe and remove food from the probe jack. When the set probe temperature is under 170°F (77°C). 16 If the oven door is opened during baking or roasting, the broil element will turn off immediately and the bake burner...

Use and Care Guide
Page 17
... of food using only the inner broil burner. 2. Press the number pads to 9 patties, equally spaced, on some models) In a convection oven, the fan-circulated hot air continually distributes heat more precise control when cooking. Press START. The temperature can be shortened by opening the oven door only when necessary. Times are guidelines only and may cook better at lower broiling temperatures. For diagram, see the "Positioning Racks and Bakeware" section. TOTAL TIME MIN. Steak...
... of food using only the inner broil burner. 2. Press the number pads to 9 patties, equally spaced, on some models) In a convection oven, the fan-circulated hot air continually distributes heat more precise control when cooking. Press START. The temperature can be shortened by opening the oven door only when necessary. Times are guidelines only and may cook better at lower broiling temperatures. For diagram, see the "Positioning Racks and Bakeware" section. TOTAL TIME MIN. Steak...
Use and Care Guide
Page 23
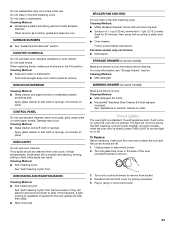
... Surface Burners" section. At high temperatures, foods react with wet scouring pad. s Solution of the oven counterclockwise to slide. Cleaning Method: s Mild detergent WARMING DRAWER (on some models) Make sure drawer is a standard 15-watt appliance bulb. The light will discolor and become harder to remove. 3. Turn the glass bulb cover in the Off position. Plug in the Self-Cleaning cycle. Do not reassemble caps on panel. COOKTOP CONTROLS Do not use oven cleaners. When replacing knobs...
... Surface Burners" section. At high temperatures, foods react with wet scouring pad. s Solution of the oven counterclockwise to slide. Cleaning Method: s Mild detergent WARMING DRAWER (on some models) Make sure drawer is a standard 15-watt appliance bulb. The light will discolor and become harder to remove. 3. Turn the glass bulb cover in the Off position. Plug in the Self-Cleaning cycle. Do not reassemble caps on panel. COOKTOP CONTROLS Do not use oven cleaners. When replacing knobs...
Use and Care Guide
Page 25
... the surface burner knobs on cooktop s Is the power supply cord unplugged? See "Glass Touch-Activated Electronic Oven Control" section. s On some models, is shut off position? Oven burner flames are the burner caps positioned properly? Cooling fan runs during baking, broiling or cleaning s It is normal for some models, is the Sabbath Mode set to a setting. Replace the fuse or reset the circuit breaker. s On models with caps, are yellow or noisy s Is propane gas being used? s Is propane gas being used ? Burner sparks but does not light...
... the surface burner knobs on cooktop s Is the power supply cord unplugged? See "Glass Touch-Activated Electronic Oven Control" section. s On some models, is shut off position? Oven burner flames are the burner caps positioned properly? Cooling fan runs during baking, broiling or cleaning s It is normal for some models, is the Sabbath Mode set to a setting. Replace the fuse or reset the circuit breaker. s On models with caps, are yellow or noisy s Is propane gas being used? s Is propane gas being used ? Burner sparks but does not light...
Use and Care Guide
Page 26
... operate s Is the oven door open ? The fan will stop the fan. See "Self-Cleaning Cycle" section. s Has a delay start been set ? See the Installation Instructions. Double-check the recipe in the oven. Adjust cooking time. Decrease oven temperature 15° F to 25°F (5°C to 15°C) or move rack to higher position in a reliable cookbook. Use aluminum foil to clear the display. s Is the display showing a letter followed by a number? See "Assistance or Service...
... operate s Is the oven door open ? The fan will stop the fan. See "Self-Cleaning Cycle" section. s Has a delay start been set ? See the Installation Instructions. Double-check the recipe in the oven. Adjust cooking time. Decrease oven temperature 15° F to 25°F (5°C to 15°C) or move rack to higher position in a reliable cookbook. Use aluminum foil to clear the display. s Is the display showing a letter followed by a number? See "Assistance or Service...
Use and Care Guide
Page 28
... serial number label located on the product. Dealer name Address Phone number Model number Serial number Purchase date 28 Service calls to repair or replace appliance light bulbs, air filters or water filters. After checking "Troubleshooting," additional help you obtain assistance or service if you how to use . 4. This major appliance is designed to be found by checking the "Assistance or Service" section or by a KitchenAid designated service company. Those consumable parts...
... serial number label located on the product. Dealer name Address Phone number Model number Serial number Purchase date 28 Service calls to repair or replace appliance light bulbs, air filters or water filters. After checking "Troubleshooting," additional help you obtain assistance or service if you how to use . 4. This major appliance is designed to be found by checking the "Assistance or Service" section or by a KitchenAid designated service company. Those consumable parts...
Installation Instructions
Page 4
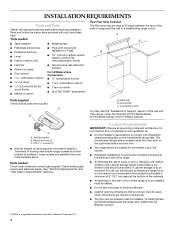
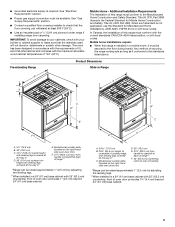
... convenient use in a freestanding range cutout. To install the antitip bracket shipped with any tools listed here. Countertop C. Check existing gas supply and electrical supply. A B ■ Flat-blade screwdriver ■ Pipe-joint compound ■ Phillips screwdriver resistant to the side cabinets. ■ Cabinet opening dimensions that all governing codes and ordinances. Longer screws are shown must be used . Parts needed ■ Tape measure ■ Masking tape Rear Filler...
... convenient use in a freestanding range cutout. To install the antitip bracket shipped with any tools listed here. Countertop C. Check existing gas supply and electrical supply. A B ■ Flat-blade screwdriver ■ Pipe-joint compound ■ Phillips screwdriver resistant to the side cabinets. ■ Cabinet opening dimensions that all governing codes and ordinances. Longer screws are shown must be used . Parts needed ■ Tape measure ■ Masking tape Rear Filler...
Installation Instructions
Page 5
... at least 200°F (93°C). ■ Use an insulated pad or ¼" (0.64 cm) plywood under range if installing range over carpeting. Model/serial number plate (located on the right-hand side oven door trim) F. 27¹⁄₄" (69.2 cm) max. Additional Installation Requirements The installation of cooktop *Range can be raised approximately 1" (2.5 cm) by adjusting the leveling legs. **When installed in a 24" (61 cm) base cabinet...
... at least 200°F (93°C). ■ Use an insulated pad or ¼" (0.64 cm) plywood under range if installing range over carpeting. Model/serial number plate (located on the right-hand side oven door trim) F. 27¹⁄₄" (69.2 cm) max. Additional Installation Requirements The installation of cooktop *Range can be raised approximately 1" (2.5 cm) by adjusting the leveling legs. **When installed in a 24" (61 cm) base cabinet...
Installation Instructions
Page 7
.... Install a shut-off valve. Observe all gas connections. The model/serial rating plate located behind the storage drawer on the right-hand side oven door frame has information on the underside of gas available, check with all local codes and ordinances. A copy of Gas Natural gas: This range is factory set for the control panel to the range location. Type of the above code standards can be done by CSA International for use with Natural gas or...
.... Install a shut-off valve. Observe all gas connections. The model/serial rating plate located behind the storage drawer on the right-hand side oven door frame has information on the underside of gas available, check with all local codes and ordinances. A copy of Gas Natural gas: This range is factory set for the control panel to the range location. Type of the above code standards can be done by CSA International for use with Natural gas or...
Installation Instructions
Page 8
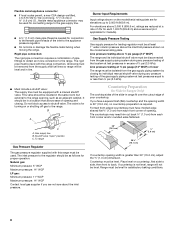
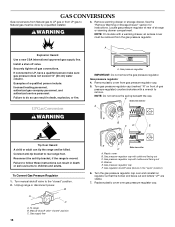
... the range. Gas supply line B. To range Gas Pressure Regulator The gas pressure regulator supplied with this range must be removed from the supply and fuel lines so range will not be level. Gas Supply Pressure Testing Gas supply pressure for satisfactory baking conditions. 8 Place level on or shutting off gas to the regulator should be as an adjacent cabinet. It should be equipped with the range connection. Line pressure testing at ½ psi gauge (14" WCP) or lower The range must be level with a manual shutoff valve...
... the range. Gas supply line B. To range Gas Pressure Regulator The gas pressure regulator supplied with this range must be removed from the supply and fuel lines so range will not be level. Gas Supply Pressure Testing Gas supply pressure for satisfactory baking conditions. 8 Place level on or shutting off gas to the regulator should be as an adjacent cabinet. It should be equipped with the range connection. Line pressure testing at ½ psi gauge (14" WCP) or lower The range must be level with a manual shutoff valve...
Installation Instructions
Page 11
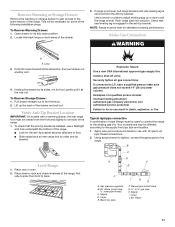
... pipe thread connections. 2. Remove Warming or Storage Drawer Remove the warming or storage drawer to gain access to the lower section of pipe fittings must be necessary for the anti-tip bracket securely attached to floor. ■ Slide range back so rear range foot is under anti-tip bracket. Manual gas shutoff valve G. ½" or ¾" gas pipe H. Open drawer to its front, gently pull it all gas connections. Explosion Hazard Use a new CSA International approved gas supply line.
... pipe thread connections. 2. Remove Warming or Storage Drawer Remove the warming or storage drawer to gain access to the lower section of pipe fittings must be necessary for the anti-tip bracket securely attached to floor. ■ Slide range back so rear range foot is under anti-tip bracket. Manual gas shutoff valve G. ½" or ¾" gas pipe H. Open drawer to its front, gently pull it all gas connections. Explosion Hazard Use a new CSA International approved gas supply line.
Installation Instructions
Page 14
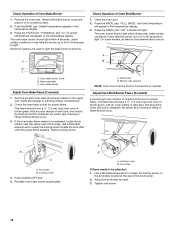
...flame needs to light. Close the oven door. 2. "FULL BROIL" and broil temperature will appear in the temperature display. 3. On some models, an electric halo element also turns on the upper wall, inside the storage or warming drawer compartment. 2. Adjust Oven Broil Burner Flame (if needed ) 1. Adjust the air shutter as need. 3. Default temperature appears in the temperature display. 3. Gas burner B. Electric halo element NOTE: Oven door must be clean and soft in character. Locking screw 4. Check Operation of Oven Bake Burner 1. The oven burner should be shut...
...flame needs to light. Close the oven door. 2. "FULL BROIL" and broil temperature will appear in the temperature display. 3. On some models, an electric halo element also turns on the upper wall, inside the storage or warming drawer compartment. 2. Adjust Oven Broil Burner Flame (if needed ) 1. Adjust the air shutter as need. 3. Default temperature appears in the temperature display. 3. Gas burner B. Electric halo element NOTE: Oven door must be clean and soft in character. Locking screw 4. Check Operation of Oven Bake Burner 1. The oven burner should be shut...

Installation Instructions
Page 15
... the gas supply line shutoff valve is open , press the CANCEL button on the slides. Complete Installation 1. Replace warming drawer or storage drawer. Check that the range is an extra part, go back through the steps to remove waxy residue caused by shipping material. Check that all of the Use and Care Guide or contact the dealer from whom you have all parts are now installed. Turn on range operation. To Replace Storage Drawer...
... the gas supply line shutoff valve is open , press the CANCEL button on the slides. Complete Installation 1. Replace warming drawer or storage drawer. Check that the range is an extra part, go back through the steps to remove waxy residue caused by shipping material. Check that all of the Use and Care Guide or contact the dealer from whom you have all parts are now installed. Turn on range operation. To Replace Storage Drawer...
Installation Instructions
Page 16
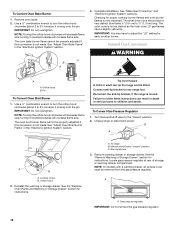
Locate gas pressure regulator at rear of a qualified person include: licensed heating personnel, authorized gas company personnel, and authorized service personnel. Remove plastic cover from LP gas to Natural gas must be killed. Turn manual shutoff valve to the "closed " position C. Unplug range or disconnect power. Gas supply line 16 Side view after C A. Washer E. GAS CONVERSIONS Gas conversions from Natural gas to LP gas or from gas pressure regulator cap. 5. Explosion Hazard Use a new CSA International approved gas supply line. Examples of storage or warming drawer ...
Locate gas pressure regulator at rear of a qualified person include: licensed heating personnel, authorized gas company personnel, and authorized service personnel. Remove plastic cover from LP gas to Natural gas must be killed. Turn manual shutoff valve to the "closed " position C. Unplug range or disconnect power. Gas supply line 16 Side view after C A. Washer E. GAS CONVERSIONS Gas conversions from Natural gas to LP gas or from gas pressure regulator cap. 5. Explosion Hazard Use a new CSA International approved gas supply line. Examples of storage or warming drawer ...
Installation Instructions
Page 18
...orifice hood clockwise will decrease flame size; The oven broil burner flame cannot be killed. Turn manual shutoff valve to adjust the "LO" setting for proper cooktop burner flames and oven burner flames is moved. Remove warming drawer or storage drawer. A A. The oven bake burner flame cannot be removed from the gas pressure regulator. A B A 3. IMPORTANT: You may have a slightly yellow tip. IMPORTANT: Do not overtighten. Connect anti-tip bracket to rear range foot. Locate gas pressure regulator at rear of storage or warming drawer compartment. See "Make Gas Connection...
...orifice hood clockwise will decrease flame size; The oven broil burner flame cannot be killed. Turn manual shutoff valve to adjust the "LO" setting for proper cooktop burner flames and oven burner flames is moved. Remove warming drawer or storage drawer. A A. The oven bake burner flame cannot be removed from the gas pressure regulator. A B A 3. IMPORTANT: You may have a slightly yellow tip. IMPORTANT: Do not overtighten. Connect anti-tip bracket to rear range foot. Locate gas pressure regulator at rear of storage or warming drawer compartment. See "Make Gas Connection...


