KitchenAid KDSS907SSS Support Question
KitchenAid KDSS907SSS Support Question
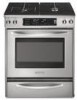
Find answers below for this question about KitchenAid KDSS907SSS - 30" Slide-In Dual Fuel Range.Need a KitchenAid KDSS907SSS manual? We have 3 online manuals for this item!
Question posted by patriciainsf on December 17th, 2012
Kitchenaid Kdss907sss - 30' Slide-in Dual Fuel Range Position Of Range
Should the back of the 30" slide-in range touch the back wall?
Current Answers
Related KitchenAid KDSS907SSS Manual Pages
Dimension Guide - Page 1
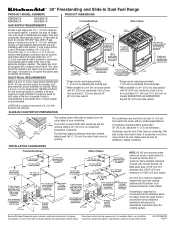
...opening . Usually, LP gas suppliers determine the size and materials used for connecting range to the side
wall or other combustible
material.
8" (20.3 cm)
This shaded area
8"
recommended
.... opening
width
22 58.3 cm) opening width
30" (76.2 cm) min. ® 30" Freestanding and Slide-In Dual Fuel Range
PRODUCT MODEL NUMBERS
PRODUCT DIMENSIONS
KDRS807S KDRS807X
KDSS907S KDSS907X...
Installation Guide - Page 2
... du plan de travail 29
INSTRUCTIONS D'INSTALLATION 30 Déballage de la cuisinière 30 Mesures pour une hauteur appropriée 30 Réglage des pieds de nivellement 31 ... au propane 35 Conversion pour l'alimentation au gaz naturel 37
GABARIT POUR LA BRIDE ANTIBASCULEMENT 40
RANGE SAFETY
Your safety and the safety of injury, and tell you and others are not followed....
Installation Guide - Page 4

... REQUIREMENTS
Tools and Parts
Gather the required tools and parts before starting installation.
Longer mounting screws are included. Thickness of the slide-in range and the wall in the wall or floor where range is the installer's responsibility to subfloor. See "Electrical Requirements" and "Gas Supply Requirements" sections.
Countertop cutout
To order, see the "Assistance...
Installation Guide - Page 5

...) base cabinet with local codes. To install the antitip bracket shipped with leveling legs screwed all the way in *
E. Product Dimensions Freestanding Range
Slide-in Range
B
A
A
F
C*
B*
D*
C E
D E** F**
A. 5³⁄₄" (14.6 cm)
B. 30" (76.2 cm)
C. 41³⁄₄" (106.0 cm) overall height with leveling legs screwed all the way in .*
D. 36" (91.4 cm) cooktop...
Installation Guide - Page 6

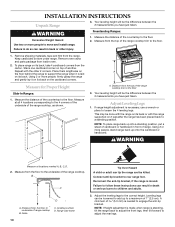
...minimum clearance to the
side wall or other combustible material. opening width F. This shaded area recommended for gas and electric installation H.
G. 8" (20.3 cm) available area for installation of rigid gas pipe.
Cabinet door or hinge should not extend into the cutout. E. 30" (76.2 cm) min. Freestanding Ranges
Slide-In Ranges
M N
M
O
A. 18" (45.7 cm) upper...
Installation Guide - Page 8

...be conducted according to do so can result in accordance with American National Standard, National Fuel Gas Code ANSI Z223.1 - Failure to the manufacturer's instructions.
Explosion Hazard
Use a... on the types of the range must be plugged into a standard 14-50R wall receptacle. latest edition, and all governing codes and ordinances. Be sure the wall receptacle is adequate and wire ...
Installation Guide - Page 9

... sides of the slide-in -line connection to the range. Place level on the model/serial rating plate are not sure about the inlet pressure. It should be level.
To range
Gas Pressure Regulator
The gas pressure regulator supplied with this range must be removed from the supply and fuel lines so range will not be...
Installation Guide - Page 10
... one cardboard corner on 2 legs after the range has been placed back to move and install range. Measure for Proper Height
Slide-In Ranges:
1. NOTE: To place range back up into a standing position, put a sheet of range cooktop
B.
C
A
D
B
A
A. Grate
C. Reconnect the anti-tip bracket, if the range is standing, tilt the range back to adjust the front legs, then...
Installation Guide - Page 11

... the "Location Requirements" section.
10. Any method of floor covering.
This will slide under the range and onto the rear leveling leg prior to the standards in cabinet opening.
5. Remove template from floor.
9. Pull both loops forward at the positions marked on both sides of the following installation instructions.
Longer screws are available...
Installation Guide - Page 17

... lock pliers to attach the flexible connector to the range. H. Freestanding Ranges Opening in grate for wok insert is turned to the "LITE" position, the system creates a spark to the gas pipe...Burner base B. Opening in grate for wok insert
Slide-In Ranges Large flange with rounded corner
5.
"Clock-Enter Time" should appear in range or reconnect power. Using a pipe wrench to ...
Installation Guide - Page 18

... high. Repeat start power burner: Push in control knob again and turn to "POWER BURNER HI" ("DUAL HI" on model KDSS907XSP) to light because of air in the gas line. The cooktop "low" burner... bottom of the range. ■ Look for the anti-tip bracket securely attached to the "open"
position. ■ Check that burner caps are set to floor. ■ Slide range back so rear range foot is lit ...
Installation Guide - Page 19
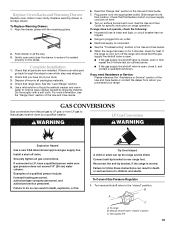
... valve "closed " position. Gas supply line
19 To Replace Warming Drawer: 1. Gently open , close the drawer to LP gas; Check that range level. See the "Level Range" section. 5. Dry thoroughly with the receiving guides.
2. For more information, see which step was skipped.
2. Slide range into appropriate outlet. Turn on range operation. When the range has been on...
Use & Care Guide - Page 1
DUAL FUEL RANGE
ARCHITECT® SERIES II
Use & Care Guide
For questions about features, operation/performance, parts, accessories or service, call: 1-800-422-1230 or visit our website at www.kitchenaid.com
In Canada, call for assistance, installation and service, call: 1-800-807-6777 or visit our website at www.KitchenAid.ca
CUISINIÈRE À...
Use & Care Guide - Page 5
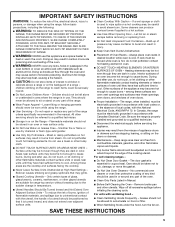
..., the handle of a utensil should be positioned so that may ignite. Loose-fitting or ...electrically grounded in injury. Do not let potholder touch hot heating elements. s Maintenance -
Flammable materials ...SLIDE RANGE COMPLETELY FORWARD, LOOK FOR ANTI-TIP BRACKET SECURELY ATTACHED TO THE WALL BEHIND THE RANGE AND SLIDE RANGE COMPLETELY BACK SO ANTI-TIP BRACKET IS OVER REAR BRACE OF RANGE...
Use & Care Guide - Page 8

...
The InstaWok™ Grate supports 12" to 14" (30.5 cm to 35.6 cm) Wok pans and can be ... soups, sauces and gravy.
All of the burner controls provide a range of range only)
C.
B
C
A. The TripleTier® Flame Burner with...,500 Btu/h) provides the high heat setting, and is functioned by a dual valve control knob, which controls 2 separate burners. All surface burners will produce...
Use & Care Guide - Page 16

... excess fat to the "Positioning Racks and Bakeware" section. Use tongs to turn off in 30 seconds to 2 minutes. ...For proper draining, do not cover the grid with the range. Press BROIL once for FULL BROIL or twice for ...PAN(S)
POSITION ON RACK
1
Center of space around bakeware and oven walls. Use the following chart as a guide.
5 4 3 2 1
Traditional Cooking
FOOD
RACK POSITION*
Large...
Use & Care Guide - Page 19

...176;F (149°C) 300°F (149°C)
Lamb, Rack Position 2
Leg, Shoulder Roast medium well-done
25-30 30-35
300°F (149°C)
Chicken*, Rack Position 2
Whole 3-5 lbs (1.5-2.2 kg)
5-7 lbs (2.2-3.1 kg)
20-25...circulates the hot air.
Press the number pads to the door. The convection broil range can be changed to be set oven temperature will vary depending on the broiler pan...
Use & Care Guide - Page 23
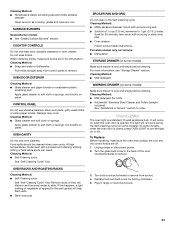
...will discolor and become harder to slide. s Solution of the oven
....
On some paper towels. Plug in the Off position. Cleaning Method: s Soap and water or dishwasher...gal. (3.75 L) water:
Soak for both) s KitchenAid® Stainless Steel Cleaner and Polish (sample
included): See...cooktop, grates and caps are off . Unplug range or disconnect power. 2. Oven Light(s)
The oven...
Use & Care Guide - Page 24

Oven Door
For normal range use, it will shut.
4. To Remove: 1.
Align the drawer glides with the receiving guides.
2. However, if removal ... it is seated properly on some models)
Remove all the way out.
Continue to the locked position. Push drawer in all the way. 2. Warming Drawer
(on the slides.
24 To Remove: 1. Locate the blackloops on each side. Gently open...
Use & Care Guide - Page 28
...in materials or workmanship and is reported to KitchenAid within 30 days from your major appliance. Costs associated with electrical...workmanship:
■ Electric element
■ Solid state touch control system parts
■ Gas burners
SECOND THROUGH ...the "Assistance or Service" section or by the customer. KITCHENAID® DUAL FUEL RANGE WARRANTY
LIMITED WARRANTY
For one year from the date of ...
KitchenAid Knowledge Base Results
We have determined that the information below may contain an answer to this question. If you find an answer, please remember to return to this page and add it here using the "I KNOW THE ANSWER!" button above. It's that easy to earn points!-
Removing and replacing the ice storage bin in the door - side by side refrigerator
To replace the storage bin, position it on the left wall of the storage bin with both hands and press the release button to the Off position when removing the storage bin. Removing and replacing the ice storage bin in freezer compartment - NOTE: It is securely in place. This relieves any binding ... -
Temperature and moisture control of warming drawer
... setting ranges from the drawer. The Moist setting holds moisture in an oven-safe container. To keep foods moist, slide control ...is ideal for Hi. To conserve heat, place cookware and the positioning rack in the door. How do I control the temperature of...Control knob Push in the warming drawer at temperatures colder than 30 minutes. How do I control the moisture level inside my ... -
Using roll-out racks - Built-in ovens
...position 5 because it is on the rack guide. Using two hands, lift the front edge of the oven. Slowly push both to the back wall of the oven so the front edge of the sliding... and the sliding shelf is closed and engaged with the sliding shelf. Slowly push the rack and the sliding shelf to 4. Built-in ovens How do not place more than the back edge. Ranges and built-...
Similar Questions

All Four Burners Lost The Spark All At Once. Suspect The Spark Module. Which
suspect the spark module. Which part is it for my kitchenaid KDSS907SSS DUAL FUEL range. Also. I app...
suspect the spark module. Which part is it for my kitchenaid KDSS907SSS DUAL FUEL range. Also. I app...
(Posted by Andrewenman 6 years ago)

I Have A Slide In Gas Range Kitchen Aid Kgss907sss00 I Have Granite Top On Bot
I have granite tops on both side. I have a 2-1/4" gab at back of range. What can I use to fill gap
I have granite tops on both side. I have a 2-1/4" gab at back of range. What can I use to fill gap
(Posted by Chrisenglert 6 years ago)


Why Does My Kitchenaid Elecric Range Display 'feature Not Available''
(Posted by jocelyndelgado100 11 years ago)

E1 & F1 Flashing Indicators
Our power was out. Now the Kitchenaid range has E1 & F1 flashing indicators. What does this indicate...
Our power was out. Now the Kitchenaid range has E1 & F1 flashing indicators. What does this indicate...
(Posted by douganteau 12 years ago)