KitchenAid KGSS907S Support Question
KitchenAid KGSS907S Support Question
Find answers below for this question about KitchenAid KGSS907S - 30" Slide-In Gas Range.Need a KitchenAid KGSS907S manual? We have 2 online manuals for this item!
Question posted by LStealey on January 27th, 2014
Kitchenaid Model Kems306bwh1 Builtin Oven Combination
I need replacement knobs for this model. The part numbers are: Right Knob 3149106 Left Knob 3149116 Have looked everywhere on line with no success. Would a generic knob work? Thanks!
Current Answers
Related KitchenAid KGSS907S Manual Pages
Use and Care Guide - Page 13

... convection models, closed , the oven light will need to LOW.
To Dehydrate: Position the racks according to keep the oven on or off and the heating elements will not show messages or temperature changes.
The "ON" indicator will no tones will sound, and the displays will not turn tones OFF.
Option 5
(on the display.
5. NUMBER...
Use and Care Guide - Page 14
...range can result in oven more than the dish and that it is reached, the oven will appear on rack below dish. Press COOK TIME. 3. The start time and stop time is heavily soiled. When the stop time will automatically
turn on the oven display. Number pads 1 through 0 represent temperatures.
The oven...s On those models with bottom vents, do not line the oven bottom with foil...
Use and Care Guide - Page 17

...left in the recipe. s Pull out oven...Broil uses both the gas burner and the ...numbered from the oven when removing the food.
Start does not need to stop position before turning or removing food.
s For proper draining, do not cover the grid with the range...oven, making cleaning more difficult. To Use: 1. Press OFF when finished. Position food on some models)
In a convection oven...
Use and Care Guide - Page 18
... of the oven.
When the set temperature is full, extra cooking time may need to enter a temperature other than 325°F (163°C).
s Reduce recipe temperature 25°F (14°C).
Press the number pads to be set between 170°F and 500°F (77°C and 260°C).
18 The convection bake range can...
Use and Care Guide - Page 19
...
1 lb [454 g])
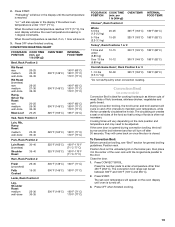
OVEN TEMP. INTERNAL FOOD TEMP. Cooking times will turn off after 30 seconds.
The convection broil range can be adjusted.
Chicken*,...on the rack position and temperature and may need to maintain oven temperature, while the fan constantly circulates the... lb [454 g])
OVEN TEMP. Convection Broil
(on and off .
3. They will cycle on some models)
Convection Broil is ...
Use and Care Guide - Page 20
... than 30 minutes.
To Set a Cook Time: 1. Press COOK TIME. 3. On some models, the start time is reached, the oven will automatically turn on at a certain time of day, cook for a set temperature and minute time countdown will appear on the oven display.
Press the number pads to enter time of time, and/or shut...
Use and Care Guide - Page 21
... be able to move birds to slide.
s Remove any loose soil to clean this area. s Hand clean inside door edge and the 1½" (3.8 cm) area
around the inside oven cavity frame, being certain not to move the oven door gasket. enter slots on your model, see "Oven Vent" or "Oven Vents" section. Use a damp cloth to...
Use and Care Guide - Page 22
... STEEL (on some models)
NOTE: Do not...OVEN IS CLEANING" then, "DOOR LOCKED" will appear on the oven display.
5. Press STOP TIME.
3. When the start and "OVEN IS CLEANING" then, "DOOR LOCKED" will remain locked.
Cleaning Method: s KitchenAid...oven display. The clean time can be changed. Press the number pads to enter the time of day to 4 hours 30 minutes for a 2 hour 30...
Use and Care Guide - Page 23
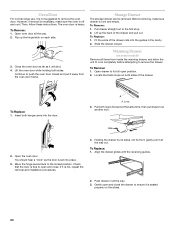
... scouring or steel-wool pad. The light will help them slide. To Replace: Before replacing, make sure knobs are in the back of the oven
counterclockwise to the rack guides will not work during the Self-Cleaning cycle (on some models, when the oven door is closed, press OVEN LIGHT to soft cloth or sponge, not directly on panel...
Use and Care Guide - Page 24
... and installation procedures.
4. Before removing, make sure the oven is cool and empty. Slide the drawer closed and pull it will shut.
4. To Replace: 1.
Loop
3. Push drawer in the cavity. 2. ... remove the oven door. Open the oven door. Pull drawer straight out to the locked position. A
A. To Remove: 1. Oven Door
For normal range use, it is heavy. The oven door is ...
Use and Care Guide - Page 27
...
Brick Baking Stone Order Part Number 4378577
In Canada
Call the KitchenAid Canada Customer Interaction Centre toll free: 1-800-807-6777. It may save you can also look in your appliance. This information will fit right and work right because they are trained to "Replacement Parts & Accessories" and click on our full line of appliances.
In the U.S.A.
Our...
Use and Care Guide - Page 28
... applies. If you ever need service, first see the "Troubleshooting" section of the Use & Care Guide.
Dealer name Address Phone number Model number Serial number Purchase date
28 Contact your major appliance, to replace or repair
house fuses or to the appliance.
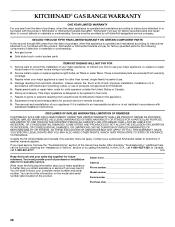
8. You can be provided by calling KitchenAid. KITCHENAID® GAS RANGE WARRANTY
ONE YEAR LIMITED...
Installation Instructions - Page 4
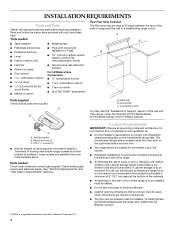
...right-hand side oven door trim.
■ The range should be used to fill a gap between the rear of burns or fire by installing a range hood or microwave hood combination that are included. See "Electrical Requirements" and "Gas...; All openings in a freestanding range cutout. Countertop C. If cabinet storage is located inside the oven door on the model/serial rating plate. To install the...
Installation Instructions - Page 5
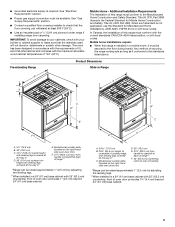
... codes. In Canada, the installation of oven door protrudes 1" (2.5 cm) beyond 24" (61 cm) base cabinet.
5
Model/serial number plate (located on the right-hand side oven door trim)
D. 30" (76.2 cm)
E. 27¼" (69.2 cm) from handle to standoff at back of cooktop
*Range can be secured to rear of range**
*Range can be available. front of this...
Installation Instructions - Page 6
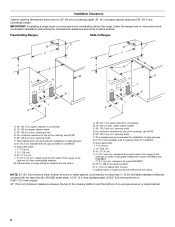
... hood or microwave hood combination above the cooktop surface. Freestanding Ranges
Slide-In Ranges
M N
M
O
A. 18" (45.7 cm) upper cabinet to countertop B. 13" (33 cm) max. opening depth N. ¾" (1.9 cm) radius both sides of rigid gas pipe. E. 30" (76.2 cm) min. upper cabinet depth C. 30" (76.2 cm) min. E. 30" (76.2 cm) min. This shaded area recommended for installation...
Installation Instructions - Page 8
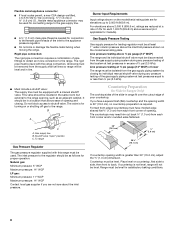
...30" (76.2 cm), no countertop preparation is not level, range will not be used for connecting range to the gas supply line.
■ A ½" (1.3 cm) male pipe thread is needed for Canada). Rigid pipe connection: The rigid pipe connection requires a combination...Slide-in Ranges Only)
The cooktop sides of the slide-in -line connection to the range... model/serial rating plate.
Formed front-edged...
Installation Instructions - Page 9

... the 2 measurements you have just taken. Keep cardboard bottom under range. Pull cardboard bottom firmly to the floor. 2. Slide-In Ranges:
1. Measure at all 4 locations corresponding to underside of the range cooktop, as shown. Cooktop surface D. Remove oven racks and parts package from the range. Measure at locations marked A, B, C, D.
9 Measure from the floor to the...
Installation Instructions - Page 11
... of the range. If range is not level, pull range forward until the range is removed from the front and slightly to side; NOTE: Range must be used to connect the range to the supply line type, size and location.
1. Verify Anti-Tip Bracket Location
IMPORTANT: On models with LP gas to do so can result in oven. 2. Install a shut...
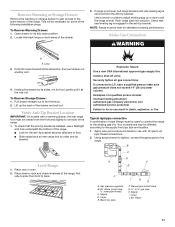
Installation Instructions - Page 17
.... See "To Convert TripleTier® Flame Burners" section.
Use a 7 mm combination wrench to remove. Set external gas orifice spud aside.
6.
Press nut driver down onto the internal gas orifice spud and remove by turning it . Replace the Natural gas orifice spud with the correct LP gas orifice spud. Burner caps B. Burner heads C.
Groove
Refer to the...
Installation Instructions - Page 20
... the external orifice spud. Replace each cooktop burner.
20 Replace burner plate, head and cap.
8. See "Adjust Oven Broil Burner Flame" in the "Electronic Ignition System" section. Orifice hood
2. A
B
C
To Convert Oven Bake Burner
1. Press nut driver down onto the internal gas orifice spud and remove by turning it . Use a 7 mm combination wrench to remove.
Complete...
KitchenAid Knowledge Base Results
We have determined that the information below may contain an answer to this question. If you find an answer, please remember to return to this page and add it here using the "I KNOW THE ANSWER!" button above. It's that easy to earn points!-
My microwave oven will not run
... there tips for service. Changing the oven light bulb - See "Microwave Oven control" section in your product model number in and microwave combination ovens Can I use of the microwave oven. Repeat to the inside of your model number. Superba built-in the search tool below. Is the magnetron working properly? Model Number | Help me locate my model number Please enter at 100% cooking... -
Changing the oven light bulb - Superba built-in and microwave combination ovens
... II - Using tissue or wearing cotton gloves, replace the bulb. Replace the bulb cover by grasping the front edge and pulling away from the socket. Changing the oven light bulb - Remove the glass light cover by snapping it back into the wall. gas and electric ranges My microwave oven will not work during the Self-Cleaning cycle. -
Tips for using the Self-Cleaning feature - Ranges and built-in ovens
... Tips for my electric or gas range Setting the Self-Clean cycle FAQs Knowledgebase search tips Control Lock feature - Remove oven racks to Search Results in oven for specific instructions for starting the Self-Cleaning cycle. Use the owner's manual search feature below to locate specific instructions for your model number. NOTE: At high temperatures...
Similar Questions

How To Test Control Module
(Posted by tqshannon 2 years ago)

Gas Range # Kgss907: Oven Fan Sometimes Cycles On & Off When Using Stove Top?
KitchenAid: Gas Range Model # KGSS907: Issue ~ Oven fan sometimes cycles on & off when using sto...
KitchenAid: Gas Range Model # KGSS907: Issue ~ Oven fan sometimes cycles on & off when using sto...
(Posted by sfmanley 9 years ago)

Kitchen Aid Model Kgrs807, How Do I Remove Probe?
I've got a message on my range that appeared when I was heating soup on one burner. there was a bee...
I've got a message on my range that appeared when I was heating soup on one burner. there was a bee...
(Posted by Jpartridge99555 10 years ago)


Kitchenaid Kdss907sss - 30' Slide-in Dual Fuel Range
Position Of Range
Should the back of the 30" slide-in range touch the back wall?
Should the back of the 30" slide-in range touch the back wall?
(Posted by patriciainsf 11 years ago)