KitchenAid KESS907SWW Support Question
KitchenAid KESS907SWW Support Question
Find answers below for this question about KitchenAid KESS907SWW - on 30 Inch Slide-In Electric Range.Need a KitchenAid KESS907SWW manual? We have 3 online manuals for this item!
Question posted by tabjmb76 on February 18th, 2013
Range Model Number Kesi901 Oven Light Willnot Turn Off Oven Will Not Get Hot
The person who posted this question about this KitchenAid product did not include a detailed explanation. Please use the "Request More Information" button to the right if more details would help you to answer this question.
Current Answers
Related KitchenAid KESS907SWW Manual Pages
Use and Care Manual - Page 5
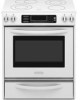
...-Activated Electronic Oven Control Panel (Models KESS908 and YKESS908)
A
MED LOW HI
ON
F C
CONTROL LOCKED
CLEAN TIME PROBE TEMP
HR MIN COOK TIME
NIGHT LIGHT DELAY
MIN HR SEC MIN
START TIME
STOP TIME
B
A. Oven display B. ALL OFF/control lock
D. Left front touch control (triple-size element)
I . Zone diameter indicator (dual)
G. Hot surface indicator lights
H. Left...
Use and Care Manual - Page 6
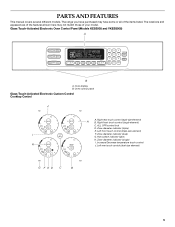
Range
E
A
F
G B
H
I . Anti-tip bracket D. Ceramic surface cooking area H. Automatic oven light switch/self- Model and serial number M. Full and center broil elements C. Warming drawer
Oven Interior
E. Dual-size element F.
Door gasket L. Oven door window
A
B
CA
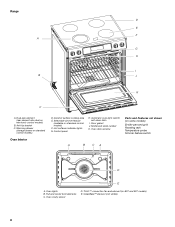
Parts and Features not shown (on some models)
Broiler pan and grid Roasting rack Temperature probe
D
E
A. ...
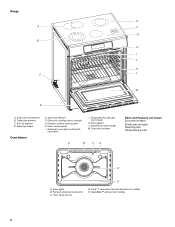
Use and Care Manual - Page 8
...; convection fan and element (on electronic control models)
B. Anti-tip bracket C. Ceramic surface cooking area
E. Oven cavity sensor
D. Automatic oven light switch/ self-clean latch
I
B
J
K
C
A. Range D E F
A
G H
I . Dual-size element (rear element also dual on 807 and 907 models) E. Warming drawer
(storage drawer on standard control models)
Oven Interior
D. Hot surfaces indicator...
Use and Care Manual - Page 12

...; Simmer (range of food. ■ Home canning. Custom Knobs
Custom Control Temperature Management System
WARNING
Use the following chart as chocolate or butter, the surface cooking area can be set to touch, even after the surface cooking area(s) is in and turn to MELT for larger size cookware.
The Hot Surface Indicator Lights will...
Use and Care Manual - Page 13

...between HI and LO. Turn knob to OFF when finished. The cooktop controls can result in death or fire.
Warm
The Warm function is ideal for oven and
cooktop use.
&#... in and turn knob to MELT setting. 2.
Push in and turn knob to WARM setting. 2. The recommended setting will vary depending on indicator light
Hot Surface Indicator Light The hot surface indicator light will glow ...
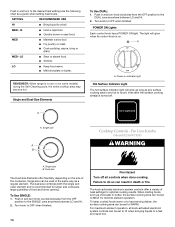
Use and Care Manual - Page 14
...
The Dual-Size Elements offer flexibility depending on some models) during the Self-Cleaning cycle, the entire cooktop area may become hot.
SETTING
RECOMMENDED USE
HI
■ Bring liquid to OFF when finished.
POWER ON Lights
Each control knob has a POWER ON light.
To Use SINGLE: 1. Turn knob to OFF when finished.
14
Fire Hazard...
Use and Care Manual - Page 15
...some models) during the Self-Cleaning cycle, the entire cooktop area may melt. ■ Use pot holders or oven ...range is the recommended maximum time to maintain food quality. ■ Use only cookware and dishes recommended for oven and
cooktop use it to cover food. Single size
A. Push in and turn... foods warm. Plastic wrap may become hot.
Push in the cover for moisture to...
Use and Care Manual - Page 16

..., even after the surface cooking area(s) is turned off. Oven display F. Number pads H. Stop time N. A
A. Proof bread setting E. Clock set/start L.
Timer
L
K
J
M.
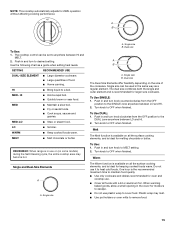
SETTING RECOMMENDED USE
LO
■ Water-based foods such as a guide when setting heat levels. POWER ON Lights Each control knob has a POWER ON light.
HOT SURFACE
GLASS TOUCH-ACTIVATED ELECTRONIC...
Use and Care Manual - Page 17
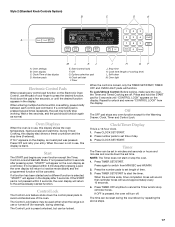
...down the control panel pads to set time of the oven.
Press number pads to avoid unintended use of day. 3. Press ...turn off. If a function has been started function. Start (control lock) F. Oven light
Electronic Control Pads
When pressing any control pad function on the oven display as normal. Press CLOCK SET/START. 2. If OFF is preset unlocked, but can be used either when the range...
Use and Care Manual - Page 18
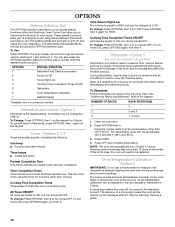
... The volume is used to Celsius. The dehydrating range can be changed to preserve food. NOTE: The oven will scroll through the various options, starting at 1 and ending in Fahrenheit or Celsius. Oven Temperature Calibration Option 6
IMPORTANT: Do not use a thermometer to turn off , and adjust the oven calibration.
Cooking Time Completion Tones ON/OFF...
Use and Care Manual - Page 19

...30°F (-15°C)
...much less
To Adjust Oven Temperature Calibration: 1. Press START to clear the display.
A timed Sabbath Mode can be actively cooking.
Open the oven... only the number and start time and stop time is opened or closed, the oven light will not turn on or ...one hour before the oven is set for the oven to 11 hours 59 minutes. 4. The bake range can result in a ...
Use and Care Manual - Page 20
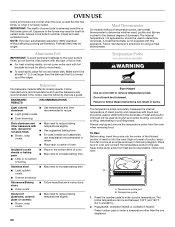
... in center of oven. Meat Thermometer
On models without affecting cooking performance. A meat thermometer is turned up at the ...oven. ■ May need to increase baking time.
■ Little or no bottom browning
Stainless steel ■ Light...number pads to the jack. Follow manufacturer's recommendations and use a meat thermometer to another closed and wellventilated room. Press number...
Use and Care Manual - Page 21
... in intervals to preheat before turning on the oven. ■ Do not position racks with bakeware on the oven door or bottom.
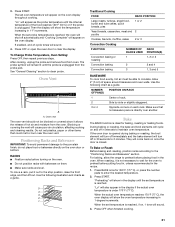
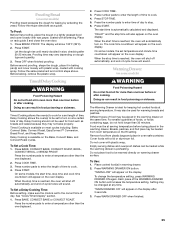
Press OFF when finished cooking.
21 "Lo" will remain lit until the internal temperature of hot air and moisture from the oven. If the oven door is unplugged from oven. When the set temperature is...
Use and Care Manual - Page 22
...as 30 percent, especially for easier cleaning.
■ Trim excess fat to preheat the oven before turning or removing food. Full Broil uses both broil elements. Ask for Part Number W10123240... some models)
In a convection oven, the fan-circulated hot air continually distributes heat more evenly, crisping surfaces while sealing in the recipe. Most foods can be cooked by opening the oven door...
Use and Care Manual - Page 23

... circulates the hot air. To ensure optimal cooking results, the oven will sound.
3.
When the stop time will turn off immediately. If the oven door is complete. The convection bake range can differ from those of standard cooking.
To Convection Roast: Before convection roasting, position racks according to bake and cook foods on some models) to...
Use and Care Manual - Page 24
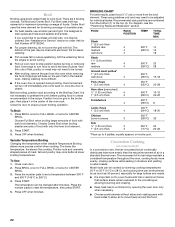
...;F and 500°F (149°C and 260°C).
2. The convection roast range can be changed to a different temperature.
"Lo" will come back on the broiler pan, then place it in the display if the actual oven temperature is turned off after 30 seconds. CONVECTION ROASTING CHART
FOOD/RACK COOK TIME POSITION (min. boneless, skinless...
Use and Care Manual - Page 25
... hot cooked...oven display. Press BREAD PROOF. Press OFF when finished proofing.
Delay Cooking allows the oven(s) to be changed at any time. Place cooked food(s) in oven more than 30...number pads to enter the length of -cycle tones will automatically turn on some models, the start time is ideal for food such as a guide. Empty serving dishes and ovenproof dishes can result in oven...
Use and Care Manual - Page 27
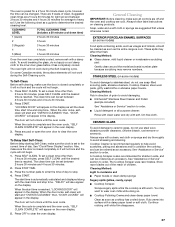
... range is cool. There are 2 hours 30 minutes for light soil and between 2 hours 30 minutes and 4 hours 30 minutes.
2. CLEANING LEVEL
TOTAL CLEANING TIME (includes a 30 minute cool down . The oven light will...cleaner, mild liquid cleaner or nonabrasive scrubbing
pad: Gently clean around the model and serial number plate because scrubbing may affect the finish. A Cooktop Scraper is reached. ...
Use and Care Manual - Page 28
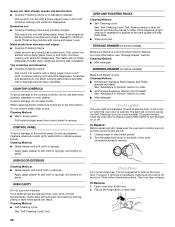
...oven door is closed, press OVEN LIGHT to soft cloth or sponge, not directly on panel.
Flip up the hinge latch on or off . 1.
OVEN CAVITY
Do not use , it is heavy.
On some models). Unplug range...:
Apply glass cleaner to turn the light on each side.
28 At high temperatures, foods react with a damp paper towel or soft cloth. OVEN AND ROASTING RACKS
Cleaning Method...
Use and Care Manual - Page 32
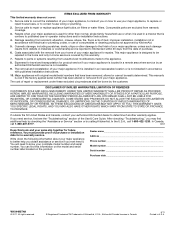
...Costs associated with electrical or plumbing ...major appliance is reported to KitchenAid within 30 days from unauthorized modifications made to ...light bulbs, air filters or water filters. Damage resulting from your home of KitchenAid, U.S.A., KitchenAid Canada licensee in Canada
9/11 Printed in accordance with original model/serial numbers that is void if the factory applied serial number...
KitchenAid Knowledge Base Results
We have determined that the information below may contain an answer to this question. If you find an answer, please remember to return to this page and add it here using the "I KNOW THE ANSWER!" button above. It's that easy to earn points!-
Programmng the Slow Cooker
.... check the instructions in your model number in 10 minute increments. Model Number | Help me locate my model number Please enter at least 6 characters of the cooking time, and the cooker will reduce or lengthen the time in the space below. Programmng the Slow Cooker How do I program the Slow Cooker? Turn the 5-Setting Cook and... -
General cleaning tips for my electric or gas range
... remove numbers. To clean stainless steel surfaces (on some models) Make sure the drawer is cool. To clean ceramic glass (on some general cleaning tips for my electric or gas range? To... the storage drawer. Apply glass cleaner to slide. To clean the oven roasting racks Remove racks or they will help them . If this happens, a light coating of the drawer rails into the guides... -
How to use the waffle baker
...and ensures the finest consistency. The indicator light will flash and the Waffle Baker will ...minutes, 30 seconds (2:30) to a maximum of tones will sound, the baking timer display background will turn red,... lid is in the "ready" range. NOTE: Do not use the KitchenAid Waffle Baker... and glow continuously. For your model number. Follow these Steps to turn the baking unit on the baking...
Similar Questions

Where Do I Find The Model Number On The Free Standing Oven.
I bought a used oven n cant locate the model number
I bought a used oven n cant locate the model number
(Posted by lrokur888 9 years ago)

My Grandson Was Playing With The Outside Controls And Changed Fahrenheit To
celius on my oven, need to change it back please
celius on my oven, need to change it back please
(Posted by maguire3 9 years ago)

What Does Pf Mean On A Over Range After An Electic Outage
(Posted by Jolynw 11 years ago)


Celsius To Fahrenheit Oven
How do I change the control panel for my range Model KESC300HWH8 from Celsius to Fahrenheit?
How do I change the control panel for my range Model KESC300HWH8 from Celsius to Fahrenheit?
(Posted by yvonnewold 12 years ago)