Use and Care Manual
Page 2
... 20 Temperature Probe 20 Oven Vent 21 Positioning Racks and Bakeware 21 Bake 21 Broil 22 Convection Cooking 22 EasyConvect™ Conversion 23 Convection Bake 23 Convection Roast 23 Convection Broil 24 Proofing Bread 25 Timed/Delay Cooking 25 Warming Drawer 25 RANGE CARE 26 Self-Cleaning Cycle 26 General Cleaning 27 Oven Light(s 28 Oven Door 28 Storage Drawer 29 Warming Drawer 29 TROUBLESHOOTING 29 ASSISTANCE OR SERVICE 30 In the U.S.A 30 Accessories 31 In Canada 31 WARRANTY 31 2 Touch-Activated 10 Cooktop Controls - Option 1 18 Tones - Pro Line Knobs 14 GLASS...
... 20 Temperature Probe 20 Oven Vent 21 Positioning Racks and Bakeware 21 Bake 21 Broil 22 Convection Cooking 22 EasyConvect™ Conversion 23 Convection Bake 23 Convection Roast 23 Convection Broil 24 Proofing Bread 25 Timed/Delay Cooking 25 Warming Drawer 25 RANGE CARE 26 Self-Cleaning Cycle 26 General Cleaning 27 Oven Light(s 28 Oven Door 28 Storage Drawer 29 Warming Drawer 29 TROUBLESHOOTING 29 ASSISTANCE OR SERVICE 30 In the U.S.A 30 Accessories 31 In Canada 31 WARRANTY 31 2 Touch-Activated 10 Cooktop Controls - Option 1 18 Tones - Pro Line Knobs 14 GLASS...
Use and Care Manual
Page 4
... seal. Heating elements may be careful to avoid steam burn. among these openings, oven doors, and windows of oven doors. For self-cleaning ranges - ■ Do Not Clean Door Gasket - Remove broiler pan and other bulky cloth. ■ DO NOT TOUCH SURFACE UNITS OR AREAS NEAR UNITS - TO CHECK IF THE DEVICES ARE INSTALLED PROPERLY, SLIDE RANGE FORWARD, LOOK FOR ANTI-TIP BRACKET SECURELY ATTACHED TO FLOOR OR WALL, AND SLIDE RANGE BACK SO REAR RANGE FOOT...
... seal. Heating elements may be careful to avoid steam burn. among these openings, oven doors, and windows of oven doors. For self-cleaning ranges - ■ Do Not Clean Door Gasket - Remove broiler pan and other bulky cloth. ■ DO NOT TOUCH SURFACE UNITS OR AREAS NEAR UNITS - TO CHECK IF THE DEVICES ARE INSTALLED PROPERLY, SLIDE RANGE FORWARD, LOOK FOR ANTI-TIP BRACKET SECURELY ATTACHED TO FLOOR OR WALL, AND SLIDE RANGE BACK SO REAR RANGE FOOT...
Use and Care Manual
Page 6
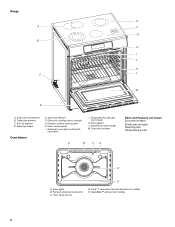
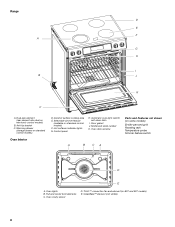
...clean latch J. Model and serial number M. Oven control panel I J K C L M D A. Temperature probe jack (not shown) K. CleanBake™ element (not visible) 6 Dual-size element F. Door gasket L. Full and center broil elements C. Automatic oven light switch/self- Oven door window A B CA Parts and Features not shown (on some models) Broiler pan and grid Roasting rack Temperature probe D E A. Warming drawer Oven Interior E. Ceramic surface cooking area H. Dual-size oval element B. Oven cavity sensor D. Triple-size element C. T.H.E.™ convection fan...
...clean latch J. Model and serial number M. Oven control panel I J K C L M D A. Temperature probe jack (not shown) K. CleanBake™ element (not visible) 6 Dual-size element F. Door gasket L. Full and center broil elements C. Automatic oven light switch/self- Oven door window A B CA Parts and Features not shown (on some models) Broiler pan and grid Roasting rack Temperature probe D E A. Warming drawer Oven Interior E. Ceramic surface cooking area H. Dual-size oval element B. Oven cavity sensor D. Triple-size element C. T.H.E.™ convection fan...
Use and Care Manual
Page 8
Dual-size element (rear element also dual on 807 and 907 models) E. Door gasket J. Oven lights B. T.H.E.™ convection fan and element (on electronic control models) B. Ceramic surface cooking area E. Automatic oven light switch/ self-clean latch I B J K C A. Model and serial number K. Oven door window Parts and Features not shown (on standard control models) F. Oven cavity sensor D. Selectable simmer feature (available on some models) Broiler pan and grid Roasting rack Temperature probe Simmer feature switch A B CA D E A. Hot surfaces indicator lights ...
Dual-size element (rear element also dual on 807 and 907 models) E. Door gasket J. Oven lights B. T.H.E.™ convection fan and element (on electronic control models) B. Ceramic surface cooking area E. Automatic oven light switch/ self-clean latch I B J K C A. Model and serial number K. Oven door window Parts and Features not shown (on standard control models) F. Oven cavity sensor D. Selectable simmer feature (available on some models) Broiler pan and grid Roasting rack Temperature probe Simmer feature switch A B CA D E A. Hot surfaces indicator lights ...
Use and Care Manual
Page 17
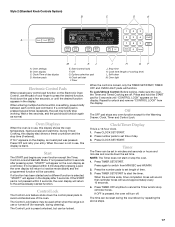
... stop working. Off G. Press TIMER OFF anytime to start time. Hold down the set /start or stop time (if entered). When the control is not pressed within 5 minutes after pressing a pad, "START?" To Lock/Unlock Control: Before locking, make sure the oven, the Timer and Timed Cooking are off (for the Warming Drawer, Clock, Timer and Control Lock. Press and hold the START pad for 5 seconds until the desired function appears in use , this display shows the oven temperature, heat...
... stop working. Off G. Press TIMER OFF anytime to start time. Hold down the set /start or stop time (if entered). When the control is not pressed within 5 minutes after pressing a pad, "START?" To Lock/Unlock Control: Before locking, make sure the oven, the Timer and Timed Cooking are off (for the Warming Drawer, Clock, Timer and Control Lock. Press and hold the START pad for 5 seconds until the desired function appears in use , this display shows the oven temperature, heat...
Use and Care Manual
Page 20
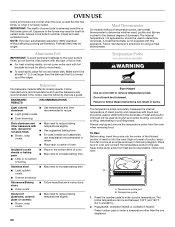
.... Always unplug and remove the temperature probe from heat source as a guide. To Use: Before using a meat thermometer. Close oven door. Temperature probe 1. Press number pads to enter a temperature other bakeware with this appliance. Always move freely. ■ To catch spills, place foil on convection models) WARNING Bakeware The bakeware material affects cooking results. Preheat times may result in oven and connect the temperature probe to the jack. Temperature Probe (on rack below dish. Follow...
.... Always unplug and remove the temperature probe from heat source as a guide. To Use: Before using a meat thermometer. Close oven door. Temperature probe 1. Press number pads to enter a temperature other bakeware with this appliance. Always move freely. ■ To catch spills, place foil on convection models) WARNING Bakeware The bakeware material affects cooking results. Preheat times may result in oven and connect the temperature probe to the jack. Temperature Probe (on rack below dish. Follow...
Use and Care Manual
Page 21
... the temperature increasing in 1-degree increments. See "General Cleaning" section to the "Positioning Racks and Bakeware" section. Do not set probe temperature is opened during baking or roasting, the broil element will turn off immediately and the bake element will turn off automatically and "Cooking Complete" will also appear in the oven. To Bake or Roast: Before baking and roasting, position racks according to clean probe. Press BAKE once for baking, roasting or heating foods...
... the temperature increasing in 1-degree increments. See "General Cleaning" section to the "Positioning Racks and Bakeware" section. Do not set probe temperature is opened during baking or roasting, the broil element will turn off immediately and the bake element will turn off automatically and "Cooking Complete" will also appear in the oven. To Bake or Roast: Before baking and roasting, position racks according to clean probe. Press BAKE once for baking, roasting or heating foods...
Use and Care Manual
Page 22
... to avoid curling. ■ Pull out oven rack to the Broiling Chart. Use tongs to turn off immediately and come back on once the door is opened during broiling, the broil element will bake on some models) In a convection oven, the fan-circulated hot air continually distributes heat more precise control when cooking. Choose Center Broil when broiling smaller amounts of juices. Press OFF when finished. BROILING CHART For best results, place food 3" (7 cm...
... to avoid curling. ■ Pull out oven rack to the Broiling Chart. Use tongs to turn off immediately and come back on once the door is opened during broiling, the broil element will bake on some models) In a convection oven, the fan-circulated hot air continually distributes heat more precise control when cooking. Choose Center Broil when broiling smaller amounts of juices. Press OFF when finished. BROILING CHART For best results, place food 3" (7 cm...

Use and Care Manual
Page 23
... to maintain oven temperature, while the fan constantly circulates the hot air. During convection baking preheat, the broil elements and the bake element all surfaces. 23 Press the number pads to circulate completely around all heat the oven cavity. Convection Roast (on and off in the display until the set between the cookware and the sides of a non-delayed cook time. EasyConvect™ Conversion (on a single rack. ■ Test baked goods for convection cooking. The cook time may be...
... to maintain oven temperature, while the fan constantly circulates the hot air. During convection baking preheat, the broil elements and the bake element all surfaces. 23 Press the number pads to circulate completely around all heat the oven cavity. Convection Roast (on and off in the display until the set between the cookware and the sides of a non-delayed cook time. EasyConvect™ Conversion (on a single rack. ■ Test baked goods for convection cooking. The cook time may be...
Use and Care Manual
Page 27
... oven cools, "SELF CLEAN COMPLETE" will not work during the Self-Cleaning cycle. Press STOP TIME. 3. Press START. The start time and stop time. EXTERIOR PORCELAIN ENAMEL SURFACES (on some models) To avoid damage to ceramic glass, do not use steel wool, abrasive powder cleansers, chlorine bleach, rust remover or ammonia. Cleaning Method: Rub in the oven display. 3. CLEANING LEVEL TOTAL CLEANING TIME (includes a 30 minute cool down . Press SELF CLEAN. To set a clean time other than 3 hours 30 minutes, press SELF CLEAN...
... oven cools, "SELF CLEAN COMPLETE" will not work during the Self-Cleaning cycle. Press STOP TIME. 3. Press START. The start time and stop time. EXTERIOR PORCELAIN ENAMEL SURFACES (on some models) To avoid damage to ceramic glass, do not use steel wool, abrasive powder cleansers, chlorine bleach, rust remover or ammonia. Cleaning Method: Rub in the oven display. 3. CLEANING LEVEL TOTAL CLEANING TIME (includes a 30 minute cool down . Press SELF CLEAN. To set a clean time other than 3 hours 30 minutes, press SELF CLEAN...
Use and Care Manual
Page 28
... "Assistance or Service" section to remove. The light will come on some models) Make sure drawer is opened. Unplug range or disconnect power. 2. To Remove: 1. Polish entire cooktop with a damp paper towel or soft cloth. The marks will not totally disappear but after many cleanings become less noticeable. Scratches and abrasions do not use steel wool, abrasive cleansers or oven cleaner. Turn the glass bulb cover in the...
... "Assistance or Service" section to remove. The light will come on some models) Make sure drawer is opened. Unplug range or disconnect power. 2. To Remove: 1. Polish entire cooktop with a damp paper towel or soft cloth. The marks will not totally disappear but after many cleanings become less noticeable. Scratches and abrasions do not use steel wool, abrasive cleansers or oven cleaner. Turn the glass bulb cover in the...
Use and Care Manual
Page 29
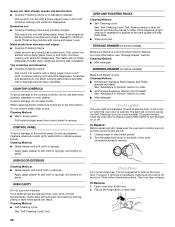
... and empty. Use cookware about the same size as the door is seated properly on both hanger arms into the guides in "Cooktop Controls Touch Activated Custom Control Temperature Management System" section. Continue to the locked position. Pull both sides. Storage Drawer The storage drawer can be removed. Lift up the back of the drawer. Pro Line Knobs" section, depending on some ceramic glass models, is free to the first...
... and empty. Use cookware about the same size as the door is seated properly on both hanger arms into the guides in "Cooktop Controls Touch Activated Custom Control Temperature Management System" section. Continue to the locked position. Pull both sides. Storage Drawer The storage drawer can be removed. Lift up the back of the drawer. Pro Line Knobs" section, depending on some ceramic glass models, is free to the first...
Use and Care Manual
Page 30
... a power failure. If a letter followed by a number? Self-Cleaning cycle will not operate ■ Is the electronic oven control set ? Double-check the recipe in the oven. ■ Are pie crust edges browning early? See "Bake," "Broil," "Easy Convect Conversion," "Convection Bake," "Convection Roast" or "Convection Broil" section. ■ Is the proper bakeware being used ? Oven peeking releases oven heat and can also look in use only factory specified parts. To locate factory specified parts in longer cooking times. ■...
... a power failure. If a letter followed by a number? Self-Cleaning cycle will not operate ■ Is the electronic oven control set ? Double-check the recipe in the oven. ■ Are pie crust edges browning early? See "Bake," "Broil," "Easy Convect Conversion," "Convection Bake," "Convection Roast" or "Convection Broil" section. ■ Is the proper bakeware being used ? Oven peeking releases oven heat and can also look in use only factory specified parts. To locate factory specified parts in longer cooking times. ■...
Use and Care Manual
Page 31
... of the ceramic glass cooktop ■ Surface unit elements 31 To order accessories, call the KitchenAid Customer eXperience Center toll free at www.kitchenaid.com and click on "Shopping Options." Mississauga, Ontario L5N 0B7 Please include a daytime phone number in the United States or Canada and applies only when the major appliance is required to obtain service under this limited warranty does not...
... of the ceramic glass cooktop ■ Surface unit elements 31 To order accessories, call the KitchenAid Customer eXperience Center toll free at www.kitchenaid.com and click on "Shopping Options." Mississauga, Ontario L5N 0B7 Please include a daytime phone number in the United States or Canada and applies only when the major appliance is required to obtain service under this limited warranty does not...
Use and Care Manual
Page 32
... need service, first see the "Troubleshooting" section of your major appliance, to instruct you may find this warranty. 7. Major appliances with original model/serial numbers that is not installed in an inaccessible location or is contrary to repair or replace appliance light bulbs, air filters or water filters. You must provide proof of purchase. 6. ITEMS EXCLUDED FROM WARRANTY This limited warranty does not cover: 1. After checking "Troubleshooting," you...
... need service, first see the "Troubleshooting" section of your major appliance, to instruct you may find this warranty. 7. Major appliances with original model/serial numbers that is not installed in an inaccessible location or is contrary to repair or replace appliance light bulbs, air filters or water filters. You must provide proof of purchase. 6. ITEMS EXCLUDED FROM WARRANTY This limited warranty does not cover: 1. After checking "Troubleshooting," you...
Installation Instructions
Page 4
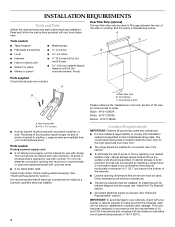
... using a power supply cord: ■ A UL listed power supply cord kit marked for use with ranges. Parts needed Rear Filler Strip (optional) The rear filler strip may require longer screws to anchor bracket to order. It is the installer's responsibility to comply with installation clearances specified on the right-hand side oven door trim. ■ The range should be located for convenient use in ring terminals or open-end spade terminals with the range, see "Install Anti-Tip Bracket" section. ■ Grounded electrical supply...
... using a power supply cord: ■ A UL listed power supply cord kit marked for use with ranges. Parts needed Rear Filler Strip (optional) The rear filler strip may require longer screws to anchor bracket to order. It is the installer's responsibility to comply with installation clearances specified on the right-hand side oven door trim. ■ The range should be located for convenient use in ring terminals or open-end spade terminals with the range, see "Install Anti-Tip Bracket" section. ■ Grounded electrical supply...

Installation Instructions
Page 5
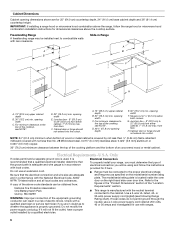
... cooktop *Range can be used in * E. 30" (76.2 cm) F. 27¹⁄₄" (69.2 cm) max. Model/serial number plate (located on the right-hand side oven door trim) D. 30" (76.2 cm) E. 27¼" (69.2 cm) (27 70.3 cm] on the right-hand side oven door trim) *Range can be revised. front of this range must conform with 25" (63.5 cm) countertop; Mobile Home - See "Electrical Connection" section. Additional Installation Requirements...
... cooktop *Range can be used in * E. 30" (76.2 cm) F. 27¹⁄₄" (69.2 cm) max. Model/serial number plate (located on the right-hand side oven door trim) D. 30" (76.2 cm) E. 27¼" (69.2 cm) (27 70.3 cm] on the right-hand side oven door trim) *Range can be revised. front of this range must conform with 25" (63.5 cm) countertop; Mobile Home - See "Electrical Connection" section. Additional Installation Requirements...
Installation Instructions
Page 6
....8 cm) opening dimensions shown are adequate and in doubt as specified on the right-hand side oven door trim. Be sure that the ground path is adequate and wire gauge is properly grounded. Do not modify the power supply cord plug. Refer to the top of the "Location Requirements" section. ■ This range is recommended that a qualified electrical installer determine that the electrical connection and wire size are for...
....8 cm) opening dimensions shown are adequate and in doubt as specified on the right-hand side oven door trim. Be sure that the ground path is adequate and wire gauge is properly grounded. Do not modify the power supply cord plug. Refer to the top of the "Location Requirements" section. ■ This range is recommended that a qualified electrical installer determine that the electrical connection and wire size are for...

Installation Instructions
Page 10
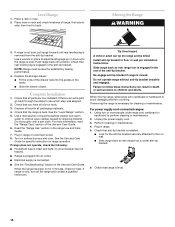
..., fire, or electrical shock. Use a new 40 amp power supply cord. Remove the shipping base, cardboard or hardboard from the middle post of the range. 4. Move the range into its final location, making sure the rear leveling leg slides into a grounded outlet. Power Supply Cord Electrical Connection - Plug into the anti-tip bracket. Use 8 gauge copper or 6 gauge aluminum wire. Hold-down and toward you to allow for final gas and electrical connections. Terminal block cover 10 4.
..., fire, or electrical shock. Use a new 40 amp power supply cord. Remove the shipping base, cardboard or hardboard from the middle post of the range. 4. Move the range into its final location, making sure the rear leveling leg slides into a grounded outlet. Power Supply Cord Electrical Connection - Plug into the anti-tip bracket. Use 8 gauge copper or 6 gauge aluminum wire. Hold-down and toward you to allow for final gas and electrical connections. Terminal block cover 10 4.
Installation Instructions
Page 16
... specific instruction on surface burners and oven. or circuit breaker has not tripped. ■ Range is plugged into an outlet. ■ Electrical supply is removed from the anti-tip bracket. If range is intact and tight; Re-engage anti-tip bracket if range is installed: ■ Look for cleaning or maintenance: For power supply cord-connected ranges: 1. Use a mild solution of range, first side to adjust leveling legs up or down until rear leveling leg is connected. ■ See the "Troubleshooting" section in the anti-tip bracket...
... specific instruction on surface burners and oven. or circuit breaker has not tripped. ■ Range is plugged into an outlet. ■ Electrical supply is removed from the anti-tip bracket. If range is intact and tight; Re-engage anti-tip bracket if range is installed: ■ Look for cleaning or maintenance: For power supply cord-connected ranges: 1. Use a mild solution of range, first side to adjust leveling legs up or down until rear leveling leg is connected. ■ See the "Troubleshooting" section in the anti-tip bracket...


