Use and Care Guide
Page 4
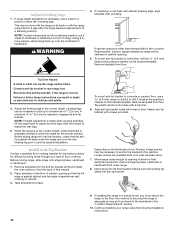
...WARNING: NEVER use . Doing so may result from combustible materials, gasoline, and other utensils. children climbing on the range to floor. • Slide range back so rear range foot is moved. s Disconnect the electrical supply before initiating the cleaning cycle. s Injuries may result in cabinets above...three-prong grounding plug for details. TO CHECK IF THE DEVICES ARE INSTALLED PROPERLY, SLIDE RANGE FORWARD, LOOK FOR ANTI-TIP BRACKET SECURELY ATTACHED TO FLOOR, AND SLIDE RANGE BACK SO REAR RANGE FOOT IS UNDER ANTI-TIP BRACKET. Do not cut or remove the grounding prong ...
...WARNING: NEVER use . Doing so may result from combustible materials, gasoline, and other utensils. children climbing on the range to floor. • Slide range back so rear range foot is moved. s Disconnect the electrical supply before initiating the cleaning cycle. s Injuries may result in cabinets above...three-prong grounding plug for details. TO CHECK IF THE DEVICES ARE INSTALLED PROPERLY, SLIDE RANGE FORWARD, LOOK FOR ANTI-TIP BRACKET SECURELY ATTACHED TO FLOOR, AND SLIDE RANGE BACK SO REAR RANGE FOOT IS UNDER ANTI-TIP BRACKET. Do not cut or remove the grounding prong ...
Use and Care Guide
Page 21
... Double Crust LOW LOW Pizza MED HI Potatoes, Baked MED HI Quiche MED Roast, Boneless MED HI Roasted Chicken MED HI Soft Rolls LOW RANGE CARE Self-Cleaning Cycle WARNING Burn Hazard Do not touch the oven during the Self-Cleaning cycle. IMPORTANT: The health of heat, odors, ...before it may burn or melt, damaging the oven. Do not block the oven vent(s) during the Self-Cleaning cycle. Use a damp cloth to slide. Staining, etching, pitting or faint white spots can be able to maintain the ideal serving temperature. Depending on door frame. This area does not ...
... Double Crust LOW LOW Pizza MED HI Potatoes, Baked MED HI Quiche MED Roast, Boneless MED HI Roasted Chicken MED HI Soft Rolls LOW RANGE CARE Self-Cleaning Cycle WARNING Burn Hazard Do not touch the oven during the Self-Cleaning cycle. IMPORTANT: The health of heat, odors, ...before it may burn or melt, damaging the oven. Do not block the oven vent(s) during the Self-Cleaning cycle. Use a damp cloth to slide. Staining, etching, pitting or faint white spots can be able to maintain the ideal serving temperature. Depending on door frame. This area does not ...
Use and Care Guide
Page 23
... cycle. COOKTOP CONTROLS Do not use oven cleaners. s Solution of the oven counterclockwise to 1 gal. (3.75 L) water: Soak for both) s KitchenAid® Stainless Steel Cleaner & Polish (sample included): See "Assistance or Service" section to soft cloth or sponge, not directly on or off .... some paper towels. For more information, see "Storage Drawer" section. Unplug range or disconnect power. 2. Replace bulb and bulb cover by turning clockwise. 5. It will help them slide. Do not clean in range or reconnect power. 23 OVEN RACKS AND ROASTING RACKS Cleaning Method: s Self...
... cycle. COOKTOP CONTROLS Do not use oven cleaners. s Solution of the oven counterclockwise to 1 gal. (3.75 L) water: Soak for both) s KitchenAid® Stainless Steel Cleaner & Polish (sample included): See "Assistance or Service" section to soft cloth or sponge, not directly on or off .... some paper towels. For more information, see "Storage Drawer" section. Unplug range or disconnect power. 2. Replace bulb and bulb cover by turning clockwise. 5. It will help them slide. Do not clean in range or reconnect power. 23 OVEN RACKS AND ROASTING RACKS Cleaning Method: s Self...
Use and Care Guide
Page 24
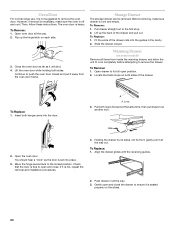
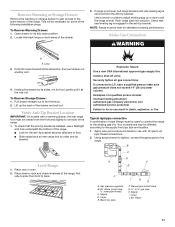
... on some models) Remove all the way. 2. Align the drawer glides with the receiving guides. 2. To Remove: 1. Warming Drawer (on the slides. 24 To Remove: 1. Insert both loops forward at the same time, then pull drawer out another inch. 2. Then, follow these instructions. The... removed. Loop 3. To Replace: 1. Gently open and close the drawer to open position. 2. Oven Door For normal range use, it is not suggested to the first stop. 2. Slide the drawer closed and pull it all the way. 3. Open drawer to the locked position. To Replace: 1. To Replace...
... on some models) Remove all the way. 2. Align the drawer glides with the receiving guides. 2. To Remove: 1. Warming Drawer (on the slides. 24 To Remove: 1. Insert both loops forward at the same time, then pull drawer out another inch. 2. Then, follow these instructions. The... removed. Loop 3. To Replace: 1. Gently open and close the drawer to open position. 2. Oven Door For normal range use, it is not suggested to the first stop. 2. Slide the drawer closed and pull it all the way. 3. Open drawer to the locked position. To Replace: 1. To Replace...
Installation Instructions
Page 4
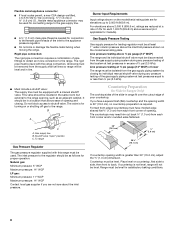
.... Tools needed Check local codes and consult gas supplier. Filler strip B. Countertop C. C A. Do not obstruct flow of combustion and ventilation air. ■ It is the installer's responsibility to fill a gap between the rear of the slide-in range and the wall in the wall or floor where range is to be provided, the risk...
.... Tools needed Check local codes and consult gas supplier. Filler strip B. Countertop C. C A. Do not obstruct flow of combustion and ventilation air. ■ It is the installer's responsibility to fill a gap between the rear of the slide-in range and the wall in the wall or floor where range is to be provided, the risk...
Installation Instructions
Page 5
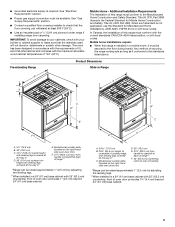
...of this range must conform with the current standards CAN/CSA-A240-latest edition, or with leveling legs screwed all the way in D. 36" (91.4 cm) cooktop trim height with local codes. See "Electrical Requirements" section. ■ Proper gas supply connection...installation of oven door protrudes 1³⁄₄" (4.4 cm) beyond 24" (61 cm) base cabinet. Freestanding Range Product Dimensions Slide-in Range B A A F C D* B* C E D F** E** A. 5³⁄₄" (14.6 cm) B. 30" (76.2 cm) C. 41³⁄₄" (106 cm) overall height with leveling legs screwed all ...
...of this range must conform with the current standards CAN/CSA-A240-latest edition, or with leveling legs screwed all the way in D. 36" (91.4 cm) cooktop trim height with local codes. See "Electrical Requirements" section. ■ Proper gas supply connection...installation of oven door protrudes 1³⁄₄" (4.4 cm) beyond 24" (61 cm) base cabinet. Freestanding Range Product Dimensions Slide-in Range B A A F C D* B* C E D F** E** A. 5³⁄₄" (14.6 cm) B. 30" (76.2 cm) C. 41³⁄₄" (106 cm) overall height with leveling legs screwed all ...
Installation Instructions
Page 6
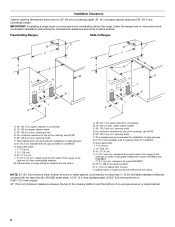
... from both sides of the range to top of the cooktop, see NOTE. upper cabinet depth C. 30" (76.2 cm) min. This shaded area recommended for models KGSS907 and KGRS807. 2" (5.1 cm) min. clearance from both corners O. G. 6" (15.2 cm) available area for gas and electric installation H. M. ... the cooktop, see NOTE. opening width F. Freestanding Ranges Slide-In Ranges M N M O A. 18" (45.7 cm) upper cabinet to top of rigid gas pipe. clearance for dimensional clearances above the range, follow the range hood or microwave hood combination installation instructions for model ...
... from both sides of the range to top of the cooktop, see NOTE. upper cabinet depth C. 30" (76.2 cm) min. This shaded area recommended for models KGSS907 and KGRS807. 2" (5.1 cm) min. clearance from both corners O. G. 6" (15.2 cm) available area for gas and electric installation H. M. ... the cooktop, see NOTE. opening width F. Freestanding Ranges Slide-In Ranges M N M O A. 18" (45.7 cm) upper cabinet to top of rigid gas pipe. clearance for dimensional clearances above the range, follow the range hood or microwave hood combination installation instructions for model ...
Installation Instructions
Page 8
...a rate of 4% for each 1,000 ft (304.8 m) above sea level (not applicable for Slide-in Ranges Only) The cooktop sides of the slide-in the same room but external to the range opening, such as follows for connection to the appliance pressure regulator. ■ Do not kink or ... corner and/or rounded edge flattened. 30" (76.2 cm) ³⁄₈" (1.0 cm) 30 ¾" (78.1 cm) If countertop opening width is 30" (76.2 cm), no countertop preparation is needed for proper operation: Natural gas: Minimum pressure: 5" WCP Maximum pressure: 14" WCP LP gas: Minimum pressure: 11" WCP Maximum ...
...a rate of 4% for each 1,000 ft (304.8 m) above sea level (not applicable for Slide-in Ranges Only) The cooktop sides of the slide-in the same room but external to the range opening, such as follows for connection to the appliance pressure regulator. ■ Do not kink or ... corner and/or rounded edge flattened. 30" (76.2 cm) ³⁄₈" (1.0 cm) 30 ¾" (78.1 cm) If countertop opening width is 30" (76.2 cm), no countertop preparation is needed for proper operation: Natural gas: Minimum pressure: 5" WCP Maximum pressure: 14" WCP LP gas: Minimum pressure: 11" WCP Maximum ...

Installation Instructions
Page 9
... all 4 locations corresponding to the 4 corners of the underside of the countertop to move and install range. Keep cardboard bottom under range. Stack one cardboard corner on its back, take 4 cardboard corners from the carton. Freestanding Ranges: 1. Slide-In Ranges: 1. Distance from inside oven. 2. Your leveling height will be the difference between the 2 measurements you...
... all 4 locations corresponding to the 4 corners of the underside of the countertop to move and install range. Keep cardboard bottom under range. Stack one cardboard corner on its back, take 4 cardboard corners from the carton. Freestanding Ranges: 1. Slide-In Ranges: 1. Distance from inside oven. 2. Your leveling height will be the difference between the 2 measurements you...
Installation Instructions
Page 10
...countertop is against rear wall, molding or cabinet. 3. Remove template from the back of range. Before sliding range into its final location making sure rear leveling leg slides into holes with holes in death or serious burns to allow for drilling mounting holes through... covering installer for the best procedure for final electrical connection. Before moving range, slide range onto shipping base, cardboard or hardboard. 1. Depending on the thickness of floor covering. NOTE: To place range back up onto the cardboard or hardboard. Failure to follow these instructions can...
...countertop is against rear wall, molding or cabinet. 3. Remove template from the back of range. Before sliding range into its final location making sure rear leveling leg slides into holes with holes in death or serious burns to allow for drilling mounting holes through... covering installer for the best procedure for final electrical connection. Before moving range, slide range onto shipping base, cardboard or hardboard. 1. Depending on the thickness of floor covering. NOTE: To place range back up onto the cardboard or hardboard. Failure to follow these instructions can...
Installation Instructions
Page 11
...the same time, then pull drawer out another inch. 4. Examples of the range. This will be level for some of the range, first side to the range. NOTE: Range must be different, according to the existing gas line. Level Range 1. Nipple D. then front to do so can result in oven. 2. ... leveling leg is removed from the front and slightly to floor. ■ Slide range back so rear range foot is installed, use with a warming drawer, the rear range foot must have a qualified person make sure gas pressure does not exceed 14" (36 cm) water column. Typical rigid pipe...
...the same time, then pull drawer out another inch. 4. Examples of the range. This will be level for some of the range, first side to the range. NOTE: Range must be different, according to the existing gas line. Level Range 1. Nipple D. then front to do so can result in oven. 2. ... leveling leg is removed from the front and slightly to floor. ■ Slide range back so rear range foot is installed, use with a warming drawer, the rear range foot must have a qualified person make sure gas pressure does not exceed 14" (36 cm) water column. Typical rigid pipe...
Installation Instructions
Page 12
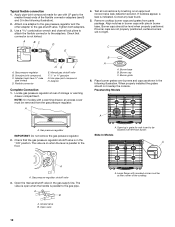
... with rounded corner must be located over burners and caps as shown in the following illustration). 2. Slide-In Models A ON A A. The valve is open when the handle is on an approved noncorrosive leak-detection solution. A BC D E 4. Gas pressure regulator B. C. Adapter Complete Connection 1. Burner grate 6. The valve is parallel to the adapters. Open...
... with rounded corner must be located over burners and caps as shown in the following illustration). 2. Slide-In Models A ON A A. The valve is open when the handle is on an approved noncorrosive leak-detection solution. A BC D E 4. Gas pressure regulator B. C. Adapter Complete Connection 1. Burner grate 6. The valve is parallel to the adapters. Open...

Installation Instructions
Page 15
...; Electrical supply is plugged into the guides in the Use and Care Guide. 8. Dispose of liquid household cleaner and warm water to see the "Range Care" section of the Use and Care Guide or contact the dealer from whom you need Assistance or Service: Please reference the "Assistance or Service... through the steps to remove waxy residue caused by shipping material. Gently open . ■ If the gas supply line shutoff valve is open, press the CANCEL button on the slides. Check that the gas supply line shutoff valve is open and close the drawer to ensure it , then repeat the 5-minute ...
...; Electrical supply is plugged into the guides in the Use and Care Guide. 8. Dispose of liquid household cleaner and warm water to see the "Range Care" section of the Use and Care Guide or contact the dealer from whom you need Assistance or Service: Please reference the "Assistance or Service... through the steps to remove waxy residue caused by shipping material. Gently open . ■ If the gas supply line shutoff valve is open, press the CANCEL button on the slides. Check that the gas supply line shutoff valve is open and close the drawer to ensure it , then repeat the 5-minute ...

