Use and Care Guide
Page 3
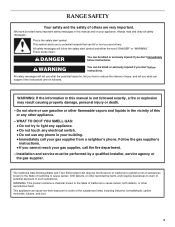
... to warn of potential exposure to the State of the substances listed, including benzene, formaldehyde, carbon monoxide, toluene, and soot. 3 RANGE SAFETY Your safety and the safety of others . All safety messages will follow instructions. The California Safe Drinking Water and Toxic Enforcement Act...phone in this or any electrical switch. • Do not use gasoline or other flammable vapors and liquids in this manual is the safety alert symbol. Follow the gas supplier's instructions. • If you don't follow the safety alert symbol and either the word "DANGER" or ...
... to warn of potential exposure to the State of the substances listed, including benzene, formaldehyde, carbon monoxide, toluene, and soot. 3 RANGE SAFETY Your safety and the safety of others . All safety messages will follow instructions. The California Safe Drinking Water and Toxic Enforcement Act...phone in this or any electrical switch. • Do not use gasoline or other flammable vapors and liquids in this manual is the safety alert symbol. Follow the gas supplier's instructions. • If you don't follow the safety alert symbol and either the word "DANGER" or ...
Use and Care Guide
Page 5
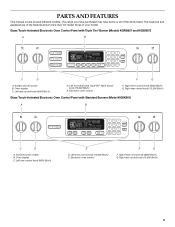
... Btu/h) G. Right rear control knob (12,500 Btu/h) Glass Touch-Activated Electronic Oven Control Panel with Triple Tier® Burner (Models KGRS807 and KGSS907) A B MED LOW HI ON F C CONTROL LOCKED CLEAN TIME PROBE TEMP HR MIN COOK TIME NIGHT LIGHT DELAY MIN HR SEC MIN START ... purchased may not match those of the items listed. Right front control knob (6000 Btu/h) G. PARTS AND FEATURES This manual covers several different models. Surface burner locator B. The range you have some or all of your model. Left rear control knob (6000 Btu/h) D. Oven display C. Glass Touch...
... Btu/h) G. Right rear control knob (12,500 Btu/h) Glass Touch-Activated Electronic Oven Control Panel with Triple Tier® Burner (Models KGRS807 and KGSS907) A B MED LOW HI ON F C CONTROL LOCKED CLEAN TIME PROBE TEMP HR MIN COOK TIME NIGHT LIGHT DELAY MIN HR SEC MIN START ... purchased may not match those of the items listed. Right front control knob (6000 Btu/h) G. PARTS AND FEATURES This manual covers several different models. Surface burner locator B. The range you have some or all of your model. Left rear control knob (6000 Btu/h) D. Oven display C. Glass Touch...
Use and Care Guide
Page 7
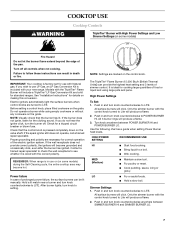
...highest heat setting and 3 levels of the electric ignition system. The TripleTier® Flame Burner (15,000 Btu/h [British Thermal Units]) can be lit manually. Push in and turn the burner off all controls when not cooking. s Wok cooking. s Fry poultry or meat. Before setting a control knob,...the grate. High Power Settings To Set: 1. s Cook pudding, sauce, icing or gravy. Failure to use LP Gas, an LP Gas Conversion Kit is factory-set for standard ranges. Do not operate a burner while using large pots and pans. If you wish to follow these instructions can result in...
...highest heat setting and 3 levels of the electric ignition system. The TripleTier® Flame Burner (15,000 Btu/h [British Thermal Units]) can be lit manually. Push in and turn the burner off all controls when not cooking. s Wok cooking. s Fry poultry or meat. Before setting a control knob,...the grate. High Power Settings To Set: 1. s Cook pudding, sauce, icing or gravy. Failure to use LP Gas, an LP Gas Conversion Kit is factory-set for standard ranges. Do not operate a burner while using large pots and pans. If you wish to follow these instructions can result in...

Installation Instructions
Page 2
... instructions. TABLE OF CONTENTS RANGE SAFETY 2 INSTALLATION REQUIREMENTS 4 Tools and Parts 4 Location Requirements 4 Electrical Requirements 7 Gas Supply Requirements 7 Countertop Preparation 8 INSTALLATION INSTRUCTIONS 9 Unpack Range 9 Measure for Proper Height...aplomb de la cuisinière 29 Raccordement à la canalisation de gaz 30 Système d'allumage électronique 31 Réinstallation des grilles du... alert symbol. We have provided many important safety messages in this manual and on your appliance. Always read and obey all safety messages. These...
... instructions. TABLE OF CONTENTS RANGE SAFETY 2 INSTALLATION REQUIREMENTS 4 Tools and Parts 4 Location Requirements 4 Electrical Requirements 7 Gas Supply Requirements 7 Countertop Preparation 8 INSTALLATION INSTRUCTIONS 9 Unpack Range 9 Measure for Proper Height...aplomb de la cuisinière 29 Raccordement à la canalisation de gaz 30 Système d'allumage électronique 31 Réinstallation des grilles du... alert symbol. We have provided many important safety messages in this manual and on your appliance. Always read and obey all safety messages. These...

Installation Instructions
Page 3
... Immediately call the fire department. - Failure to follow the "What to rear range foot. Do not store or use gasoline or other appliance. - WARNING: Gas leaks cannot always be a T-handle type. ■ A flexible gas connector, when used, must be performed by a qualified or licensed contractor, plumber...State of this manual is moved. Gas suppliers recommend that you use any phone in your gas supplier. Connect anti-tip bracket to do if you cannot reach your gas supplier, call your gas supplier from a neighbor's phone. Reconnect the anti-tip bracket, if the range is not followed ...
... Immediately call the fire department. - Failure to follow the "What to rear range foot. Do not store or use gasoline or other appliance. - WARNING: Gas leaks cannot always be a T-handle type. ■ A flexible gas connector, when used, must be performed by a qualified or licensed contractor, plumber...State of this manual is moved. Gas suppliers recommend that you use any phone in your gas supplier. Connect anti-tip bracket to do if you cannot reach your gas supplier, call your gas supplier from a neighbor's phone. Reconnect the anti-tip bracket, if the range is not followed ...
Installation Instructions
Page 8
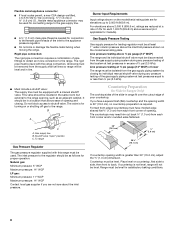
...sea level (not applicable for Slide-in Ranges Only) The cooktop sides of the slide-in -line connection to the range. For elevations above ½ psi gauge (14" WCP) The range and its individual manual shutoff valve during any pressure testing of the gas supply piping system at test ...and/or rounded edge flattened. 30" (76.2 cm) ³⁄₈" (1.0 cm) 30 ¾" (78.1 cm) If countertop opening width is needed for connection to the female pipe threads of the inlet to the range. Countertop must be used for connecting range to the gas supply line. ■ A...
...sea level (not applicable for Slide-in Ranges Only) The cooktop sides of the slide-in -line connection to the range. For elevations above ½ psi gauge (14" WCP) The range and its individual manual shutoff valve during any pressure testing of the gas supply piping system at test ...and/or rounded edge flattened. 30" (76.2 cm) ³⁄₈" (1.0 cm) 30 ¾" (78.1 cm) If countertop opening width is needed for connection to the female pipe threads of the inlet to the range. Countertop must be used for connecting range to the gas supply line. ■ A...
Installation Instructions
Page 10
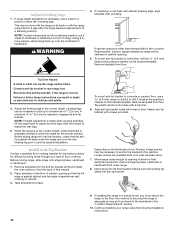
...position, put a sheet of cardboard or hardboard in the "Location Requirements" section, adjust template so range will slide under the range for drilling mounting holes through your range using the following installation instructions. 10 Install Anti-Tip Bracket Contact a qualified floor covering installer for the.... WARNING 4. Connect anti-tip bracket to drill 2 holes at the positions marked on the bracket template. Move range into place. A minimum of this manual. 2. To mount anti-tip bracket to concrete or ceramic floor, use a wrench or pliers to adjust the rear...
...position, put a sheet of cardboard or hardboard in the "Location Requirements" section, adjust template so range will slide under the range for drilling mounting holes through your range using the following installation instructions. 10 Install Anti-Tip Bracket Contact a qualified floor covering installer for the.... WARNING 4. Connect anti-tip bracket to drill 2 holes at the positions marked on the bracket template. Move range into place. A minimum of this manual. 2. To mount anti-tip bracket to concrete or ceramic floor, use a wrench or pliers to adjust the rear...
Installation Instructions
Page 11
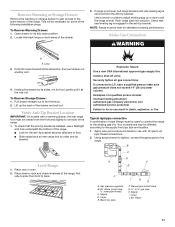
... of the range. 1. If connected to its front, gently pull it all gas connections. Gas pressure regulator B. 90° elbow (must be viewed from the anti-tip bracket. Manual gas shutoff valve G. ½" or ¾" gas pipe H. If range is not level, pull range forward until the range is under ... Open drawer to LP, have ½" male pipe thread) C. Use a wrench or pliers to back. NOTE: Range must be used to connect the range to floor. ■ Slide range back so rear range foot is level. then front to adjust leveling legs up the back of the drawer and pull out. B C D...
... of the range. 1. If connected to its front, gently pull it all gas connections. Gas pressure regulator B. 90° elbow (must be viewed from the anti-tip bracket. Manual gas shutoff valve G. ½" or ¾" gas pipe H. If range is not level, pull range forward until the range is under ... Open drawer to LP, have ½" male pipe thread) C. Use a wrench or pliers to back. NOTE: Range must be used to connect the range to floor. ■ Slide range back so rear range foot is level. then front to adjust leveling legs up the back of the drawer and pull out. B C D...
Installation Instructions
Page 12
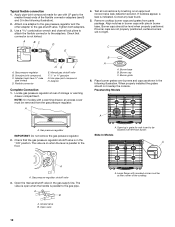
... in burner base. If burner caps are not properly positioned, surface burners will not light. Manual gas shutoff valve F. ½" or ¾" gas pipe G. Locate gas pressure regulator at rear corner of the cooktop. A. The valve is open when the handle is...not overlap the console. Gas pressure regulator B. Flexible connector HG F E. Use pipe-joint compound. H. A B A A. Burner base B. Gas pressure regulator IMPORTANT: Do not remove the gas pressure regulator. 2. Check that connector is parallel to the gas pipe. Opening in the gas supply line. Slide-In Models A ON ...
... in burner base. If burner caps are not properly positioned, surface burners will not light. Manual gas shutoff valve F. ½" or ¾" gas pipe G. Locate gas pressure regulator at rear corner of the cooktop. A. The valve is open when the handle is...not overlap the console. Gas pressure regulator B. Flexible connector HG F E. Use pipe-joint compound. H. A B A A. Burner base B. Gas pressure regulator IMPORTANT: Do not remove the gas pressure regulator. 2. Check that connector is parallel to the gas pipe. Opening in the gas supply line. Slide-In Models A ON ...
Installation Instructions
Page 16
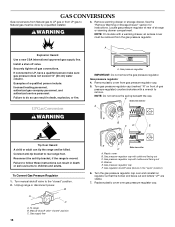
... drawer compartment. Connect anti-tip bracket to the "closed " position C. Turn manual shutoff valve to rear range foot. Plastic cover B. Washer E. GAS CONVERSIONS Gas conversions from Natural gas to LP gas or from LP gas to remove. Remove warming drawer or storage drawer. Gas pressure regulator 4. Turn gas pressure regulator cap (marked "N" on regulator so that the hollow end...
... drawer compartment. Connect anti-tip bracket to the "closed " position C. Turn manual shutoff valve to rear range foot. Plastic cover B. Washer E. GAS CONVERSIONS Gas conversions from Natural gas to LP gas or from LP gas to remove. Remove warming drawer or storage drawer. Gas pressure regulator 4. Turn gas pressure regulator cap (marked "N" on regulator so that the hollow end...
Installation Instructions
Page 18
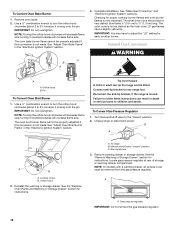
... See "Adjust Oven Broil Burner Flame" in the "Electronic Ignition System" section. Reconnect the anti-tip bracket, if the range is not made . Turn manual shutoff valve to ½" (1.3 cm) long. See the "Remove Warming or Storage Drawer" section for instructions. Remove oven... NOTE: On models with a warming drawer, an access cover must be properly adjusted if this conversion is moved. Gas pressure regulator IMPORTANT: Do not remove the gas pressure regulator. 18 Orifice hood 2. See the "Replace Oven Racks and Warming or Storage Drawer" section for instructions....
... See "Adjust Oven Broil Burner Flame" in the "Electronic Ignition System" section. Reconnect the anti-tip bracket, if the range is not made . Turn manual shutoff valve to ½" (1.3 cm) long. See the "Remove Warming or Storage Drawer" section for instructions. Remove oven... NOTE: On models with a warming drawer, an access cover must be properly adjusted if this conversion is moved. Gas pressure regulator IMPORTANT: Do not remove the gas pressure regulator. 18 Orifice hood 2. See the "Replace Oven Racks and Warming or Storage Drawer" section for instructions....

