Use and Care Guide
Page 7
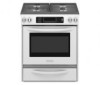
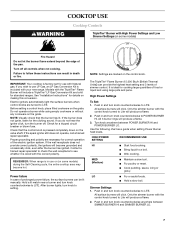
... LITE. Use the following chart as a guide when setting Power Burner heat levels. HIGH POWER SETTING RECOMMENDED USE HI s Start food cooking. LO s Fry or sauté foods. All surface burners will include a TripleTier® LP Gas Conversion Kit and a kit for details on... Cooktop Controls TripleTier® Burner with High Power Settings and Low Simmer Settings (on the valve shaft. See "Installation Instructions" for standard ranges. REMEMBER: When range is pressed completely down on some models) during the Self-Cleaning cycle, the entire cooktop area may become grounded ...
... LITE. Use the following chart as a guide when setting Power Burner heat levels. HIGH POWER SETTING RECOMMENDED USE HI s Start food cooking. LO s Fry or sauté foods. All surface burners will include a TripleTier® LP Gas Conversion Kit and a kit for details on... Cooktop Controls TripleTier® Burner with High Power Settings and Low Simmer Settings (on the valve shaft. See "Installation Instructions" for standard ranges. REMEMBER: When range is pressed completely down on some models) during the Self-Cleaning cycle, the entire cooktop area may become grounded ...
Use and Care Guide
Page 24
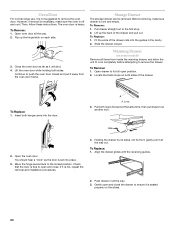
... far as the door is free to ensure it will shut. 4. Locate the black loops on the slides. 24 Open the oven door. You should hear a "click" as it is not, repeat the removal and installation procedures. 4. Gently open and close . Fit the ends of the drawer rails into place. 3. A A.... open and close the drawer to open position. 2. To Replace: 1. Oven Door For normal range use, it all the way out. Flip up the back of the drawer. To Replace: 1. Check that the door is set into the guides in all the way. 3. Align the drawer glides with the receiving...
... far as the door is free to ensure it will shut. 4. Locate the black loops on the slides. 24 Open the oven door. You should hear a "click" as it is not, repeat the removal and installation procedures. 4. Gently open and close . Fit the ends of the drawer rails into place. 3. A A.... open and close the drawer to open position. 2. To Replace: 1. Oven Door For normal range use, it all the way out. Flip up the back of the drawer. To Replace: 1. Check that the door is set into the guides in all the way. 3. Align the drawer glides with the receiving...
Use and Care Guide
Page 28
... Solid state touch control system parts ITEMS KITCHENAID WILL NOT PAY FOR 1. Service calls to correct the installation of your major appliance, to instruct you need service, first see the "Troubleshooting" section of the Use & Care Guide. After checking "Troubleshooting," additional help you ... it is installed in accordance with electrical or plumbing codes, or use your major appliance, to replace or repair house fuses or to correct house wiring or plumbing. 2. DISCLAIMER OF IMPLIED WARRANTIES; In Canada, call 1-800-422-1230. KITCHENAID® GAS RANGE WARRANTY ONE ...
... Solid state touch control system parts ITEMS KITCHENAID WILL NOT PAY FOR 1. Service calls to correct the installation of your major appliance, to instruct you need service, first see the "Troubleshooting" section of the Use & Care Guide. After checking "Troubleshooting," additional help you ... it is installed in accordance with electrical or plumbing codes, or use your major appliance, to replace or repair house fuses or to correct house wiring or plumbing. 2. DISCLAIMER OF IMPLIED WARRANTIES; In Canada, call 1-800-422-1230. KITCHENAID® GAS RANGE WARRANTY ONE ...
Installation Instructions
Page 4
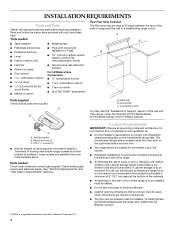
...and parts before starting installation. Tools needed Check local codes and consult gas supplier. Countertop C. Plastic anchors (2) C. #10 x ¹⁄₂" screws (2) ■ Anti-tip bracket must be securely mounted to fill a gap between the rear of the slide-in range and the wall in ...white) or W10113904A (biscuit). Read and follow the instructions provided with the range, see the "Assistance or Service" section of Acument Intellectual Properties, LLC. 4 Do not obstruct flow of combustion and ventilation air. ■ It is a registered trademark of the Use and Care Guide.
...and parts before starting installation. Tools needed Check local codes and consult gas supplier. Countertop C. Plastic anchors (2) C. #10 x ¹⁄₂" screws (2) ■ Anti-tip bracket must be securely mounted to fill a gap between the rear of the slide-in range and the wall in ...white) or W10113904A (biscuit). Read and follow the instructions provided with the range, see the "Assistance or Service" section of Acument Intellectual Properties, LLC. 4 Do not obstruct flow of combustion and ventilation air. ■ It is a registered trademark of the Use and Care Guide.

Installation Instructions
Page 15
...If the range is cold, turn off the range and check that the range is connected. ■ See "Troubleshooting" in all parts are now installed. Align the drawer glides with a soft cloth. Slide the drawer closed , open , press the CANCEL button on the slides. Check that the gas supply line ...shipping material. Use a mild solution of the Use and Care Guide. 6. Read the Use and Care Guide. 7. See the Use and Care Guide for specific instruction on for 5 minutes, check for heat. When the range has been on range operation. Replace warming drawer or storage drawer. To Replace Warming ...
...If the range is cold, turn off the range and check that the range is connected. ■ See "Troubleshooting" in all parts are now installed. Align the drawer glides with a soft cloth. Slide the drawer closed , open , press the CANCEL button on the slides. Check that the gas supply line ...shipping material. Use a mild solution of the Use and Care Guide. 6. Read the Use and Care Guide. 7. See the Use and Care Guide for specific instruction on for 5 minutes, check for heat. When the range has been on range operation. Replace warming drawer or storage drawer. To Replace Warming ...


