Use and Care Guide
Page 22
...sounds. "LOCKING DOOR" will start time and stop time. When the door locks, selfclean will start time is reached, "LOCKING DOOR" will not unlock until the oven cools. The door will appear in the display. See "Clock/Timer Display" section. Press STOP TIME. 3. Cleaning Method: s KitchenAid® ... The clean time can be set between 2 hours 30 minutes and 4 hours 30 minutes. 2. The clean time can be set between 3 hours 30 minutes to 4 hours 30 minutes for light soil and between 2 hours 30 minutes and 4 hours 30 minutes. 2. "DELAY" will appear on the display...
...sounds. "LOCKING DOOR" will start time and stop time. When the door locks, selfclean will start time is reached, "LOCKING DOOR" will not unlock until the oven cools. The door will appear in the display. See "Clock/Timer Display" section. Press STOP TIME. 3. Cleaning Method: s KitchenAid® ... The clean time can be set between 2 hours 30 minutes and 4 hours 30 minutes. 2. The clean time can be set between 3 hours 30 minutes to 4 hours 30 minutes for light soil and between 2 hours 30 minutes and 4 hours 30 minutes. 2. "DELAY" will appear on the display...
Use and Care Guide
Page 24
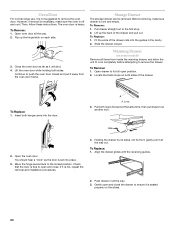
The oven door is set into the door. Pull drawer straight out to the locked position. Fit the ends of the drawer rails into the guides in all the way. 3. Close the oven door as far as the door is heavy. Lift the oven door while holding both loops forward at the same time, then ... the receiving guides. 2. To Remove: 1. Warming Drawer (on each side. If it will shut. 4. To Replace: 1. Oven Door For normal range use, it all the way out. Locate the black loops on the slides. 24 Insert both sides of the drawer and pull out. Holding the drawer by its sides, not its...
The oven door is set into the door. Pull drawer straight out to the locked position. Fit the ends of the drawer rails into the guides in all the way. 3. Close the oven door as far as the door is heavy. Lift the oven door while holding both loops forward at the same time, then ... the receiving guides. 2. To Remove: 1. Warming Drawer (on each side. If it will shut. 4. To Replace: 1. Oven Door For normal range use, it all the way out. Locate the black loops on the slides. 24 Insert both sides of the drawer and pull out. Holding the drawer by its sides, not its...
Installation Instructions
Page 14
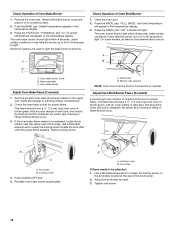
... or lifting of the range. Use a flat-blade screwdriver to light the bake and broil burners. A B A. B A A. "Preheating" and "Lo" (or actual temperature) will light. Oven bake burner cover B. Check the oven bake burner for broil burner to loosen the locking screw on a covered ... to light. Rotate the air shutter until the proper flame appears. Close the oven door. 2. Locking screw 4. Check Operation of dark blue, and should be clean and soft in character. Locking screw B. Gas burner B. "FULL BROIL" and broil temperature will appear in the temperature display. 3....
... or lifting of the range. Use a flat-blade screwdriver to light the bake and broil burners. A B A. B A A. "Preheating" and "Lo" (or actual temperature) will light. Oven bake burner cover B. Check the oven bake burner for broil burner to loosen the locking screw on a covered ... to light. Rotate the air shutter until the proper flame appears. Close the oven door. 2. Locking screw 4. Check Operation of dark blue, and should be clean and soft in character. Locking screw B. Gas burner B. "FULL BROIL" and broil temperature will appear in the temperature display. 3....


