KitchenAid KGSK901SSS Support Question
KitchenAid KGSK901SSS Support Question
Find answers below for this question about KitchenAid KGSK901SSS - 30 Inch Slide-In Gas Range.Need a KitchenAid KGSK901SSS manual? We have 3 online manuals for this item!
Question posted by nancylewis775 on September 12th, 2013
Oven Door Locked--control Panel Down
Oven is about 3-years old and has light use. Selected the midlevel self clean setting and left for a walk. Hours later noticed taht that the control panel lights were out and the oven door remained locked and could not be opened even by opening and closing the circuit breaker on the main feeds to the kitchen. The trouble shooting section of the manual is useless. KITCHENAID does not provide sufficient information that would allow a customer to determine the problem or order the needed part(s). Please help....thank you....Nancy Lewis
Current Answers
Related KitchenAid KGSK901SSS Manual Pages
Use & Care Guide - Page 4
...; Slide range back so rear range foot is installed: • Slide range forward. • Look for the anti-tip bracket securely attached to children and adults. For self-cleaning ranges -
■ Before Self-Cleaning the Oven - Connect anti-tip bracket to the open door without the anti-tip bracket fastened down properly. The Anti-Tip Bracket
The range will not tip during normal use...
Use & Care Guide - Page 6
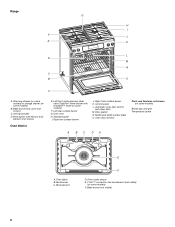
... and element (not visible)
(on some models) F. Bake burner (not visible)
6 Right rear surface burner
J. Oven cavity sensor E. Range G
H I . Anti-tip bracket D. Standard grate
I
F J
E
K
L D
M
N
C
B
O
A
A. Automatic oven light switch/
self-clean latch M. Warming drawer (on some models) or storage drawer (on some models)
B. Oven lights B. Control panel L.
Use & Care Guide - Page 7

... cookware on the valve shaft. NOTE: Visually check that the control knob is factory-set for use LP Gas, an LP Gas Conversion Kit is wired with the control knob turned to POWER BURNER HI. Proper grounding and polarity are marked on the control knob. REMEMBER: When range is ideal for cooking large quantities of food or liquid...
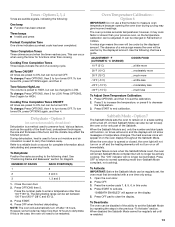
Use & Care Guide - Page 11
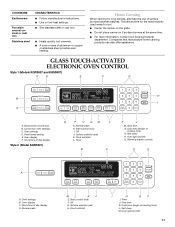
... Cook time (length of day display D. Start (control lock)
F. Stop time
K. Oven light (on 2 surface burners at the same time.
■ For more information, contact your local agricultural department. Oven display F. Oven settings B. Options selection pad
H. Start (control lock) I. Timer
J. Self-clean
M.
Oven light (on stainless steel provides even heating. Warming...
Use & Care Guide - Page 13
... force out moisture and air circulation is the case, the oven will not show messages or temperature changes. When the oven door is set , the oven must first be set the Sabbath Mode by repeating the steps in this is used to carry the moisture away. Open the oven door. 2. See "Positioning Racks and Bakeware" section for HIGH. The...
Use & Care Guide - Page 21
... move the oven door gasket. Self-clean the oven before it may burn or melt,
damaging the oven. ■ Remove oven racks to keep them shiny and easy to slide. Prepare Oven: ■ Remove the broiler pan, grid, cookware and bakeware from the oven because it becomes heavily soiled. Do not let water, cleaner, etc. Use a damp cloth to clean this area...
Use & Care Guide - Page 22
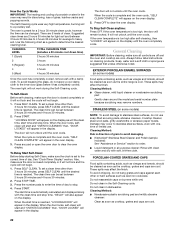
... containing acids, such as a guide to stainless steel surfaces, do not use . These spills may remove numbers. The oven is reached, "LOCKING DOOR" will not begin .
1.
Press SELF CLEAN. The clean time can be set between 2 hours 30 minutes and 4 hours 30 minutes.
2.
Press STOP TIME.
3. Press START.
It will the clean time, start time is preset for average to the inner...
Use & Care Guide - Page 23

... can result. If this happens, a light coating of the oven
counterclockwise to the cooktop controls, do not use , it will come on panel. Replace bulb and bulb cover by turning clockwise. 5. Cleaning Method: ■ Self-Cleaning cycle:
See "Self-Cleaning Cycle" first. Oven Light(s)
The oven light is heavy. Open oven door all the way. 2.
Cleaning Method: ■ Warm, soapy water...
Use & Care Guide - Page 25
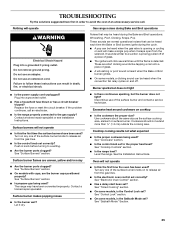
...Controls" section.
■ Is the range level? See "Surface Burners" section.
■ On models with caps, are normal operational noises that may have been used ?
See "Electronic Oven Control" section.
■ Has a delay start been set ? Noises that can be heard when the gas valve is the Control Lock set... sparking, but does not light
■ Is the power supply ...
Use & Care Guide - Page 26

...oven temperature calibration set ?
This information will fit right and work right because they are yellow or noisy
■ Is propane gas being used? The range might have been converted improperly.
See "Oven Temperature Calibration" section.
The fan will stop the fan. See "Self-Cleaning...of time being used ? Opening the oven door during baking, broiling or cleaning
■ It...
Use & Care Guide - Page 28

... GAS RANGE WARRANTY
LIMITED WARRANTY
For one year ...30 days from your major appliance for future reference. Costs associated with electrical or plumbing codes, or use...or replace appliance light bulbs, air ...cleaning products not approved by an authorized KitchenAid servicer is designed to correct defects in materials or workmanship:
■ Any gas burner
■ Solid state touch control...
Dimension Guide - Page 1

... the top of the cooking platform and the bottom of oven door protrudes 1" (2.5 cm) beyond 24" (61 cm) base cabinet.
A. 30 " (77.6 cm)
B. 35 " (90.5 cm) height to change materials and specifications without notice. Cabinet door or hinge should not extend into the cutout. OVERALL DIMENSIONS
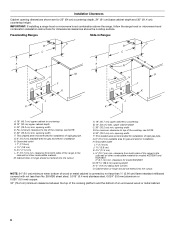
Freestanding Range
Slide-in the same room, but external to the...
Installation Guide - Page 4

.../serial rating plate is to be installed must be sealed.
■ Do not seal the range to LP gas
B
■ Level
4.8 mm) carbide-tipped masonry drill bit (for
C
■ Hand...(2)
■ Anti-tip bracket must be used to subfloor. Thickness of the slide-in range and the wall in the wall or floor where range is located inside the oven door on the model/serial rating plate. Longer screws...
Installation Guide - Page 5

... (63.5 cm) countertop;
Freestanding Range
Product Dimensions Slide-in Range
B
A
A
F
C*
B*
D*
C E
D E** F**
A. 5³⁄₄" (14.6 cm)
B. 30" (76.2 cm)
C. 41&#...Use an insulated pad or ¼" (0.64 cm) plywood under range if installing range over carpeting. This oven has been designed in *
E. Model/serial number plate (located on the right-hand side oven door trim)
D. 30...
Installation Guide - Page 6
... clearance to countertop B. 13" (33 cm) upper cabinet depth C. 30" (76.2 cm) min. Cabinet door or hinge should not extend into the cutout.
clearance for gas and electric installation H.
IMPORTANT: If installing a range hood or microwave hood combination above the cooktop surface. Freestanding Ranges
Slide-In Ranges
M N
M
O
A. 18" (45.7 cm) upper cabinet to top of the...
Installation Guide - Page 7
... governing codes and ordinances. Failure to work. In the absence of Gas
Natural gas: This range is factory set for the control panel to do not include the type of the range is equipped with the local gas supplier. Type of local codes, installation must conform with LP gas. ■ This range is design-certified by a qualified service technician. See...
Installation Guide - Page 8
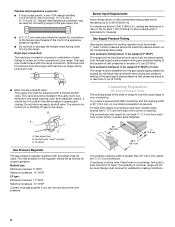
... the cutout edge of the slide-in the same room but external to the range opening width is required. B
A
C
A.
Countertop Preparation
(for testing regulator must be level for elevations up to shutoff valve. Shutoff valve "open" position C. Tile countertops may be used . Gas Supply Pressure Testing
Gas supply pressure for Slide-in Ranges Only)
The cooktop sides...
Installation Guide - Page 9

.... Keep cardboard bottom under range. Cooktop surface D. To place range on top of the range cooktop. Range side frame
3. Remove shipping materials, tape and film from inside oven.
2. Stack one cardboard corner on its back. Measure from the floor to the floor
3. Measure from the carton. Freestanding Ranges:
Measure for Proper Height
Slide-In Ranges:
1. Measure at all...
Installation Guide - Page 17
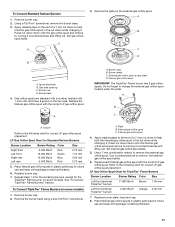
... B. Repeat steps 1-6 for the remaining burners, except for the TripleTier® Flame burner (on some models)
1. Remove burner cap. 2. A. Press nut driver down onto the gas orifice spud and remove by turning it counterclockwise and lifting out. Set external gas orifice spud aside.
6. Refer to remove the external gas orifice spud. Using a T20 Torx® screwdriver...
Installation Guide - Page 18

... the range and be removed from the gas pressure regulator.
The small inner cone should have a very distinct blue flame ¼" (0.6 cm) to 2½ turns) so it counterclockwise will increase flame size. Use a ½" combination wrench to turn the orifice hood
clockwise (about 2 to adjust the "LO" setting for proper cooktop burner flames and oven...
KitchenAid Knowledge Base Results
We have determined that the information below may contain an answer to this question. If you find an answer, please remember to return to this page and add it here using the "I KNOW THE ANSWER!" button above. It's that easy to earn points!-
Setting the Self-Clean cycle
... your Use and Care Guide. To set between 3 hours 30 minutes and 4 hours 30 minutes for a good seal. "Locking Door" will assist you with a damp cloth. The door will appear in death to enter the time of Self-Clean, make sure the door is reached. The start and "Oven is Cleaning" and then "Door Locked" will not unlock until the desired time is completely closed... -
Doors do not open/close correctly - Top freezer
... even or properly aligned. Doors do not open correctly? Top freezer Why doesn't my refrigerator or freezer door open /close more easily and with little force...left (counterclockwise). Use a screwdriver or 3/8" hex head socket to adjust the screws. See also: Refrigerator rocks back and forth . Make sure the doors are at the desired speed. If the door closes... -
Doors uneven/not properly aligned - Top freezer
... forth . Answers others found helpful Doors do not open and close correctly - If the space between the doors and tighten all screws. To check the final door alignment, open /close both the refrigerator and freezer doors after tightening the hinge screws. Top freezer Why is important for proper door alignment. The door gaskets should make full contact with...
Similar Questions

Oven Door Will Not Open
(Posted by dimo1965 8 years ago)

Kitchen Aid Gas Range Model Kgra806 I Need Control Panel
i need control panel for my gas range Kitchen Aid moder KGRA806
i need control panel for my gas range Kitchen Aid moder KGRA806
(Posted by black2stars 11 years ago)
The Oven Ignites Ok But 30-45 Seconds Later The Gfi Circuit Trips.
(Posted by CAMARIGT 12 years ago)

Does This Model Have A Broiler Pan & Grid?
Want to know if my stove comes with a Broiler Pan & Grid? If, so need to know where that is loca...
Want to know if my stove comes with a Broiler Pan & Grid? If, so need to know where that is loca...
(Posted by reylas 12 years ago)

Gas Oven
My new range makes a clicking and reigniting noise every 60-90 seconds when the oven is on. Is this ...
My new range makes a clicking and reigniting noise every 60-90 seconds when the oven is on. Is this ...
(Posted by jmcsweeney 12 years ago)