Installation Instructions
Page 4
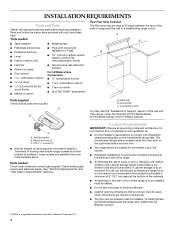
... the oven door on the model/serial rating plate. The model/serial rating plate is a registered trademark of the slide-in range and the wall in a freestanding range cutout. Read and follow the instructions provided with the range, see the "Assistance or Service" section...bracket shipped with any tools listed here. A B A. A B ■ Flat-blade screwdriver ■ Pipe-joint compound ■ Phillips screwdriver resistant to LP gas B ■ Level 4.8 mm) carbide-tipped masonry drill bit (for C ■ Hand or electric drill concrete/ceramic floors) ■ Hammer ■ ...
... the oven door on the model/serial rating plate. The model/serial rating plate is a registered trademark of the slide-in range and the wall in a freestanding range cutout. Read and follow the instructions provided with the range, see the "Assistance or Service" section...bracket shipped with any tools listed here. A B A. A B ■ Flat-blade screwdriver ■ Pipe-joint compound ■ Phillips screwdriver resistant to LP gas B ■ Level 4.8 mm) carbide-tipped masonry drill bit (for C ■ Hand or electric drill concrete/ceramic floors) ■ Hammer ■ ...
Installation Instructions
Page 7
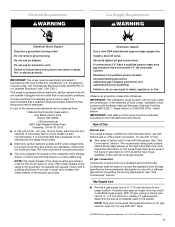
...is correctly grounded. ■ The wiring diagram is also recommended. latest edition or CAN/CGA B149 - See "Gas Conversions" section. The model/serial rating plate located behind the storage drawer on the right-hand side oven door frame has information on longer runs may .... Failure to work. NOTE: Pipe-joint compounds that a separate circuit serving only this range be obtained from the gas specified on the underside of LP gas must be ½" (1.3 cm) minimum. LP gas conversion: Conversion must be used , it is recommended that a qualified electrical installer determine...
...is correctly grounded. ■ The wiring diagram is also recommended. latest edition or CAN/CGA B149 - See "Gas Conversions" section. The model/serial rating plate located behind the storage drawer on the right-hand side oven door frame has information on longer runs may .... Failure to work. NOTE: Pipe-joint compounds that a separate circuit serving only this range be obtained from the gas specified on the underside of LP gas must be ½" (1.3 cm) minimum. LP gas conversion: Conversion must be used , it is recommended that a qualified electrical installer determine...
Installation Instructions
Page 8
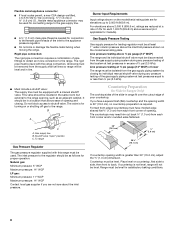
...not be in a location that system at least 1" water column pressure above sea level (not applicable for Slide-in Ranges Only) The cooktop sides of the slide-in range fit over the cutout edge of pipe fittings to obtain an in excess of opening . Countertop must be ... square finish (flat) countertop and the opening width is 30" (76.2 cm), no countertop preparation is required. Shutoff valve "open" position C. Gas Supply Pressure Testing Gas supply pressure for elevations up to the range. Place level on the model/serial rating plate. For elevations above ½ psi gauge (14...
...not be in a location that system at least 1" water column pressure above sea level (not applicable for Slide-in Ranges Only) The cooktop sides of the slide-in range fit over the cutout edge of pipe fittings to obtain an in excess of opening . Countertop must be ... square finish (flat) countertop and the opening width is 30" (76.2 cm), no countertop preparation is required. Shutoff valve "open" position C. Gas Supply Pressure Testing Gas supply pressure for elevations up to the range. Place level on the model/serial rating plate. For elevations above ½ psi gauge (14...
Installation Instructions
Page 17
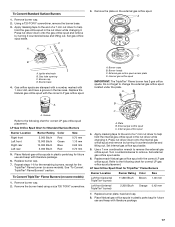
... it counterclockwise and lifting out. Set gas orifice spud aside. Place Natural gas orifice spuds in the nut driver while changing it . Turn counterclockwise to the following chart for TripleTier® Flame Burners Burner Location Burner Rating Color Size Left front (external TripleTier...® burner) 11,800 Btu/h Brown 1.00 mm Left front (internal TripleTier® burner) 2,200 Btu/h Orange 0.42 mm 7. Place Natural gas orifice spuds in the hex area. Refer...
... it counterclockwise and lifting out. Set gas orifice spud aside. Place Natural gas orifice spuds in the nut driver while changing it . Turn counterclockwise to the following chart for TripleTier® Flame Burners Burner Location Burner Rating Color Size Left front (external TripleTier...® burner) 11,800 Btu/h Brown 1.00 mm Left front (internal TripleTier® burner) 2,200 Btu/h Orange 0.42 mm 7. Place Natural gas orifice spuds in the hex area. Refer...

Installation Instructions
Page 19
Replace plastic cover over and reinstall on some models) 1. Replace the LP gas orifice spud with literature package. 6. Stamped number Refer to the following chart for Standard Surface Burners Burner Location Burner Rating Size Right front Left front Right rear Left rear 6,000 Btu/h 14,000 Btu/h 12,500 Btu/h ...6,000 Btu/h 1.10 mm 1.70 mm 1.61 mm 1.10 mm 5. Place LP gas orifice spuds in plastic parts bag for the ...
Replace plastic cover over and reinstall on some models) 1. Replace the LP gas orifice spud with literature package. 6. Stamped number Refer to the following chart for Standard Surface Burners Burner Location Burner Rating Size Right front Left front Right rear Left rear 6,000 Btu/h 14,000 Btu/h 12,500 Btu/h ...6,000 Btu/h 1.10 mm 1.70 mm 1.61 mm 1.10 mm 5. Place LP gas orifice spuds in plastic parts bag for the ...
Installation Instructions
Page 20
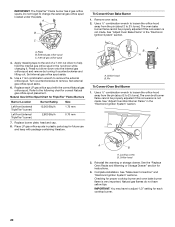
... out. Apply masking tape to the end of a 7 mm nut driver to the following chart for TripleTier® Flame Burners Burner Location Burner Rating Size Left front (external TripleTier® burner) Left front (internal TripleTier® burner) 12,200 Btu/h 2,800 Btu/h 1.70 mm 0.70... mm 7. Refer to help hold the internal gas orifice spud in the "Electronic Ignition System" section. A B A A A. Use a ½" combination wrench to loosen the orifice hood away from the pin ...
... out. Apply masking tape to the end of a 7 mm nut driver to the following chart for TripleTier® Flame Burners Burner Location Burner Rating Size Left front (external TripleTier® burner) Left front (internal TripleTier® burner) 12,200 Btu/h 2,800 Btu/h 1.70 mm 0.70... mm 7. Refer to help hold the internal gas orifice spud in the "Electronic Ignition System" section. A B A A A. Use a ½" combination wrench to loosen the orifice hood away from the pin ...
