Use and Care Guide
Page 7
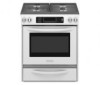
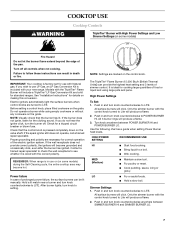
...ideal for cooking large quantities of simmer control. Models with Natural gas. See "Installation Instructions" for the clicking sound. Power failure In case of prolonged... operation of the pan. Push in and turn knob counterclockwise to LITE. Use the following chart as a guide when setting Power Burner heat levels. s Wok cooking. s Fry poultry or meat. LO s Fry or... area may become grounded and occasionally click, even after the burner has ignited. Check for standard ranges. If the spark igniter still does not operate, call a trained repair specialist. Proper grounding and...
...ideal for cooking large quantities of simmer control. Models with Natural gas. See "Installation Instructions" for the clicking sound. Power failure In case of prolonged... operation of the pan. Push in and turn knob counterclockwise to LITE. Use the following chart as a guide when setting Power Burner heat levels. s Wok cooking. s Fry poultry or meat. LO s Fry or... area may become grounded and occasionally click, even after the burner has ignited. Check for standard ranges. If the spark igniter still does not operate, call a trained repair specialist. Proper grounding and...
Use and Care Guide
Page 24
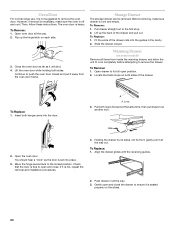
...attempting to remove the drawer. Locate the black loops on the slides. 24 Loop 3. Open the oven door. Open oven door ...arms into the guides in all the way. 2. Insert both sides of the drawer. Align the drawer glides with the receiving guides. 2. Push ...off and cool. Before removing, make sure the oven is not, repeat the removal and installation procedures. 4. To Replace: 1. Pull drawer straight out to the locked position. To Replace... 1. Continue to remove the oven door. Oven Door For normal range use, it is cool and empty. If it will shut. 4....
...attempting to remove the drawer. Locate the black loops on the slides. 24 Loop 3. Open the oven door. Open oven door ...arms into the guides in all the way. 2. Insert both sides of the drawer. Align the drawer glides with the receiving guides. 2. Push ...off and cool. Before removing, make sure the oven is not, repeat the removal and installation procedures. 4. To Replace: 1. Pull drawer straight out to the locked position. To Replace... 1. Continue to remove the oven door. Oven Door For normal range use, it is cool and empty. If it will shut. 4....
Use and Care Guide
Page 28
...gas burner s Solid state touch control system parts ITEMS KITCHENAID WILL NOT PAY FOR 1. SECOND THROUGH FIFTH YEAR LIMITED WARRANTY ON CERTAIN COMPONENT PARTS In the second through fifth years from the date of purchase, when this appliance is not installed in -warranty service. The removal and reinstallation of the Use & Care Guide... date of purchase or installation date for future reference. Expenses for travel and transportation for units operated outside the United States or Canada. 6. You can be provided by calling KitchenAid. KITCHENAID® GAS RANGE WARRANTY ONE YEAR LIMITED ...
...gas burner s Solid state touch control system parts ITEMS KITCHENAID WILL NOT PAY FOR 1. SECOND THROUGH FIFTH YEAR LIMITED WARRANTY ON CERTAIN COMPONENT PARTS In the second through fifth years from the date of purchase, when this appliance is not installed in -warranty service. The removal and reinstallation of the Use & Care Guide... date of purchase or installation date for future reference. Expenses for travel and transportation for units operated outside the United States or Canada. 6. You can be provided by calling KitchenAid. KITCHENAID® GAS RANGE WARRANTY ONE YEAR LIMITED ...
Installation Instructions
Page 4
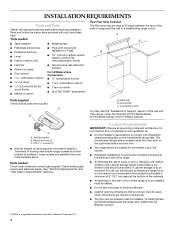
...to fill a gap between the rear of the Use and Care Guide. INSTALLATION REQUIREMENTS Tools and Parts Gather the required tools and parts before starting installation. A B A. Countertop cutout To order, see "Install Anti-Tip Bracket" section. †®TORX is located inside the... the "Assistance or Service" section of the slide-in range and the wall in the kitchen. ■ Recessed installations must be located for wood floors) ■ Marker or pencil ■ Noncorrosive leak-detection solution For LP/Natural Gas Conversions ■ ½" combination wrench ■ 7 mm ...
...to fill a gap between the rear of the Use and Care Guide. INSTALLATION REQUIREMENTS Tools and Parts Gather the required tools and parts before starting installation. A B A. Countertop cutout To order, see "Install Anti-Tip Bracket" section. †®TORX is located inside the... the "Assistance or Service" section of the slide-in range and the wall in the kitchen. ■ Recessed installations must be located for wood floors) ■ Marker or pencil ■ Noncorrosive leak-detection solution For LP/Natural Gas Conversions ■ ½" combination wrench ■ 7 mm ...

Installation Instructions
Page 15
..., then repeat the 5-minute test as outlined above. ■ If the gas supply line shutoff valve is seated properly on range operation. See the Use and Care Guide for heat. Complete Installation 1. Slide the drawer closed , open it is open and close the drawer to see ...the "Range Care" section of /recycle all parts are now installed. Replace warming drawer or storage...
..., then repeat the 5-minute test as outlined above. ■ If the gas supply line shutoff valve is seated properly on range operation. See the Use and Care Guide for heat. Complete Installation 1. Slide the drawer closed , open it is open and close the drawer to see ...the "Range Care" section of /recycle all parts are now installed. Replace warming drawer or storage...


