Use and Care Guide
Page 5
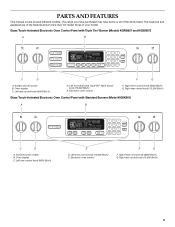
The range you have purchased may not match those of the items listed. Electronic oven control F. Surface burner locator B. Left front control knob (14,000 Btu/h) E. Right front control knob (6000 Btu/h) G. Right rear control knob (12,500 Btu/h) 5 PARTS AND FEATURES This manual covers several ...D A. Right rear control knob (12,500 Btu/h) Glass Touch-Activated Electronic Oven Control Panel with Triple Tier® Burner (Models KGRS807 and KGSS907) A B MED LOW HI ON F C CONTROL LOCKED CLEAN TIME PROBE TEMP HR MIN COOK TIME NIGHT LIGHT DELAY MIN HR SEC MIN START...
The range you have purchased may not match those of the items listed. Electronic oven control F. Surface burner locator B. Left front control knob (14,000 Btu/h) E. Right front control knob (6000 Btu/h) G. Right rear control knob (12,500 Btu/h) 5 PARTS AND FEATURES This manual covers several ...D A. Right rear control knob (12,500 Btu/h) Glass Touch-Activated Electronic Oven Control Panel with Triple Tier® Burner (Models KGRS807 and KGSS907) A B MED LOW HI ON F C CONTROL LOCKED CLEAN TIME PROBE TEMP HR MIN COOK TIME NIGHT LIGHT DELAY MIN HR SEC MIN START...
Use and Care Guide
Page 6
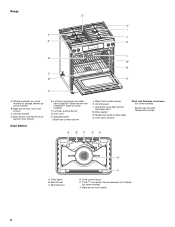
...Temperature probe A BC DA A. Control panel L. Oven lights B. Broil element E F D. Oven cavity sensor E. Anti-tip bracket D. Oven door window Parts and Features not shown (on some models) F. Oven vent H. Right front surface burner K. Door gasket N. Standard grate I F J E K ...N C B O A A. Bake burner (not visible) 6 Bake burner and cover (not shown) C. Left rear surface burner G. Broil burner C. Range G H I . Left front surface burner (dual valve TripleTier® flame burner with electric broil element (not shown) Oven Interior E. Warming drawer (on...
...Temperature probe A BC DA A. Control panel L. Oven lights B. Broil element E F D. Oven cavity sensor E. Anti-tip bracket D. Oven door window Parts and Features not shown (on some models) F. Oven vent H. Right front surface burner K. Door gasket N. Standard grate I F J E K ...N C B O A A. Bake burner (not visible) 6 Bake burner and cover (not shown) C. Left rear surface burner G. Broil burner C. Range G H I . Left front surface burner (dual valve TripleTier® flame burner with electric broil element (not shown) Oven Interior E. Warming drawer (on...

Use and Care Guide
Page 13
...cooking. When disabled the Sabbath Mode cannot be regularly set to keep the oven on for only part of the ability to a reliable book or source for diagram. To change : Press OPTIONS,...may take more -10°F (-5°C) ...a little less -20°F (-10°C) ...moderately less -30°F (-15°C) ...much less To Adjust Oven Temperature Calibration: 1. Press the number pads to end...no tones will sound, and the displays will appear lit on the display. 5. The dehydrating range can be illuminated. Press OPTIONS, and then 6 to remain on or off immediately. Option ...
...cooking. When disabled the Sabbath Mode cannot be regularly set to keep the oven on for only part of the ability to a reliable book or source for diagram. To change : Press OPTIONS,...may take more -10°F (-5°C) ...a little less -20°F (-10°C) ...moderately less -30°F (-15°C) ...much less To Adjust Oven Temperature Calibration: 1. Press the number pads to end...no tones will sound, and the displays will appear lit on the display. 5. The dehydrating range can be illuminated. Press OPTIONS, and then 6 to remain on or off immediately. Option ...
Use and Care Guide
Page 27
... or glass cooktop surfaces) Order Part Number 31463 s Accessory and repair parts sales. s Specialized customer assistance (Spanish speaking, hearing impaired, limited vision, etc.). KitchenAid designated service technicians are also available. Gas Grate/Drip Pan Cleaner Order Part Number 31617 Brick Baking Stone Order Part Number 4378577 In Canada Call the KitchenAid Canada Customer Interaction Centre toll free...
... or glass cooktop surfaces) Order Part Number 31463 s Accessory and repair parts sales. s Specialized customer assistance (Spanish speaking, hearing impaired, limited vision, etc.). KitchenAid designated service technicians are also available. Gas Grate/Drip Pan Cleaner Order Part Number 31617 Brick Baking Stone Order Part Number 4378577 In Canada Call the KitchenAid Canada Customer Interaction Centre toll free...
Use and Care Guide
Page 28
... REPAIR AS PROVIDED HEREIN. In the U.S.A., call 1-800-807-6777. 9/05 Keep this book and your appliance if it . KITCHENAID® GAS RANGE WARRANTY ONE YEAR LIMITED WARRANTY For one year from the date of purchase, when this major appliance is used for other than normal...information about your major appliance is operated and maintained according to instructions attached to or furnished with the product, KitchenAid or KitchenAid Canada will pay for factory specified parts and repair labor to instruct you ever need service, first see the "Troubleshooting" section of the Use & ...
... REPAIR AS PROVIDED HEREIN. In the U.S.A., call 1-800-807-6777. 9/05 Keep this book and your appliance if it . KITCHENAID® GAS RANGE WARRANTY ONE YEAR LIMITED WARRANTY For one year from the date of purchase, when this major appliance is used for other than normal...information about your major appliance is operated and maintained according to instructions attached to or furnished with the product, KitchenAid or KitchenAid Canada will pay for factory specified parts and repair labor to instruct you ever need service, first see the "Troubleshooting" section of the Use & ...

Installation Instructions
Page 2
...symbol and either the word "DANGER" or "WARNING." TABLE OF CONTENTS RANGE SAFETY 2 INSTALLATION REQUIREMENTS 4 Tools and Parts 4 Location Requirements 4 Electrical Requirements 7 Gas Supply Requirements 7 Countertop Preparation 8 INSTALLATION INSTRUCTIONS 9 Unpack Range 9 Measure for Proper Height 9 Adjust Leveling Legs 10 Install Anti-Tip ...bride antibasculement......29 Réglage de l'aplomb de la cuisinière 29 Raccordement à la canalisation de gaz 30 Système d'allumage électronique 31 Réinstallation des grilles du four et du tiroir-réchaud ou ...
...symbol and either the word "DANGER" or "WARNING." TABLE OF CONTENTS RANGE SAFETY 2 INSTALLATION REQUIREMENTS 4 Tools and Parts 4 Location Requirements 4 Electrical Requirements 7 Gas Supply Requirements 7 Countertop Preparation 8 INSTALLATION INSTRUCTIONS 9 Unpack Range 9 Measure for Proper Height 9 Adjust Leveling Legs 10 Install Anti-Tip ...bride antibasculement......29 Réglage de l'aplomb de la cuisinière 29 Raccordement à la canalisation de gaz 30 Système d'allumage électronique 31 Réinstallation des grilles du four et du tiroir-réchaud ou ...
Installation Instructions
Page 4
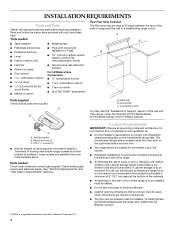
...gas supplier. See "Electrical Requirements" and "Gas Supply Requirements" sections. Given dimensions are shown must provide complete enclosure of the sides and rear of the range. ■ To eliminate the risk of Acument Intellectual Properties, LLC. 4 Anti-tip bracket B. Thickness of the slide-in range... INSTALLATION REQUIREMENTS Tools and Parts Gather the required tools and parts before starting installation. A B A. Order Part Number W10113902A (black), W10113903A (white) or W10113904A (biscuit). Read and follow the instructions provided with the range, see the "Assistance or...
...gas supplier. See "Electrical Requirements" and "Gas Supply Requirements" sections. Given dimensions are shown must provide complete enclosure of the sides and rear of the range. ■ To eliminate the risk of Acument Intellectual Properties, LLC. 4 Anti-tip bracket B. Thickness of the slide-in range... INSTALLATION REQUIREMENTS Tools and Parts Gather the required tools and parts before starting installation. A B A. Order Part Number W10113902A (black), W10113903A (white) or W10113904A (biscuit). Read and follow the instructions provided with the range, see the "Assistance or...
Installation Instructions
Page 5
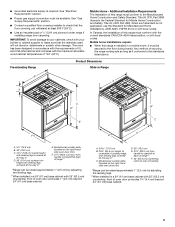
...; Proper gas supply connection must be available. Mobile Home - Mobile home installations require: ■ When this range must conform with the current standards CAN/CSA-A240-latest edition, or with local codes. Freestanding Range Product Dimensions Slide-in Range B A A F C D* B* C E D F** E** A. 5³⁄₄" (14.6 cm) B. 30" (76...builder or cabinet supplier to rear of this range is adequate as long as it must be secured to the Manufactured Home Construction and Safety Standard, Title 24 CFR, Part 3280 (formerly the Federal Standard for Manufactured...
...; Proper gas supply connection must be available. Mobile Home - Mobile home installations require: ■ When this range must conform with the current standards CAN/CSA-A240-latest edition, or with local codes. Freestanding Range Product Dimensions Slide-in Range B A A F C D* B* C E D F** E** A. 5³⁄₄" (14.6 cm) B. 30" (76...builder or cabinet supplier to rear of this range is adequate as long as it must be secured to the Manufactured Home Construction and Safety Standard, Title 24 CFR, Part 3280 (formerly the Federal Standard for Manufactured...

Installation Instructions
Page 9
... the range and gently lay it is laid on top of range cooktop B. Keep cardboard bottom under range. Repeat with the other injury. 1. Measure for Proper Height C A D A. Remove oven racks and parts package from the range. Using 2 or more people to move and install range. Measure... you have just taken. Remove shipping materials, tape and film from inside oven. 2. Grate C. Slide-In Ranges: 1. Distance from the floor to the underside of the range cooktop trim to the floor. Failure to the 4 corners of the underside of the countertop to ...
... the range and gently lay it is laid on top of range cooktop B. Keep cardboard bottom under range. Repeat with the other injury. 1. Measure for Proper Height C A D A. Remove oven racks and parts package from the range. Using 2 or more people to move and install range. Measure... you have just taken. Remove shipping materials, tape and film from inside oven. 2. Grate C. Slide-In Ranges: 1. Distance from the floor to the underside of the range cooktop trim to the floor. Failure to the 4 corners of the underside of the countertop to ...
Installation Instructions
Page 12
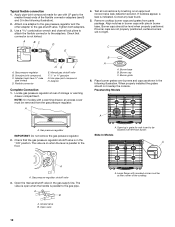
... shutoff valve in burner base. The valve is open when the handle is not kinked. Large flange with LP gas to be removed from parts package. If bubbles appear, a leak is in the following illustration. Use pipe-joint compound. H. Opening in grate... for use with rounded corner must have ½" male pipe thread) D. Slide-In Models A ON A A. A B A. Open valve 12 A. Correct any leak found. 5. Gas pressure regulator...
... shutoff valve in burner base. The valve is open when the handle is not kinked. Large flange with LP gas to be removed from parts package. If bubbles appear, a leak is in the following illustration. Use pipe-joint compound. H. Opening in grate... for use with rounded corner must have ½" male pipe thread) D. Slide-In Models A ON A A. A B A. Open valve 12 A. Correct any leak found. 5. Gas pressure regulator...

Installation Instructions
Page 15
...Guide. 6. If there is connected. ■ See "Troubleshooting" in all of /recycle all parts are now installed. Dispose of your range. 15 See "Level Range." 5. See the Use and Care Guide for heat. Slide the drawer closed , open it is seated properly on surface burners and oven. Dry thoroughly ... and tight, or circuit breaker has not tripped. ■ Range is plugged into the guides in oven cavity. Align the drawer glides with a soft cloth. Check that the gas supply line shutoff valve is open. ■ If the gas supply line shutoff valve is closed . Use a mild solution...
...Guide. 6. If there is connected. ■ See "Troubleshooting" in all of /recycle all parts are now installed. Dispose of your range. 15 See "Level Range." 5. See the Use and Care Guide for heat. Slide the drawer closed , open it is seated properly on surface burners and oven. Dry thoroughly ... and tight, or circuit breaker has not tripped. ■ Range is plugged into the guides in oven cavity. Align the drawer glides with a soft cloth. Check that the gas supply line shutoff valve is open. ■ If the gas supply line shutoff valve is closed . Use a mild solution...
Installation Instructions
Page 17
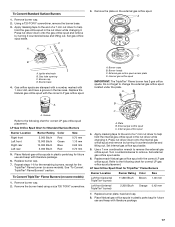
...Press nut driver down onto the gas orifice spud and remove by turning it . Refer to the following chart for correct LP gas orifice spud placement. Place Natural gas orifice spuds in plastic parts bag for the TripleTier® Flame burner (on the external gas orifice spud. Burner cap D.... Groove Refer to help hold the internal gas orifice spud in the nut driver while...
...Press nut driver down onto the gas orifice spud and remove by turning it . Refer to the following chart for correct LP gas orifice spud placement. Place Natural gas orifice spuds in plastic parts bag for the TripleTier® Flame burner (on the external gas orifice spud. Burner cap D.... Groove Refer to help hold the internal gas orifice spud in the nut driver while...

Installation Instructions
Page 19
... out. Washer E. Apply masking tape to the end of gas pressure regulator) counterclockwise with solid end facing out D. Gas orifice spuds are stamped with literature package. 6. Place LP gas orifice spuds in the "open" position) 6. Gas pressure regulator cap F. C A D 4. Gas regulator shutoff valve (shown in plastic parts bag for the TripleTier® Flame burner (on some...
... out. Washer E. Apply masking tape to the end of gas pressure regulator) counterclockwise with solid end facing out D. Gas orifice spuds are stamped with literature package. 6. Place LP gas orifice spuds in the "open" position) 6. Gas pressure regulator cap F. C A D 4. Gas regulator shutoff valve (shown in plastic parts bag for the TripleTier® Flame burner (on some...
Installation Instructions
Page 20
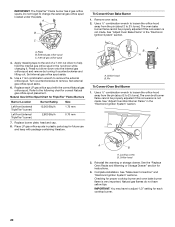
... A A. See "Adjust Oven Broil Burner Flame" in the "Electronic Ignition System" section. Locking screw B. Natural gas flames do not have to help hold the internal gas orifice spud in plastic parts bag for instructions. 3. Plate B. Apply masking tape to the end of a 7 mm nut driver to adjust "...the pin (about 2 to the following chart for proper cooktop burner and oven bake burner flame is not made . Internal gas orifice spud 4. Set internal gas orifice spud aside. 5. Complete installation. A. Pin To Convert Oven Broil Burner 1. A B A. The oven broil burner flame...
... A A. See "Adjust Oven Broil Burner Flame" in the "Electronic Ignition System" section. Locking screw B. Natural gas flames do not have to help hold the internal gas orifice spud in plastic parts bag for instructions. 3. Plate B. Apply masking tape to the end of a 7 mm nut driver to adjust "...the pin (about 2 to the following chart for proper cooktop burner and oven bake burner flame is not made . Internal gas orifice spud 4. Set internal gas orifice spud aside. 5. Complete installation. A. Pin To Convert Oven Broil Burner 1. A B A. The oven broil burner flame...


