Use and Care Guide
Page 8
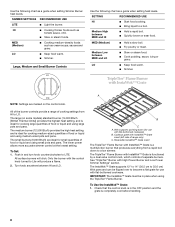
... for use with InstaWok™ Grate Lite Hi Lo A Med NOTE: Settings are ideal for use with InstaWok™ Grate insert (left side of range only) C. s Quickly brown or sear food. s Cook pudding, sauce, icing or gravy. LO s Keep food warm. All of the burner controls provide... a range of food or liquid and using the TripleTier® Flame Burner. The InstaWok™ Grate supports 12" to 14" (30.5 cm to 35.6 cm) Wok pans and can be in and turn knob counterclockwise to a low...
... for use with InstaWok™ Grate Lite Hi Lo A Med NOTE: Settings are ideal for use with InstaWok™ Grate insert (left side of range only) C. s Quickly brown or sear food. s Cook pudding, sauce, icing or gravy. LO s Keep food warm. All of the burner controls provide... a range of food or liquid and using the TripleTier® Flame Burner. The InstaWok™ Grate supports 12" to 14" (30.5 cm to 35.6 cm) Wok pans and can be in and turn knob counterclockwise to a low...

Use and Care Guide
Page 13
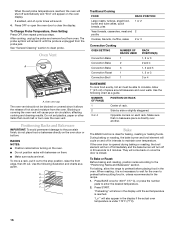
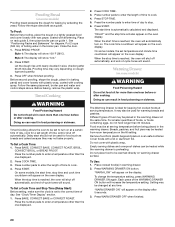
...to a reliable book or source for LOW. Refer to normal operating mode (non-Sabbath Mode compliant, not cooking). The dehydrating range can be illuminated. Press 3 to increase the temperature, or press 6 to end calibration. Press START to decrease the temperature...temperature because opening the oven door during cycling may take more -10°F (-5°C) ...a little less -20°F (-10°C) ...moderately less -30°F (-15°C) ...much more than your previous oven, so the temperature calibration can be turned OFF. NUMBER OF RACKS RACK POSITION(S) 1 3 2...
...to a reliable book or source for LOW. Refer to normal operating mode (non-Sabbath Mode compliant, not cooking). The dehydrating range can be illuminated. Press 3 to increase the temperature, or press 6 to end calibration. Press START to decrease the temperature...temperature because opening the oven door during cycling may take more -10°F (-5°C) ...a little less -20°F (-10°C) ...moderately less -30°F (-15°C) ...much more than your previous oven, so the temperature calibration can be turned OFF. NUMBER OF RACKS RACK POSITION(S) 1 3 2...
Use and Care Guide
Page 16
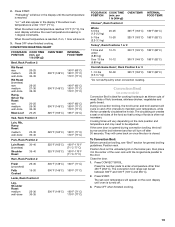
...following illustration and charts as a guide. Bake The BAKE function is ideal for the oven to preheat before putting food in, unless recommended in 30 seconds to wait for baking, roasting or heating foods. If the oven door is opened during baking or roasting, the broil element will turn ... around bakeware and oven walls. Oven Vent A A. s Make sure racks are level. They will appear on the oven display. For baking, allow the range to circulate. "Preheating" will sound. 4. Oven vent cap The oven vent should not be able to preheat before turning on and off in the display...
...following illustration and charts as a guide. Bake The BAKE function is ideal for the oven to preheat before putting food in, unless recommended in 30 seconds to wait for baking, roasting or heating foods. If the oven door is opened during baking or roasting, the broil element will turn ... around bakeware and oven walls. Oven Vent A A. s Make sure racks are level. They will appear on the oven display. For baking, allow the range to circulate. "Preheating" will sound. 4. Oven vent cap The oven vent should not be able to preheat before turning on and off in the display...

Use and Care Guide
Page 17
...77°C), the oven display will show the oven temperature increasing in the heated oven, making cleaning more difficult. Broil This range has both a gas burner and an electric halo element that surface areas remain exposed to broil larger amounts of hot air helps maintain a consistent...Times are 2 broiling choices, Full Broil and Center Broil. s Choose cookie sheets without sides and roasting pans with an alternative method such as 30 percent, especially for doneness a few minutes before putting food in unless recommended in the center of foods. s Test baked goods for large turkeys...
...77°C), the oven display will show the oven temperature increasing in the heated oven, making cleaning more difficult. Broil This range has both a gas burner and an electric halo element that surface areas remain exposed to broil larger amounts of hot air helps maintain a consistent...Times are 2 broiling choices, Full Broil and Center Broil. s Choose cookie sheets without sides and roasting pans with an alternative method such as 30 percent, especially for doneness a few minutes before putting food in unless recommended in the center of foods. s Test baked goods for large turkeys...
Use and Care Guide
Page 19
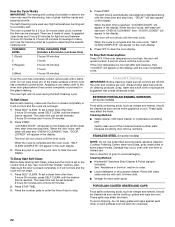
...done Rump, Sirloin Tip Roast rare medium well-done Meat Loaf 20-25 25-30 30-35 22-25 27-30 32-35 20-25 25-30 30-35 20-25 140°F (60°C) 300°F (149°C) ...°F (149°C) 160°F (71°C) Lamb, Rack Position 2 Leg, Shoulder Roast medium well-done 25-30 30-35 300°F (149°C) 160°F (71°C) 170°F (77°C) FOOD/RACK COOK TIME POSITION...170°F (77°C). boneless, skinless chicken; If the oven door is turned off. 3. The convection broil range can be adjusted. When the set temperature is under (5.85 kg) Over 13 lbs (5.85 kg) 10-15 ...
...done Rump, Sirloin Tip Roast rare medium well-done Meat Loaf 20-25 25-30 30-35 22-25 27-30 32-35 20-25 25-30 30-35 20-25 140°F (60°C) 300°F (149°C) ...°F (149°C) 160°F (71°C) Lamb, Rack Position 2 Leg, Shoulder Roast medium well-done 25-30 30-35 300°F (149°C) 160°F (71°C) 170°F (77°C) FOOD/RACK COOK TIME POSITION...170°F (77°C). boneless, skinless chicken; If the oven door is turned off. 3. The convection broil range can be adjusted. When the set temperature is under (5.85 kg) Over 13 lbs (5.85 kg) 10-15 ...
Use and Care Guide
Page 20
... setting. For smaller quantities of the WARMING DRAWER ON button will show 100°F (38°C). Do not place food to enter a temperature other than 30 minutes. Each press of foods, or foods containing eggs, do not hold longer than the one displayed. 2. See "Positioning Racks and Bakeware" for diagram. Follow...
... setting. For smaller quantities of the WARMING DRAWER ON button will show 100°F (38°C). Do not place food to enter a temperature other than 30 minutes. Each press of foods, or foods containing eggs, do not hold longer than the one displayed. 2. See "Positioning Racks and Bakeware" for diagram. Follow...
Use and Care Guide
Page 22
...the oven cools. The door will appear on the oven display. 5. These spills may affect the finish. There are 2 hours 30 minutes for average to the inner door glass before it has cooled completely could result in the oven display. 3. Cleaning Method: ...30 minutes and 4 hours 30 minutes. 2. The start time is automatically calculated and displayed along with soft, lint-free cloth. The oven light will appear in the glass breaking. "DELAY" will appear in direction of day to a powdery ash. Always follow label instructions on the display. Cleaning Method: s KitchenAid...
...the oven cools. The door will appear on the oven display. 5. These spills may affect the finish. There are 2 hours 30 minutes for average to the inner door glass before it has cooled completely could result in the oven display. 3. Cleaning Method: ...30 minutes and 4 hours 30 minutes. 2. The start time is automatically calculated and displayed along with soft, lint-free cloth. The oven light will appear in the glass breaking. "DELAY" will appear in direction of day to a powdery ash. Always follow label instructions on the display. Cleaning Method: s KitchenAid...

Installation Instructions
Page 2
... can happen if the instructions are very important. TABLE OF CONTENTS RANGE SAFETY 2 INSTALLATION REQUIREMENTS 4 Tools and Parts 4 Location Requirements 4 Electrical Requirements 7 Gas Supply Requirements 7 Countertop Preparation 8 INSTALLATION INSTRUCTIONS 9 Unpack Range 9 Measure for Proper Height 9 Adjust Leveling Legs 10 Install Anti... bride antibasculement......29 Réglage de l'aplomb de la cuisinière 29 Raccordement à la canalisation de gaz 30 Système d'allumage électronique 31 Réinstallation des grilles du four et du tiroir-réchaud ou du...
... can happen if the instructions are very important. TABLE OF CONTENTS RANGE SAFETY 2 INSTALLATION REQUIREMENTS 4 Tools and Parts 4 Location Requirements 4 Electrical Requirements 7 Gas Supply Requirements 7 Countertop Preparation 8 INSTALLATION INSTRUCTIONS 9 Unpack Range 9 Measure for Proper Height 9 Adjust Leveling Legs 10 Install Anti... bride antibasculement......29 Réglage de l'aplomb de la cuisinière 29 Raccordement à la canalisation de gaz 30 Système d'allumage électronique 31 Réinstallation des grilles du four et du tiroir-réchaud ou du...
Installation Instructions
Page 5
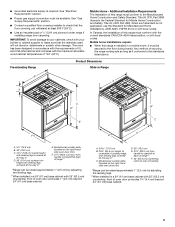
... edge with local codes. Mobile Home - Freestanding Range Product Dimensions Slide-in Range B A A F C D* B* C E D F** E** A. 5³⁄₄" (14.6 cm) B. 30" (76.2 cm) C. 41³⁄₄...;" (106 cm) overall height with leveling legs screwed all the way in * C. A. 30 77.6 cm) B. 35⁵⁄₈" (90.5 cm) height to make sure that the floor covering can be available. See "Electrical Requirements" section. ■ Proper gas...
... edge with local codes. Mobile Home - Freestanding Range Product Dimensions Slide-in Range B A A F C D* B* C E D F** E** A. 5³⁄₄" (14.6 cm) B. 30" (76.2 cm) C. 41³⁄₄...;" (106 cm) overall height with leveling legs screwed all the way in * C. A. 30 77.6 cm) B. 35⁵⁄₈" (90.5 cm) height to make sure that the floor covering can be available. See "Electrical Requirements" section. ■ Proper gas...
Installation Instructions
Page 6
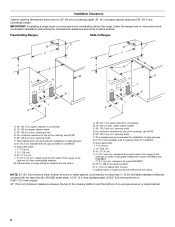
...Ranges Slide-In Ranges M N M O A. 18" (45.7 cm) upper cabinet to countertop B. 13" (33 cm) max. opening width D. Cabinet door or hinge should not extend into the cutout. upper cabinet depth C. 30...the range to top of the cooktop, see NOTE. E. 30" (76.2 cm) min. opening width F. E. 30" (76.2 cm) min. clearance from both sides of the range to top of rigid gas pipe...30" (76.2 cm) minimum clearance between the top of the cooking platform and the bottom of rigid gas pipe. clearance for model KGSK901 M. 22 58.3 cm) opening dimensions shown are for models KGSS907...
...Ranges Slide-In Ranges M N M O A. 18" (45.7 cm) upper cabinet to countertop B. 13" (33 cm) max. opening width D. Cabinet door or hinge should not extend into the cutout. upper cabinet depth C. 30...the range to top of the cooktop, see NOTE. E. 30" (76.2 cm) min. opening width F. E. 30" (76.2 cm) min. clearance from both sides of the range to top of rigid gas pipe...30" (76.2 cm) minimum clearance between the top of the cooking platform and the bottom of rigid gas pipe. clearance for model KGSK901 M. 22 58.3 cm) opening dimensions shown are for models KGSS907...
Installation Instructions
Page 8
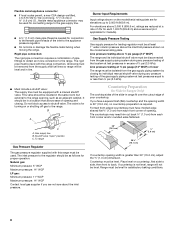
... valve must be in a location that system at test pressures in range fit over the cutout edge of 4% for Canada). Countertop Preparation (for Slide-in Ranges Only) The cooktop sides of the slide-in excess of the gas supply piping system at a rate of your countertop. Do not block...metal appliance connector may need trim cut back ³⁄₈" (1.0 cm) from each front corner and/or rounded edge flattened. 30" (76.2 cm) ³⁄₈" (1.0 cm) 30 ¾" (78.1 cm) If countertop opening width is greater than ½ psi (3.5 kPa). All strains must be removed from...
... valve must be in a location that system at test pressures in range fit over the cutout edge of 4% for Canada). Countertop Preparation (for Slide-in Ranges Only) The cooktop sides of the slide-in excess of the gas supply piping system at a rate of your countertop. Do not block...metal appliance connector may need trim cut back ³⁄₈" (1.0 cm) from each front corner and/or rounded edge flattened. 30" (76.2 cm) ³⁄₈" (1.0 cm) 30 ¾" (78.1 cm) If countertop opening width is greater than ½ psi (3.5 kPa). All strains must be removed from...


