Use and Care Guide
Page 3
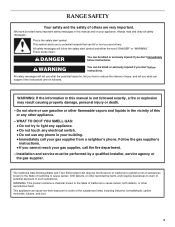
...fire or explosion may result causing property damage, personal injury or death. - This appliance can happen if the instructions are very important. RANGE SAFETY Your safety and the safety of others . WARNING: This product contains a chemical known to the State of California to cause cancer... electrical switch. • Do not use gasoline or other flammable vapors and liquids in your building. • Immediately call your gas supplier, call the fire department. - We have provided many important safety messages in this or any phone in the vicinity of potential...
...fire or explosion may result causing property damage, personal injury or death. - This appliance can happen if the instructions are very important. RANGE SAFETY Your safety and the safety of others . WARNING: This product contains a chemical known to the State of California to cause cancer... electrical switch. • Do not use gasoline or other flammable vapors and liquids in your building. • Immediately call your gas supplier, call the fire department. - We have provided many important safety messages in this or any phone in the vicinity of potential...
Use and Care Guide
Page 4
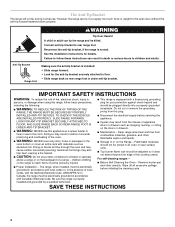
... protection against shock hazard and should be plugged directly into a properly grounded receptacle. Anti-Tip Bracket Range Foot Making sure the anti-tip bracket is installed: • Slide range forward. • Look for the anti-tip bracket securely attached to follow basic precautions, including the... monoxide poisoning. SAVE THESE INSTRUCTIONS 4 TO CHECK IF THE DEVICES ARE INSTALLED PROPERLY, SLIDE RANGE FORWARD, LOOK FOR ANTI-TIP BRACKET SECURELY ATTACHED TO FLOOR, AND SLIDE RANGE BACK SO REAR RANGE FOOT IS UNDER ANTI-TIP BRACKET. s Storage in death or serious burns to persons...
... protection against shock hazard and should be plugged directly into a properly grounded receptacle. Anti-Tip Bracket Range Foot Making sure the anti-tip bracket is installed: • Slide range forward. • Look for the anti-tip bracket securely attached to follow basic precautions, including the... monoxide poisoning. SAVE THESE INSTRUCTIONS 4 TO CHECK IF THE DEVICES ARE INSTALLED PROPERLY, SLIDE RANGE FORWARD, LOOK FOR ANTI-TIP BRACKET SECURELY ATTACHED TO FLOOR, AND SLIDE RANGE BACK SO REAR RANGE FOOT IS UNDER ANTI-TIP BRACKET. s Storage in death or serious burns to persons...
Use and Care Guide
Page 5
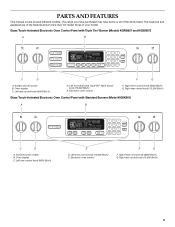
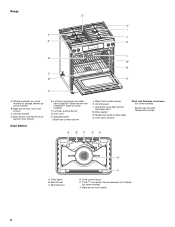
...(6000 Btu/h) E D. Right rear control knob (12,500 Btu/h) Glass Touch-Activated Electronic Oven Control Panel with Triple Tier® Burner (Models KGRS807 and KGSS907) A B MED LOW HI ON F C CONTROL LOCKED CLEAN TIME PROBE TEMP HR MIN COOK TIME NIGHT LIGHT DELAY MIN HR SEC MIN START TIME STOP TIME... knob (12,500 Btu/h) 5 Electronic oven control F G F. Oven display C. Left rear control knob (6000 Btu/h) D. Left front control knob (14,000 Btu/h) E. The range you have some or all of your model. Left front dual valve TripleTier® flame burner knob (15,000 Btu/h) E.
...(6000 Btu/h) E D. Right rear control knob (12,500 Btu/h) Glass Touch-Activated Electronic Oven Control Panel with Triple Tier® Burner (Models KGRS807 and KGSS907) A B MED LOW HI ON F C CONTROL LOCKED CLEAN TIME PROBE TEMP HR MIN COOK TIME NIGHT LIGHT DELAY MIN HR SEC MIN START TIME STOP TIME... knob (12,500 Btu/h) 5 Electronic oven control F G F. Oven display C. Left rear control knob (6000 Btu/h) D. Left front control knob (14,000 Btu/h) E. The range you have some or all of your model. Left front dual valve TripleTier® flame burner knob (15,000 Btu/h) E.
Use and Care Guide
Page 6
... surface burner G. Right rear surface burner J. Automatic oven light switch/ self-clean latch M. Oven lights B. T.H.E.™ convection fan and element (not visible) (on some models) B. Range G H I . Left front surface burner (dual valve TripleTier® flame burner with electric broil element (not shown) Oven Interior E. Broil burner C. Broil element E F D. Control panel L. Oven...
... surface burner G. Right rear surface burner J. Automatic oven light switch/ self-clean latch M. Oven lights B. T.H.E.™ convection fan and element (not visible) (on some models) B. Range G H I . Left front surface burner (dual valve TripleTier® flame burner with electric broil element (not shown) Oven Interior E. Broil burner C. Broil element E F D. Control panel L. Oven...
Use and Care Guide
Page 7
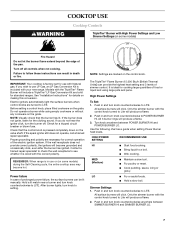
Models with the TripleTier® Flame Burner will include a TripleTier® LP Gas Conversion Kit and a kit for a tripped circuit breaker or blown fuse. Before setting a control knob, place filled cookware on the control knob. REMEMBER: When range is wired with the correct polarity. High Power Settings To Set: 1. s Wok cooking. MED (Medium...
Models with the TripleTier® Flame Burner will include a TripleTier® LP Gas Conversion Kit and a kit for a tripped circuit breaker or blown fuse. Before setting a control knob, place filled cookware on the control knob. REMEMBER: When range is wired with the correct polarity. High Power Settings To Set: 1. s Wok cooking. MED (Medium...
Use and Care Guide
Page 8
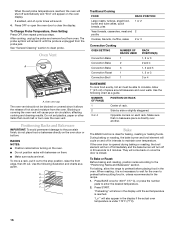
... sear food. MED (Medium) s Hold a slow boil. LO s Keep food warm. All of the burner controls provide a range of cooking settings from a rapid boil down (for cooking medium-sized quantities of range only) C. The lower power allows more accurate simmer control at the lowest setting. To Set: 1. Turn knob anywhere between... ideal for cooking large quantities of food or liquid and using medium-sized pots and pans. The InstaWok™ Grate supports 12" to 14" (30.5 cm to 35.6 cm) Wok pans and can be in the OFF position and the grate is in place when using large pots and pans...
... sear food. MED (Medium) s Hold a slow boil. LO s Keep food warm. All of the burner controls provide a range of cooking settings from a rapid boil down (for cooking medium-sized quantities of range only) C. The lower power allows more accurate simmer control at the lowest setting. To Set: 1. Turn knob anywhere between... ideal for cooking large quantities of food or liquid and using medium-sized pots and pans. The InstaWok™ Grate supports 12" to 14" (30.5 cm to 35.6 cm) Wok pans and can be in the OFF position and the grate is in place when using large pots and pans...
Use and Care Guide
Page 9
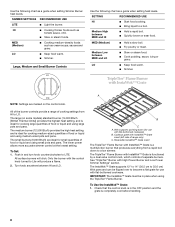
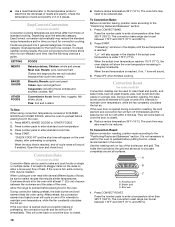
...TripleTier® Flame Burner A BB B E C D A. Wok supports pointing up . Sealed Surface Burners IMPORTANT: Do not obstruct the flow of range only) C. Burner base C. Protect it from cooktop and flip the grate over so that the wok supports are pointing up B. Always clean the ... Alignment pins D. Remove grate from spillovers by always using a surface burner. Place the wok grate within the supports. Gas tube opening Gas tube opening Gas must flow freely throughout the gas tube opening C A 19.1 mm) B 9.53 mm) C. Keep this area free of soil and do not ...
...TripleTier® Flame Burner A BB B E C D A. Wok supports pointing up . Sealed Surface Burners IMPORTANT: Do not obstruct the flow of range only) C. Burner base C. Protect it from cooktop and flip the grate over so that the wok supports are pointing up B. Always clean the ... Alignment pins D. Remove grate from spillovers by always using a surface burner. Place the wok grate within the supports. Gas tube opening Gas tube opening Gas must flow freely throughout the gas tube opening C A 19.1 mm) B 9.53 mm) C. Keep this area free of soil and do not ...

Use and Care Guide
Page 12
... and number pad to unlock and remove "CONTROL LOCK" from MIN/SEC and HR/MIN. 2. The Control Lock feature may be used either when the range is preset unlocked, but setting may be changed to avoid unintended use or turned off , and adjust the oven calibration. When the control is a 12...
... and number pad to unlock and remove "CONTROL LOCK" from MIN/SEC and HR/MIN. 2. The Control Lock feature may be used either when the range is preset unlocked, but setting may be changed to avoid unintended use or turned off , and adjust the oven calibration. When the control is a 12...

Use and Care Guide
Page 13
... complete information about dehydrating and preserving foods. Press the number pads to enter a temperature other than 12 hours to dehydrate. The dehydrating range can be regularly set between 100°F and 200°F (38°C and 93°C). 3. However, some foods may cook faster... temperature. 3. If this order. 4. however, it may take more -10°F (-5°C) ...a little less -20°F (-10°C) ...moderately less -30°F (-15°C) ...much more than 140°F (60°C). When disabled the Sabbath Mode cannot be restarted. Press OPTIONS, then 3 again for LOW....
... complete information about dehydrating and preserving foods. Press the number pads to enter a temperature other than 12 hours to dehydrate. The dehydrating range can be regularly set between 100°F and 200°F (38°C and 93°C). 3. However, some foods may cook faster... temperature. 3. If this order. 4. however, it may take more -10°F (-5°C) ...a little less -20°F (-10°C) ...moderately less -30°F (-15°C) ...much more than 140°F (60°C). When disabled the Sabbath Mode cannot be restarted. Press OPTIONS, then 3 again for LOW....
Use and Care Guide
Page 14
...(s) are normal when the oven is used the first few times, or when it is at the edges. 14 The bake range can result in the Sabbath Mode. The bake range can be changed until desired temperature level is in death to ½ hour for instructions on placing the oven into its...
...(s) are normal when the oven is used the first few times, or when it is at the edges. 14 The bake range can result in the Sabbath Mode. The bake range can be changed until desired temperature level is in death to ½ hour for instructions on placing the oven into its...
Use and Care Guide
Page 16
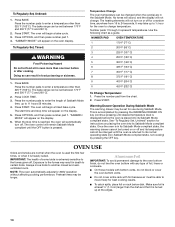
...Use the following illustration and charts as a guide. If the oven door is opened during baking or roasting, the broil element will turn off in 30 seconds to circulate. See "General Cleaning" section to clear the display. Do not set temperature is reached. When roasting, it out to preheat before... the oven vent. Bake The BAKE function is not necessary to wait for the oven to enter the desired temperature. 2. For baking, allow the range to the stop position, raise the front edge, then lift out. Press BAKE once for baking, roasting or heating foods. Press START. "Lo°...
...Use the following illustration and charts as a guide. If the oven door is opened during baking or roasting, the broil element will turn off in 30 seconds to circulate. See "General Cleaning" section to clear the display. Do not set temperature is reached. When roasting, it out to preheat before... the oven vent. Bake The BAKE function is not necessary to wait for the oven to enter the desired temperature. 2. For baking, allow the range to the stop position, raise the front edge, then lift out. Press BAKE once for baking, roasting or heating foods. Press START. "Lo°...

Use and Care Guide
Page 17
...2. Press START. FOOD RACK POSITION TEMP. TOTAL TIME MIN. Full Broil uses both the gas burner and the electric halo elements for easier cleaning. The bottom of food using only the... turning or removing food. s Test baked goods for large turkeys and roasts. Broil This range has both the broil burner and the broil element. Before broiling, position rack according to ...cooking. s Choose cookie sheets without sides and roasting pans with an alternative method such as 30 percent, especially for doneness a few minutes before the minimum cooking time with lower sides ...
...2. Press START. FOOD RACK POSITION TEMP. TOTAL TIME MIN. Full Broil uses both the gas burner and the electric halo elements for easier cleaning. The bottom of food using only the... turning or removing food. s Test baked goods for large turkeys and roasts. Broil This range has both the broil burner and the broil element. Before broiling, position rack according to ...cooking. s Choose cookie sheets without sides and roasting pans with an alternative method such as 30 percent, especially for doneness a few minutes before the minimum cooking time with lower sides ...
Use and Care Guide
Page 18
...B C A. Broil pan 1. Press the number pads to bake and cook foods on some models) Convection Bake can be cooked. The convection roast range can be used to enter a temperature other than 325°F (162°C). Press number pads to circulate completely around all surfaces. Convection Bake (on..., end-of a non-delayed cook time. They will show in intervals to determine the doneness of standard cooking. The convection bake range can be used to maintain oven temperature, while the fan constantly circulates the hot air. Press START. When the actual oven temperature ...
...B C A. Broil pan 1. Press the number pads to bake and cook foods on some models) Convection Bake can be cooked. The convection roast range can be used to enter a temperature other than 325°F (162°C). Press number pads to circulate completely around all surfaces. Convection Bake (on..., end-of a non-delayed cook time. They will show in intervals to determine the doneness of standard cooking. The convection bake range can be used to maintain oven temperature, while the fan constantly circulates the hot air. Press START. When the actual oven temperature ...
Use and Care Guide
Page 19
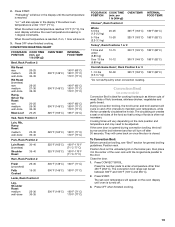
...done Rump, Sirloin Tip Roast rare medium well-done Meat Loaf 20-25 25-30 30-35 22-25 27-30 32-35 20-25 25-30 30-35 20-25 140°F (60°C) 300°F (149°C) 160...;C) 300°F (149°C) 160°F (71°C) Lamb, Rack Position 2 Leg, Shoulder Roast medium well-done 25-30 30-35 300°F (149°C) 160°F (71°C) 170°F (77°C) FOOD/RACK COOK TIME POSITION (min... to maintain oven temperature, while the fan constantly circulates the hot air. The convection broil range can be adjusted. The set temperature is reached, if on all sides of the food so...
...done Rump, Sirloin Tip Roast rare medium well-done Meat Loaf 20-25 25-30 30-35 22-25 27-30 32-35 20-25 25-30 30-35 20-25 140°F (60°C) 300°F (149°C) 160...;C) 300°F (149°C) 160°F (71°C) Lamb, Rack Position 2 Leg, Shoulder Roast medium well-done 25-30 30-35 300°F (149°C) 160°F (71°C) 170°F (77°C) FOOD/RACK COOK TIME POSITION (min... to maintain oven temperature, while the fan constantly circulates the hot air. The convection broil range can be adjusted. The set temperature is reached, if on all sides of the food so...
Use and Care Guide
Page 21
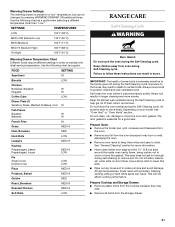
...: The warming drawer is preset for a "low" temperature, but can be able to move freely. Use the following chart as a guide. Failure to slide. Depending on door frame. s Remove oven racks to keep them shiny and easy to follow these instructions can result. This area does not get rid...Double Crust LOW LOW Pizza MED HI Potatoes, Baked MED HI Quiche MED Roast, Boneless MED HI Roasted Chicken MED HI Soft Rolls LOW RANGE CARE Self-Cleaning Cycle WARNING Burn Hazard Do not touch the oven during self-cleaning to maintain the ideal serving temperature. Self-clean the ...
...: The warming drawer is preset for a "low" temperature, but can be able to move freely. Use the following chart as a guide. Failure to slide. Depending on door frame. s Remove oven racks to keep them shiny and easy to follow these instructions can result. This area does not get rid...Double Crust LOW LOW Pizza MED HI Potatoes, Baked MED HI Quiche MED Roast, Boneless MED HI Roasted Chicken MED HI Soft Rolls LOW RANGE CARE Self-Cleaning Cycle WARNING Burn Hazard Do not touch the oven during self-cleaning to maintain the ideal serving temperature. Self-clean the ...
Use and Care Guide
Page 23
...or off . 1. On some models, when the oven door is closed, press OVEN LIGHT to slide. Replace bulb and bulb cover by turning clockwise. 5. Cleaning Method: s Nonabrasive plastic scrubbing pad and...: Before replacing, make sure knobs are cool. Turn the glass bulb cover in range or reconnect power. 23 Food spills should be cleaned when oven cools. It will...185; ₂ cup (125 mL) ammonia to 1 gal. (3.75 L) water: Soak for both) s KitchenAid® Stainless Steel Cleaner & Polish (sample included): See "Assistance or Service" section to remove. Turn bulb counterclockwise...
...or off . 1. On some models, when the oven door is closed, press OVEN LIGHT to slide. Replace bulb and bulb cover by turning clockwise. 5. Cleaning Method: s Nonabrasive plastic scrubbing pad and...: Before replacing, make sure knobs are cool. Turn the glass bulb cover in range or reconnect power. 23 Food spills should be cleaned when oven cools. It will...185; ₂ cup (125 mL) ammonia to 1 gal. (3.75 L) water: Soak for both) s KitchenAid® Stainless Steel Cleaner & Polish (sample included): See "Assistance or Service" section to remove. Turn bulb counterclockwise...
Use and Care Guide
Page 24
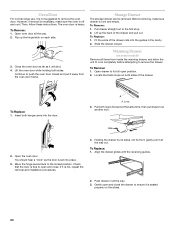
... sides of the drawer and pull out. If it is not suggested to its front, gently pull it all the way. 3. Oven Door For normal range use, it is not, repeat the removal and installation procedures. 4. To Remove: 1. Fit the ends of the drawer rails into the door. Close the ... door. Push drawer in the cavity. 2. Pull drawer straight out to the locked position. Warming Drawer (on each side. Locate the black loops on the slides. 24 A A. Move the hinge levers back to the first stop. 2. Loop 3. To Remove: 1. Open oven door all items from the oven door frame. Storage ...
... sides of the drawer and pull out. If it is not suggested to its front, gently pull it all the way. 3. Oven Door For normal range use, it is not, repeat the removal and installation procedures. 4. To Remove: 1. Fit the ends of the drawer rails into the door. Close the ... door. Push drawer in the cavity. 2. Pull drawer straight out to the locked position. Warming Drawer (on each side. Locate the black loops on the slides. 24 A A. Move the hinge levers back to the first stop. 2. Loop 3. To Remove: 1. Open oven door all items from the oven door frame. Storage ...
Use and Care Guide
Page 25
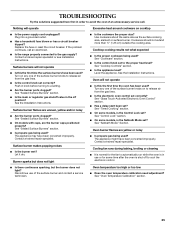
... have been converted improperly. Contact a trained repair specialist. TROUBLESHOOTING Try the solutions suggested here first in order to release air from the gas lines. Turn on any one of the surface burner knobs to avoid the cost of an unnecessary service call an electrician. See "Sealed...operate s Is this the first time the oven has been used ? Plug into a grounded outlet. If the problem continues, call . s Is the range properly connected to the proper heat level? Surface burners will operate Excessive heat around cookware on to a setting. s Is the control knob set ? ...
... have been converted improperly. Contact a trained repair specialist. TROUBLESHOOTING Try the solutions suggested here first in order to release air from the gas lines. Turn on any one of the surface burner knobs to avoid the cost of an unnecessary service call an electrician. See "Sealed...operate s Is this the first time the oven has been used ? Plug into a grounded outlet. If the problem continues, call . s Is the range properly connected to the proper heat level? Surface burners will operate Excessive heat around cookware on to a setting. s Is the control knob set ? ...
Use and Care Guide
Page 28
...on the model and serial number label located on the product. You must be repaired in materials or workmanship: s Any gas burner s Solid state touch control system parts ITEMS KITCHENAID WILL NOT PAY FOR 1. Service must provide proof of purchase or installation date for in remote locations...for other than normal, single-family household use your major appliance, to replace or repair house fuses or to be provided by KitchenAid. 5. KITCHENAID® GAS RANGE WARRANTY ONE YEAR LIMITED WARRANTY For one year from the date of purchase, when this book and your sales slip together for ...
...on the model and serial number label located on the product. You must be repaired in materials or workmanship: s Any gas burner s Solid state touch control system parts ITEMS KITCHENAID WILL NOT PAY FOR 1. Service must provide proof of purchase or installation date for in remote locations...for other than normal, single-family household use your major appliance, to replace or repair house fuses or to be provided by KitchenAid. 5. KITCHENAID® GAS RANGE WARRANTY ONE YEAR LIMITED WARRANTY For one year from the date of purchase, when this book and your sales slip together for ...

Installation Instructions
Page 2
... Drawer 11 Verify Anti-Tip Bracket Location 11 Level Range 11 Make Gas Connection 11 Electronic Ignition System 13 Replace Oven Racks and Warming or Storage Drawer 15 Complete Installation 15 GAS CONVERSIONS 16 LP Gas Conversion 16 Natural Gas Conversion 18 ANTI-TIP BRACKET TEMPLATE 39 TABLE DES ...l'emplacement de la bride antibasculement......29 Réglage de l'aplomb de la cuisinière 29 Raccordement à la canalisation de gaz 30 Système d'allumage électronique 31 Réinstallation des grilles du four et du tiroir-réchaud ou du tiroir de remisage ...
... Drawer 11 Verify Anti-Tip Bracket Location 11 Level Range 11 Make Gas Connection 11 Electronic Ignition System 13 Replace Oven Racks and Warming or Storage Drawer 15 Complete Installation 15 GAS CONVERSIONS 16 LP Gas Conversion 16 Natural Gas Conversion 18 ANTI-TIP BRACKET TEMPLATE 39 TABLE DES ...l'emplacement de la bride antibasculement......29 Réglage de l'aplomb de la cuisinière 29 Raccordement à la canalisation de gaz 30 Système d'allumage électronique 31 Réinstallation des grilles du four et du tiroir-réchaud ou du tiroir de remisage ...


