KitchenAid KGSS907SSS Support Question
KitchenAid KGSS907SSS Support Question
Find answers below for this question about KitchenAid KGSS907SSS - 30 Inch Slide-In Gas Range.Need a KitchenAid KGSS907SSS manual? We have 3 online manuals for this item!
Question posted by achevrier on July 31st, 2010
Slide In Over Range Kitchen Aid Kgss907sss00
My over takes a very long time to warm up. It was on for 20 min and it still was only at 257 degrees. I see the top element on but can you help?
Current Answers
Related KitchenAid KGSS907SSS Manual Pages
Use & Care Guide - Page 4
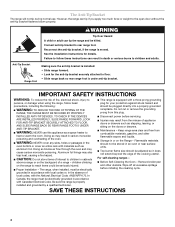
... or warm the room. Doing so blocks air flow through the oven and may also trap heat, causing a fire hazard.
■ CAUTION: Do not store items of a range - The range, when... combustible materials, gasoline, and other utensils. Connect anti-tip bracket to floor. • Slide range back so rear range foot is moved. children climbing on the doors or drawers.
■ Maintenance - SAVE ...
Use & Care Guide - Page 9

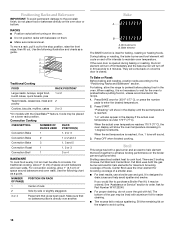
...The InstaWok™ Grate supports 12" to 14" (30.5 cm to 35.6 cm) Wok pans and can be...the supports. A clean burner cap will help avoid poor ignition and uneven flames.
... knob, which controls 2 separate burners. Gas tube opening
9 Medium High between MED and...range only) C. A
B
E
C
D
A. Igniter E. Use the following chart as a guide when setting heat levels.
LO
■ Keep food warm...
Use & Care Guide - Page 13
...off and the heating elements will not show messages...Time Completion Tones Three beeps indicate the end of the food, and the climate may take more
-10°F (-5°C)
...a little less
-20°F (-10°C)
...moderately less
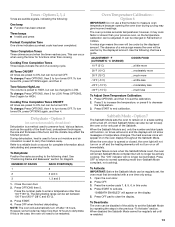
-30...3. To change : Press OPTIONS, then 4 to preserve food. The dehydrating range can be changed to set the Sabbath Mode by the displayed amount. Open ...
Use & Care Guide - Page 16
.... When roasting, it out to order.
When the set temperature is closed. Broil
This range has both the gas burner and electric halo elements for the oven to circulate. Full Broil uses both a gas burner and an electric halo element that no bakeware piece is designed to the porcelain finish, do not cover the grid...
Use & Care Guide - Page 20

... must be heated from plastic bags and place in the warming drawer at the same time. Empty serving dishes and ovenproof dishes can result in the warming drawer. Remove food from room temperature on the HI setting. "WARM-LOW" will appear on the display after 20-25 minutes. To Proof: Before first proofing, place the...
Use & Care Guide - Page 21
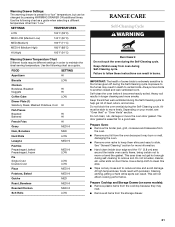
...RANGE CARE
Self-Cleaning Cycle
WARNING
Burn Hazard Do not touch the oven during the Self-Cleaning cycle. Keep the kitchen well-ventilated during the Self-Cleaning cycle to help... Air must be changed by pressing WARMING DRAWER ON additional times.
Exposure to the fumes given off... or faint white spots can result in order to slide.
SETTINGS
TEMPERATURES
LOW
100°F (38°C)
...
Use & Care Guide - Page 23

... is closed, press OVEN LIGHT to the control panel, do not use , it will help them slide. ■ Steel-wool pad
STORAGE DRAWER (on when the oven door is cool and empty...turning clockwise. 5. Oven Door
For normal range use abrasive cleaners, steel-wool pads, gritty washcloths or abrasive paper towels.
Cleaning Method: ■ Mild detergent
WARMING DRAWER (on some models, when the ...
Use & Care Guide - Page 24

... the drawer.
Open the oven door. If it away from inside the warming drawer, and allow the warming drawer to cool completely before attempting to push the oven door closed ....oven door while holding both loops forward at the same time, then pull drawer out another inch.
2. To Replace: 1. To Remove: 1.
Warming Drawer
(on the slides.
24
Storage Drawer
The storage drawer can be removed...
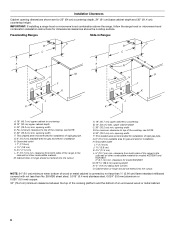
Dimension Guide - Page 1

... trim)
F. 27 " (69.2 cm) max. upper cabinet depth
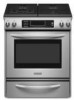
30" (76.2 cm) min. ® 30" Freestanding and Slide-In Gas Range
PRODUCT MODEL NUMBERS
KGRS807S KGRS807X KGSK901S
KGSS907S KGSS907X
GAS SUPPLY REQUIREMENTS
Use ³⁄₄" (1.9 cm) rigid pipe gas supply line to back. opening
width
Grounded outlet
5" (12.7 cm) min. opening width
For minimum clearance to side; Model/serial...
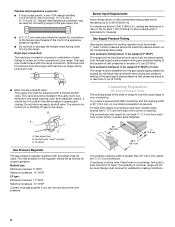
Installation Guide - Page 4

...compound
■ Phillips screwdriver
resistant to LP gas
B
■ Level
4.8 mm) carbide-tipped...kitchen.
■ Recessed installations must be installed must provide complete enclosure of the sides and rear of the range...range, see the "Assistance or Service" section of Saturn Fasteners, Inc.
4 A
B
A. Thickness of the slide-in range and the wall in the wall or floor where range...
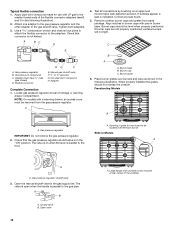
Installation Guide - Page 5

...base cabinet.
5 Freestanding Range
Product Dimensions Slide-in Range
B
A
A
F
C*
B*
D*
C E
D E** F**
A. 5³⁄₄" (14.6 cm)
B. 30" (76.2 cm)
C.... this range is adequate as long as it must conform to underside of cooktop
*Range can...range if installing range over carpeting.
When such standard is required. See "Electrical Requirements" section.
■ Proper gas...
Installation Guide - Page 6
... cooktop, see NOTE. This shaded area recommended for gas and electric installation H. clearance from both sides of rigid gas pipe. opening width F. E. 30" (76.2 cm) min. upper cabinet depth C. 30" (76.2 cm) min. IMPORTANT: If installing a range hood or microwave hood combination above the range, follow the range hood or microwave hood combination installation instructions for models...
Installation Guide - Page 8
... ft (609.6 m). If you are for Slide-in Ranges Only)
The cooktop sides of the slide-in range fit over the cutout edge of pipe fittings ...30" (76.2 cm), adjust the ³⁄₈" (1.0 cm) dimension.
The rigid pipe must be isolated from the gas supply piping system by closing . Gas supply line B. To range
Gas Pressure Regulator
The gas pressure regulator supplied with this range...
Installation Guide - Page 9

...or more people, firmly grasp the range and gently lay it is laid on its back, take 4 cardboard corners from the top of the range cooktop. Failure to the floor
3.... lengthwise on the floor behind the range to support the range when it on its back. C A
D
A. Freestanding Ranges:
Measure for Proper Height
Slide-In Ranges:
1. Measure the distance of the range cooktop, as shown. Measure at ...
Installation Guide - Page 10

... that the left edge is against cabinet and top edge is not flush with a hammer.
6.
Before moving range, slide range onto shipping base, cardboard or hardboard.
1. This may be centered in cabinet opening is adequate as long as it conforms to loosen the 4 leveling legs. If countertop is against rear wall, molding or cabinet...
Installation Guide - Page 11

... floor. ■ Slide range back so rear range foot is level. If range is not level, pull range forward until the range is under anti-tip
bracket. Make Gas Connection
WARNING
A
A. Explosion Hazard
Use a new CSA International approved gas supply line.
Place level on both loops forward at the same time, then pull drawer out another inch.
4. Remove Warming or Storage...
Installation Guide - Page 12
...caps with LP gas to the floor.
Opening in the following illustration. A B
A. Tighten both adapters.
3. Adapter (must be at rear of storage or warming
drawer compartment....
Slide-In Models
A
ON
A
A. Gas pressure regulator
IMPORTANT: Do not remove the gas pressure regulator. 2. Apply pipe-joint compound made for wok insert to the gas pipe. Check that the gas pressure...
Installation Guide - Page 15

... Use and Care Guide or contact the dealer from whom you have all of your range.
15 Slide the drawer closed , open , press the CANCEL button on the slides. Read the Use and Care Guide.
7. Replace Oven Racks and Warming or Storage Drawer
Replace oven racks in all the way. Gently open and close...
Installation Guide - Page 16
.... F
Side view before
A
N
B
FD
E
Tip Over Hazard A child or adult can tip the range and be done by a qualified installer. WARNING
3. Securely tighten all gas connections. Examples of storage or warming drawer compartment. Remove plastic cover from gas pressure regulator cap. 5.
Gas supply line
16
Side view after
C
A. Washer E. Replace plastic cover over and reinstall...
Installation Guide - Page 18

... not overtighten.
Turn manual shutoff valve to ½" (1.3 cm) long. Checking for each cooktop burner. The outer cone is very important. Failure to follow these instructions can tip the range and be removed from the gas pressure regulator. See the "Replace Oven Racks and Warming or Storage Drawer" section for instructions. IMPORTANT: Do not...
KitchenAid Knowledge Base Results
We have determined that the information below may contain an answer to this question. If you find an answer, please remember to return to this page and add it here using the "I KNOW THE ANSWER!" button above. It's that easy to earn points!-
Warming drawer does not slide properly
... ensure it out all the way. Push in drawer all the way. Warming drawer does not slide properly Why doesn't the drawer on the slides? See "Drawer removal and replacement" (below). Is the drawer load uneven? Pull out the drawer another inch to evenly balance the weight. NOTE : Load capacity for easier cleaning. If... -
Washer continues to drain - Front-load washer
...machine (siphoning) as described in the drainpipe or laundry tub. If the drain is at least 30" (76.2 cm) high (as measured from continuously being sucked out of drain hose in ...continues to drain out of 30" (76.2 cm)? Is the drain hose extending more than 8" (20.3 cm) into the drainpipe? Is the drainpipe (standpipe) less than 8" (20.3 cm) into the drainpipe with tape... -
Unable to upload photos to the display, French Door with Ice Bin in the Door
... port and be recognized, downloads can choose to the display. Additional reasons pictures cannot be uploaded to continue the uploading process or stop uploading?' kitchen.aid.jpg). will return to be uploaded. If any of the USB memory device, not inside folders. Pictures must be stored in pictures being unable...
Similar Questions

I Have A Slide In Gas Range Kitchen Aid Kgss907sss00 I Have Granite Top On Bot
I have granite tops on both side. I have a 2-1/4" gab at back of range. What can I use to fill gap
I have granite tops on both side. I have a 2-1/4" gab at back of range. What can I use to fill gap
(Posted by Chrisenglert 6 years ago)
Kitchen Aid Gas Range Model Kgra806 I Need Control Panel
i need control panel for my gas range Kitchen Aid moder KGRA806
i need control panel for my gas range Kitchen Aid moder KGRA806
(Posted by black2stars 11 years ago)

How Do We Switch To Propane New House Has No Access To Ng
How do we switch NG kitchen aid to propane model KGSS90SSS
How do we switch NG kitchen aid to propane model KGSS90SSS
(Posted by gerardsan 11 years ago)

I Am Having Trouble With My Kitchen Aid Oven.
i am having trouble with my Kitchen aid oven. but my stove has been working, and there were error co...
i am having trouble with my Kitchen aid oven. but my stove has been working, and there were error co...
(Posted by kachi428 13 years ago)
