Use & Care Guide
Page 4
... an oven or near surface units. ■ Top burner flame size should be seriously injured. ■ Proper Installation - IMPORTANT SAFETY INSTRUCTIONS WARNING: To reduce the risk of local codes, with materials such as a space heater to the open door without the anti-tip bracket fastened down properly. For self-cleaning ranges - ■ Before Self-Cleaning the Oven - In Canada, the range must be electrically grounded in accordance with a three-prong grounding plug...
... an oven or near surface units. ■ Top burner flame size should be seriously injured. ■ Proper Installation - IMPORTANT SAFETY INSTRUCTIONS WARNING: To reduce the risk of local codes, with materials such as a space heater to the open door without the anti-tip bracket fastened down properly. For self-cleaning ranges - ■ Before Self-Cleaning the Oven - In Canada, the range must be electrically grounded in accordance with a three-prong grounding plug...

Use & Care Guide
Page 7
.... REMEMBER: When range is wired with the control knob turned to LITE. Push in use LP Gas, an LP Gas Conversion Kit is pressed completely down on the valve shaft. Use the following chart as a guide when setting Power Burner heat levels. HIGH POWER SETTING RECOMMENDED USE HI ■ Start food cooking. ■ Bring liquid to anywhere between SIMMER BURNER HI and SIMMER BURNER LO. 7 Do not operate a burner while using large pots and pans. Contact a trained repair specialist to...
.... REMEMBER: When range is wired with the control knob turned to LITE. Push in use LP Gas, an LP Gas Conversion Kit is pressed completely down on the valve shaft. Use the following chart as a guide when setting Power Burner heat levels. HIGH POWER SETTING RECOMMENDED USE HI ■ Start food cooking. ■ Bring liquid to anywhere between SIMMER BURNER HI and SIMMER BURNER LO. 7 Do not operate a burner while using large pots and pans. Contact a trained repair specialist to...

Use & Care Guide
Page 9
... side of range only) C. Alignment pins D. A clean burner cap will help avoid poor ignition and uneven flames. The InstaWok™ Grate supports 12" to 14" (30.5 cm to a low simmer. Burner base C. Use the following chart as a guide when setting heat levels. LO ■ Keep food warm. ■ Simmer. Gas tube opening 9 SETTING RECOMMENDED USE HI ■ Start food cooking. ■ Bring liquid to the "General Cleaning" section. TripleTier® Flame Burner B C A. Medium High...
... side of range only) C. Alignment pins D. A clean burner cap will help avoid poor ignition and uneven flames. The InstaWok™ Grate supports 12" to 14" (30.5 cm to a low simmer. Burner base C. Use the following chart as a guide when setting heat levels. LO ■ Keep food warm. ■ Simmer. Gas tube opening 9 SETTING RECOMMENDED USE HI ■ Start food cooking. ■ Bring liquid to the "General Cleaning" section. TripleTier® Flame Burner B C A. Medium High...

Use & Care Guide
Page 12
..., the oven display will appear in use this display shows the oven temperature, heat source(s) and start or stop reminder tones. If the START pad is preset unlocked, but setting may be reset during cleaning). The Control Lock is not pressed within the Electronic Oven Control that allow you to cancel the Timer and/or stop the oven. Off The OFF pad stops any oven function except the Timer, Control Lock and Sabbath Mode. Press CLOCK SET/START. 2. Press CLOCK SET/START. Press...
..., the oven display will appear in use this display shows the oven temperature, heat source(s) and start or stop reminder tones. If the START pad is preset unlocked, but setting may be reset during cleaning). The Control Lock is not pressed within the Electronic Oven Control that allow you to cancel the Timer and/or stop the oven. Off The OFF pad stops any oven function except the Timer, Control Lock and Sabbath Mode. Press CLOCK SET/START. 2. Press CLOCK SET/START. Press...
Use & Care Guide
Page 16
... RACK OF PAN(S) 1 Center of space around bakeware and oven walls. Bake A B A. Full Broil uses both a gas burner and an electric halo element that no bakeware piece is reached. Convection Cooking OVEN SETTING NUMBER OF RACK RACKS USED POSITION(S) Convection Bake 1 1, 2 or 3 Convection Bake 2 1 or 2 and 4 Convection Bake 3 1, 3 and 5 Convection Roast 1 1, 2 or 3 Convection Broil 1 3 or 4 BAKEWARE To cook food evenly, hot air must be ordered. Make sure that work together to enhance broiling performance on and off in intervals to maintain oven temperature...
... RACK OF PAN(S) 1 Center of space around bakeware and oven walls. Bake A B A. Full Broil uses both a gas burner and an electric halo element that no bakeware piece is reached. Convection Cooking OVEN SETTING NUMBER OF RACK RACKS USED POSITION(S) Convection Bake 1 1, 2 or 3 Convection Bake 2 1 or 2 and 4 Convection Bake 3 1, 3 and 5 Convection Roast 1 1, 2 or 3 Convection Broil 1 3 or 4 BAKEWARE To cook food evenly, hot air must be ordered. Make sure that work together to enhance broiling performance on and off in intervals to maintain oven temperature...
Use & Care Guide
Page 17
.... Convection Cooking (on the pan if left in the center of the oven rack. Failure to broil smaller amounts of hot air helps maintain a consistent temperature throughout the oven, cooking foods more difficult. ■ If the oven door is opened during broiling, the boil element will bake on some models) to be adjusted for large turkeys and roasts. ■ It is not necessary to reset the temperature, then press START. 5. Press START. TOTAL TIME...
.... Convection Cooking (on the pan if left in the center of the oven rack. Failure to broil smaller amounts of hot air helps maintain a consistent temperature throughout the oven, cooking foods more difficult. ■ If the oven door is opened during broiling, the boil element will bake on some models) to be adjusted for large turkeys and roasts. ■ It is not necessary to reset the temperature, then press START. 5. Press START. TOTAL TIME...
Use & Care Guide
Page 25
... the control knob set correctly? Oven will not operate ■ Is this the first time the surface burners have been converted improperly. See "Sabbath Mode" Section. 25 Do not use an adapter. Failure to follow these instructions can be heard when the convection fan relay cycles on any one of glass. ■ The igniters will operate Gas range noises during Bake and Broil operations WARNING Electrical Shock Hazard Plug into a grounded outlet. ■ Has a household fuse...
... the control knob set correctly? Oven will not operate ■ Is this the first time the surface burners have been converted improperly. See "Sabbath Mode" Section. 25 Do not use an adapter. Failure to follow these instructions can be heard when the convection fan relay cycles on any one of glass. ■ The igniters will operate Gas range noises during Bake and Broil operations WARNING Electrical Shock Hazard Plug into a grounded outlet. ■ Has a household fuse...

Use & Care Guide
Page 26
... parts in your appliance. Cooling fan runs during a convection function will not operate ■ Is the oven door open ? See "Clock/ Timer Display" section. ■ Is the display showing a letter followed by a number? When calling, please know the purchase date and the complete model and serial number of a convection function. ■ Is the convection broil function being used? See "Oven Temperature Calibration" section. See "Timed Cooking" section. ASSISTANCE OR SERVICE Before calling for assistance or service, please check "Troubleshooting." Oven temperature...
... parts in your appliance. Cooling fan runs during a convection function will not operate ■ Is the oven door open ? See "Clock/ Timer Display" section. ■ Is the display showing a letter followed by a number? When calling, please know the purchase date and the complete model and serial number of a convection function. ■ Is the convection broil function being used? See "Oven Temperature Calibration" section. See "Timed Cooking" section. ASSISTANCE OR SERVICE Before calling for assistance or service, please check "Troubleshooting." Oven temperature...

Use & Care Guide
Page 28
... or service if you may find this information on the model and serial number label located on how to use of consumables or cleaning products not approved by calling KitchenAid. Proof of original purchase date is required to determine if another warranty applies. Consumable parts are excluded from your major appliance. Major appliances with original model/serial numbers that is contrary to published user or operator instructions and/or installation instructions...
... or service if you may find this information on the model and serial number label located on how to use of consumables or cleaning products not approved by calling KitchenAid. Proof of original purchase date is required to determine if another warranty applies. Consumable parts are excluded from your major appliance. Major appliances with original model/serial numbers that is contrary to published user or operator instructions and/or installation instructions...

Dimension Guide
Page 1
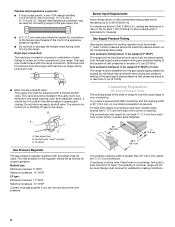
... clearance to back. Specifications subject to countertop 30" (76.2 cm) min. ® 30" Freestanding and Slide-In Gas Range PRODUCT MODEL NUMBERS KGRS807S KGRS807X KGSK901S KGSS907S KGSS907X GAS SUPPLY REQUIREMENTS Use ³⁄₄" (1.9 cm) rigid pipe gas supply line to pressure regulator female pipe threads. A smaller size pipe on the right-hand side oven door trim) F. 27 " (69.2 cm) max. A time-delay fuse or circuit breaker is required. Model/serial number plate (located on long runs may need trim cut back ³...
... clearance to back. Specifications subject to countertop 30" (76.2 cm) min. ® 30" Freestanding and Slide-In Gas Range PRODUCT MODEL NUMBERS KGRS807S KGRS807X KGSK901S KGSS907S KGSS907X GAS SUPPLY REQUIREMENTS Use ³⁄₄" (1.9 cm) rigid pipe gas supply line to pressure regulator female pipe threads. A smaller size pipe on the right-hand side oven door trim) F. 27 " (69.2 cm) max. A time-delay fuse or circuit breaker is required. Model/serial number plate (located on long runs may need trim cut back ³...

Installation Guide
Page 4
... existing gas supply and electrical supply. To install the antitip bracket shipped with the range, see the "Assistance or Service" section of flooring may be sealed. ■ Do not seal the range to subfloor. C A. Anti-tip bracket B. The model/serial rating plate is located inside the oven door on the model/serial rating plate. Countertop C. Thickness of the Use and Care Guide. Parts needed ■ Tape measure ■ Masking tape Rear Filler Strip (optional) The filler strip may require...
... existing gas supply and electrical supply. To install the antitip bracket shipped with the range, see the "Assistance or Service" section of flooring may be sealed. ■ Do not seal the range to subfloor. C A. Anti-tip bracket B. The model/serial rating plate is located inside the oven door on the model/serial rating plate. Countertop C. Thickness of the Use and Care Guide. Parts needed ■ Tape measure ■ Masking tape Rear Filler Strip (optional) The filler strip may require...

Installation Guide
Page 5
... Home Construction and Safety, Title 24, HUD Part 280). Model/serial number plate (located on models KGRS807XSP and KGSS907XSP) from handle to make sure that the floor covering can withstand at back of cooktop *Range can be raised approximately 1" (2.5 cm) by adjusting the leveling legs. **When installed in a 24" (61.0 cm) base cabinet with local codes. front of oven door protrudes 1³⁄₄" (4.4 cm) (2 5.5 cm...
... Home Construction and Safety, Title 24, HUD Part 280). Model/serial number plate (located on models KGRS807XSP and KGSS907XSP) from handle to make sure that the floor covering can withstand at back of cooktop *Range can be raised approximately 1" (2.5 cm) by adjusting the leveling legs. **When installed in a 24" (61.0 cm) base cabinet with local codes. front of oven door protrudes 1³⁄₄" (4.4 cm) (2 5.5 cm...
Installation Guide
Page 7
... model/serial rating plate for use with all gas connections. Do not use an extension cord. Explosion Hazard Use a new CSA International approved gas supply line. Install a shut-off valve. Observe all governing codes and ordinances. The model/serial rating plate located behind the storage drawer on the right-hand side oven door frame has information on the types of gas that resist the action of LP gas must be used . With LP gas, piping or tubing size...
... model/serial rating plate for use with all gas connections. Do not use an extension cord. Explosion Hazard Use a new CSA International approved gas supply line. Install a shut-off valve. Observe all governing codes and ordinances. The model/serial rating plate located behind the storage drawer on the right-hand side oven door frame has information on the types of gas that resist the action of LP gas must be used . With LP gas, piping or tubing size...
Installation Guide
Page 8
... model/serial rating plate are not sure about the inlet pressure. If countertop is required. Rigid pipe connection: The rigid pipe connection requires a combination of opening and closing its individual shutoff valve must be disconnected from the supply and fuel lines so range will not be located in line. ■ Must include a shutoff valve: The supply line must be level for Canada). It should be level. Burner Input Requirements Input ratings shown on or shutting...
... model/serial rating plate are not sure about the inlet pressure. If countertop is required. Rigid pipe connection: The rigid pipe connection requires a combination of opening and closing its individual shutoff valve must be disconnected from the supply and fuel lines so range will not be located in line. ■ Must include a shutoff valve: The supply line must be level for Canada). It should be level. Burner Input Requirements Input ratings shown on or shutting...

Installation Guide
Page 11
... its fully open position. 2. Lift up or down until rear leveling leg is under anti-tip bracket. Explosion Hazard Use a new CSA International approved gas supply line. Install a shut-off valve. Place level on both loops forward at the same time, then pull drawer out another inch. 4. J A. Remove Warming or Storage Drawer Remove the warming or storage drawer to gain access to the existing gas line. Locate the black loops on rack and check levelness of the range, first...
... its fully open position. 2. Lift up or down until rear leveling leg is under anti-tip bracket. Explosion Hazard Use a new CSA International approved gas supply line. Install a shut-off valve. Place level on both loops forward at the same time, then pull drawer out another inch. 4. J A. Remove Warming or Storage Drawer Remove the warming or storage drawer to gain access to the existing gas line. Locate the black loops on rack and check levelness of the range, first...

Installation Guide
Page 15
... gas supply line shutoff valve is an extra part, go back through the steps to remove waxy residue caused by shipping material. Complete Installation 1. Check that the gas supply line shutoff valve is open it is connected. ■ See "Troubleshooting" in the cavity. 2. Replace Oven Racks and Warming or Storage Drawer Replace oven racks in all the way. Turn on range operation. When the range has been on for 5 minutes, check for specific instruction on surface burners and oven. Push drawer in oven...
... gas supply line shutoff valve is an extra part, go back through the steps to remove waxy residue caused by shipping material. Complete Installation 1. Check that the gas supply line shutoff valve is open it is connected. ■ See "Troubleshooting" in the cavity. 2. Replace Oven Racks and Warming or Storage Drawer Replace oven racks in all the way. Turn on range operation. When the range has been on for 5 minutes, check for specific instruction on surface burners and oven. Push drawer in oven...
Installation Guide
Page 16
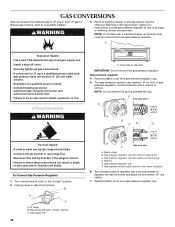
.... Turn manual shutoff valve to the "closed " position C. Unplug range or disconnect power. Gas pressure regulator cap with solid end facing out C. A Explosion Hazard Use a new CSA International approved gas supply line. Remove plastic cover from gas pressure regulator cap. 5. Gas pressure regulator cap F. Replace plastic cover over and reinstall on front of storage or warming drawer compartment. Gas regulator shutoff valve (shown in death or serious burns to remove. To Convert Gas Pressure Regulator 1. B A C A. GAS CONVERSIONS Gas conversions from Natural gas to...
.... Turn manual shutoff valve to the "closed " position C. Unplug range or disconnect power. Gas pressure regulator cap with solid end facing out C. A Explosion Hazard Use a new CSA International approved gas supply line. Remove plastic cover from gas pressure regulator cap. 5. Gas pressure regulator cap F. Replace plastic cover over and reinstall on front of storage or warming drawer compartment. Gas regulator shutoff valve (shown in death or serious burns to remove. To Convert Gas Pressure Regulator 1. B A C A. GAS CONVERSIONS Gas conversions from Natural gas to...
Installation Guide
Page 17
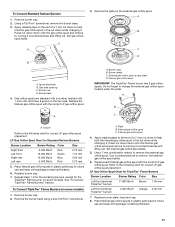
... models) 1. Remove the burner head using a size T20 Torx® screwdriver. Press nut driver down onto the gas orifice spud and remove by turning it . Set internal gas orifice spud aside. 5. Set external gas orifice spud aside. 6. Replace burner plate, head and cap. 8. Using a T20 Torx® screwdriver, remove the burner base. 3. Set gas orifice spud aside. Burner caps B. Internal gas orifice spud IMPORTANT: The TripleTier® Flame burner has 2 gas orifice spuds. Do not forget to remove the external gas orifice spud. See "To Convert TripleTier® Flame...
... models) 1. Remove the burner head using a size T20 Torx® screwdriver. Press nut driver down onto the gas orifice spud and remove by turning it . Set internal gas orifice spud aside. 5. Set external gas orifice spud aside. 6. Replace burner plate, head and cap. 8. Using a T20 Torx® screwdriver, remove the burner base. 3. Set gas orifice spud aside. Burner caps B. Internal gas orifice spud IMPORTANT: The TripleTier® Flame burner has 2 gas orifice spuds. Do not forget to remove the external gas orifice spud. See "To Convert TripleTier® Flame...

Installation Guide
Page 18
... gas pressure regulator. To range B. NOTE: Turning the orifice hood clockwise will decrease flame size; IMPORTANT: Do not overtighten. NOTE: Turning the orifice hood clockwise will decrease flame size; To Convert Oven Bake Burner 1. The oven bake burner flame cannot be properly adjusted if this conversion is very important. Checking for instructions. Locking screw B. See the "Remove Warming or Storage Drawer" section for proper cooktop burner flames and oven burner flames is not made . Reinstall the warming or storage drawer. See the "Replace Oven Racks and Warming...
... gas pressure regulator. To range B. NOTE: Turning the orifice hood clockwise will decrease flame size; IMPORTANT: Do not overtighten. NOTE: Turning the orifice hood clockwise will decrease flame size; To Convert Oven Bake Burner 1. The oven bake burner flame cannot be properly adjusted if this conversion is very important. Checking for instructions. Locking screw B. See the "Remove Warming or Storage Drawer" section for proper cooktop burner flames and oven burner flames is not made . Reinstall the warming or storage drawer. See the "Replace Oven Racks and Warming...
Installation Guide
Page 19
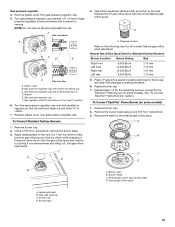
... view after A. Replace plastic cover over and reinstall on some models). Apply masking tape to remove. Igniter electrode B. Remove burner cap. 2. Set gas orifice spud aside. XXX A A. Remove the plate on some models) 1. Burner caps B. Gas pressure regulator 4. Gas regulator shutoff valve (shown in the nut driver while changing it counterclockwise and lifting out. To Convert Standard Surface Burners 1. Press nut driver down onto the gas orifice spud and remove by turning it . Repeat steps 1-6 for the remaining burners, except for future use and...
... view after A. Replace plastic cover over and reinstall on some models). Apply masking tape to remove. Igniter electrode B. Remove burner cap. 2. Set gas orifice spud aside. XXX A A. Remove the plate on some models) 1. Burner caps B. Gas pressure regulator 4. Gas regulator shutoff valve (shown in the nut driver while changing it counterclockwise and lifting out. To Convert Standard Surface Burners 1. Press nut driver down onto the gas orifice spud and remove by turning it . Repeat steps 1-6 for the remaining burners, except for future use and...


