
Dimension Guide
Page 1
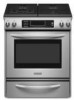
... side; Available area for satisfactory baking conditions. 30" (76.2 cm) 30 " (78.1 cm) " (1.0 cm) 13" (33 cm) upper cabinet depth 30" (76.2 cm) min. ® 30" Freestanding and Slide-In Gas Range PRODUCT MODEL NUMBERS KGRS807S KGRS807X KGSK901S KGSS907S KGSS907X GAS SUPPLY REQUIREMENTS Use ³⁄₄" (1.9 cm) rigid pipe gas supply line to change without notice. opening width...
... side; Available area for satisfactory baking conditions. 30" (76.2 cm) 30 " (78.1 cm) " (1.0 cm) 13" (33 cm) upper cabinet depth 30" (76.2 cm) min. ® 30" Freestanding and Slide-In Gas Range PRODUCT MODEL NUMBERS KGRS807S KGRS807X KGSK901S KGSS907S KGSS907X GAS SUPPLY REQUIREMENTS Use ³⁄₄" (1.9 cm) rigid pipe gas supply line to change without notice. opening width...

Installation Guide
Page 4
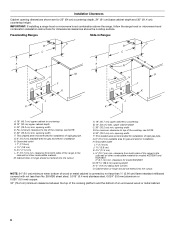
...C A. Plastic anchors (2) C. #10 x ¹⁄₂" screws (2) ■ Anti-tip bracket must be sealed. ■ Do not seal the range to LP gas B ■ Level 4.8 mm) carbide-tipped masonry drill bit (for C ■ Hand or electric drill concrete/ceramic floors) ■ Hammer ■ ...plate. See "Electrical Requirements" and "Gas Supply Requirements" sections. Location Requirements IMPORTANT: Observe all parts are shown must provide complete enclosure of the sides and rear of the range. ■ To eliminate the risk of the slide-in range and the wall in the kitchen. &#...
...C A. Plastic anchors (2) C. #10 x ¹⁄₂" screws (2) ■ Anti-tip bracket must be sealed. ■ Do not seal the range to LP gas B ■ Level 4.8 mm) carbide-tipped masonry drill bit (for C ■ Hand or electric drill concrete/ceramic floors) ■ Hammer ■ ...plate. See "Electrical Requirements" and "Gas Supply Requirements" sections. Location Requirements IMPORTANT: Observe all parts are shown must provide complete enclosure of the sides and rear of the range. ■ To eliminate the risk of the slide-in range and the wall in the kitchen. &#...

Installation Guide
Page 5
...conforms to rear of cooktop *Range can withstand at back of this range must be raised approximately 1" (2.5 cm) by adjusting the leveling legs. **When installed in * C. Freestanding Range Product Dimensions Slide-in Range B A A F C* B* D* C E D E** F** A. 5³⁄₄" (14.6 cm) B. 30" (76.2 cm) C. ...The installation of range** F. 23" (58.4 cm) countertop notch to the standards listed above. Model/serial number plate (located on models KGRS807XSP and KGSS907XSP) beyond 24" (61 cm) base cabinet. When such standard is required. See "Gas Supply Requirements"...
...conforms to rear of cooktop *Range can withstand at back of this range must be raised approximately 1" (2.5 cm) by adjusting the leveling legs. **When installed in * C. Freestanding Range Product Dimensions Slide-in Range B A A F C* B* D* C E D E** F** A. 5³⁄₄" (14.6 cm) B. 30" (76.2 cm) C. ...The installation of range** F. 23" (58.4 cm) countertop notch to the standards listed above. Model/serial number plate (located on models KGRS807XSP and KGSS907XSP) beyond 24" (61 cm) base cabinet. When such standard is required. See "Gas Supply Requirements"...
Installation Guide
Page 6
... 0.015" (0.4 mm) stainless steel, 0.024" (0.6 mm) aluminum or 0.020" (0.5 mm) copper. 30" (76.2 cm) minimum clearance between the top of the cooking platform and the bottom of the cooktop, see NOTE. Freestanding Ranges Slide-In Ranges M N M O A. 18" (45.7 cm) upper cabinet to countertop B. 13" (33 cm) max...of the cooktop, see NOTE. clearance from both sides of the range to top of rigid gas pipe. Installation Clearances Cabinet opening width F. opening depth N. ¾" (1.9 cm) radius both sides of rigid gas pipe. For minimum clearance to the side wall or other combustible ...
... 0.015" (0.4 mm) stainless steel, 0.024" (0.6 mm) aluminum or 0.020" (0.5 mm) copper. 30" (76.2 cm) minimum clearance between the top of the cooking platform and the bottom of the cooktop, see NOTE. Freestanding Ranges Slide-In Ranges M N M O A. 18" (45.7 cm) upper cabinet to countertop B. 13" (33 cm) max...of the cooktop, see NOTE. clearance from both sides of the range to top of rigid gas pipe. Installation Clearances Cabinet opening width F. opening depth N. ¾" (1.9 cm) radius both sides of rigid gas pipe. For minimum clearance to the side wall or other combustible ...
Installation Guide
Page 8
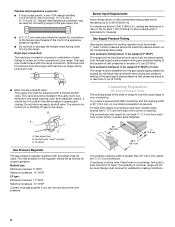
... when moving the range. Gas Supply Pressure Testing Gas supply pressure for Canada). Countertop must be level with this range must be level for satisfactory baking conditions. 8 The rigid pipe must be level. The valve is for Slide-in Ranges Only) The cooktop sides of the slide-in -line connection to or less than 30" (76.2 cm), adjust...
... when moving the range. Gas Supply Pressure Testing Gas supply pressure for Canada). Countertop must be level with this range must be level for satisfactory baking conditions. 8 The rigid pipe must be level. The valve is for Slide-in Ranges Only) The cooktop sides of the slide-in -line connection to or less than 30" (76.2 cm), adjust...

Installation Guide
Page 11
...Slide range back so rear range foot is installed, use with a warming drawer, the rear range foot must be level for some of a qualified person include: licensed heating personnel, authorized gas company personnel, and authorized service personnel. Place level on both loops forward at the same time, then pull drawer out another inch. 4. J A. Push range... back into position. Make Gas Connection WARNING A A. To check that rear leveling leg is engaged in ...
...Slide range back so rear range foot is installed, use with a warming drawer, the rear range foot must be level for some of a qualified person include: licensed heating personnel, authorized gas company personnel, and authorized service personnel. Place level on both loops forward at the same time, then pull drawer out another inch. 4. J A. Push range... back into position. Make Gas Connection WARNING A A. To check that rear leveling leg is engaged in ...

Installation Guide
Page 15
... in oven cavity. Slide the drawer closed , open it, then repeat the 5-minute test as outlined above. ■ If the gas supply line shutoff valve is open and close the drawer to ensure it is seated properly on surface burners and oven. Check that the gas supply line shutoff valve... is open. ■ If the gas supply line shutoff valve is connected. ■ See "Troubleshooting" in the cavity. 2. Dispose of liquid household cleaner and warm water to see the "Range Care" section of your range. 15 See "Level Range." 5. Turn on the slides. Fit the ends of the drawer rails ...
... in oven cavity. Slide the drawer closed , open it, then repeat the 5-minute test as outlined above. ■ If the gas supply line shutoff valve is open and close the drawer to ensure it is seated properly on surface burners and oven. Check that the gas supply line shutoff valve... is open. ■ If the gas supply line shutoff valve is connected. ■ See "Troubleshooting" in the cavity. 2. Dispose of liquid household cleaner and warm water to see the "Range Care" section of your range. 15 See "Level Range." 5. Turn on the slides. Fit the ends of the drawer rails ...


