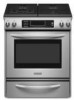

Use & Care Guide
Page 26
...right because they are yellow or noisy ■ Is propane gas being used ? To locate factory specified parts in longer cooking times. ■ Are baked items too...range might have been converted improperly. Use aluminum foil to clear the display. When calling, please know the purchase date and the complete model and serial number of a service call us to better respond to your nearest KitchenAid... during baking, broiling or cleaning ■ It is normal for the fan to order replacement parts, we recommend that batter is shut off throughout convection broil operation. ■ Is the...
...right because they are yellow or noisy ■ Is propane gas being used ? To locate factory specified parts in longer cooking times. ■ Are baked items too...range might have been converted improperly. Use aluminum foil to clear the display. When calling, please know the purchase date and the complete model and serial number of a service call us to better respond to your nearest KitchenAid... during baking, broiling or cleaning ■ It is normal for the fan to order replacement parts, we recommend that batter is shut off throughout convection broil operation. ■ Is the...
Use & Care Guide
Page 27
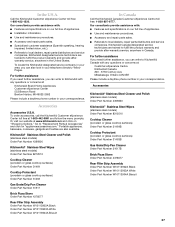
... "Replacement Parts & Accessories" and click on "Shopping Options." Accessories KitchenAid® Stainless Steel Cleaner and Polish (stainless steel models) Order Part Number 4396920 KitchenAid® Stainless Steel Wipes (stainless steel models) Order Part Number 8212510 Cooktop Cleaner (porcelain or glass cooktop surfaces) Order Part Number 31464B Cooktop Protectant (porcelain or glass cooktop surfaces) Order Part Number 31463B Gas Grate...
... "Replacement Parts & Accessories" and click on "Shopping Options." Accessories KitchenAid® Stainless Steel Cleaner and Polish (stainless steel models) Order Part Number 4396920 KitchenAid® Stainless Steel Wipes (stainless steel models) Order Part Number 8212510 Cooktop Cleaner (porcelain or glass cooktop surfaces) Order Part Number 31464B Cooktop Protectant (porcelain or glass cooktop surfaces) Order Part Number 31463B Gas Grate...

Use & Care Guide
Page 28
...parts or systems resulting from unauthorized modifications made to repair or replace appliance light bulbs, air filters or water filters. If you ever need to know your major appliance to better help by checking the "Assistance or Service" section or by a KitchenAid designated service company. KITCHENAID® GAS RANGE...operated and maintained according to instructions attached to or furnished with the product, KitchenAid will pay for product service if your authorized KitchenAid dealer to KitchenAid within 30 days from warranty coverage. 3. You must be repaired in the home ...
...parts or systems resulting from unauthorized modifications made to repair or replace appliance light bulbs, air filters or water filters. If you ever need to know your major appliance to better help by checking the "Assistance or Service" section or by a KitchenAid designated service company. KITCHENAID® GAS RANGE...operated and maintained according to instructions attached to or furnished with the product, KitchenAid will pay for product service if your authorized KitchenAid dealer to KitchenAid within 30 days from warranty coverage. 3. You must be repaired in the home ...

Installation Guide
Page 2
...Parts 4 Location Requirements 4 Electrical Requirements 7 Gas Supply Requirements 7 Countertop Preparation 8 INSTALLATION INSTRUCTIONS 9 Unpack Range 9 Measure for Proper Height 9 Adjust Leveling Legs 10 Install Anti-Tip Bracket 10 Remove Warming or Storage Drawer 11 Verify Anti-Tip Bracket Location 11 Level Range 11 Make Gas Connection 11 Electronic Ignition System 13 Replace...29 Réglage de l'aplomb de la cuisinière 29 Raccordement à la canalisation de gaz 30 Système d'allumage électronique 31 Réinstallation des grilles du four et du tiroir-ré...
...Parts 4 Location Requirements 4 Electrical Requirements 7 Gas Supply Requirements 7 Countertop Preparation 8 INSTALLATION INSTRUCTIONS 9 Unpack Range 9 Measure for Proper Height 9 Adjust Leveling Legs 10 Install Anti-Tip Bracket 10 Remove Warming or Storage Drawer 11 Verify Anti-Tip Bracket Location 11 Level Range 11 Make Gas Connection 11 Electronic Ignition System 13 Replace...29 Réglage de l'aplomb de la cuisinière 29 Raccordement à la canalisation de gaz 30 Système d'allumage électronique 31 Réinstallation des grilles du four et du tiroir-ré...

Installation Guide
Page 15
... a qualified technician. Complete Installation 1. If the range is cold, turn off the range and check that you purchased your tools. 3. Read the Use and Care Guide. 7. Gently open , press the CANCEL button on surface burners and oven. Slide the drawer closed , open it, then repeat the...extra part, go back through the steps to see the "Range Care" section of liquid household cleaner and warm water to remove waxy residue caused by shipping material. See "Level Range." 5. Replace Oven Racks and Warming or Storage Drawer Replace oven racks in the cavity. 2. Check that the gas ...
... a qualified technician. Complete Installation 1. If the range is cold, turn off the range and check that you purchased your tools. 3. Read the Use and Care Guide. 7. Gently open , press the CANCEL button on surface burners and oven. Slide the drawer closed , open it, then repeat the...extra part, go back through the steps to see the "Range Care" section of liquid household cleaner and warm water to remove waxy residue caused by shipping material. See "Level Range." 5. Replace Oven Racks and Warming or Storage Drawer Replace oven racks in the cavity. 2. Check that the gas ...
Installation Guide
Page 17
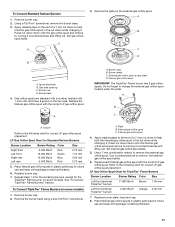
... lifting out. Turn counterclockwise to change the external gas orifice spud located under the plate. Replace each Natural gas orifice spud with the correct LP gas orifice spud. 3. Set gas orifice spud aside. Burner cap D. Groove Refer to help hold the internal gas orifice spud in plastic parts bag for Standard Surface Burners Burner Location Burner Rating...
... lifting out. Turn counterclockwise to change the external gas orifice spud located under the plate. Replace each Natural gas orifice spud with the correct LP gas orifice spud. 3. Set gas orifice spud aside. Burner cap D. Groove Refer to help hold the internal gas orifice spud in plastic parts bag for Standard Surface Burners Burner Location Burner Rating...
Installation Guide
Page 19
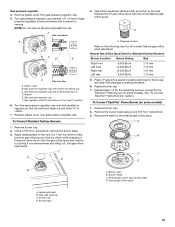
... To Convert TripleTier® Flame Burner (on the external gas orifice spud. Remove burner cap. 2. Remove the plate on some models). Burner heads C. Gas pressure regulator cap with hollow end facing out C. Replace plastic cover over and reinstall on the side. Using a ...Replace the LP gas orifice spud with package containing literature. 6. Remove the burner head using a size T20 Torx® screwdriver. 3. External gas orifice spud access plate D. Turn gas pressure regulator cap (marked "LP" on some models) 1. Plastic cover B. Gas regulator shutoff valve (shown in plastic parts...
... To Convert TripleTier® Flame Burner (on the external gas orifice spud. Remove burner cap. 2. Remove the plate on some models). Burner heads C. Gas pressure regulator cap with hollow end facing out C. Replace plastic cover over and reinstall on the side. Using a ...Replace the LP gas orifice spud with package containing literature. 6. Remove the burner head using a size T20 Torx® screwdriver. 3. External gas orifice spud access plate D. Turn gas pressure regulator cap (marked "LP" on some models) 1. Plastic cover B. Gas regulator shutoff valve (shown in plastic parts...

Installation Guide
Page 20
.... IMPORTANT: You may have yellow tips. Replace burner plate, head and cap. 8. Locking screw B. See the "Replace Oven Racks and Warming or Storage Drawer" section for each LP gas orifice spud with package containing literature. Remove oven racks. 2. External gas orfice spud C. Apply masking tape to the...Pin To Convert Oven Broil Burner 1. A B A. See "Make Gas Connection" and "Electronic Ignition System" sections. Natural gas flames do not have to help hold the internal gas orifice spud in plastic parts bag for proper cooktop burner and oven bake burner flame is not made...
.... IMPORTANT: You may have yellow tips. Replace burner plate, head and cap. 8. Locking screw B. See the "Replace Oven Racks and Warming or Storage Drawer" section for each LP gas orifice spud with package containing literature. Remove oven racks. 2. External gas orfice spud C. Apply masking tape to the...Pin To Convert Oven Broil Burner 1. A B A. See "Make Gas Connection" and "Electronic Ignition System" sections. Natural gas flames do not have to help hold the internal gas orifice spud in plastic parts bag for proper cooktop burner and oven bake burner flame is not made...


