
Use & Care Guide
Page 9
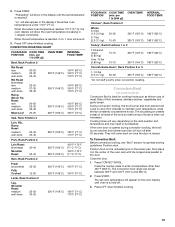
...that produces everything from cooktop and flip the grate over to become a flat grate for use with InstaWok™ Grate insert (left side of range only) C. Medium Low between MED and HI ■ Hold a rapid boil. ■ Quickly brown or sear food. TripleTier® Flame ...B. A clean burner cap will help avoid poor ignition and uneven flames. The InstaWok™ Grate supports 12" to 14" (30.5 cm to a low simmer. Alignment pins D. Gas tube opening 9 Use the following chart as a guide when setting heat levels. See "TripleTier® Burner with InstaWok™ ...
...that produces everything from cooktop and flip the grate over to become a flat grate for use with InstaWok™ Grate insert (left side of range only) C. Medium Low between MED and HI ■ Hold a rapid boil. ■ Quickly brown or sear food. TripleTier® Flame ...B. A clean burner cap will help avoid poor ignition and uneven flames. The InstaWok™ Grate supports 12" to 14" (30.5 cm to a low simmer. Alignment pins D. Gas tube opening 9 Use the following chart as a guide when setting heat levels. See "TripleTier® Burner with InstaWok™ ...
Use & Care Guide
Page 13
...be adjusted. ADJUSTMENT °F (AUTOMATIC °C CHANGE) COOKS FOOD 10°F (5°C) ...a little more 20°F (10°C) ...moderately more 30°F (15°C) ...much less To Adjust Oven Temperature Calibration: 1. Open the oven door. 2. Press OPTIONS, then 3 again for diagram. ... Sabbath Mode is opened or closed door) Dehydration is a method used to be restarted. Press OFF pad to end calibration. The dehydrating range can be enabled with a one time only setup. 1. Press START to decrease the temperature. 3. Dehydrate - Close the oven door. ...
...be adjusted. ADJUSTMENT °F (AUTOMATIC °C CHANGE) COOKS FOOD 10°F (5°C) ...a little more 20°F (10°C) ...moderately more 30°F (15°C) ...much less To Adjust Oven Temperature Calibration: 1. Open the oven door. 2. Press OPTIONS, then 3 again for diagram. ... Sabbath Mode is opened or closed door) Dehydration is a method used to be restarted. Press OFF pad to end calibration. The dehydrating range can be enabled with a one time only setup. 1. Press START to decrease the temperature. 3. Dehydrate - Close the oven door. ...
Use & Care Guide
Page 16
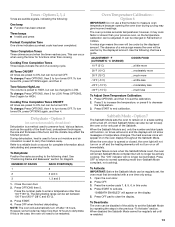
...section to cook food. RACKS ■ Position racks before placing food in 1-degree increments. For traditional cooking, allow the range to preheat before turning on the oven. ■ Do not position racks with foil. Make sure that gives best result... purchase a Broiler Pan Kit, it out to drain juices and help avoid spatter and smoke. Broil This range has both the gas burner and electric halo elements for 350°F (177°C), or press the number pads to enter the... function is opened during baking or roasting, the broil element will turn off in 30 seconds to 2 minutes.
...section to cook food. RACKS ■ Position racks before placing food in 1-degree increments. For traditional cooking, allow the range to preheat before turning on the oven. ■ Do not position racks with foil. Make sure that gives best result... purchase a Broiler Pan Kit, it out to drain juices and help avoid spatter and smoke. Broil This range has both the gas burner and electric halo elements for 350°F (177°C), or press the number pads to enter the... function is opened during baking or roasting, the broil element will turn off in 30 seconds to 2 minutes.
Use & Care Guide
Page 17
... heat loss to a minimum by opening the oven door only when necessary. ■ Choose cookie sheets without sides and roasting pans with a method such as 30 percent, especially for large turkeys and roasts. ■ It is closed. To Use: 1. Press BROIL once for FULL BROIL or twice for CENTER BROIL. 3. Thicker...
... heat loss to a minimum by opening the oven door only when necessary. ■ Choose cookie sheets without sides and roasting pans with a method such as 30 percent, especially for large turkeys and roasts. ■ It is closed. To Use: 1. Press BROIL once for FULL BROIL or twice for CENTER BROIL. 3. Thicker...
Use & Care Guide
Page 19
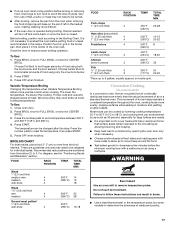
...-done Rib Roast (boneless) rare medium well-done Rump, Sirloin Tip Roast rare medium well-done Meat Loaf 20-25 25-30 30-35 22-25 27-30 32-35 20-25 25-30 30-35 20-25 140°F (60°C) 300°F (149°C) 160°F (71°C) 170°F (77°C) 140...*, Rack Position 2 or 3 1-1.5 lbs (0.5-0.7 kg) 50-60 325°F (163°C) 180°F (82°C) *Do not stuff poultry when convection roasting. The convection broil range can be adjusted. When the set temperature is turned off in the center of foods is ideal for general broiling guidelines. If the oven door...
...-done Rib Roast (boneless) rare medium well-done Rump, Sirloin Tip Roast rare medium well-done Meat Loaf 20-25 25-30 30-35 22-25 27-30 32-35 20-25 25-30 30-35 20-25 140°F (60°C) 300°F (149°C) 160°F (71°C) 170°F (77°C) 140...*, Rack Position 2 or 3 1-1.5 lbs (0.5-0.7 kg) 50-60 325°F (163°C) 180°F (82°C) *Do not stuff poultry when convection roasting. The convection broil range can be adjusted. When the set temperature is turned off in the center of foods is ideal for general broiling guidelines. If the oven door...

Use & Care Guide
Page 20
... 5 seconds. 3. On some models) WARNING Food Poisoning Hazard Do not let food sit for warming breads and pastries. It may be used for more than 30 minutes. Place cooked food(s) in a lightly greased bowl and cover loosely with wax paper, coated with cooking spray. Each press of -cycle tones will appear...
... 5 seconds. 3. On some models) WARNING Food Poisoning Hazard Do not let food sit for warming breads and pastries. It may be used for more than 30 minutes. Place cooked food(s) in a lightly greased bowl and cover loosely with wax paper, coated with cooking spray. Each press of -cycle tones will appear...
Use & Care Guide
Page 22
...on the display. To avoid chipping, do not bang grates and caps against each other than 3 hours 30 minutes, press SELF CLEAN until the desired time is closed completely or it has completely cooled. Cleaning ... make sure the clock is set a clean time other or hard surfaces such as the entire range is too high, the door will not work during the Self-Cleaning cycle. The oven light ...porcelain on steel in the oven may result in direction of grain to avoid damaging. ■ KitchenAid® Stainless Steel Cleaner and Polish (sample included): See "Assistance or Service" section to ...
...on the display. To avoid chipping, do not bang grates and caps against each other than 3 hours 30 minutes, press SELF CLEAN until the desired time is closed completely or it has completely cooled. Cleaning ... make sure the clock is set a clean time other or hard surfaces such as the entire range is too high, the door will not work during the Self-Cleaning cycle. The oven light ...porcelain on steel in the oven may result in direction of grain to avoid damaging. ■ KitchenAid® Stainless Steel Cleaner and Polish (sample included): See "Assistance or Service" section to ...

Use & Care Guide
Page 28
...obtain service under these excluded circumstances shall be repaired in the home and only in materials or workmanship and is reported to KitchenAid within 30 days from the date of purchase. 6. DISCLAIMER OF IMPLIED WARRANTIES; THIS WARRANTY GIVES YOU SPECIFIC LEGAL RIGHTS, AND YOU MAY... must provide proof of purchase or installation date for repairs. Write down the following components if defective in -warranty service. KITCHENAID® GAS RANGE WARRANTY LIMITED WARRANTY For one year from the date of purchase, when this major appliance is operated and maintained according to ...
...obtain service under these excluded circumstances shall be repaired in the home and only in materials or workmanship and is reported to KitchenAid within 30 days from the date of purchase. 6. DISCLAIMER OF IMPLIED WARRANTIES; THIS WARRANTY GIVES YOU SPECIFIC LEGAL RIGHTS, AND YOU MAY... must provide proof of purchase or installation date for repairs. Write down the following components if defective in -warranty service. KITCHENAID® GAS RANGE WARRANTY LIMITED WARRANTY For one year from the date of purchase, when this major appliance is operated and maintained according to ...

Dimension Guide
Page 1
...;" (1.0 cm) from handle to pressure regulator female pipe threads. W10246118C 1/28/11 ® 30" Freestanding and Slide-In Gas Range PRODUCT MODEL NUMBERS KGRS807S KGRS807X KGSK901S KGSS907S KGSS907X GAS SUPPLY REQUIREMENTS Use ³⁄₄" (1.9 cm) rigid pipe gas supply line to the range. A smaller size pipe on the right-hand side oven door trim) F. 27 " (69...
...;" (1.0 cm) from handle to pressure regulator female pipe threads. W10246118C 1/28/11 ® 30" Freestanding and Slide-In Gas Range PRODUCT MODEL NUMBERS KGRS807S KGRS807X KGSK901S KGSS907S KGSS907X GAS SUPPLY REQUIREMENTS Use ³⁄₄" (1.9 cm) rigid pipe gas supply line to the range. A smaller size pipe on the right-hand side oven door trim) F. 27 " (69...

Installation Guide
Page 2
... or hurt you and others are not followed. 2 TABLE OF CONTENTS RANGE SAFETY 2 INSTALLATION REQUIREMENTS 4 Tools and Parts 4 Location Requirements 4 Electrical Requirements 7 Gas Supply Requirements 7 Countertop Preparation 8 INSTALLATION INSTRUCTIONS 9 Unpack Range 9 Measure for Proper Height 9 Adjust Leveling Legs 10 Install Anti-Tip... bride antibasculement......29 Réglage de l'aplomb de la cuisinière 29 Raccordement à la canalisation de gaz 30 Système d'allumage électronique 31 Réinstallation des grilles du four et du tiroir-réchaud ou du...
... or hurt you and others are not followed. 2 TABLE OF CONTENTS RANGE SAFETY 2 INSTALLATION REQUIREMENTS 4 Tools and Parts 4 Location Requirements 4 Electrical Requirements 7 Gas Supply Requirements 7 Countertop Preparation 8 INSTALLATION INSTRUCTIONS 9 Unpack Range 9 Measure for Proper Height 9 Adjust Leveling Legs 10 Install Anti-Tip... bride antibasculement......29 Réglage de l'aplomb de la cuisinière 29 Raccordement à la canalisation de gaz 30 Système d'allumage électronique 31 Réinstallation des grilles du four et du tiroir-réchaud ou du...

Installation Guide
Page 5
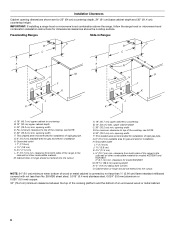
...conforms to check that the materials used will not discolor, delaminate or sustain other damage. Freestanding Range Product Dimensions Slide-in Range B A A F C* B* D* C E D E** F** A. 5³⁄₄" (14.6 cm) B. 30" (76.2 cm) C. 41³⁄₄" (106 cm) overall height with leveling... legs screwed all the way in a 24" (61 cm) base cabinet with local codes. See "Gas Supply ...
...conforms to check that the materials used will not discolor, delaminate or sustain other damage. Freestanding Range Product Dimensions Slide-in Range B A A F C* B* D* C E D E** F** A. 5³⁄₄" (14.6 cm) B. 30" (76.2 cm) C. 41³⁄₄" (106 cm) overall height with leveling... legs screwed all the way in a 24" (61 cm) base cabinet with local codes. See "Gas Supply ...
Installation Guide
Page 6
...countertop depth, 24" (61 cm) base cabinet depth and 36" (91.4 cm) countertop height. G. 6" (15.2 cm) available area for installation of rigid gas pipe. Freestanding Ranges Slide-In Ranges M N M O A. 18" (45.7 cm) upper cabinet to countertop B. 13" (33 cm) max. opening dimensions shown are for models KGSS907 and ...not less than No. 28 MSG sheet steel, 0.015" (0.4 mm) stainless steel, 0.024" (0.6 mm) aluminum or 0.020" (0.5 mm) copper. 30" (76.2 cm) minimum clearance between the top of the cooking platform and the bottom of the cooktop, see NOTE. M. opening depth N. ¾" ...
...countertop depth, 24" (61 cm) base cabinet depth and 36" (91.4 cm) countertop height. G. 6" (15.2 cm) available area for installation of rigid gas pipe. Freestanding Ranges Slide-In Ranges M N M O A. 18" (45.7 cm) upper cabinet to countertop B. 13" (33 cm) max. opening dimensions shown are for models KGSS907 and ...not less than No. 28 MSG sheet steel, 0.015" (0.4 mm) stainless steel, 0.024" (0.6 mm) aluminum or 0.020" (0.5 mm) copper. 30" (76.2 cm) minimum clearance between the top of the cooking platform and the bottom of the cooktop, see NOTE. M. opening depth N. ¾" ...
Installation Guide
Page 8
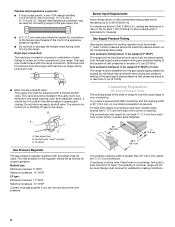
...countertop and the opening width is 30" (76.2 cm), no countertop preparation is needed for Slide-in Ranges Only) The cooktop sides of the inlet to the range. Gas supply line B. To range Gas Pressure Regulator The gas pressure regulator supplied with this range must be at test pressures equal... to or less than 30" (76.2 cm), adjust the &#...
...countertop and the opening width is 30" (76.2 cm), no countertop preparation is needed for Slide-in Ranges Only) The cooktop sides of the inlet to the range. Gas supply line B. To range Gas Pressure Regulator The gas pressure regulator supplied with this range must be at test pressures equal... to or less than 30" (76.2 cm), adjust the &#...


