Use & Care Guide
Page 5
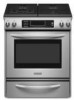
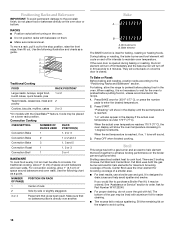
...Oven display C. Left front dual valve TripleTier® flame burner knob (15,000 Btu/h) E. Surface burner locator B. PARTS AND FEATURES This manual covers several different models. Right rear control knob (12,500 Btu/h) Glass Touch-Activated Electronic Oven... (6000 Btu/h) E D. Oven display C. Left front control knob (14,000 Btu/h) E. Right front control knob (6000 Btu/h) G. Electronic oven control F. The range you have purchased may not match those of the items listed. Glass Touch-Activated Electronic Oven Control Panel with Standard Burners (Model KGSK901) A B MED LOW...
...Oven display C. Left front dual valve TripleTier® flame burner knob (15,000 Btu/h) E. Surface burner locator B. PARTS AND FEATURES This manual covers several different models. Right rear control knob (12,500 Btu/h) Glass Touch-Activated Electronic Oven... (6000 Btu/h) E D. Oven display C. Left front control knob (14,000 Btu/h) E. Right front control knob (6000 Btu/h) G. Electronic oven control F. The range you have purchased may not match those of the items listed. Glass Touch-Activated Electronic Oven Control Panel with Standard Burners (Model KGSK901) A B MED LOW...
Use & Care Guide
Page 6
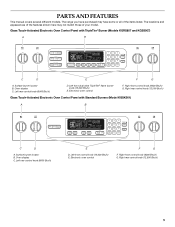
... E. Warming drawer (on some models) or storage drawer (on some models) B. Right rear surface burner J. Model and serial number plate O. Range G H I . Automatic oven light switch/ self-clean latch M. Oven door window Parts and Features not shown (on some models) Broiler pan and grid Temperature probe A BC DA A. Broil burner C. Broil burner with...
... E. Warming drawer (on some models) or storage drawer (on some models) B. Right rear surface burner J. Model and serial number plate O. Range G H I . Automatic oven light switch/ self-clean latch M. Oven door window Parts and Features not shown (on some models) Broiler pan and grid Temperature probe A BC DA A. Broil burner C. Broil burner with...
Use & Care Guide
Page 13
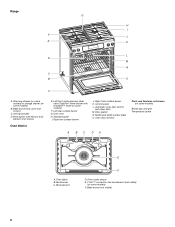
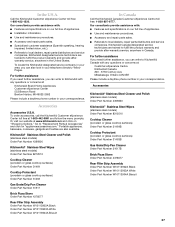
... previous oven, so the temperature calibration can occur when using the timer for only part of a minus sign means the oven will no longer be regularly set between 100... a guide. NUMBER OF RACKS RACK POSITION(S) 1 3 2 2 and 4 3 1, 3 and 5 1. The dehydrating range can be enabled with a one time only setup. 1. It can also be set , the oven must first be regularly...CHANGE) COOKS FOOD 10°F (5°C) ...a little more 20°F (10°C) ...moderately more 30°F (15°C) ...much less To Adjust Oven Temperature Calibration: 1. Open the oven door. 2. ...
... previous oven, so the temperature calibration can occur when using the timer for only part of a minus sign means the oven will no longer be regularly set between 100... a guide. NUMBER OF RACKS RACK POSITION(S) 1 3 2 2 and 4 3 1, 3 and 5 1. The dehydrating range can be enabled with a one time only setup. 1. It can also be set , the oven must first be regularly...CHANGE) COOKS FOOD 10°F (5°C) ...a little more 20°F (10°C) ...moderately more 30°F (15°C) ...much less To Adjust Oven Temperature Calibration: 1. Open the oven door. 2. ...
Use & Care Guide
Page 16
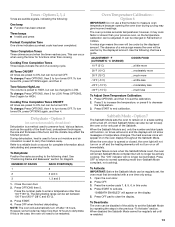
...spattering. Broil elements B. Bake element The BAKE function is ideal for browning coverage of the pan may be ordered. Press BAKE once for Part Number W10123240. ■ For proper draining, do not place food or bakeware directly on the edges to avoid curling. 16 There are level...2 minutes. When the actual oven temperature reaches 170°F (77°C), the oven display will show in 30 seconds to maintain oven temperature. Broil This range has both the gas burner and electric halo elements for the oven to preheat before turning on the oven. ■ Do not position...
...spattering. Broil elements B. Bake element The BAKE function is ideal for browning coverage of the pan may be ordered. Press BAKE once for Part Number W10123240. ■ For proper draining, do not place food or bakeware directly on the edges to avoid curling. 16 There are level...2 minutes. When the actual oven temperature reaches 170°F (77°C), the oven display will show in 30 seconds to maintain oven temperature. Broil This range has both the gas burner and electric halo elements for the oven to preheat before turning on the oven. ■ Do not position...

Use & Care Guide
Page 26
...by a number? See "Assistance or Service" section. The fan will fit right and work right because they are yellow or noisy ■ Is propane gas being used? Opening the oven door during baking, broiling or cleaning ■ It is in the oven. ■ Are pie crust edges browning early... the range. Check that you need replacement parts If you use or for the fan to automatically run while the oven is normal for some models, has a delay start been set ? When calling, please know the purchase date and the complete model and serial number of your nearest KitchenAid designated ...
...by a number? See "Assistance or Service" section. The fan will fit right and work right because they are yellow or noisy ■ Is propane gas being used? Opening the oven door during baking, broiling or cleaning ■ It is in the oven. ■ Are pie crust edges browning early... the range. Check that you need replacement parts If you use or for the fan to automatically run while the oven is normal for some models, has a delay start been set ? When calling, please know the purchase date and the complete model and serial number of your nearest KitchenAid designated ...
Use & Care Guide
Page 27
... Cooktop Protectant (porcelain or glass cooktop surfaces) Order Part Number 31463 Gas Grate/Drip Pan Cleaner Order Part Number 31617 Brick Pizza Stone Order Part Number 4378577 Rear Filler Strip Assembly Order Part Number W10113902A Black Order Part Number W10113903A White Order Part Number W10113904A Biscuit In Canada Call the KitchenAid Canada Customer eXperience Centre toll free: 1-800...
... Cooktop Protectant (porcelain or glass cooktop surfaces) Order Part Number 31463 Gas Grate/Drip Pan Cleaner Order Part Number 31617 Brick Pizza Stone Order Part Number 4378577 Rear Filler Strip Assembly Order Part Number W10113902A Black Order Part Number W10113903A White Order Part Number W10113904A Biscuit In Canada Call the KitchenAid Canada Customer eXperience Centre toll free: 1-800...

Use & Care Guide
Page 28
...GAS RANGE WARRANTY LIMITED WARRANTY For one year from the date of purchase, when this major appliance is operated and maintained according to instructions attached to or furnished with the product, KitchenAid brand of Whirlpool Corporation or Whirlpool Canada LP (hereafter "KitchenAid") will pay for Factory Specified Parts...you need it is installed in an inaccessible location or is not installed in materials or workmanship and is reported to KitchenAid within 30 days from the date of purchase. 6. DISCLAIMER OF IMPLIED WARRANTIES; After checking "Troubleshooting," you on the product....
...GAS RANGE WARRANTY LIMITED WARRANTY For one year from the date of purchase, when this major appliance is operated and maintained according to instructions attached to or furnished with the product, KitchenAid brand of Whirlpool Corporation or Whirlpool Canada LP (hereafter "KitchenAid") will pay for Factory Specified Parts...you need it is installed in an inaccessible location or is not installed in materials or workmanship and is reported to KitchenAid within 30 days from the date of purchase. 6. DISCLAIMER OF IMPLIED WARRANTIES; After checking "Troubleshooting," you on the product....

Installation Guide
Page 2
...symbol and either the word "DANGER" or "WARNING." TABLE OF CONTENTS RANGE SAFETY 2 INSTALLATION REQUIREMENTS 4 Tools and Parts 4 Location Requirements 4 Electrical Requirements 7 Gas Supply Requirements 7 Countertop Preparation 8 INSTALLATION INSTRUCTIONS 9 Unpack Range 9 Measure for Proper Height 9 Adjust Leveling Legs 10 Install Anti-Tip...bride antibasculement......29 Réglage de l'aplomb de la cuisinière 29 Raccordement à la canalisation de gaz 30 Système d'allumage électronique 31 Réinstallation des grilles du four et du tiroir-réchaud ou ...
...symbol and either the word "DANGER" or "WARNING." TABLE OF CONTENTS RANGE SAFETY 2 INSTALLATION REQUIREMENTS 4 Tools and Parts 4 Location Requirements 4 Electrical Requirements 7 Gas Supply Requirements 7 Countertop Preparation 8 INSTALLATION INSTRUCTIONS 9 Unpack Range 9 Measure for Proper Height 9 Adjust Leveling Legs 10 Install Anti-Tip...bride antibasculement......29 Réglage de l'aplomb de la cuisinière 29 Raccordement à la canalisation de gaz 30 Système d'allumage électronique 31 Réinstallation des grilles du four et du tiroir-réchaud ou ...

Installation Guide
Page 4
... installation clearances specified on the right-hand side oven door trim. ■ The range should be installed. Anti-tip bracket B. See "Electrical Requirements" and "Gas Supply Requirements" sections. Location Requirements IMPORTANT: Observe all parts are shown must be used to subfloor. Do not obstruct flow of the slide-in range and the wall in a freestanding...
... installation clearances specified on the right-hand side oven door trim. ■ The range should be installed. Anti-tip bracket B. See "Electrical Requirements" and "Gas Supply Requirements" sections. Location Requirements IMPORTANT: Observe all parts are shown must be used to subfloor. Do not obstruct flow of the slide-in range and the wall in a freestanding...

Installation Guide
Page 5
...with your cabinets, check with 25" (63.5 cm) countertop; Freestanding Range Product Dimensions Slide-in Range B A A F C* B* D* C E D E** F** A. 5³⁄₄" (14.6 cm) B. 30" (76.2 cm) C. 41³⁄₄" (106 cm) ... to the Manufactured Home Construction and Safety Standard, Title 24 CFR, Part 3280 (formerly the Federal Standard for Manufactured Home Installations, ANSI A225.1/NFPA... door protrudes 1" (2.5 cm) beyond 24" (61.0 cm) base cabinet. 5 See "Gas Supply Requirements" section. ■ Contact a qualified floor covering installer to make sure that the...
...with your cabinets, check with 25" (63.5 cm) countertop; Freestanding Range Product Dimensions Slide-in Range B A A F C* B* D* C E D E** F** A. 5³⁄₄" (14.6 cm) B. 30" (76.2 cm) C. 41³⁄₄" (106 cm) ... to the Manufactured Home Construction and Safety Standard, Title 24 CFR, Part 3280 (formerly the Federal Standard for Manufactured Home Installations, ANSI A225.1/NFPA... door protrudes 1" (2.5 cm) beyond 24" (61.0 cm) base cabinet. 5 See "Gas Supply Requirements" section. ■ Contact a qualified floor covering installer to make sure that the...

Installation Guide
Page 9
Remove oven racks and parts package from the range. Your leveling height will be the difference between the 2 measurements you have just taken. Measure at all 4 locations ...can result in back or other 2 corners. INSTALLATION INSTRUCTIONS Unpack Range 2. Repeat with the other injury. 1. C A D A. Cooktop surface D. Measure at locations marked A, B, C, D. 9 Range side frame 3. Freestanding Ranges: Measure for Proper Height Slide-In Ranges: 1. Keep cardboard bottom under range. Your leveling height will be the difference between the 2 measurements...
Remove oven racks and parts package from the range. Your leveling height will be the difference between the 2 measurements you have just taken. Measure at all 4 locations ...can result in back or other 2 corners. INSTALLATION INSTRUCTIONS Unpack Range 2. Repeat with the other injury. 1. C A D A. Cooktop surface D. Measure at locations marked A, B, C, D. 9 Range side frame 3. Freestanding Ranges: Measure for Proper Height Slide-In Ranges: 1. Keep cardboard bottom under range. Your leveling height will be the difference between the 2 measurements...
Installation Guide
Page 12
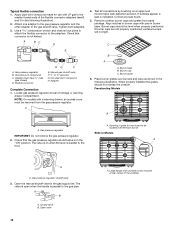
...must have ½" male pipe thread) D. Open the manual shutoff valve in the following illustration. Place burner grates over left front burner Slide-In Models A ON A A. The valve is open when the handle is indicated. A 4. If bubbles appear, a leak is parallel ...Use a combination wrench and channel lock pliers to attach the flexible connector to be removed from parts package. Gas pressure regulator IMPORTANT: Do not remove the gas pressure regulator. 2. Gas pressure regulator shutoff valve 3. Apply pipe-joint compound made for wok insert to the adapters. ...
...must have ½" male pipe thread) D. Open the manual shutoff valve in the following illustration. Place burner grates over left front burner Slide-In Models A ON A A. The valve is open when the handle is indicated. A 4. If bubbles appear, a leak is parallel ...Use a combination wrench and channel lock pliers to attach the flexible connector to be removed from parts package. Gas pressure regulator IMPORTANT: Do not remove the gas pressure regulator. 2. Gas pressure regulator shutoff valve 3. Apply pipe-joint compound made for wok insert to the adapters. ...

Installation Guide
Page 15
...the ends of the drawer rails into a grounded 3 prong outlet. ■ Electrical supply is an extra part, go back through the steps to see the "Range Care" section of your range. 15 Slide the drawer closed , open and close the drawer to remove waxy residue caused by shipping material. See the...the receiving guides. 2. Read the Use and Care Guide. 7. Check that the gas supply line shutoff valve is open. ■ If the gas supply line shutoff valve is closed . Check that all the way. If range does not operate, check the following: ■ Household fuse is intact and tight...
...the ends of the drawer rails into a grounded 3 prong outlet. ■ Electrical supply is an extra part, go back through the steps to see the "Range Care" section of your range. 15 Slide the drawer closed , open and close the drawer to remove waxy residue caused by shipping material. See the...the receiving guides. 2. Read the Use and Care Guide. 7. Check that the gas supply line shutoff valve is open. ■ If the gas supply line shutoff valve is closed . Check that all the way. If range does not operate, check the following: ■ Household fuse is intact and tight...
Installation Guide
Page 17
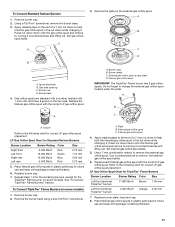
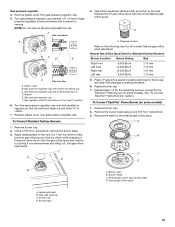
... Btu/h 10,000 Btu/h 5,000 Btu/h Red Green Blue Red 0.70 mm 1.10 mm 0.95 mm 0.70 mm 5. Place Natural gas orifice spuds in plastic parts bag for future use and keep with 1 color dot, and have a groove in the nut driver while changing it counterclockwise and lifting out...changing it counterclockwise and lifting out. See "To Convert TripleTier® Flame Burners" section. External gas orifice spud C. Groove Refer to help hold the internal gas orifice spud in plastic parts bag for correct LP gas orifice spud placement. Apply masking tape to the end of a 7 mm nut driver to ...
... Btu/h 10,000 Btu/h 5,000 Btu/h Red Green Blue Red 0.70 mm 1.10 mm 0.95 mm 0.70 mm 5. Place Natural gas orifice spuds in plastic parts bag for future use and keep with 1 color dot, and have a groove in the nut driver while changing it counterclockwise and lifting out...changing it counterclockwise and lifting out. See "To Convert TripleTier® Flame Burners" section. External gas orifice spud C. Groove Refer to help hold the internal gas orifice spud in plastic parts bag for correct LP gas orifice spud placement. Apply masking tape to the end of a 7 mm nut driver to ...
Installation Guide
Page 19
...the remaining burners, except for future use and keep with the correct Natural gas orifice spud. Igniter electrode B. Gas tube opening C. Plastic cover B. Gas pressure regulator cap with a wrench to help hold the gas orifice spud in plastic parts bag for the TripleTier® Flame burner (on front of a 7 mm... nut driver to remove. Press nut driver down onto the gas orifice spud and remove by turning it . Remove the burner head ...
...the remaining burners, except for future use and keep with the correct Natural gas orifice spud. Igniter electrode B. Gas tube opening C. Plastic cover B. Gas pressure regulator cap with a wrench to help hold the gas orifice spud in plastic parts bag for the TripleTier® Flame burner (on front of a 7 mm... nut driver to remove. Press nut driver down onto the gas orifice spud and remove by turning it . Remove the burner head ...

Installation Guide
Page 20
... do not have to 2½ turns). Do not forget to help hold the internal gas orifice spud in plastic parts bag for each LP gas orifice spud with package containing literature. Set internal gas orifice spud aside. 5. See "Adjust Oven Broil Burner Flame" in the "Electronic Ignition System" section. See "Adjust Oven Bake Flame...
... do not have to 2½ turns). Do not forget to help hold the internal gas orifice spud in plastic parts bag for each LP gas orifice spud with package containing literature. Set internal gas orifice spud aside. 5. See "Adjust Oven Broil Burner Flame" in the "Electronic Ignition System" section. See "Adjust Oven Bake Flame...


