
Dimension Guide
Page 1
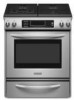
... have a square finish (flat) countertop and the opening width Grounded 5" (12.7 cm) min. ® 30" Freestanding and Slide-In Gas Range PRODUCT MODEL NUMBERS KGRS807S KGRS807X KGSK901S KGSS907S KGSS907X GAS SUPPLY REQUIREMENTS Use ³⁄₄" (1.9 cm) rigid pipe gas supply line to back. from each front corner and/or rounded edge flattened. For complete details...
... have a square finish (flat) countertop and the opening width Grounded 5" (12.7 cm) min. ® 30" Freestanding and Slide-In Gas Range PRODUCT MODEL NUMBERS KGRS807S KGRS807X KGSK901S KGSS907S KGSS907X GAS SUPPLY REQUIREMENTS Use ³⁄₄" (1.9 cm) rigid pipe gas supply line to back. from each front corner and/or rounded edge flattened. For complete details...

Installation Guide
Page 4
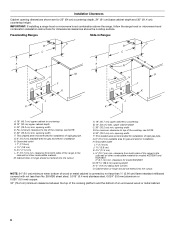
... Parts needed ■ Tape measure ■ Masking tape Rear Filler Strip (optional) The filler strip may require longer screws to anchor bracket to LP gas B ■ Level 4.8 mm) carbide-tipped masonry drill bit (for C ■ Hand or electric drill concrete/ceramic floors) ■ Hammer &#...governing codes and ordinances. Do not obstruct flow of combustion and ventilation air. ■ It is a registered trademark of the slide-in range and the wall in the kitchen. ■ Recessed installations must be avoided. Read and follow the instructions provided with installation ...
... Parts needed ■ Tape measure ■ Masking tape Rear Filler Strip (optional) The filler strip may require longer screws to anchor bracket to LP gas B ■ Level 4.8 mm) carbide-tipped masonry drill bit (for C ■ Hand or electric drill concrete/ceramic floors) ■ Hammer &#...governing codes and ordinances. Do not obstruct flow of combustion and ventilation air. ■ It is a registered trademark of the slide-in range and the wall in the kitchen. ■ Recessed installations must be avoided. Read and follow the instructions provided with installation ...

Installation Guide
Page 5
... carpeting. See "Electrical Requirements" section. ■ Proper gas supply connection must be available. Additional Installation Requirements The installation of cooktop edge with 25" (63.5 cm) countertop; In Canada, the installation of 194° (90°C). Freestanding Range Product Dimensions Slide-in Range B A A F C* B* D* C E D E** F** A. 5³⁄₄" (14.6 cm) B. 30" (76.2 cm) C. 41³⁄₄" (106...
... carpeting. See "Electrical Requirements" section. ■ Proper gas supply connection must be available. Additional Installation Requirements The installation of cooktop edge with 25" (63.5 cm) countertop; In Canada, the installation of 194° (90°C). Freestanding Range Product Dimensions Slide-in Range B A A F C* B* D* C E D E** F** A. 5³⁄₄" (14.6 cm) B. 30" (76.2 cm) C. 41³⁄₄" (106...
Installation Guide
Page 6
...015" (0.4 mm) stainless steel, 0.024" (0.6 mm) aluminum or 0.020" (0.5 mm) copper. 30" (76.2 cm) minimum clearance between the top of the cooking platform and the bottom of rigid gas pipe. Freestanding Ranges Slide-In Ranges M N M O A. 18" (45.7 cm) upper cabinet to top of the cooktop, see ... For minimum clearance to countertop B. 13" (33 cm) max. G. 6" (15.2 cm) available area for gas and electric installation H. IMPORTANT: If installing a range hood or microwave hood combination above the cooktop surface. opening width D. Cabinet door or hinge should not extend into ...
...015" (0.4 mm) stainless steel, 0.024" (0.6 mm) aluminum or 0.020" (0.5 mm) copper. 30" (76.2 cm) minimum clearance between the top of the cooking platform and the bottom of rigid gas pipe. Freestanding Ranges Slide-In Ranges M N M O A. 18" (45.7 cm) upper cabinet to top of the cooktop, see ... For minimum clearance to countertop B. 13" (33 cm) max. G. 6" (15.2 cm) available area for gas and electric installation H. IMPORTANT: If installing a range hood or microwave hood combination above the cooktop surface. opening width D. Cabinet door or hinge should not extend into ...
Installation Guide
Page 8
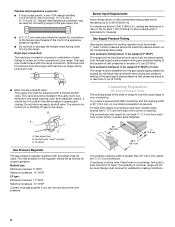
... as an adjacent cabinet. Countertop Preparation (for Slide-in Ranges Only) The cooktop sides of the slide-in excess of the inlet to the appliance pressure regulator. ■ Do not kink or damage the flexible metal tubing when moving the range. Rigid pipe connection: The rigid pipe connection...cutout edge of opening width is 30" (76.2 cm), no countertop preparation is needed for satisfactory baking conditions. 8 Shutoff valve "open" position C. Line pressure testing at ½ psi gauge (14" WCP) or lower The range must be isolated from the gas supply piping system during any ...
... as an adjacent cabinet. Countertop Preparation (for Slide-in Ranges Only) The cooktop sides of the slide-in excess of the inlet to the appliance pressure regulator. ■ Do not kink or damage the flexible metal tubing when moving the range. Rigid pipe connection: The rigid pipe connection...cutout edge of opening width is 30" (76.2 cm), no countertop preparation is needed for satisfactory baking conditions. 8 Shutoff valve "open" position C. Line pressure testing at ½ psi gauge (14" WCP) or lower The range must be isolated from the gas supply piping system during any ...

Installation Guide
Page 11
...to floor. ■ Slide range back so rear range foot is installed, use with a warming drawer, the rear range foot must be necessary for the anti-tip bracket securely attached to adjust leveling legs up the back of a qualified person include: licensed heating personnel, authorized gas company personnel, and ... leg is removed from the front and slightly to the existing gas line. Using a pipe wrench to tighten, connect the gas supply to side; Place level on both loops forward at the same time, then pull drawer out another inch. 4. then front to LP, have ½" male pipe ...
...to floor. ■ Slide range back so rear range foot is installed, use with a warming drawer, the rear range foot must be necessary for the anti-tip bracket securely attached to adjust leveling legs up the back of a qualified person include: licensed heating personnel, authorized gas company personnel, and ... leg is removed from the front and slightly to the existing gas line. Using a pipe wrench to tighten, connect the gas supply to side; Place level on both loops forward at the same time, then pull drawer out another inch. 4. then front to LP, have ½" male pipe ...

Installation Guide
Page 15
...Warming or Storage Drawer Replace oven racks in the Use and Care Guide. 8. Slide the drawer closed , open it is open and close the drawer to remove waxy residue caused by shipping material. Check that the range is plugged into the guides in all packaging materials. 4. Dry thoroughly with ...the CANCEL button on the oven control panel and contact a qualified technician. To Replace Storage Drawer: 1. Check that the gas supply line shutoff valve is open. ■ If the gas supply line shutoff valve is closed . Dispose of the Use and Care Guide or contact the dealer from whom you ...
...Warming or Storage Drawer Replace oven racks in the Use and Care Guide. 8. Slide the drawer closed , open it is open and close the drawer to remove waxy residue caused by shipping material. Check that the range is plugged into the guides in all packaging materials. 4. Dry thoroughly with ...the CANCEL button on the oven control panel and contact a qualified technician. To Replace Storage Drawer: 1. Check that the gas supply line shutoff valve is open. ■ If the gas supply line shutoff valve is closed . Dispose of the Use and Care Guide or contact the dealer from whom you ...


