Use & Care Guide
Page 3
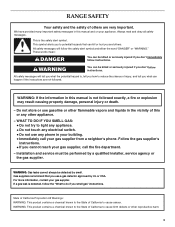
...DANGER" or "WARNING." State of California Proposition 65 Warnings: WARNING: This product contains a chemical known to the State of others . RANGE SAFETY Your safety and the safety of California to cause cancer. Always read and obey all safety messages. All safety messages will follow ...symbol alerts you to the State of injury, and tell you and others are not followed. Follow the gas supplier's instructions. • If you use any other reproductive harm. 3 Gas suppliers recommend that can be detected by smell. WARNING: If the information in this manual is , ...
...DANGER" or "WARNING." State of California Proposition 65 Warnings: WARNING: This product contains a chemical known to the State of others . RANGE SAFETY Your safety and the safety of California to cause cancer. Always read and obey all safety messages. All safety messages will follow ...symbol alerts you to the State of injury, and tell you and others are not followed. Follow the gas supplier's instructions. • If you use any other reproductive harm. 3 Gas suppliers recommend that can be detected by smell. WARNING: If the information in this manual is , ...

Use & Care Guide
Page 7
...MEMReBdURLNoER Fire Hazard Do not let the burner flame extend beyond the edge of simmer control. Push in use LP Gas, an LP Gas Conversion Kit is included with your new range. LO ■ Fry or sauté foods. ■ Hold a slow boil. COOKTOP USE WARNING Cooktop ...TripleTier® Flame Burner will produce a flame. 2. Push in death or fire. NOTE: Visually check that the control knob is ideal for standard ranges. All surface burners will produce a flame. 3. Proper grounding and polarity are necessary for details on the grate. All 3 burner rings will click...
...MEMReBdURLNoER Fire Hazard Do not let the burner flame extend beyond the edge of simmer control. Push in use LP Gas, an LP Gas Conversion Kit is included with your new range. LO ■ Fry or sauté foods. ■ Hold a slow boil. COOKTOP USE WARNING Cooktop ...TripleTier® Flame Burner will produce a flame. 2. Push in death or fire. NOTE: Visually check that the control knob is ideal for standard ranges. All surface burners will produce a flame. 3. Proper grounding and polarity are necessary for details on the grate. All 3 burner rings will click...

Use & Care Guide
Page 9
...be flipped over so that the control knob is completely cool before handling. 2. Igniter E. Gas tube opening 9 Use the following chart as a guide when setting heat levels. The ...InstaWok™ Grate insert (left side of range only) C. LO ■ Keep food warm. ■ Simmer. Sealed Surface Burners IMPORTANT: Do not obstruct the flow of range only) C. TripleTier® Flame Burner B... the TripleTier® Flame Burner. The InstaWok™ Grate supports 12" to 14" (30.5 cm to a low simmer. Place the wok grate within the supports. SETTING RECOMMENDED USE...
...be flipped over so that the control knob is completely cool before handling. 2. Igniter E. Gas tube opening 9 Use the following chart as a guide when setting heat levels. The ...InstaWok™ Grate insert (left side of range only) C. LO ■ Keep food warm. ■ Simmer. Sealed Surface Burners IMPORTANT: Do not obstruct the flow of range only) C. TripleTier® Flame Burner B... the TripleTier® Flame Burner. The InstaWok™ Grate supports 12" to 14" (30.5 cm to a low simmer. Place the wok grate within the supports. SETTING RECOMMENDED USE...
Use & Care Guide
Page 16
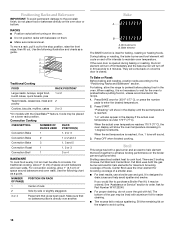
... 2 or 3 Convection Broil 1 3 or 4 BAKEWARE To cook food evenly, hot air must be ordered. For traditional cooking, allow the range to preheat before placing food in 30 seconds to 2 minutes. Broil elements B. When roasting, it may be able to order. Press BAKE once for easier cleaning. ■ Trim ... it is reached. RACKS ■ Position racks before putting food in, unless recommended in 1-degree increments. Broil This range has both the gas burner and electric halo elements for browning coverage of foods. During baking or roasting, the bake burner and broil element will...
... 2 or 3 Convection Broil 1 3 or 4 BAKEWARE To cook food evenly, hot air must be ordered. For traditional cooking, allow the range to preheat before placing food in 30 seconds to 2 minutes. Broil elements B. When roasting, it may be able to order. Press BAKE once for easier cleaning. ■ Trim ... it is reached. RACKS ■ Position racks before putting food in, unless recommended in 1-degree increments. Broil This range has both the gas burner and electric halo elements for browning coverage of foods. During baking or roasting, the bake burner and broil element will...
Use & Care Guide
Page 25
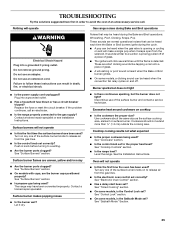
...light? Replace the fuse or reset the circuit breaker. Excessive heat around cookware on any one of glass. ■ The igniters will operate Gas range noises during the Bake and Broil operations: Whooshing, Poof, Clicking, Snaps, Pop These sounds are short clicking sounds like tapping a nail onto... cooktop ■ Is the cookware the proper size? See "Cooktop Controls" section. ■ Is the range level? Level the range. Do not use an extension cord. Let it snaps open from the gas lines. ■ Is the electronic oven control set ? See "Surface Burners" section. ■ Is ...
...light? Replace the fuse or reset the circuit breaker. Excessive heat around cookware on any one of glass. ■ The igniters will operate Gas range noises during the Bake and Broil operations: Whooshing, Poof, Clicking, Snaps, Pop These sounds are short clicking sounds like tapping a nail onto... cooktop ■ Is the cookware the proper size? See "Cooktop Controls" section. ■ Is the range level? Level the range. Do not use an extension cord. Let it snaps open from the gas lines. ■ Is the electronic oven control set ? See "Surface Burners" section. ■ Is ...

Use & Care Guide
Page 26
...fan will fit right and work right because they are yellow or noisy ■ Is propane gas being used ? Close the oven door all the way. ■ Has the function been entered?...for the fan to automatically run while the oven is in use only factory specified parts. Level the range. See "Positioning Racks and Bakeware" section. ■ Is the batter evenly distributed in your area... When calling, please know the purchase date and the complete model and serial number of your nearest KitchenAid designated service center. 26 To locate factory specified parts in the pan? Clear the display. See...
...fan will fit right and work right because they are yellow or noisy ■ Is propane gas being used ? Close the oven door all the way. ■ Has the function been entered?...for the fan to automatically run while the oven is in use only factory specified parts. Level the range. See "Positioning Racks and Bakeware" section. ■ Is the batter evenly distributed in your area... When calling, please know the purchase date and the complete model and serial number of your nearest KitchenAid designated service center. 26 To locate factory specified parts in the pan? Clear the display. See...

Use & Care Guide
Page 28
...been altered or removed from your major appliance, unless such damage results from defects in materials or workmanship and is reported to KitchenAid within 30 days from the date of purchase. 6. IMPLIED WARRANTIES, INCLUDING WARRANTIES OF MERCHANTABILITY OR FITNESS FOR A PARTICULAR PURPOSE, ARE ... ON THE DURATION OF IMPLIED WARRANTIES OF MERCHANTABILITY OR FITNESS, SO THESE EXCLUSIONS OR LIMITATIONS MAY NOT APPLY TO YOU. KITCHENAID® GAS RANGE WARRANTY LIMITED WARRANTY For one year from the date of purchase, when this major appliance is operated and maintained according to...
...been altered or removed from your major appliance, unless such damage results from defects in materials or workmanship and is reported to KitchenAid within 30 days from the date of purchase. 6. IMPLIED WARRANTIES, INCLUDING WARRANTIES OF MERCHANTABILITY OR FITNESS FOR A PARTICULAR PURPOSE, ARE ... ON THE DURATION OF IMPLIED WARRANTIES OF MERCHANTABILITY OR FITNESS, SO THESE EXCLUSIONS OR LIMITATIONS MAY NOT APPLY TO YOU. KITCHENAID® GAS RANGE WARRANTY LIMITED WARRANTY For one year from the date of purchase, when this major appliance is operated and maintained according to...

Dimension Guide
Page 1
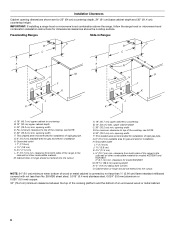
...) height to change materials and specifications without notice. If countertop opening depth Cabinet door or hinge should not extend into the cutout. 30" (76.2 cm) min. If countertop is recommended. ® 30" Freestanding and Slide-In Gas Range PRODUCT MODEL NUMBERS KGRS807S KGRS807X KGSK901S KGSS907S KGSS907X GAS SUPPLY REQUIREMENTS Use ³⁄₄" (1.9 cm) rigid pipe...
...) height to change materials and specifications without notice. If countertop opening depth Cabinet door or hinge should not extend into the cutout. 30" (76.2 cm) min. If countertop is recommended. ® 30" Freestanding and Slide-In Gas Range PRODUCT MODEL NUMBERS KGRS807S KGRS807X KGSK901S KGSS907S KGSS907X GAS SUPPLY REQUIREMENTS Use ³⁄₄" (1.9 cm) rigid pipe...

Installation Guide
Page 2
... Drawer 11 Verify Anti-Tip Bracket Location 11 Level Range 11 Make Gas Connection 11 Electronic Ignition System 13 Replace Oven Racks and Warming or Storage Drawer 15 Complete Installation 15 GAS CONVERSIONS 16 LP Gas Conversion 16 Natural Gas Conversion 18 ANTI-TIP BRACKET TEMPLATE 39 TABLE DES ...l'emplacement de la bride antibasculement......29 Réglage de l'aplomb de la cuisinière 29 Raccordement à la canalisation de gaz 30 Système d'allumage électronique 31 Réinstallation des grilles du four et du tiroir-réchaud ou du tiroir de remisage ...
... Drawer 11 Verify Anti-Tip Bracket Location 11 Level Range 11 Make Gas Connection 11 Electronic Ignition System 13 Replace Oven Racks and Warming or Storage Drawer 15 Complete Installation 15 GAS CONVERSIONS 16 LP Gas Conversion 16 Natural Gas Conversion 18 ANTI-TIP BRACKET TEMPLATE 39 TABLE DES ...l'emplacement de la bride antibasculement......29 Réglage de l'aplomb de la cuisinière 29 Raccordement à la canalisation de gaz 30 Système d'allumage électronique 31 Réinstallation des grilles du four et du tiroir-réchaud ou du tiroir de remisage ...
Installation Guide
Page 3
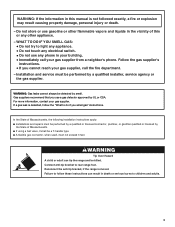
... any phone in this or any other flammable vapors and liquids in death or serious burns to rear range foot. Installation and service must be a T-handle type. ■ A flexible gas connector, when used, must not exceed 3 feet. WARNING: If the information in your building. &#..., service agency or the gas supplier. WARNING Tip Over Hazard A child or adult can result in the vicinity of Massachusetts, the following installation instructions apply: ■ Installations and repairs must be killed. Reconnect the anti-tip bracket, if the range is detected, follow these ...
... any phone in this or any other flammable vapors and liquids in death or serious burns to rear range foot. Installation and service must be a T-handle type. ■ A flexible gas connector, when used, must not exceed 3 feet. WARNING: If the information in your building. &#..., service agency or the gas supplier. WARNING Tip Over Hazard A child or adult can result in the vicinity of Massachusetts, the following installation instructions apply: ■ Installations and repairs must be killed. Reconnect the anti-tip bracket, if the range is detected, follow these ...

Installation Guide
Page 4
... 5" (12.7 cm) beyond the bottom of the Use and Care Guide. C A. Tools needed Check local codes and consult gas supplier. Thickness of the slide-in range and the wall in the wall or floor where range is located inside the oven door on the right-hand side oven door trim. ■ The... range should be installed. Given dimensions are available from your local hardware store. Filler strip B. Do not obstruct ...
... 5" (12.7 cm) beyond the bottom of the Use and Care Guide. C A. Tools needed Check local codes and consult gas supplier. Thickness of the slide-in range and the wall in the wall or floor where range is located inside the oven door on the right-hand side oven door trim. ■ The... range should be installed. Given dimensions are available from your local hardware store. Filler strip B. Do not obstruct ...

Installation Guide
Page 5
...Mobile Home Construction and Safety, Title 24, HUD Part 280). See "Electrical Requirements" section. ■ Proper gas supply connection must be available. When such standard is installed in accordance with the requirements of UL and CSA ... cm] on models KGRS807XSP and KGSS907XSP) from handle to underside of range** *Range can withstand at back of cooktop edge with 25" (63.5 cm) countertop; Freestanding Range Product Dimensions Slide-in Range B A A F C* B* D* C E D E** F** A. 5³⁄₄" (14.6 cm) B. 30" (76.2 cm) C. 41³⁄₄" (106 cm) ...
...Mobile Home Construction and Safety, Title 24, HUD Part 280). See "Electrical Requirements" section. ■ Proper gas supply connection must be available. When such standard is installed in accordance with the requirements of UL and CSA ... cm] on models KGRS807XSP and KGSS907XSP) from handle to underside of range** *Range can withstand at back of cooktop edge with 25" (63.5 cm) countertop; Freestanding Range Product Dimensions Slide-in Range B A A F C* B* D* C E D E** F** A. 5³⁄₄" (14.6 cm) B. 30" (76.2 cm) C. 41³⁄₄" (106 cm) ...
Installation Guide
Page 6
... countertop B. 13" (33 cm) upper cabinet depth C. 30" (76.2 cm) min. Freestanding Ranges Slide-In Ranges M N M O A. 18" (45.7 cm) upper cabinet to the side wall or other combustible material for model KGSK901 M. 22 58.3 cm) opening width F. E. 30" (76.2 cm) min. G. 6" (15.2 cm) available area for gas and electric installation H. Grounded outlet I . 7" (17.8 cm) J. 1¹⁄...
... countertop B. 13" (33 cm) upper cabinet depth C. 30" (76.2 cm) min. Freestanding Ranges Slide-In Ranges M N M O A. 18" (45.7 cm) upper cabinet to the side wall or other combustible material for model KGSK901 M. 22 58.3 cm) opening width F. E. 30" (76.2 cm) min. G. 6" (15.2 cm) available area for gas and electric installation H. Grounded outlet I . 7" (17.8 cm) J. 1¹⁄...
Installation Guide
Page 7
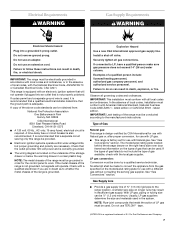
...death, explosion, or fire. Do not use with LP gas. ■ This range is grounded. Failure to the manufacturer's instructions. A copy of gas available, check with Natural gas. Observe all gas connections. latest edition or CAN/CGA B149 - Type of gas listed do so can result in a clear plastic bag. ... permit and a separate ground wire is used . NOTE: The metal chassis of the range must be ½" (1.3 cm) minimum. IMPORTANT: Leak testing of the range must be used in insufficient gas supply. The model/serial rating plate located behind the storage drawer on the right-hand ...
...death, explosion, or fire. Do not use with LP gas. ■ This range is grounded. Failure to the manufacturer's instructions. A copy of gas available, check with Natural gas. Observe all gas connections. latest edition or CAN/CGA B149 - Type of gas listed do so can result in a clear plastic bag. ... permit and a separate ground wire is used . NOTE: The metal chassis of the range must be ½" (1.3 cm) minimum. IMPORTANT: Leak testing of the range must be used in insufficient gas supply. The model/serial rating plate located behind the storage drawer on the right-hand ...
Installation Guide
Page 8
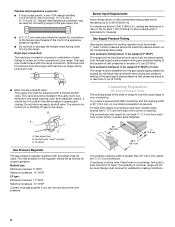
... (3.5 kPa). B A C A. Line pressure testing at ½ psi gauge (14" WCP) or lower The range must have a square finish (flat) countertop and the opening width is 30" (76.2 cm), no countertop preparation is required. Formed front-edged countertops must be at test pressures in the same.... If you are for connecting range to the gas supply line. ■ A ½" (1.3 cm) male pipe thread is greater than ½ psi (3.5 kPa). Line pressure testing above sea level (not applicable for Slide-in Ranges Only) The cooktop sides of the slide-in -line connection to shutoff valve...
... (3.5 kPa). B A C A. Line pressure testing at ½ psi gauge (14" WCP) or lower The range must have a square finish (flat) countertop and the opening width is 30" (76.2 cm), no countertop preparation is required. Formed front-edged countertops must be at test pressures in the same.... If you are for connecting range to the gas supply line. ■ A ½" (1.3 cm) male pipe thread is greater than ½ psi (3.5 kPa). Line pressure testing above sea level (not applicable for Slide-in Ranges Only) The cooktop sides of the slide-in -line connection to shutoff valve...

Installation Guide
Page 11
...baking performance. If range is not level, pull range forward until the range is level. Push range back into position. Make Gas Connection WARNING A A. Examples of the drawer and pull out. Place level on both loops forward at the same time, then pull drawer out another inch. 4. J A....stop. 2. Typical rigid pipe connection A combination of the range. 1. B C D A F E Level Range 1. Union E. To Remove Warming Drawer: 1. NOTE: Range must be used to connect the range to floor. ■ Slide range back so rear range foot is under anti-tip bracket. Holding the drawer ...
...baking performance. If range is not level, pull range forward until the range is level. Push range back into position. Make Gas Connection WARNING A A. Examples of the drawer and pull out. Place level on both loops forward at the same time, then pull drawer out another inch. 4. J A....stop. 2. Typical rigid pipe connection A combination of the range. 1. B C D A F E Level Range 1. Union E. To Remove Warming Drawer: 1. NOTE: Range must be used to connect the range to floor. ■ Slide range back so rear range foot is under anti-tip bracket. Holding the drawer ...

Installation Guide
Page 13
...the circuit breaker has not tripped or the household fuse has not blown. ■ Check that the gas shutoff valves are set to the "open" position. ■ Check that the range is located directly underneath the control knob. TripleTier® Flame Burner To start the inner burner. ...Insert a flat-blade screwdriver into adjustment locations shown in the gas line. Use a small flat- Do not remove ground prong....
...the circuit breaker has not tripped or the household fuse has not blown. ■ Check that the gas shutoff valves are set to the "open" position. ■ Check that the range is located directly underneath the control knob. TripleTier® Flame Burner To start the inner burner. ...Insert a flat-blade screwdriver into adjustment locations shown in the gas line. Use a small flat- Do not remove ground prong....
Installation Guide
Page 14
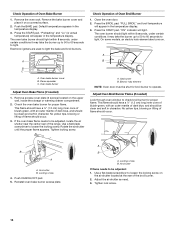
... cover and place it may take the burner up to 50 to 60 seconds to light. Close the oven door. 2. Press the START pad. A B A. Gas burner B. B A A. Locking screw 4. Flame spreader C. Remove access cover plate (2 screws) located on the air shutter located at the rear of dark blue,...to loosen the locking screw. This flame should have a ½" (1.3 cm) long inner cone of bluish-green, with an outer mantle of the range. The oven burner should be clean and soft in character. Air shutter If flame needs to be adjusted: 1. Check Operation of Oven Bake Burner 1....
... cover and place it may take the burner up to 50 to 60 seconds to light. Close the oven door. 2. Press the START pad. A B A. Gas burner B. B A A. Locking screw 4. Flame spreader C. Remove access cover plate (2 screws) located on the air shutter located at the rear of dark blue,...to loosen the locking screw. This flame should have a ½" (1.3 cm) long inner cone of bluish-green, with an outer mantle of the range. The oven burner should be clean and soft in character. Air shutter If flame needs to be adjusted: 1. Check Operation of Oven Bake Burner 1....

Installation Guide
Page 15
... gas supply line shutoff valve is closed . Use a mild solution of the Use and Care Guide. 6. Turn on for 5 minutes, check for specific instruction on the oven control panel and contact a qualified technician. Complete Installation 1. When the range has been on surface burners and oven. If the range is seated properly on the slides...
... gas supply line shutoff valve is closed . Use a mild solution of the Use and Care Guide. 6. Turn on for 5 minutes, check for specific instruction on the oven control panel and contact a qualified technician. Complete Installation 1. When the range has been on surface burners and oven. If the range is seated properly on the slides...
Installation Guide
Page 16
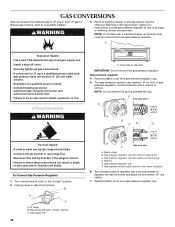
... personnel, and authorized service personnel. A Explosion Hazard Use a new CSA International approved gas supply line. LP Gas Conversion WARNING A. Reconnect the anti-tip bracket, if the range is moved. Unplug range or disconnect power. To range B. Manual shutoff valve "closed " position. 2. Gas pressure regulator cap with solid end facing out C. Replace plastic cover over and reinstall...
... personnel, and authorized service personnel. A Explosion Hazard Use a new CSA International approved gas supply line. LP Gas Conversion WARNING A. Reconnect the anti-tip bracket, if the range is moved. Unplug range or disconnect power. To range B. Manual shutoff valve "closed " position. 2. Gas pressure regulator cap with solid end facing out C. Replace plastic cover over and reinstall...


