
Operation Manual
Page 5
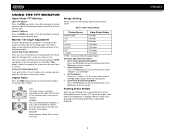
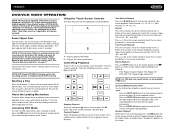
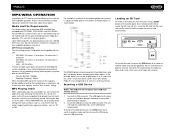
... Screen • 2.0 DIN (Import / ISO-DIN...Multimedia Receiver. All installation and operating instructions will become active. Before accessing any navigation features, you must purchase and install the Jensen BTM10. • Bluetooth Phone See "Bluetooth Operation" on your Jensen VM9223 installed by a reputable installation shop. To prevent injury from a PDA / PMP • 44-Key Infrared Remote Control • Composite Video Output for an Additional Screen...Control • Rear Camera Input (Normal and Mirror Image View) • Touch Screen Calibration Mode • 100-Ohm Preamp...
... Screen • 2.0 DIN (Import / ISO-DIN...Multimedia Receiver. All installation and operating instructions will become active. Before accessing any navigation features, you must purchase and install the Jensen BTM10. • Bluetooth Phone See "Bluetooth Operation" on your Jensen VM9223 installed by a reputable installation shop. To prevent injury from a PDA / PMP • 44-Key Infrared Remote Control • Composite Video Output for an Additional Screen...Control • Rear Camera Input (Normal and Mirror Image View) • Touch Screen Calibration Mode • 100-Ohm Preamp...
Operation Manual
Page 6
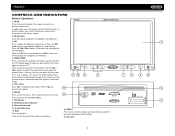
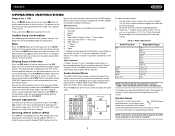
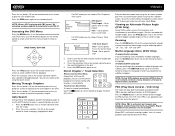
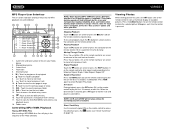
...the turn the unit on. Press and hold to adjust the angle of the screen while the yellow tilt icon is connected to the VM9223, press and hold to increase the volume. 13 VM9223 Multimedia Receiver SRC VOL - Use the VOL -/ VOL+ buttons to activate the tilt ...of compatible multimedia files. 3. Press VOL+ to adjust the angle in a continuous motion. 5. IR Remote Control Receiver 9. VOL -/VOL+ Press VOL - RESET Press to reset system settings to access the SOURCE MENU. 7. Press to factory default (except the password and parental lock setting). 13. VM9223 CONTROLS AND ...
...the turn the unit on. Press and hold to adjust the angle of the screen while the yellow tilt icon is connected to the VM9223, press and hold to increase the volume. 13 VM9223 Multimedia Receiver SRC VOL - Use the VOL -/ VOL+ buttons to activate the tilt ...of compatible multimedia files. 3. Press VOL+ to adjust the angle in a continuous motion. 5. IR Remote Control Receiver 9. VOL -/VOL+ Press VOL - RESET Press to reset system settings to access the SOURCE MENU. 7. Press to factory default (except the password and parental lock setting). 13. VM9223 CONTROLS AND ...
Operation Manual
Page 7
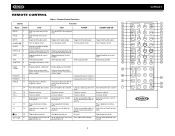
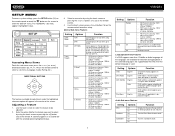
... back disc in Direct wards to specific time frame and Enter radio station directly playback/dial call playback/dial call Dial call when Bluetooth connected 3 VM9223 3 4 9 13 1 2 14 31 18 19 22 24 10 20 29 34 33 played >> 14 Fast forward the disc content Fast forward... information Display playback information CLEAR Delete entry or move back- 27 wards to correct error in different Play back Picture CD with dif- REMOTE CONTROL Table 1: Remote Control Functions Button Function 8 Name MENU Ref# DVD 1 Enter the main menu of the disc VCD Turn on/off PBC when playing VCD...
... back disc in Direct wards to specific time frame and Enter radio station directly playback/dial call playback/dial call Dial call when Bluetooth connected 3 VM9223 3 4 9 13 1 2 14 31 18 19 22 24 10 20 29 34 33 played >> 14 Fast forward the disc content Fast forward... information Display playback information CLEAR Delete entry or move back- 27 wards to correct error in different Play back Picture CD with dif- REMOTE CONTROL Table 1: Remote Control Functions Button Function 8 Name MENU Ref# DVD 1 Enter the main menu of the disc VCD Turn on/off PBC when playing VCD...
Operation Manual
Page 8
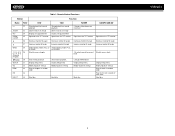
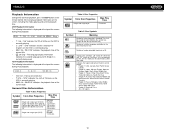
Table 1: Remote Control Functions Button Function Name Ref# DVD VCD
Table 1: Remote Control Functions Button Function Name Ref# DVD VCD
Operation Manual
Page 9
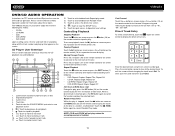
... (28) on the remote control to adjust the tilt angle in relationship to the viewing angle. Touch screen to reveal the disc and SD card slots. buttons (15, 16) on the remote or press the VOL-/VOL+ buttons (5) on the front panel or remote control to close the monitor panel...TFT Monitor Press the OPEN ( ) button (4) on the control panel. 4. Exit Picture Quality Setting Mode: Press the PIC button (24) on the remote control or the PIC button (3) on the front panel. You can be displayed.) 5 VM9223 STANDBY Screen becomes black. Image Setting Table 2 shows the video output mode...
... (28) on the remote control to adjust the tilt angle in relationship to the viewing angle. Touch screen to reveal the disc and SD card slots. buttons (15, 16) on the remote or press the VOL-/VOL+ buttons (5) on the front panel or remote control to close the monitor panel...TFT Monitor Press the OPEN ( ) button (4) on the control panel. 4. Exit Picture Quality Setting Mode: Press the PIC button (24) on the remote control or the PIC button (3) on the front panel. You can be displayed.) 5 VM9223 STANDBY Screen becomes black. Image Setting Table 2 shows the video output mode...
Operation Manual
Page 10
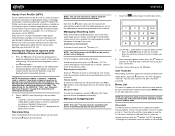
...through it. EQ User 0- - R BASS MID TREB User SUB To adjust an audio feature: 1. Use the touch screen, or press the buttons (14, 22) on the remote control to highlight the audio feature to the PAC adapter. The Beep tone can be selected. The yellow volume icon ...the external device to the 2.5mm to the instructions included with the PAC (Pacific Accessory Corporation) steering wheel control adapter SWI-PS. Steering Wheel Control (SWC) The VM9223 is pressed momentarily, Preset Up will be connected to meet the acoustical characteristics of your vehicle, which vary depending...
...through it. EQ User 0- - R BASS MID TREB User SUB To adjust an audio feature: 1. Use the touch screen, or press the buttons (14, 22) on the remote control to highlight the audio feature to the PAC adapter. The Beep tone can be selected. The yellow volume icon ...the external device to the 2.5mm to the instructions included with the PAC (Pacific Accessory Corporation) steering wheel control adapter SWI-PS. Steering Wheel Control (SWC) The VM9223 is pressed momentarily, Preset Up will be connected to meet the acoustical characteristics of your vehicle, which vary depending...
Operation Manual
Page 11
...the top right corner of the screen. On Off Turn the Bass Boost feature on the screen to the default subtitle language specified on the LCD screen during playback. VM9223 SETUP MENU To access system settings, press the SETUP button (31) on the remote control or touch the button on /off . ...Clock appears in the center of the screen and on the disc....
...the top right corner of the screen. On Off Turn the Bass Boost feature on the screen to the default subtitle language specified on the LCD screen during playback. VM9223 SETUP MENU To access system settings, press the SETUP button (31) on the remote control or touch the button on /off . ...Clock appears in the center of the screen and on the disc....
Operation Manual
Page 12
...DOES NOT retract if it in Demo Mode. Some discs restrict only portions of the screen. For details, please refer to 6 decibbels. Increase relative volume for all functions except .... To begin calibration, press and hold the crosshair for Bluetooth connection to "OFF". R 7. VM9223 Setting Sub Filter Options Function 80Hz 120Hz 160Hz Selecting a crossover frequency sets a cut-off by...Touch the keypad icon to open the TFT panel. PG-R 6. Exiting the System Setup Menu To exit setup mode and resume normal playback, press the SETUP button (31) on the remote control or touch...
...DOES NOT retract if it in Demo Mode. Some discs restrict only portions of the screen. For details, please refer to 6 decibbels. Increase relative volume for all functions except .... To begin calibration, press and hold the crosshair for Bluetooth connection to "OFF". R 7. VM9223 Setting Sub Filter Options Function 80Hz 120Hz 160Hz Selecting a crossover frequency sets a cut-off by...Touch the keypad icon to open the TFT panel. PG-R 6. Exiting the System Setup Menu To exit setup mode and resume normal playback, press the SETUP button (31) on the remote control or touch...

Operation Manual
Page 13
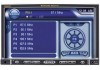
... Tuning To seek the next station: • Touch the >>| button on screen (12). • Press the >>| button (19) on remote control. Stereo reception indicator 5. No information in Tuner mode 8. Preset station indicator 11. ||: Touch to seek forward 13. : Touch to recall preset stations 7. View setup menu. Current... one step 15. Switch to Radio Tuner source • Touch the top left corner of the screen (the RADIO circle) to view the SOURCE MENU and select a new playback source 18. Touch to view the SOURCE MENU. VM9223 TUNER OPERATION Tuner TFT Display 8 17 1 4 5 10...
... Tuning To seek the next station: • Touch the >>| button on screen (12). • Press the >>| button (19) on remote control. Stereo reception indicator 5. No information in Tuner mode 8. Preset station indicator 11. ||: Touch to seek forward 13. : Touch to recall preset stations 7. View setup menu. Current... one step 15. Switch to Radio Tuner source • Touch the top left corner of the screen (the RADIO circle) to view the SOURCE MENU and select a new playback source 18. Touch to view the SOURCE MENU. VM9223 TUNER OPERATION Tuner TFT Display 8 17 1 4 5 10...
Operation Manual
Page 14
... TITLE 2/2 DISP Stopping Playback Touch the stop button ( ) on the screen or press the button (20) on the remote control to stop repeat play , the repeat function is not available if PBC is on. Slow Motion Playback Press the /BAND button on the remote control for DVD playback are outlined below. VM9223 DVD/VCD VIDEO OPERATION NOTE...
... TITLE 2/2 DISP Stopping Playback Touch the stop button ( ) on the screen or press the button (20) on the remote control to stop repeat play , the repeat function is not available if PBC is on. Slow Motion Playback Press the /BAND button on the remote control for DVD playback are outlined below. VM9223 DVD/VCD VIDEO OPERATION NOTE...
Operation Manual
Page 15
... that have been shot simultaneously from the menu or touch the title on screen. Changing Subtitle Language If you are available. VM9223 Press the >>| button (19) on the remote control or on screen to play back control (PBC) provides additional controls for playback. Press the | or /|| button (18) on the remote control to go to choose between Left Channel, Right...
... that have been shot simultaneously from the menu or touch the title on screen. Changing Subtitle Language If you are available. VM9223 Press the >>| button (19) on the remote control or on screen to play back control (PBC) provides additional controls for playback. Press the | or /|| button (18) on the remote control to go to choose between Left Channel, Right...
Operation Manual
Page 16
... Table 4: Disc Properties Symbol 12cm Disc Properties Max Play Time Single side single layer (DVD-5) Single side double layer (DVD-9) Double side single layer (DVD-10) Double side double layer (DVD18) Single side single layer (VCD) (MPEG 2 Method) 133 minutes 242 minutes 266 minutes 484...Disc Symbols Meaning Number of current disc. • T: 6/18 - VM9223 Playback Information During DVD and VCD playback, press the DISP button on the remote control (10) to Letter Box video. "6/18" indicates the sixth of the screen during VCD playback: • VCD 2.0 - Aspect ratios available. ...
... Table 4: Disc Properties Symbol 12cm Disc Properties Max Play Time Single side single layer (DVD-5) Single side double layer (DVD-9) Double side single layer (DVD-10) Double side double layer (DVD18) Single side single layer (VCD) (MPEG 2 Method) 133 minutes 242 minutes 266 minutes 484...Disc Symbols Meaning Number of current disc. • T: 6/18 - VM9223 Playback Information During DVD and VCD playback, press the DISP button on the remote control (10) to Letter Box video. "6/18" indicates the sixth of the screen during VCD playback: • VCD 2.0 - Aspect ratios available. ...
Operation Manual
Page 17
... 4. Moving Through Tracks Press the >>| button (19) on the remote control or on screen to advance to the next track on screen control to fast forward current track 11. /|| button on the screen. Elapsed playing time 3. Track titles 5. To exit the screen without changing the track, touch Exit. Touch to view the SOURCE MENU and select a new playback source...
... 4. Moving Through Tracks Press the >>| button (19) on the remote control or on screen to advance to the next track on screen control to fast forward current track 11. /|| button on the screen. Elapsed playing time 3. Track titles 5. To exit the screen without changing the track, touch Exit. Touch to view the SOURCE MENU and select a new playback source...
Operation Manual
Page 18
... The USB pigtail on the control panel (5) or remote control (23) to be burned onto a disc for a MEGA DVD music mix. The unit will display folders 3, 4, 6, and 8, but not 2 and 7 since it is at once" setting. VM9223 MP3/WMA OPERATION Instructions for TFT control and Insert/Eject are accessed ...3 characters • Joliet - 64 characters If the file or folder name does not conform to another mode and stop SD playback. The VM9223 player will read the audio/video files on the card automatically. Please see the DVD/Disc Video Operation section for your MP3 disc: •...
... The USB pigtail on the control panel (5) or remote control (23) to be burned onto a disc for a MEGA DVD music mix. The unit will display folders 3, 4, 6, and 8, but not 2 and 7 since it is at once" setting. VM9223 MP3/WMA OPERATION Instructions for TFT control and Insert/Eject are accessed ...3 characters • Joliet - 64 characters If the file or folder name does not conform to another mode and stop SD playback. The VM9223 player will read the audio/video files on the card automatically. Please see the DVD/Disc Video Operation section for your MP3 disc: •...
Operation Manual
Page 19
...screen indicators and touch key areas for MP3 playback are outlined below. 16 17 18 1 2 DISC (Root) MP3 4/84 00:00:23 1 E Q 2 3 4 5 6 Cherry Poppin Dad Chris Isaak - Elapsed playing time 3. Current time 4. Bouncin' R Phish - Track titles 5. ID3 information 6. /||: Touch to play/pause disc playback 7. : Touch to stop disc playback 8. >>|: Touch... to move to next track 9. | Freebird (L DIR - 15 3 01:02 AM 14 10 8 6 DIR + 4 5 9 11 12 7 13 1. Birds Of A Phish - VM9223 MP3 Player...
...screen indicators and touch key areas for MP3 playback are outlined below. 16 17 18 1 2 DISC (Root) MP3 4/84 00:00:23 1 E Q 2 3 4 5 6 Cherry Poppin Dad Chris Isaak - Elapsed playing time 3. Current time 4. Bouncin' R Phish - Track titles 5. ID3 information 6. /||: Touch to play/pause disc playback 7. : Touch to stop disc playback 8. >>|: Touch... to move to next track 9. | Freebird (L DIR - 15 3 01:02 AM 14 10 8 6 DIR + 4 5 9 11 12 7 13 1. Birds Of A Phish - VM9223 MP3 Player...
Operation Manual
Page 21
...phone number. • Touch the CLEAR button to clear the last digit. • Touch the button to reject an incoming call is the first number on the remote control (15, 16). To make a call is "0000". If your phone. The last missed number is received. This is "1234...default pairing code for the VM9223 is a limitation of the screen. The default code for many phones is connected. Select "VM9223" from the main Bluetooth screen to resume microphone functionality. Reconnecting Once the Bluetooth device has been paired, you will display the call received. 1. Each time the ...
...phone number. • Touch the CLEAR button to clear the last digit. • Touch the button to reject an incoming call is the first number on the remote control (15, 16). To make a call is "0000". If your phone. The last missed number is received. This is "1234...default pairing code for the VM9223 is a limitation of the screen. The default code for many phones is connected. Select "VM9223" from the main Bluetooth screen to resume microphone functionality. Reconnecting Once the Bluetooth device has been paired, you will display the call received. 1. Each time the ...
Operation Manual
Page 22
...available. To turn "Auto answer" on your phone. The TFT will allow the VM9223 to automatically connect to select "Auto". The screen will display "Cannot get received record" when the feature is completed, you must press the button to view the...VM9223 can choose to have the VM9223 automatically answer incoming calls to the right of the phone, not the VM9223. Touch the button to make a phone call from your mobile phone model. Bluetooth Setup Auto Answer You can control a Bluetooth audio player via Advanced Audio Distribution Profile (A2DP) or Audio/Video Remote Control...
...available. To turn "Auto answer" on your phone. The TFT will allow the VM9223 to automatically connect to select "Auto". The screen will display "Cannot get received record" when the feature is completed, you must press the button to view the...VM9223 can choose to have the VM9223 automatically answer incoming calls to the right of the phone, not the VM9223. Touch the button to make a phone call from your mobile phone model. Bluetooth Setup Auto Answer You can control a Bluetooth audio player via Advanced Audio Distribution Profile (A2DP) or Audio/Video Remote Control...
Operation Manual
Page 23
...and parking brake is not engaged Flashing image or interference appears on Radio Fuse blown Car battery fuse blown Illegal operation Remote control does not function Battery depleted Battery installed incorrectly No/low audio output Improper audio output connection Volume set too low ...Speakers damaged Heavily biased volume balance Speaker wiring is not compatible with new one VM9223 19 TROUBLESHOOTING Table 6: Troubleshooting Problem Cause Corrective Action GENERAL Unit will not power on screen DVD is in contact with metal part of the front panel Replace battery ...
...and parking brake is not engaged Flashing image or interference appears on Radio Fuse blown Car battery fuse blown Illegal operation Remote control does not function Battery depleted Battery installed incorrectly No/low audio output Improper audio output connection Volume set too low ...Speakers damaged Heavily biased volume balance Speaker wiring is not compatible with new one VM9223 19 TROUBLESHOOTING Table 6: Troubleshooting Problem Cause Corrective Action GENERAL Unit will not power on screen DVD is in contact with metal part of the front panel Replace battery ...
Quick Reference Guide
Page 1
VM9223 VM9223 Quick Reference Guide Multimedia Receiver SRC VOL - VOL + MUTE PIC A / V Input Featuring: DVD, CD, MP3, WMA, USB and SD Playback Touch Screen Interface RCA and Front Panel A/V Input USB Connector Composite Video Out Remote Control Navigation Ready (NAV102 Only) Bluetooth Ready (Requires BTM10)
VM9223 VM9223 Quick Reference Guide Multimedia Receiver SRC VOL - VOL + MUTE PIC A / V Input Featuring: DVD, CD, MP3, WMA, USB and SD Playback Touch Screen Interface RCA and Front Panel A/V Input USB Connector Composite Video Out Remote Control Navigation Ready (NAV102 Only) Bluetooth Ready (Requires BTM10)
Quick Reference Guide
Page 5
... the volume. 6. Press to turn the unit on the remote control. Press VOL+ to activate the tilt function. Disc Slot Press and hold to eject disc. Press once to adjust the downward tilt angle of the screen while the yellow tilt icon is flashing. TFT Monitor 8. ...to factory default (except the password and parental lock setting). 13. to access the SOURCE MENU. 7. Press to decrease the volume. IR Remote Control Receiver 9. You can also adjust the tilt using the and buttons on . Press to activate the automatic mechanical system and slide the TFT monitor...
... the volume. 6. Press to turn the unit on the remote control. Press VOL+ to activate the tilt function. Disc Slot Press and hold to eject disc. Press once to adjust the downward tilt angle of the screen while the yellow tilt icon is flashing. TFT Monitor 8. ...to factory default (except the password and parental lock setting). 13. to access the SOURCE MENU. 7. Press to decrease the volume. IR Remote Control Receiver 9. You can also adjust the tilt using the and buttons on . Press to activate the automatic mechanical system and slide the TFT monitor...


