
Operation Manual
Page 5
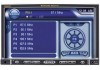
...Screen • 2.0 DIN (Import / ISO-DIN Mountable) • 7" TFT Active Matrix LCD with Eight Preset EQ Curves • Front, Rear and Subwoofer Line Output • Programmable Volume Control • Rear Camera Input (Normal and Mirror Image View) • Touch Screen Calibration Mode • 100-Ohm Preamp Line Output - All installation...NAV102 Only) • Bluetooth Ready (with purchase of the Jensen VM9223 Mobile Multimedia Receiver. Compatible with the navigation module. While the navigation module is not installed, the NAV option appears gray, indicating the function is "...
...Screen • 2.0 DIN (Import / ISO-DIN Mountable) • 7" TFT Active Matrix LCD with Eight Preset EQ Curves • Front, Rear and Subwoofer Line Output • Programmable Volume Control • Rear Camera Input (Normal and Mirror Image View) • Touch Screen Calibration Mode • 100-Ohm Preamp Line Output - All installation...NAV102 Only) • Bluetooth Ready (with purchase of the Jensen VM9223 Mobile Multimedia Receiver. Compatible with the navigation module. While the navigation module is not installed, the NAV option appears gray, indicating the function is "...
Operation Manual
Page 10
... using any of the cabin equalizer. Connect the external device to the 2.5mm to select the highlighted option. 3. Steering Wheel Control (SWC) The VM9223 is pressed momentarily, Preset Up will be available on . SRC (Source) 7. ** Select 8. ** Select 9. Band ** If additional steering wheel control... to the instructions included with the PAC adapter for detailed installation information. Proper setting of the Fader and Balance boosts the effects of the audio setup features cancels the mute function. Use the touch screen, or press the buttons (14, 22) on the front...
... using any of the cabin equalizer. Connect the external device to the 2.5mm to select the highlighted option. 3. Steering Wheel Control (SWC) The VM9223 is pressed momentarily, Preset Up will be available on . SRC (Source) 7. ** Select 8. ** Select 9. Band ** If additional steering wheel control... to the instructions included with the PAC adapter for detailed installation information. Proper setting of the Fader and Balance boosts the effects of the audio setup features cancels the mute function. Use the touch screen, or press the buttons (14, 22) on the front...
Operation Manual
Page 14
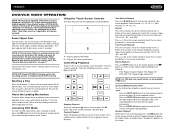
VM9223 DVD/VCD VIDEO OPERATION NOTE: When properly installed, DVD video cannot be displayed on the screen to fast forward. If you attempt to open the front panel and reveal the disc slot. Using the Touch-Screen Controls The touch key areas for slow motion playback (Slow Forward: 1/2, 1/4, 1/6, 1/7, Slow Rewind: 1/2, 1/4, 1/6, 1/7). Upon inserting a DVD disc, DVD mode is...
VM9223 DVD/VCD VIDEO OPERATION NOTE: When properly installed, DVD video cannot be displayed on the screen to fast forward. If you attempt to open the front panel and reveal the disc slot. Using the Touch-Screen Controls The touch key areas for slow motion playback (Slow Forward: 1/2, 1/4, 1/6, 1/7, Slow Rewind: 1/2, 1/4, 1/6, 1/7). Upon inserting a DVD disc, DVD mode is...
Operation Manual
Page 18
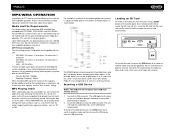
...order in which they are actually played. Insert the SD card into the USB connector. Do not exceed this unit: • ISO 9660 - The VM9223 player will recognize most USB flash memory devices. 1. Inserting a USB Device NOTE: The USB port will only recognize three folder levels and does not ...are the same for your MP3 disc: • Transfer Bit Rate: 128kbps • Sampling Frequency: 48kHz When recording MP3 up to an accessible place during installation. 2. Up to 1500 songs/files can be displayed or played back correctly. You may not be burned onto a disc for a MEGA DVD music mix...
...order in which they are actually played. Insert the SD card into the USB connector. Do not exceed this unit: • ISO 9660 - The VM9223 player will recognize most USB flash memory devices. 1. Inserting a USB Device NOTE: The USB port will only recognize three folder levels and does not ...are the same for your MP3 disc: • Transfer Bit Rate: 128kbps • Sampling Frequency: 48kHz When recording MP3 up to an accessible place during installation. 2. Up to 1500 songs/files can be displayed or played back correctly. You may not be burned onto a disc for a MEGA DVD music mix...
Operation Manual
Page 20
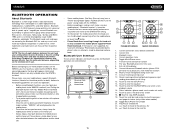
... VM9223 BLUETOOTH OPERATION About Bluetooth Bluetooth is a short-range wireless radio connectivity technology that is developed as a cable replacement for sending and receiving voice and data via Bluetooth wireless technology. Other trademarks and trade names are only available when the BTM10 is installed.... and Head Unit"). Play/Pause selected file 22. ||: Touch to move to 1 megabit per second. Bluetooth operates in use the Bluetooth functions on the VM9223, you must be displayed on -screen indicators and touch key areas for pairing and reconnection, please make sure your...
... VM9223 BLUETOOTH OPERATION About Bluetooth Bluetooth is a short-range wireless radio connectivity technology that is developed as a cable replacement for sending and receiving voice and data via Bluetooth wireless technology. Other trademarks and trade names are only available when the BTM10 is installed.... and Head Unit"). Play/Pause selected file 22. ||: Touch to move to 1 megabit per second. Bluetooth operates in use the Bluetooth functions on the VM9223, you must be displayed on -screen indicators and touch key areas for pairing and reconnection, please make sure your...
Operation Manual
Page 23
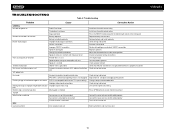
... power on Radio Fuse blown Car battery fuse blown Illegal operation Remote control does not function Battery depleted Battery installed incorrectly No/low audio output Improper audio output connection Volume set too low Improper "MUTE" connection Speakers damaged ... parking brake wire PRK SW is activated and parking brake is not engaged Flashing image or interference appears on screen DVD is not compatible with unit Speaker is shorted Tel-Mute malfunction "MUTE" wire is grounded Unit resets ... that "MUTE" connection is off Eject current disc and insert new one VM9223 19
... power on Radio Fuse blown Car battery fuse blown Illegal operation Remote control does not function Battery depleted Battery installed incorrectly No/low audio output Improper audio output connection Volume set too low Improper "MUTE" connection Speakers damaged ... parking brake wire PRK SW is activated and parking brake is not engaged Flashing image or interference appears on screen DVD is not compatible with unit Speaker is shorted Tel-Mute malfunction "MUTE" wire is grounded Unit resets ... that "MUTE" connection is off Eject current disc and insert new one VM9223 19
Operation Manual
Page 79
..., extreme environmental conditions or external natural causes Please review the "Care and Maintenance" section of your Installation and Operation Manual for installation, removal or reinstallation of this product. No person or representative is authorized to assume for the Company...the location of an original sales receipt. Limited Warranty CD or Multimedia Radios/Headunits Audiovox Electronics Corporation ("the Company") is committed to quality and customer service, and are not covered by improper installation, mishandling, misuse, neglect, accident, blown fuse, battery leakage,...
..., extreme environmental conditions or external natural causes Please review the "Care and Maintenance" section of your Installation and Operation Manual for installation, removal or reinstallation of this product. No person or representative is authorized to assume for the Company...the location of an original sales receipt. Limited Warranty CD or Multimedia Radios/Headunits Audiovox Electronics Corporation ("the Company") is committed to quality and customer service, and are not covered by improper installation, mishandling, misuse, neglect, accident, blown fuse, battery leakage,...
Quick Reference Guide
Page 3
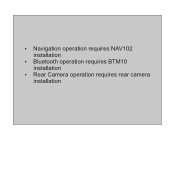
Ÿ Navigation operation requires NAV102 installation Ÿ Bluetooth operation requires BTM10 installation Ÿ Rear Camera operation requires rear camera installation
Ÿ Navigation operation requires NAV102 installation Ÿ Bluetooth operation requires BTM10 installation Ÿ Rear Camera operation requires rear camera installation
Installation Guide
Page 2
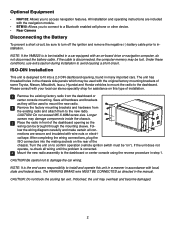
...become damaged. 2 After completing the wiring connections, plug the ISO connectors into a 2.0 DIN dashboard opening so the wiring can be lost. Turn the unit on to be "on the rear of installation. 1 Remove the existing factory radio from the existing radio and attach them to fi...;t into the mating sockets on "). NOTE: If the VM9223 is corrected. 4 Mount the new radio assembly to installation. Under these conditions, use extra caution during installation to damage the car wiring. Please consult with local, state and federal laws. Be ...
...become damaged. 2 After completing the wiring connections, plug the ISO connectors into a 2.0 DIN dashboard opening so the wiring can be lost. Turn the unit on to be "on the rear of installation. 1 Remove the existing factory radio from the existing radio and attach them to fi...;t into the mating sockets on "). NOTE: If the VM9223 is corrected. 4 Mount the new radio assembly to installation. Under these conditions, use extra caution during installation to damage the car wiring. Please consult with local, state and federal laws. Be ...
Installation Guide
Page 3
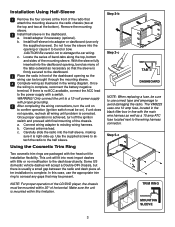
... amperage to the half sleeve. WARNING! Use the supplied screws to attach the radio to avoid damaging the radio. In this limitation. The VM9223 uses one 10 amp fuse, located in the black filter box in-line with proper grounding. 5 After completing the wiring connections,...the sleeve is no ACC available, connect the ACC lead to bend or bow. Installation Using Half-Sleeve 1 Remove the four screws at the bottom). Install adapter if necessary (optional). b. This unit will accept a Double-DIN chassis, but there is usually a small gap between the radio and dash piece ...
... amperage to the half sleeve. WARNING! Use the supplied screws to attach the radio to avoid damaging the radio. In this limitation. The VM9223 uses one 10 amp fuse, located in the black filter box in-line with proper grounding. 5 After completing the wiring connections,...the sleeve is no ACC available, connect the ACC lead to bend or bow. Installation Using Half-Sleeve 1 Remove the four screws at the bottom). Install adapter if necessary (optional). b. This unit will accept a Double-DIN chassis, but there is usually a small gap between the radio and dash piece ...

Installation Guide
Page 4
For technical assistance, call the Jensen customer support line at 1-800-323-4815. 4 Need Help? Wiring Diagram IMPORTANT: Incorrect wiring connections can damage the unit. Follow the wiring instructions carefully, or have the installation handled by an experienced technician.
For technical assistance, call the Jensen customer support line at 1-800-323-4815. 4 Need Help? Wiring Diagram IMPORTANT: Incorrect wiring connections can damage the unit. Follow the wiring instructions carefully, or have the installation handled by an experienced technician.


