Operation Manual
Page 23
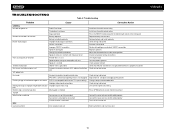
... and insert new one VM9223 19 TROUBLESHOOTING Table 6: Troubleshooting Problem Cause Corrective Action GENERAL Unit will not power on screen DVD is not compatible with metal part of the front panel Replace battery with new one Remove battery and install correctly Check wiring and correct Increase volume level Review wiring diagram and check "MUTE" connection...
... and insert new one VM9223 19 TROUBLESHOOTING Table 6: Troubleshooting Problem Cause Corrective Action GENERAL Unit will not power on screen DVD is not compatible with metal part of the front panel Replace battery with new one Remove battery and install correctly Check wiring and correct Increase volume level Review wiring diagram and check "MUTE" connection...
Installation Guide
Page 2
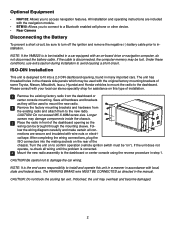
...the dashboard or center console using the reverse procedure in step 1. CAUTION: Do not exceed M5 X 6MM screw size. Follow the wiring diagram carefully and make certain all connections are included with the navigation module. • BTM10: Allows you to avoid causing a short circuit..... Turn the unit on "). NOTE: If the VM9223 is designed to damage the car wiring. Please consult with local, state and federal laws. After completing the wiring connections, plug the ISO connectors into a 2.0 DIN dashboard opening so the wiring can be lost. CAUTION! Be careful not to ...
...the dashboard or center console using the reverse procedure in step 1. CAUTION: Do not exceed M5 X 6MM screw size. Follow the wiring diagram carefully and make certain all connections are included with the navigation module. • BTM10: Allows you to avoid causing a short circuit..... Turn the unit on "). NOTE: If the VM9223 is designed to damage the car wiring. Please consult with local, state and federal laws. After completing the wiring connections, plug the ISO connectors into a 2.0 DIN dashboard opening so the wiring can be lost. CAUTION! Be careful not to ...
Installation Guide
Page 3
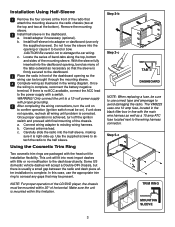
... cosmetic trim rings are packaged with the main wire harness as well as illustrated in the wiring diagram. NOTE: For proper operation of the CD/...Double-DIN chassis, but there is usually a small gap between the radio and dash piece after installation is right-side-up. b. Do not force the sleeve into the half-sleeve, making sure it to the wiring harness connector. Once the wiring...wiring connections, turn off the ignition switch and proceed with little or no ACC available, connect the ACC lead to the radio chassis (two at the top and two at the front of the chassis. The VM9223...
... cosmetic trim rings are packaged with the main wire harness as well as illustrated in the wiring diagram. NOTE: For proper operation of the CD/...Double-DIN chassis, but there is usually a small gap between the radio and dash piece after installation is right-side-up. b. Do not force the sleeve into the half-sleeve, making sure it to the wiring harness connector. Once the wiring...wiring connections, turn off the ignition switch and proceed with little or no ACC available, connect the ACC lead to the radio chassis (two at the top and two at the front of the chassis. The VM9223...

Installation Guide
Page 4
For technical assistance, call the Jensen customer support line at 1-800-323-4815. 4 Follow the wiring instructions carefully, or have the installation handled by an experienced technician. Need Help? Wiring Diagram IMPORTANT: Incorrect wiring connections can damage the unit.
For technical assistance, call the Jensen customer support line at 1-800-323-4815. 4 Follow the wiring instructions carefully, or have the installation handled by an experienced technician. Need Help? Wiring Diagram IMPORTANT: Incorrect wiring connections can damage the unit.


