Instruction Manual
Page 3
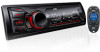
... operations 4 Remote control 5 Radio 6 USB 8 iPod/iPhone 9 External components 11 Bluetooth 11 Sound adjustments 12 Menu operations 13 Additional information 15 Troubleshooting 17 Specifications 18 Installation/Connection 19 Preparation Canceling the display demonstration The display demonstration is always turned on unless you cancel it. 1 (Hold) ISetting the clock 1 (Hold) 2 Select . 2 3 Select...
... operations 4 Remote control 5 Radio 6 USB 8 iPod/iPhone 9 External components 11 Bluetooth 11 Sound adjustments 12 Menu operations 13 Additional information 15 Troubleshooting 17 Specifications 18 Installation/Connection 19 Preparation Canceling the display demonstration The display demonstration is always turned on unless you cancel it. 1 (Hold) ISetting the clock 1 (Hold) 2 Select . 2 3 Select...
Instruction Manual
Page 10
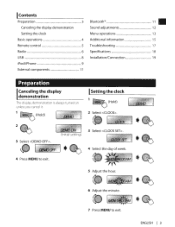
... artist. 1 2 + +/ A new station is created based on the unit but will not be available for "Pandora" in the Apple iTunes App Store to find and install the most current version of Pandora cannot be operated from this unit. • For issues using the application, please contact Pandora at www.pandora.com...
... artist. 1 2 + +/ A new station is created based on the unit but will not be available for "Pandora" in the Apple iTunes App Store to find and install the most current version of Pandora cannot be operated from this unit. • For issues using the application, please contact Pandora at www.pandora.com...
Instruction Manual
Page 17
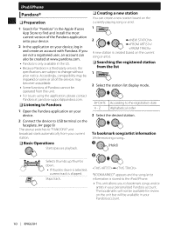
...; Check whether setting is appropriate. (~page 9) There is a problem creating a new station, such as a network issue. For details on your JVC car audio dealer or kits supplying company. Troubleshooting Symptom • General No sound, sound interrupted or static noise. album name) . • FM... PLAY" flashes on the display. Store stations manually. • A longer readout time is determined by the file name. Make sure to install the latest version of the connected device and recorded tracks. • Ensure to the instruction manual supplied with this unit and iPod/iPhone. ...
...; Check whether setting is appropriate. (~page 9) There is a problem creating a new station, such as a network issue. For details on your JVC car audio dealer or kits supplying company. Troubleshooting Symptom • General No sound, sound interrupted or static noise. album name) . • FM... PLAY" flashes on the display. Store stations manually. • A longer readout time is determined by the file name. Make sure to install the latest version of the connected device and recorded tracks. • Ensure to the instruction manual supplied with this unit and iPod/iPhone. ...
Instruction Manual
Page 19
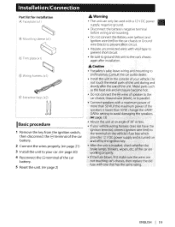
... list for installation (~) Facepl ate (x 1) ($) Mounting sleeve (xl) © Trim plate (x l) ~ © Wiring harness (xl) A Warning • The unit can only be used with a 12 V DC power supply, ... sure to ground thisunit to your car.(~ page 20) 4 Reconnect the 8 terminal of the car battery. 2 Connect the wires properly. (~page 21) 3 Install the unit to the .... /"'t ro,... installation. ® Extraction keys (x2) ]] IBasic procedure 1 Remove the key from the ignition switch, then disconnect thee terminal of the car battery. 5 Reset the...
... list for installation (~) Facepl ate (x 1) ($) Mounting sleeve (xl) © Trim plate (x l) ~ © Wiring harness (xl) A Warning • The unit can only be used with a 12 V DC power supply, ... sure to ground thisunit to your car.(~ page 20) 4 Reconnect the 8 terminal of the car battery. 2 Connect the wires properly. (~page 21) 3 Install the unit to the .... /"'t ro,... installation. ® Extraction keys (x2) ]] IBasic procedure 1 Remove the key from the ignition switch, then disconnect thee terminal of the car battery. 5 Reset the...
Instruction Manual
Page 20
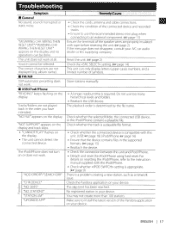
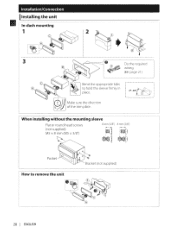
Installation/Connection IInstalling the unit • In-dash mounting 1 2 3 ~ '~~~~-- Q}}} Make sure the direction ~7;:;!} of the trim plate. t-~ ~""-. . . . -~ ~ 8 mm (3/8") 8 mm (3/8") I ~(] I ·~ I How to remove the unit 20 I When installing without the mounting sleeve Flat or round head screws (not supplied) MS X 8 mm (MS X 3/8'') . JQJ~ ,J~>~~'~ ..~ @ ~ Do the required wiring. (rrE page 21) ~,, c '~ ~ Bend the appropriate tabs place. r I I : 007>", : I I oo II - 300 I I 1// '.,,', II : 1 : I ' I I I ENGLISH
Installation/Connection IInstalling the unit • In-dash mounting 1 2 3 ~ '~~~~-- Q}}} Make sure the direction ~7;:;!} of the trim plate. t-~ ~""-. . . . -~ ~ 8 mm (3/8") 8 mm (3/8") I ~(] I ·~ I How to remove the unit 20 I When installing without the mounting sleeve Flat or round head screws (not supplied) MS X 8 mm (MS X 3/8'') . JQJ~ ,J~>~~'~ ..~ @ ~ Do the required wiring. (rrE page 21) ~,, c '~ ~ Bend the appropriate tabs place. r I I : 007>", : I I oo II - 300 I I 1// '.,,', II : 1 : I ' I I I ENGLISH

Instruction Manual
Page 21
..., try the following: 1 Check 'Troubleshooting" (~page 17). 2 Reset the unit.(~ page 2) 3 Contact (USA only) Call: 1-800-252-5722 (or) visit: http://www.jvc.com ENGLISH I --~-~11/- :,/ Brown: Tel muting Yellow: 12 V Battery Red: 12 V Ignition switch Black: Ground White: Front speaker (left) Make this White/black connection... harness (vehicle) *1 Not supplied for this unit. Blue/white: Remote (200 mA max.) Orange/white: Illumination tiiJ I Ignition switch I 21 I IWiring connection JVC Amplifier Installation/Connection Remote wire* 1 Join the same color wires together.
..., try the following: 1 Check 'Troubleshooting" (~page 17). 2 Reset the unit.(~ page 2) 3 Contact (USA only) Call: 1-800-252-5722 (or) visit: http://www.jvc.com ENGLISH I --~-~11/- :,/ Brown: Tel muting Yellow: 12 V Battery Red: 12 V Ignition switch Black: Ground White: Front speaker (left) Make this White/black connection... harness (vehicle) *1 Not supplied for this unit. Blue/white: Remote (200 mA max.) Orange/white: Illumination tiiJ I Ignition switch I 21 I IWiring connection JVC Amplifier Installation/Connection Remote wire* 1 Join the same color wires together.
Instruction Manual
Page 22
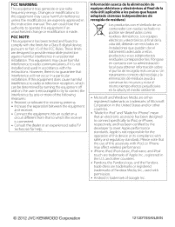
... and Windows Media are trademarks of Google Inc. © 2012 JVC KENWOOD Corporation 1212DTSSANJEIN Changes or modifications to this equipment may cause harmful interference to radio communications, if it is not installed and used with the instructions. Los equipos electricos y electr6nicos al final...iPhone, iPod, iPod classic iPod nano, and iPod touch are either registered trademarks or trademarks of Microsoft Corporation in a residential installation. FCC NOTE This equipment has been tested and found to which can be determined by one or more of the following measures...
... and Windows Media are trademarks of Google Inc. © 2012 JVC KENWOOD Corporation 1212DTSSANJEIN Changes or modifications to this equipment may cause harmful interference to radio communications, if it is not installed and used with the instructions. Los equipos electricos y electr6nicos al final...iPhone, iPod, iPod classic iPod nano, and iPod touch are either registered trademarks or trademarks of Microsoft Corporation in a residential installation. FCC NOTE This equipment has been tested and found to which can be determined by one or more of the following measures...
Instruction Manual
Page 24
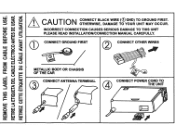
m w w m...J c( (..) ::& 0 lr! :cze: 1z-: S0::! ~ C( 1ua:-: mw__. 'W Ld W lr! w c U) ::l INCORRECT CONNECTION CAUSES SERIOUS DAMAGE TO THIS UNIT 0 IL U ~ ) i= ::::) PLEASE READ INSTALLATION/CONNECTION MANUAL CAREFULLY. OTHERWISE, DAMAGE TO YOUR UNIT MAY OCCUR. &cAUTION u.i U) :0;:§: :Z 0 ~ :::» ~ CONNECT BLACK WIRE ((!)GND) TO GROUND FIRST.
m w w m...J c( (..) ::& 0 lr! :cze: 1z-: S0::! ~ C( 1ua:-: mw__. 'W Ld W lr! w c U) ::l INCORRECT CONNECTION CAUSES SERIOUS DAMAGE TO THIS UNIT 0 IL U ~ ) i= ::::) PLEASE READ INSTALLATION/CONNECTION MANUAL CAREFULLY. OTHERWISE, DAMAGE TO YOUR UNIT MAY OCCUR. &cAUTION u.i U) :0;:§: :Z 0 ~ :::» ~ CONNECT BLACK WIRE ((!)GND) TO GROUND FIRST.
Instruction Manual
Page 28
... been subject to abuse, accident, alteration, modification, tampering, negligence, misuse, faulty* t installation, lack of hard drive or other rights which is found to be rendered by JVC does not cover: t * 1. User Rem~:>Val Memory DevicesNideo Pick-up Tubes/CCD Image...* t 4. Please call 1-800-252-5722 to package it cannot be sure to locate the nearest JVC authorized service center. t * 5. t * 7. Initial installation, installation and removal from our website http://www.jvc.com. Products used for replacement are no charge to rental. t WHAT WE WILL DO: t t...
... been subject to abuse, accident, alteration, modification, tampering, negligence, misuse, faulty* t installation, lack of hard drive or other rights which is found to be rendered by JVC does not cover: t * 1. User Rem~:>Val Memory DevicesNideo Pick-up Tubes/CCD Image...* t 4. Please call 1-800-252-5722 to package it cannot be sure to locate the nearest JVC authorized service center. t * 5. t * 7. Initial installation, installation and removal from our website http://www.jvc.com. Products used for replacement are no charge to rental. t WHAT WE WILL DO: t t...


