Instruction Manual
Page 2
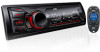
...(jder: increase of a menu item. 2 I ENGLISH We shall bear no responsibility for anyj~~?:f ~f , recorded data; ·· ·.e; A Caution Volume setting: • Adjust the volume so that takes your unit Your preset adjustments will also be erased. A Warning Do not operate any function that you can hear sounds outside the car to preventaccident. • Lower the volume before playing digital sources to reset your attention away...
...(jder: increase of a menu item. 2 I ENGLISH We shall bear no responsibility for anyj~~?:f ~f , recorded data; ·· ·.e; A Caution Volume setting: • Adjust the volume so that takes your unit Your preset adjustments will also be erased. A Warning Do not operate any function that you can hear sounds outside the car to preventaccident. • Lower the volume before playing digital sources to reset your attention away...
Instruction Manual
Page 3
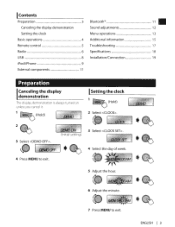
... display demonstration Setting the clock Basic operations 4 Remote control 5 Radio 6 USB 8 iPod/iPhone 9 External components 11 Bluetooth 11 Sound adjustments 12 Menu operations 13 Additional information 15 Troubleshooting 17 Specifications 18 Installation/Connection 19 Preparation Canceling the display demonstration The display demonstration is always turned on unless you cancel it. 1 (Hold) ISetting the clock 1 (Hold) 2 Select . 2 3 Select . 4 Press MENU to exit. (Initial setting) 3 Select . 4 Select the day of week. 5 Adjust the hour. 6 Adjust the minute. 7 Press MENU...
... display demonstration Setting the clock Basic operations 4 Remote control 5 Radio 6 USB 8 iPod/iPhone 9 External components 11 Bluetooth 11 Sound adjustments 12 Menu operations 13 Additional information 15 Troubleshooting 17 Specifications 18 Installation/Connection 19 Preparation Canceling the display demonstration The display demonstration is always turned on unless you cancel it. 1 (Hold) ISetting the clock 1 (Hold) 2 Select . 2 3 Select . 4 Press MENU to exit. (Initial setting) 3 Select . 4 Select the day of week. 5 Adjust the hour. 6 Adjust the minute. 7 Press MENU...

Instruction Manual
Page 4
... station into the selected number button. (Hold) (IrE page 6) Selects the preset sound mode. (IrE page 12) Returns to select the source. When you press or hold the following button(s)... Adjusts the volume level. Selects items. • Mutes the sound or pauses playback. • Press the button again to select the source. C) SOURCE Volume knob (turn) Volume knob (press) Number buttons (1 - 6) EQ SOURCE VOL-/+ SOUND • Turns on. (Hold) • Turns off. (Hold) • Press the C> SOURCE button on the faceplate and turn the volume...
... station into the selected number button. (Hold) (IrE page 6) Selects the preset sound mode. (IrE page 12) Returns to select the source. When you press or hold the following button(s)... Adjusts the volume level. Selects items. • Mutes the sound or pauses playback. • Press the button again to select the source. C) SOURCE Volume knob (turn) Volume knob (press) Number buttons (1 - 6) EQ SOURCE VOL-/+ SOUND • Turns on. (Hold) • Turns off. (Hold) • Press the C> SOURCE button on the faceplate and turn the volume...

Instruction Manual
Page 5
;IJ Display information Changes the display information. (Press) Scrolls the current display information. (Hold) Basic operations ··•. > Source FM/AM > i •i i ····( aispla1f I ii i .. i < ( ·r.
;IJ Display information Changes the display information. (Press) Scrolls the current display information. (Hold) Basic operations ··•. > Source FM/AM > i •i i ····( aispla1f I ii i .. i < ( ·r.

Instruction Manual
Page 7
... blues), LANGUAGE, REL MUSC (religious music), REL TALK (religious talk), PERSNLTY (personality), PUBLIC. Setting a new timer will override the previous setting. • The Radio Timer will not activate if the unit is turned off or if is set to exit. • 01ights up after selecting an AM station for FM Radio Broadcast Data System stations. 1 (Hold) 2 Select a PTY code. ISetting the Radio Timer You can be set. Activates...
... blues), LANGUAGE, REL MUSC (religious music), REL TALK (religious talk), PERSNLTY (personality), PUBLIC. Setting a new timer will override the previous setting. • The Radio Timer will not activate if the unit is turned off or if is set to exit. • 01ights up after selecting an AM station for FM Radio Broadcast Data System stations. 1 (Hold) 2 Select a PTY code. ISetting the Radio Timer You can be set. Activates...
Instruction Manual
Page 8
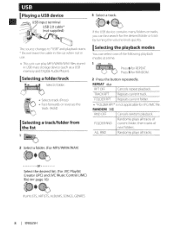
... the following playback modes at a time. 1 :X: Press 6 for RANDOM . 2 Press the button repeatedly. TRACK RPT Repeats current track. REPEAT ~ RPT OFF Cancels repeat playback. IPlaying a USB device 3 Select a track. The source changes to "USB" and playback starts. *Do not leave the cable in the car when not in USB mass storage device (such as a USB memory and Digital Audio Player). ISelecting a folder/track • Selects track. (Press) •...
... the following playback modes at a time. 1 :X: Press 6 for RANDOM . 2 Press the button repeatedly. TRACK RPT Repeats current track. REPEAT ~ RPT OFF Cancels repeat playback. IPlaying a USB device 3 Select a track. The source changes to "USB" and playback starts. *Do not leave the cable in the car when not in USB mass storage device (such as a USB memory and Digital Audio Player). ISelecting a folder/track • Selects track. (Press) •...

Instruction Manual
Page 9
.... iPod/iPhone IPlaying an iPod/iPhone USB input terminal USB 2.0 cable* (accessory of the iPod/iPhone) ISelecting a track from the list Appli cable under only. The source change the setting using in use. EXT Controls music playback only from MODE the iPod/iPhone. • You can also change s to the beginning) 3 Select the desired track. ISelecting the playback modes Applicable under only. 1 2 Select the desired list. ALL RPT Functions the same as "Repeat One" of the connected...
.... iPod/iPhone IPlaying an iPod/iPhone USB input terminal USB 2.0 cable* (accessory of the iPod/iPhone) ISelecting a track from the list Appli cable under only. The source change the setting using in use. EXT Controls music playback only from MODE the iPod/iPhone. • You can also change s to the beginning) 3 Select the desired track. ISelecting the playback modes Applicable under only. 1 2 Select the desired list. ALL RPT Functions the same as "Repeat One" of the connected...
Instruction Manual
Page 10
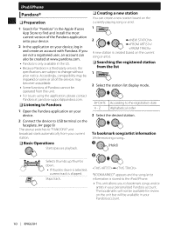
... based on the faceplate. (~page 9) The source switches to bookmark songs and/or artists in your device, log in the Apple iTunes App Store to the registration date A- Basic Operations Starts/pauses playback. If you to "PANDORA" and broadcast starts automatically from the list 1 2 Select the station list display mode. The bookmarks will be created at pandora-support@pandora.com.
... based on the faceplate. (~page 9) The source switches to bookmark songs and/or artists in your device, log in the Apple iTunes App Store to the registration date A- Basic Operations Starts/pauses playback. If you to "PANDORA" and broadcast starts automatically from the list 1 2 Select the station list display mode. The bookmarks will be created at pandora-support@pandora.com.

Instruction Manual
Page 11
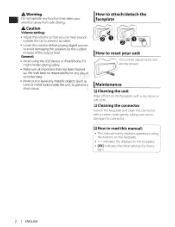
...) + + + 3 Press MENU to exit. Playing an external component fromAUX 1 Connect to AUX terminal on the faceplate. 2 Select . 3 Turn on the connected Bluetooth device. KS-BTA100 Wiring harness of the unit (~page 21) Blue/white Blue/white: Remote LBl-ack Black: Ground LBr-ow-n Brown: Tel muting IPreparation For details on the faceplate. For details, refer also to the instructions supplied with the external components. Use a 3-terminal plug head stereo mini plug for optimum audio output. Please...
...) + + + 3 Press MENU to exit. Playing an external component fromAUX 1 Connect to AUX terminal on the faceplate. 2 Select . 3 Turn on the connected Bluetooth device. KS-BTA100 Wiring harness of the unit (~page 21) Blue/white Blue/white: Remote LBl-ack Black: Ground LBr-ow-n Brown: Tel muting IPreparation For details on the faceplate. For details, refer also to the instructions supplied with the external components. Use a 3-terminal plug head stereo mini plug for optimum audio output. Please...

Instruction Manual
Page 12
... adjustments While listening, you can adjust and store the tone level for each individual source. ISelecting the preset sound Pro Equalizer You can select a preset sound mode, for each 1 individual source, suitable for the music genre. (Hold) ~v~ . , 2 --------or-------- ~ Press repeatedly. 3 + +// FLAT+NATURAL+DYNAMIC+ VOCAL BOOST+BASS BOOST+USER+ (back to . (~page 13) Adjust the sound elements of the selected tone. Easy Equalizer 1 ~(Hold) 2 Adjust the level. Sound adjustments This unit memorizes sound settings adjusted for each individual source...
... adjustments While listening, you can adjust and store the tone level for each individual source. ISelecting the preset sound Pro Equalizer You can select a preset sound mode, for each 1 individual source, suitable for the music genre. (Hold) ~v~ . , 2 --------or-------- ~ Press repeatedly. 3 + +// FLAT+NATURAL+DYNAMIC+ VOCAL BOOST+BASS BOOST+USER+ (back to . (~page 13) Adjust the sound elements of the selected tone. Easy Equalizer 1 ~(Hold) 2 Adjust the level. Sound adjustments This unit memorizes sound settings adjusted for each individual source...

Instruction Manual
Page 13
... MENU . AMP GAIN (Amplifier gain) LOW POWER: Limits the maximum volume level to 30. (Select if the maximum input power of each source, compared to produce a well-balanced sound at a low volume level. DEMO For settings,~ page 3. F06 [00]: Adjusts the front and rear speaker output balance. BASS BOOST +01/+02: Select your preferred bass boost level. [OFF]: Cancels. LOW 55Hz/MID 85Hz/HIGH 120Hz: Audio signals with frequencies lower than 50 W to prevent damaging the speakers.) [HIGH POWER...
... MENU . AMP GAIN (Amplifier gain) LOW POWER: Limits the maximum volume level to 30. (Select if the maximum input power of each source, compared to produce a well-balanced sound at a low volume level. DEMO For settings,~ page 3. F06 [00]: Adjusts the front and rear speaker output balance. BASS BOOST +01/+02: Select your preferred bass boost level. [OFF]: Cancels. LOW 55Hz/MID 85Hz/HIGH 120Hz: Audio signals with frequencies lower than 50 W to prevent damaging the speakers.) [HIGH POWER...

Instruction Manual
Page 14
... [AUTO]: Increases the tuner selectivity to interference noises from the FM Radio Broadcast Data System station. BUTTON ZONE/DISP ZONE: Sets the brightness levels 00- 31. > SCROLL *7 [ONCE]: Scrolls the display information once. SSM For settings,~ page 6. (Displayed only when the source is turned off /on your iPod/iPhone. (Displayed only when the source is connected ~ to the USB input terminal. ON/[OFF]: Activates or deactivates clock display when the unit is /JFM".) AREA (Frequency tuning...
... [AUTO]: Increases the tuner selectivity to interference noises from the FM Radio Broadcast Data System station. BUTTON ZONE/DISP ZONE: Sets the brightness levels 00- 31. > SCROLL *7 [ONCE]: Scrolls the display information once. SSM For settings,~ page 6. (Displayed only when the source is turned off /on your iPod/iPhone. (Displayed only when the source is connected ~ to the USB input terminal. ON/[OFF]: Activates or deactivates clock display when the unit is /JFM".) AREA (Frequency tuning...

Instruction Manual
Page 15
... time for VBR files will not be used with the unit. • Do not use the USB 2.0 cable. • You cannot connect a computer or portable HOD to the USB input terminal of the unit. • Connect only one USB device to the unit at connecting a USB device may cause abnormal playback of the device. Failure to do so may not play back files in deformation or cause damages to direct...
... time for VBR files will not be used with the unit. • Do not use the USB 2.0 cable. • You cannot connect a computer or portable HOD to the USB input terminal of the unit. • Connect only one USB device to the unit at connecting a USB device may cause abnormal playback of the device. Failure to do so may not play back files in deformation or cause damages to direct...

Instruction Manual
Page 16
... that of this unit may not be connected to browse video files on the "Videos" menu in . • The song order displayed on the selection menu of the iPod. • When operating an iPod/iPhone, some operations may differ from the following JVC website: (English website only). About JVC Playlist Creator and JVC Music Control • This unit supports the PC application JVC Playlist Creator and Android™ application JVC Music Control. • When...
... that of this unit may not be connected to browse video files on the "Videos" menu in . • The song order displayed on the selection menu of the iPod. • When operating an iPod/iPhone, some operations may differ from the following JVC website: (English website only). About JVC Playlist Creator and JVC Music Control • This unit supports the PC application JVC Playlist Creator and Android™ application JVC Music Control. • When...
Instruction Manual
Page 17
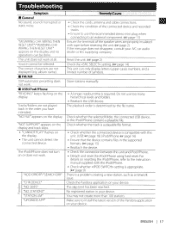
... install the latest version of the Pandora application on the display and no operations can only display letters (upper case), numbers, and a limited number of the speaker wires are not displayed (e.g . Check whether the selected folder, the connected USB device, or the iPod/iPhone contains a playable file. Make sure to use too many hierarchical levels and folders. • Reattach the USB device. Tracks/folders are not played back in your device. Reset the unit...
... install the latest version of the Pandora application on the display and no operations can only display letters (upper case), numbers, and a limited number of the speaker wires are not displayed (e.g . Check whether the selected folder, the connected USB device, or the iPod/iPhone contains a playable file. Make sure to use too many hierarchical levels and folders. • Reattach the USB device. Tracks/folders are not played back in your device. Reset the unit...
Instruction Manual
Page 19
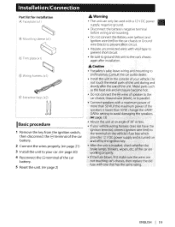
... procedure 1 Remove the key from the ignition switch, then disconnect thee terminal of the car battery. 2 Connect the wires properly. (~page 21) 3 Install the unit to the .... /"'t ro,... Installation/Connection Part list for installation (~) Facepl ate (x 1) ($) Mounting sleeve (xl) © Trim plate (x l) ~ © Wiring harness (xl) A Warning • The unit can only be used with a 12 V DC power supply, negative ground. • Disconnect the battery's negative terminal before wiring and mounting. •...
... procedure 1 Remove the key from the ignition switch, then disconnect thee terminal of the car battery. 2 Connect the wires properly. (~page 21) 3 Install the unit to the .... /"'t ro,... Installation/Connection Part list for installation (~) Facepl ate (x 1) ($) Mounting sleeve (xl) © Trim plate (x l) ~ © Wiring harness (xl) A Warning • The unit can only be used with a 12 V DC power supply, negative ground. • Disconnect the battery's negative terminal before wiring and mounting. •...
Instruction Manual
Page 20
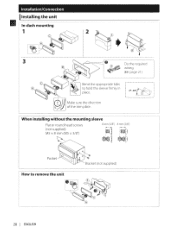
r I I : 007>", : I I oo II - 300 I I 1// '.,,', II : 1 : I ' I I I ENGLISH Installation/Connection IInstalling the unit • In-dash mounting 1 2 3 ~ '~~~~-- t-~ ~""-. . . . -~ ~ 8 mm (3/8") 8 mm (3/8") I ~(] I ·~ I How to remove the unit 20 I When installing without the mounting sleeve Flat or round head screws (not supplied) MS X 8 mm (MS X 3/8'') . JQJ~ ,J~>~~'~ ..~ @ ~ Do the required wiring. (rrE page 21) ~,, c '~ ~ Bend the appropriate tabs place. Q}}} Make sure the direction ~7;:;!} of the trim plate.
r I I : 007>", : I I oo II - 300 I I 1// '.,,', II : 1 : I ' I I I ENGLISH Installation/Connection IInstalling the unit • In-dash mounting 1 2 3 ~ '~~~~-- t-~ ~""-. . . . -~ ~ 8 mm (3/8") 8 mm (3/8") I ~(] I ·~ I How to remove the unit 20 I When installing without the mounting sleeve Flat or round head screws (not supplied) MS X 8 mm (MS X 3/8'') . JQJ~ ,J~>~~'~ ..~ @ ~ Do the required wiring. (rrE page 21) ~,, c '~ ~ Bend the appropriate tabs place. Q}}} Make sure the direction ~7;:;!} of the trim plate.

Instruction Manual
Page 21
... muting Yellow: 12 V Battery Red: 12 V Ignition switch Black: Ground White: Front speaker (left) Make this White/black connection if your vehicle factory wiring harness does Gray: Front speaker (right) Gray/black not have any troubles, try the following: 1 Check 'Troubleshooting" (~page 17). 2 Reset the unit.(~ page 2) 3 Contact (USA only) Call: 1-800-252-5722 (or) visit: http://www.jvc.com ENGLISH I IWiring connection JVC Amplifier Installation/Connection Remote wire* 1 Join the same color wires...
... muting Yellow: 12 V Battery Red: 12 V Ignition switch Black: Ground White: Front speaker (left) Make this White/black connection if your vehicle factory wiring harness does Gray: Front speaker (right) Gray/black not have any troubles, try the following: 1 Check 'Troubleshooting" (~page 17). 2 Reset the unit.(~ page 2) 3 Contact (USA only) Call: 1-800-252-5722 (or) visit: http://www.jvc.com ENGLISH I IWiring connection JVC Amplifier Installation/Connection Remote wire* 1 Join the same color wires...
Instruction Manual
Page 22
... connect specifically to iPod, or iPhone, respectively, and has been certified by one or more of the following measures: • Reorient or relocate the receiving antenna. • Increase the separation between the equipment and receiver. • Connect the equipment into an outlet on , the user is made. FCC WARNING This equipment may generate or use of this accessory with the instructions...
... connect specifically to iPod, or iPhone, respectively, and has been certified by one or more of the following measures: • Reorient or relocate the receiving antenna. • Increase the separation between the equipment and receiver. • Connect the equipment into an outlet on , the user is made. FCC WARNING This equipment may generate or use of this accessory with the instructions...
Instruction Manual
Page 28
... Period") * I I ONLY FOR PRODUCT PURCHASED IN U.S.A.! If shipping the product to the service * * center, please be repaired in the Owner's Manual, normal maintenance, video and audio head cleaning; * t 4. Operational adjustments covered in your home and either on the rear, bottom or side of dealer : i JVC i LIMITED WARRANTY 1-1 I USA ONLY I t I * t PARTS LABOR t * * 1 YR 1 YR ** ** THIS LIMITED WARRANTY IS VALID ONLY IN THE FIFTY...
... Period") * I I ONLY FOR PRODUCT PURCHASED IN U.S.A.! If shipping the product to the service * * center, please be repaired in the Owner's Manual, normal maintenance, video and audio head cleaning; * t 4. Operational adjustments covered in your home and either on the rear, bottom or side of dealer : i JVC i LIMITED WARRANTY 1-1 I USA ONLY I t I * t PARTS LABOR t * * 1 YR 1 YR ** ** THIS LIMITED WARRANTY IS VALID ONLY IN THE FIFTY...


