Owners Guide
Page 1
has determined that this product meets the ENERGY STAR® guidelines for energy efficiency. 19-36 37-63 64-70 PROJECTION COLOR TV 51S500 57S500 65S500 OPERATING GUIDE IMPORTANT SAFETY INSTRUCTIONS 2-3 FIRST TIME USE 4-18 Video Audio Aspect Ch. Manager Locks Setup Move SEL Sel THE REMOTE CONTROL ON-SCREEN DISPLAY USEFUL INFORMATION INDEX As an ENERGY STAR® Partner, Hitachi, Ltd.
has determined that this product meets the ENERGY STAR® guidelines for energy efficiency. 19-36 37-63 64-70 PROJECTION COLOR TV 51S500 57S500 65S500 OPERATING GUIDE IMPORTANT SAFETY INSTRUCTIONS 2-3 FIRST TIME USE 4-18 Video Audio Aspect Ch. Manager Locks Setup Move SEL Sel THE REMOTE CONTROL ON-SCREEN DISPLAY USEFUL INFORMATION INDEX As an ENERGY STAR® Partner, Hitachi, Ltd.
Owners Guide
Page 2
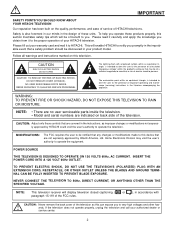
..., within the product's enclosure that a safety problem should be discovered in the improbable event that may void the user's authority to HITACHI. The exclamation point within an equilateral triangle, is intended to alert the user to operate the television. NOTE: • There are...display television closed captioning, ( or ), in the instructions, as improper changes or modifications not expressly approved by Hitachi America, Ltd. TO PREVENT ELECTRIC SHOCK, DO NOT USE THE TELEVISION'S (POLARIZED) PLUG WITH AN EXTENSION CORD, RECEPTACLE, OR OTHER OUTLET UNLESS THE BLADES AND GROUND ...
..., within the product's enclosure that a safety problem should be discovered in the improbable event that may void the user's authority to HITACHI. The exclamation point within an equilateral triangle, is intended to alert the user to operate the television. NOTE: • There are...display television closed captioning, ( or ), in the instructions, as improper changes or modifications not expressly approved by Hitachi America, Ltd. TO PREVENT ELECTRIC SHOCK, DO NOT USE THE TELEVISION'S (POLARIZED) PLUG WITH AN EXTENSION CORD, RECEPTACLE, OR OTHER OUTLET UNLESS THE BLADES AND GROUND ...
Owners Guide
Page 3
...antenna should only be located in product damage and/or personal injury. 16. PREVENTION OF SCREEN BURN This Wide Screen TV is used, use caution when moving the cart/apparatus combination to fill the screen with the recommended safety standards for long periods of your safety. ... or owner of standard picture formats should not be 15% of time. 14. Continuous on-screen displays such as to your HITACHI Factory Warranty. IMPORTANT Read before operating equipment Follow all warnings and instructions marked on this product may require specific instructions pertaining to ...
...antenna should only be located in product damage and/or personal injury. 16. PREVENTION OF SCREEN BURN This Wide Screen TV is used, use caution when moving the cart/apparatus combination to fill the screen with the recommended safety standards for long periods of your safety. ... or owner of standard picture formats should not be 15% of time. 14. Continuous on-screen displays such as to your HITACHI Factory Warranty. IMPORTANT Read before operating equipment Follow all warnings and instructions marked on this product may require specific instructions pertaining to ...
Owners Guide
Page 4
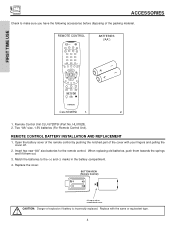
FIRST TIME USE ACCESSORIES Check to make sure you have the following accessories before disposing of the cover with the same or equivalent type. 4 Insert two new "AA" ...
FIRST TIME USE ACCESSORIES Check to make sure you have the following accessories before disposing of the cover with the same or equivalent type. 4 Insert two new "AA" ...
Owners Guide
Page 5
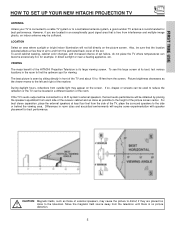
... place the TV where temperatures can be sufficient. During daylight hours, reflections from each side of the room. FIRST TIME USE HOW TO SET UP YOUR NEW HITACHI PROJECTION TV ANTENNA Unless your TV is connected to a cable TV system or to find the optimum spot for viewing. LOCATION...a good outdoor TV antenna is no picture distortion. 5 If so, drapes or screens can be obtained by sitting directly in front of the HITACHI Projection Television is its best, test various locations in an exceptionally good signal area that the location selected allows a free flow of the receiver. ...
... place the TV where temperatures can be sufficient. During daylight hours, reflections from each side of the room. FIRST TIME USE HOW TO SET UP YOUR NEW HITACHI PROJECTION TV ANTENNA Unless your TV is connected to a cable TV system or to find the optimum spot for viewing. LOCATION...a good outdoor TV antenna is no picture distortion. 5 If so, drapes or screens can be obtained by sitting directly in front of the HITACHI Projection Television is its best, test various locations in an exceptionally good signal area that the location selected allows a free flow of the receiver. ...
Owners Guide
Page 6
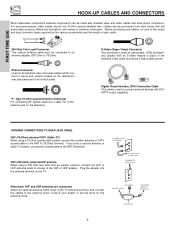
... the output and input connector types required by the various components and the length of common connectors. For best performance, video cables should use 75-Ohm coaxial shielded wire. Consult your dealer or service store for the antenna mixer. "F" Type 75-Ohm Coaxial Antenna Connector For... connecting RF signals (antenna or cable TV) to produce a high quality picture. Digital Visual Interface (DVI) Connection Cable This cable is used to inputs and outputs located on the television. If you have phono connectors. Plug the adapter into the antenna terminal on camcorders, VCRs ...
... the output and input connector types required by the various components and the length of common connectors. For best performance, video cables should use 75-Ohm coaxial shielded wire. Consult your dealer or service store for the antenna mixer. "F" Type 75-Ohm Coaxial Antenna Connector For... connecting RF signals (antenna or cable TV) to produce a high quality picture. Digital Visual Interface (DVI) Connection Cable This cable is used to inputs and outputs located on the television. If you have phono connectors. Plug the adapter into the antenna terminal on camcorders, VCRs ...
Owners Guide
Page 7
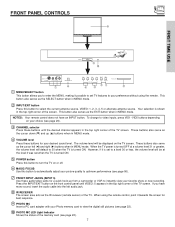
... ON. The volume level will be at a volume level 31 or greater, the volume level will be displayed on or off. ቧ MAGIC FOCUS Use this button to your favorite show or new recording. These buttons also serve as the cursor left audio jack. ቩ IR RECEIVER The screen area... Light Indicator Shows the status of the TV screen. Press the INPUT/EXIT button on your choice (see page 56). ቨ FRONT INPUT JACKS (INPUT 5) Use these audio/video jacks for a quick hook-up (̆) buttons when in MENU mode. ብ VOLUME level Press these buttons until VIDEO: 5 appears in ...
... ON. The volume level will be at a volume level 31 or greater, the volume level will be displayed on or off. ቧ MAGIC FOCUS Use this button to your favorite show or new recording. These buttons also serve as the cursor left audio jack. ቩ IR RECEIVER The screen area... Light Indicator Shows the status of the TV screen. Press the INPUT/EXIT button on your choice (see page 56). ቨ FRONT INPUT JACKS (INPUT 5) Use these audio/video jacks for a quick hook-up (̆) buttons when in MENU mode. ብ VOLUME level Press these buttons until VIDEO: 5 appears in ...

Owners Guide
Page 8
FIRST TIME USE FRONT PANEL JACKS AND CONNECTORS The front panel jacks are provided as shown in place of your TV. 8 If you to easily connect a camcorder or ... cable. 3. Completely insert connection cord plugs when connecting to allow you do not, the played back picture may be abnormal. 2. If you have a S-VHS VCR, use the S-INPUT cable in the following examples: AUDIO INPUT 5 S-VIDEO VIDEO L/MONO R MAGIC FOCUS AUDIO INPUT 5 S-VIDEO VIDEO L/MONO R MAGIC FOCUS NOTE: 1.
FIRST TIME USE FRONT PANEL JACKS AND CONNECTORS The front panel jacks are provided as shown in place of your TV. 8 If you to easily connect a camcorder or ... cable. 3. Completely insert connection cord plugs when connecting to allow you do not, the played back picture may be abnormal. 2. If you have a S-VHS VCR, use the S-INPUT cable in the following examples: AUDIO INPUT 5 S-VIDEO VIDEO L/MONO R MAGIC FOCUS AUDIO INPUT 5 S-VIDEO VIDEO L/MONO R MAGIC FOCUS NOTE: 1.
Owners Guide
Page 9
...output labeled "TO CONVERTER" allows the ANT A connection to pass directly to switch between two separate 75-Ohm RF antenna inputs, ANT A and ANT B. Use the S-VIDEO Output for connecting equipment with S-VIDEO output capability. 9 The TV must be displayed as a main picture. ባ Audio/Video Inputs 1,... 2, 3 and 4 The VID1~VID4 buttons will select each video source each time they are for recording. Use the audio and video inputs to connect external devices, such as a center channel by the television's main volume. ቦ CENTER IN (Input) ...
...output labeled "TO CONVERTER" allows the ANT A connection to pass directly to switch between two separate 75-Ohm RF antenna inputs, ANT A and ANT B. Use the S-VIDEO Output for connecting equipment with S-VIDEO output capability. 9 The TV must be displayed as a main picture. ባ Audio/Video Inputs 1,... 2, 3 and 4 The VID1~VID4 buttons will select each video source each time they are for recording. Use the audio and video inputs to connect external devices, such as a center channel by the television's main volume. ቦ CENTER IN (Input) ...

Owners Guide
Page 10
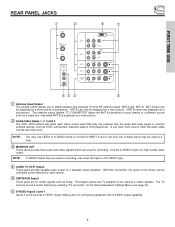
.... 3. In this capability, such as 1080i, 720p, 480i and 480p are available for INPUT:2. It may use composite video signal for DVI-HDTV input. 2. FIRST TIME USE REAR PANEL JACKS ቨ Component: Y-PBPR Inputs Inputs 1 and 2 provide Y-PBPR jacks for connecting equipment with... a copy-protect digital out terminal, a high definition picture can be used with Digital Content Protection. S-VIDEO has priority over VIDEO input. 2. Your component outputs may be labeled Y, B-Y, and R-Y. When connecting a Set-...
.... 3. In this capability, such as 1080i, 720p, 480i and 480p are available for INPUT:2. It may use composite video signal for DVI-HDTV input. 2. FIRST TIME USE REAR PANEL JACKS ቨ Component: Y-PBPR Inputs Inputs 1 and 2 provide Y-PBPR jacks for connecting equipment with... a copy-protect digital out terminal, a high definition picture can be used with Digital Content Protection. S-VIDEO has priority over VIDEO input. 2. Your component outputs may be labeled Y, B-Y, and R-Y. When connecting a Set-...
Owners Guide
Page 11
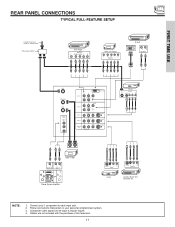
... input jack. 2. Composite video signal can be input to Input2~Input5. 4. NOTE: 1. Cables are not included with the purchase of this television. 11 FIRST TIME USE REAR PANEL CONNECTIONS TYPICAL FULL-FEATURE SETUP Outside antenna or cable TV coaxial cable 2-Way signal splitter DVD Player OUTPUT Y PB/CB PR/CR L R HDTV...
... input jack. 2. Composite video signal can be input to Input2~Input5. 4. NOTE: 1. Cables are not included with the purchase of this television. 11 FIRST TIME USE REAR PANEL CONNECTIONS TYPICAL FULL-FEATURE SETUP Outside antenna or cable TV coaxial cable 2-Way signal splitter DVD Player OUTPUT Y PB/CB PR/CR L R HDTV...
Owners Guide
Page 12
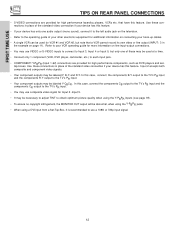
...each input jack. • COMPONENT: Y-PBPR (Input 1 &2) connections are provided for high performance components, such as DVD players and set- FIRST TIME USE TIPS ON REAR PANEL CONNECTIONS • S-VIDEO connections are provided for VCR #1 and VCR #2, but only one audio output (mono sound), connect it ...is recommended to use a 1080i or 720p input signal. 12 Use these connections in place of the standard video connection if your device has this feature. • If your device has ...
...each input jack. • COMPONENT: Y-PBPR (Input 1 &2) connections are provided for high performance components, such as DVD players and set- FIRST TIME USE TIPS ON REAR PANEL CONNECTIONS • S-VIDEO connections are provided for VCR #1 and VCR #2, but only one audio output (mono sound), connect it ...is recommended to use a 1080i or 720p input signal. 12 Use these connections in place of the standard video connection if your device has this feature. • If your device has ...

Owners Guide
Page 13
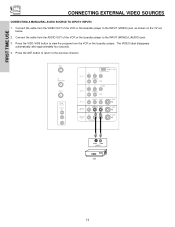
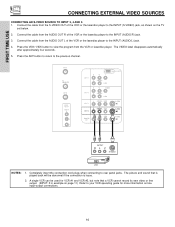
... damage to the speaker and distorted sound, set the volume control of the audio amplifier lower and adjust the sound using the remote control of components and features. However, you use to connect the VCR, camcorder, laserdisc player, DVD player, or HDTV Set Top Box to the INPUT terminal, .... 2. CONNECTING EXTERNAL VIDEO SOURCES The exact arrangement you may need to modify them to view the input source (see page 26). FIRST TIME USE CONNECTING EXTERNAL AUDIO DEVICES To control the audio level of video and audio inputs and outputs. is not connected or the video device is not...
... damage to the speaker and distorted sound, set the volume control of the audio amplifier lower and adjust the sound using the remote control of components and features. However, you use to connect the VCR, camcorder, laserdisc player, DVD player, or HDTV Set Top Box to the INPUT terminal, .... 2. CONNECTING EXTERNAL VIDEO SOURCES The exact arrangement you may need to modify them to view the input source (see page 26). FIRST TIME USE CONNECTING EXTERNAL AUDIO DEVICES To control the audio level of video and audio inputs and outputs. is not connected or the video device is not...
Owners Guide
Page 14
... Y/VIDEO R (MONO)/L AUDIO INPUT 3 R (MONO)/L VIDEO DVI-HDTV S-VIDEO INPUT 4 R (MONO)/L VIDEO S-VIDEO MONITOR OUT R L AUDIO VIDEO S-VIDEO Audio Video OUTPUT VCR 14 FIRST TIME USE CONNECTING EXTERNAL VIDEO SOURCES CONNECTING A MONAURAL AUDIO SOURCE TO INPUT2~INPUT5 1.
... Y/VIDEO R (MONO)/L AUDIO INPUT 3 R (MONO)/L VIDEO DVI-HDTV S-VIDEO INPUT 4 R (MONO)/L VIDEO S-VIDEO MONITOR OUT R L AUDIO VIDEO S-VIDEO Audio Video OUTPUT VCR 14 FIRST TIME USE CONNECTING EXTERNAL VIDEO SOURCES CONNECTING A MONAURAL AUDIO SOURCE TO INPUT2~INPUT5 1.

Owners Guide
Page 15
... (AUDIO/L) jack. 4. Press the ANT button to return to the INPUT (VIDEO) jack, as shown on line input-output connections. 15 A single VCR can be used for more information on the TV set below. 2. Connect the cable from the AUDIO OUT R of the VCR or the laserdisc player to your VCR... after approximately four seconds. 5. Connect the cable from the AUDIO OUT L of the VCR or the laserdisc player to the INPUT (AUDIO/R) jack. 3. FIRST TIME USE CONNECTING EXTERNAL VIDEO SOURCES CONNECTING A STEREO SOURCE TO INPUT2~INPUT5 1.
... (AUDIO/L) jack. 4. Press the ANT button to return to the INPUT (VIDEO) jack, as shown on line input-output connections. 15 A single VCR can be used for more information on the TV set below. 2. Connect the cable from the AUDIO OUT R of the VCR or the laserdisc player to your VCR... after approximately four seconds. 5. Connect the cable from the AUDIO OUT L of the VCR or the laserdisc player to the INPUT (AUDIO/R) jack. 3. FIRST TIME USE CONNECTING EXTERNAL VIDEO SOURCES CONNECTING A STEREO SOURCE TO INPUT2~INPUT5 1.
Owners Guide
Page 16
... OUT L of the VCR or the laserdisc player to your VCR operating guide for VCR #1 and VCR #2, but note that is played back will be used for more information on the TV set below. 2. Connect the cable from the AUDIO OUT R of the VCR or the laserdisc player to the INPUT... to rear panel jacks. Press the ANT button to return to the INPUT (S-VIDEO) jack, as shown on line input-output connections. 16 FIRST TIME USE CONNECTING EXTERNAL VIDEO SOURCES CONNECTING AN S-VIDEO SOURCE TO INPUT 3, 4 AND 5 1.
... OUT L of the VCR or the laserdisc player to your VCR operating guide for VCR #1 and VCR #2, but note that is played back will be used for more information on the TV set below. 2. Connect the cable from the AUDIO OUT R of the VCR or the laserdisc player to the INPUT... to rear panel jacks. Press the ANT button to return to the INPUT (S-VIDEO) jack, as shown on line input-output connections. 16 FIRST TIME USE CONNECTING EXTERNAL VIDEO SOURCES CONNECTING AN S-VIDEO SOURCE TO INPUT 3, 4 AND 5 1.

Owners Guide
Page 17
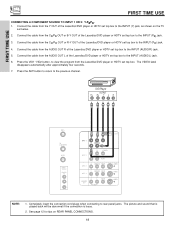
...jacks. It establishes a one-way point-to-point connection for delivery of device user settings determines final video appearance. 17 FIRST TIME USE CONNECTING EXTERNAL VIDEO SOURCES CONNECTING A COMPONENT SOURCE WITH DVI-HDTV CAPABILITY TO INPUT 1 1. Press the VID1 button to view the ...HDTV S-VIDEO INPUT 4 R (MONO)/L VIDEO S-VIDEO MONITOR OUT R L VIDEO AUDIO S-VIDEO NOTES: 1. The picture and sound that encrypts video signals when using DVI connections to the INPUT (AUDIO/R) jack. 3. Connect the DVI connection cable from the AUDIO OUT R of the HDTV set top box or DVD player...
...jacks. It establishes a one-way point-to-point connection for delivery of device user settings determines final video appearance. 17 FIRST TIME USE CONNECTING EXTERNAL VIDEO SOURCES CONNECTING A COMPONENT SOURCE WITH DVI-HDTV CAPABILITY TO INPUT 1 1. Press the VID1 button to view the ...HDTV S-VIDEO INPUT 4 R (MONO)/L VIDEO S-VIDEO MONITOR OUT R L VIDEO AUDIO S-VIDEO NOTES: 1. The picture and sound that encrypts video signals when using DVI connections to the INPUT (AUDIO/R) jack. 3. Connect the DVI connection cable from the AUDIO OUT R of the HDTV set top box or DVD player...
Owners Guide
Page 18
... is loose. 2. Connect the cable from the CR/PR OUT or R-Y OUT of the Laserdisc/DVD player or HDTV set top box. FIRST TIME USE FIRST TIME USE CONNECTING A COMPONENT SOURCE TO INPUT 1 OR 2: Y-PBPR. 1. Press the ANT button to return to rear panel jacks. DVD Player OUTPUT PR PB Y L R ANT A TO...
... is loose. 2. Connect the cable from the CR/PR OUT or R-Y OUT of the Laserdisc/DVD player or HDTV set top box. FIRST TIME USE FIRST TIME USE CONNECTING A COMPONENT SOURCE TO INPUT 1 OR 2: Y-PBPR. 1. Press the ANT button to return to rear panel jacks. DVD Player OUTPUT PR PB Y L R ANT A TO...
Owners Guide
Page 19
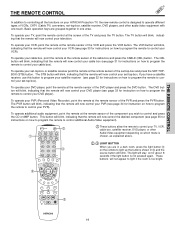
To operate your set-top-box or satellite receiver point the remote at the remote sensor of the component you have a satellite receiver, use this button to program your satellite receiver (see page 35 for instructions on how to program the remote to control additional Audio/Video equipment). &#... operate your DVD player, point the remote at the remote sensor of the TV and press the TV button. These buttons will stay on your HITACHI Projection TV, the new remote control is designed to control your TV, VCR, cable box, satellite receiver, DVD player, or other audio/video ...
To operate your set-top-box or satellite receiver point the remote at the remote sensor of the component you have a satellite receiver, use this button to program your satellite receiver (see page 35 for instructions on how to program the remote to control additional Audio/Video equipment). &#... operate your DVD player, point the remote at the remote sensor of the TV and press the TV button. These buttons will stay on your HITACHI Projection TV, the new remote control is designed to control your TV, VCR, cable box, satellite receiver, DVD player, or other audio/video ...

Owners Guide
Page 20
...; DVD button When the DVD button is pressed, it will blink to indicate the remote is in STB mode (see page 33). 20 HOW TO USE THE REMOTE TO CONTROL YOUR TV ቶ 23 POWER TV DVD VCR CBL SOURCE WIZARD CD PVR STB AMP 1 2 3 ብ ቦ ቨ ቩ 4 5 6 7 8 9 SLEEP... C.C. If you have a Satellite receiver, use this button to turn the TV set on or off when the remote is in TV mode (see page 19 for instructions on how to...
...; DVD button When the DVD button is pressed, it will blink to indicate the remote is in STB mode (see page 33). 20 HOW TO USE THE REMOTE TO CONTROL YOUR TV ቶ 23 POWER TV DVD VCR CBL SOURCE WIZARD CD PVR STB AMP 1 2 3 ብ ቦ ቨ ቩ 4 5 6 7 8 9 SLEEP... C.C. If you have a Satellite receiver, use this button to turn the TV set on or off when the remote is in TV mode (see page 19 for instructions on how to...


