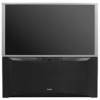
Owners Guide
Page 2
... user serviceable parts inside the television. • Model and serial numbers are not expressly approved by HITACHI could void the user's authority to you operate these units. NOTE: This television receiver will enable HITACHI to notify you to this television. CAUTION: Never remove the back cover of these products properly, this can expose you promptly in the improbable event that any changes or modifications made to very high...
... user serviceable parts inside the television. • Model and serial numbers are not expressly approved by HITACHI could void the user's authority to you operate these units. NOTE: This television receiver will enable HITACHI to notify you to this television. CAUTION: Never remove the back cover of these products properly, this can expose you promptly in the improbable event that any changes or modifications made to very high...
Owners Guide
Page 3
... not use this television. 1. Install in the lighted area of programs broadcast by TV stations and cable companies, as well as programs from other sources, may require specific instructions pertaining to display wide screen pictures. Do not defeat the safety purpose of unit to qualified service personnel. The wide blade or the third prong are heavy and can cause permanent damage to television receivers. Protect the power cord...
... not use this television. 1. Install in the lighted area of programs broadcast by TV stations and cable companies, as well as programs from other sources, may require specific instructions pertaining to display wide screen pictures. Do not defeat the safety purpose of unit to qualified service personnel. The wide blade or the third prong are heavy and can cause permanent damage to television receivers. Protect the power cord...
Owners Guide
Page 5
... the receiver. If the TV's audio output will be connected to a Hi-Fi system's external speakers, the best audio performance will be sure that is free from interference and multiple image ghosts, an indoor antenna may cause the picture to distort if they are located in an exceptionally good signal area that the location selected allows a free flow of the picture screen center. To avoid cabinet warping, cabinet color changes, and...
... the receiver. If the TV's audio output will be connected to a Hi-Fi system's external speakers, the best audio performance will be sure that is free from interference and multiple image ghosts, an indoor antenna may cause the picture to distort if they are located in an exceptionally good signal area that the location selected allows a free flow of the picture screen center. To avoid cabinet warping, cabinet color changes, and...
Owners Guide
Page 7
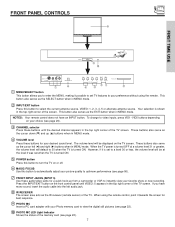
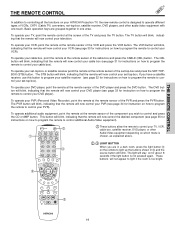
... remote. NOTES: Your remote control does not have mono sound, insert the audio cable into the left (̇) and right (̈) buttons when in MENU mode. ባ INPUT/EXIT button Press this button to automatically adjust your picture quality to turn the TV on your desired sound level. These buttons also serve as the IR receiver (remote sensor) of the TV screen. These buttons also serve as the SELECT button when in MENU mode. When the TV power...
... remote. NOTES: Your remote control does not have mono sound, insert the audio cable into the left (̇) and right (̈) buttons when in MENU mode. ባ INPUT/EXIT button Press this button to automatically adjust your picture quality to turn the TV on your desired sound level. These buttons also serve as the IR receiver (remote sensor) of the TV screen. These buttons also serve as the SELECT button when in MENU mode. When the TV power...
Owners Guide
Page 9
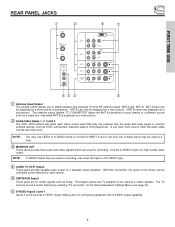
... used at a time. ቤ MONITOR OUT These jacks provide fixed audio and video signals which are pressed. Use the S-VIDEO Output for connecting equipment with S-VIDEO output capability. 9 NOTE: S-VIDEO Output may be displayed as a sub-picture.) The antenna output labeled "TO CONVERTER" allows the ANT A connection to pass directly to a different source such as a cable box, only when ANT B is of these inputs may be set as a center channel by the television's main volume. ቦ CENTER IN (Input...
... used at a time. ቤ MONITOR OUT These jacks provide fixed audio and video signals which are pressed. Use the S-VIDEO Output for connecting equipment with S-VIDEO output capability. 9 NOTE: S-VIDEO Output may be displayed as a sub-picture.) The antenna output labeled "TO CONVERTER" allows the ANT A connection to pass directly to a different source such as a cable box, only when ANT B is of these inputs may be set as a center channel by the television's main volume. ቦ CENTER IN (Input...
Owners Guide
Page 11
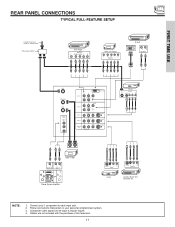
...4. FIRST TIME USE REAR PANEL CONNECTIONS TYPICAL FULL-FEATURE SETUP Outside antenna or cable TV coaxial cable 2-Way signal splitter DVD Player OUTPUT Y PB/CB PR/CR L R HDTV Set-Top Box Y PB PR L R OUTPUT D-VHS DIGITAL OUTPUT LR OUTPUT ANT A TO CONVERTER ANT B AUDIO TO HI-FI CENTER IN L R INPUT 1 PR PB Y R (MONO)/L AUDIO DVI-HDTV INPUT 2 PR PB Y/VIDEO R (MONO)/L AUDIO INPUT 3 R (MONO)/L VIDEO INPUT 4 R (MONO)/L VIDEO S-VIDEO S-VIDEO MONITOR OUT R L AUDIO VIDEO S-VIDEO VCR #1 ANT OUTPUT IN S-VIDEO V L R OUTPUT INPUT Cable TV Box C OUTPUT LR INPUT Stereo...
...4. FIRST TIME USE REAR PANEL CONNECTIONS TYPICAL FULL-FEATURE SETUP Outside antenna or cable TV coaxial cable 2-Way signal splitter DVD Player OUTPUT Y PB/CB PR/CR L R HDTV Set-Top Box Y PB PR L R OUTPUT D-VHS DIGITAL OUTPUT LR OUTPUT ANT A TO CONVERTER ANT B AUDIO TO HI-FI CENTER IN L R INPUT 1 PR PB Y R (MONO)/L AUDIO DVI-HDTV INPUT 2 PR PB Y/VIDEO R (MONO)/L AUDIO INPUT 3 R (MONO)/L VIDEO INPUT 4 R (MONO)/L VIDEO S-VIDEO S-VIDEO MONITOR OUT R L AUDIO VIDEO S-VIDEO VCR #1 ANT OUTPUT IN S-VIDEO V L R OUTPUT INPUT Cable TV Box C OUTPUT LR INPUT Stereo...
Owners Guide
Page 12
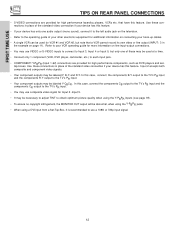
... 720p input signal. 12 FIRST TIME USE TIPS ON REAR PANEL CONNECTIONS • S-VIDEO connections are provided for Input 2~Input 5. • It may be necessary to adjust TINT to obtain optimum picture quality when using the Y-PBPR inputs (see page 39). • To ensure no copyright infringement, the MONITOR OUT output will be abnormal, when using the Y-PBPR jacks. • When using a DVI input from a Set-Top-Box, it to the left audio jack...
... 720p input signal. 12 FIRST TIME USE TIPS ON REAR PANEL CONNECTIONS • S-VIDEO connections are provided for Input 2~Input 5. • It may be necessary to adjust TINT to obtain optimum picture quality when using the Y-PBPR inputs (see page 39). • To ensure no copyright infringement, the MONITOR OUT output will be abnormal, when using the Y-PBPR jacks. • When using a DVI input from a Set-Top-Box, it to the left audio jack...

Owners Guide
Page 13
... Box to view the input source (see page 26). Before Operating External Video Source The input mode is changed every time the VID1~VID5 button is dependent on the back panel of the TV (i.e., VCR/laserdisc player, etc. For best performance, video and audio cables should be OFF. 13 FIRST TIME USE CONNECTING EXTERNAL AUDIO DEVICES To control the audio level of components and features. REAR PANEL OF TELEVISION ANT A TO CONVERTER ANT B INPUT 1 INPUT 2 PR PB Y R (MONO)/L AUDIO PR PB Y/VIDEO R (MONO)/L AUDIO DVI-HDTV AUDIO...
... Box to view the input source (see page 26). Before Operating External Video Source The input mode is changed every time the VID1~VID5 button is dependent on the back panel of the TV (i.e., VCR/laserdisc player, etc. For best performance, video and audio cables should be OFF. 13 FIRST TIME USE CONNECTING EXTERNAL AUDIO DEVICES To control the audio level of components and features. REAR PANEL OF TELEVISION ANT A TO CONVERTER ANT B INPUT 1 INPUT 2 PR PB Y R (MONO)/L AUDIO PR PB Y/VIDEO R (MONO)/L AUDIO DVI-HDTV AUDIO...

Owners Guide
Page 17
... to rear panel jacks. DVI is loose. 2. Connect the cable from the output of the HDTV set top box or DVD player to the INPUT (AUDIO/L) jack. 4. Press the VID1 button to view the program from the AUDIO OUT L of the HDTV set top box or DVD player to the DVI-HDTV input as shown on INPUT 1 contains the copy protection system called High-bandwidth Digital Content Protection (HDCP). Completely insert the connection cord plugs when connecting to the previous channel. Connect the cable...
... to rear panel jacks. DVI is loose. 2. Connect the cable from the output of the HDTV set top box or DVD player to the INPUT (AUDIO/L) jack. 4. Press the VID1 button to view the program from the AUDIO OUT L of the HDTV set top box or DVD player to the DVI-HDTV input as shown on INPUT 1 contains the copy protection system called High-bandwidth Digital Content Protection (HDCP). Completely insert the connection cord plugs when connecting to the previous channel. Connect the cable...
Owners Guide
Page 19
... control your DVD player). To operate your cable box, point the remote at the remote sensor of the set -top-box. To operate your satellite receiver (see page 30 for about 8 seconds if the light button is too bright. ቤ MENU EXIT VOL SELECT CH MUTE LAST CH VID 1 VID 2 PIP VID 3 SURF VID 5 VID 4 FREEZE PIP MODE PIP ACCESS SWAP DAY/NIGHT ቤ REC 19 If you have a satellite receiver, use this button...
... control your DVD player). To operate your cable box, point the remote at the remote sensor of the set -top-box. To operate your satellite receiver (see page 30 for about 8 seconds if the light button is too bright. ቤ MENU EXIT VOL SELECT CH MUTE LAST CH VID 1 VID 2 PIP VID 3 SURF VID 5 VID 4 FREEZE PIP MODE PIP ACCESS SWAP DAY/NIGHT ቤ REC 19 If you have a satellite receiver, use this button...

Owners Guide
Page 21
... (-) button can also access this button when you want to check the channel being received, the picture source, if the channel has stereo (ST) or second audio program (SAP), the time, CHANNEL ID and if the SLEEP timer is in the lower left corner of these buttons will blink to indicate the remote is in Audio mode (see page 35). ቪ CHANNEL selector buttons CHANNEL selector buttons are not in the correct ANTENNA/CABLE mode...
... (-) button can also access this button when you want to check the channel being received, the picture source, if the channel has stereo (ST) or second audio program (SAP), the time, CHANNEL ID and if the SLEEP timer is in the lower left corner of these buttons will blink to indicate the remote is in Audio mode (see page 35). ቪ CHANNEL selector buttons CHANNEL selector buttons are not in the correct ANTENNA/CABLE mode...
Owners Guide
Page 27
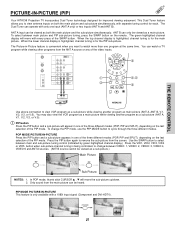
... picture and sub-picture simultaneously, with a 1080i input signal (Component and DVI-HDTV). PIP MODE PICTURE-IN-PICTURE This feature is being controlled, to change the PIP mode, use the PIP MODE button to watch a TV program while viewing other programs from the ANT A source or any of the SWAP button. PIP MODE 27 When the lower channel display is highlighted, channel tuning is for the main picture. The Dual Tuner can be viewed as a sub-picture.) Main Picture PIP PIP Sub Picture NOTES: 1. ANT A input can operate...
... picture and sub-picture simultaneously, with a 1080i input signal (Component and DVI-HDTV). PIP MODE PICTURE-IN-PICTURE This feature is being controlled, to change the PIP mode, use the PIP MODE button to watch a TV program while viewing other programs from the ANT A source or any of the SWAP button. PIP MODE 27 When the lower channel display is highlighted, channel tuning is for the main picture. The Dual Tuner can be viewed as a sub-picture.) Main Picture PIP PIP Sub Picture NOTES: 1. ANT A input can operate...
Owners Guide
Page 31
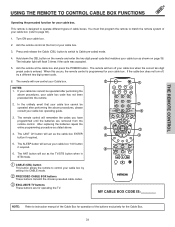
... 4 FREEZE PIP MODE PIP ACCESS SWAP DAY/NIGHT ባ ቤ ቢ CABLE (CBL) button This button allows the remote to page 36). 1. The remote control will now control your cable box code has not been precoded into the remote. 2. The SLEEP button will flash 3 times if the code was accepted. 5. Turn ON your cable box by setting it to Cable pre-coded mode. 4. This remote is designed to instruction manual of the Cable Box for operation of your cable box. The indicator light will act...
... 4 FREEZE PIP MODE PIP ACCESS SWAP DAY/NIGHT ባ ቤ ቢ CABLE (CBL) button This button allows the remote to page 36). 1. The remote control will now control your cable box code has not been precoded into the remote. 2. The SLEEP button will flash 3 times if the code was accepted. 5. Turn ON your cable box by setting it to Cable pre-coded mode. 4. This remote is designed to instruction manual of the Cable Box for operation of your cable box. The indicator light will act...

Owners Guide
Page 32
... PIP MODE PIP ACCESS SWAP DAY/NIGHT ባ ቤ REC MY SATELLITE RECEIVER/STB CODE IS: NOTE: Refer to control your set-top-box/satellite receiver. The indicator light will act as the TV/STB button when in STB mode. ቢ SET-TOP-BOX (STB) button This button allows the remote to instruction manual of the set-top-box/satellite receiver for operation of your set-top-box/satellite systems. 2. After replacing the batteries repeat the entire programming procedure...
... PIP MODE PIP ACCESS SWAP DAY/NIGHT ባ ቤ REC MY SATELLITE RECEIVER/STB CODE IS: NOTE: Refer to control your set-top-box/satellite receiver. The indicator light will act as the TV/STB button when in STB mode. ቢ SET-TOP-BOX (STB) button This button allows the remote to instruction manual of the set-top-box/satellite receiver for operation of your set-top-box/satellite systems. 2. After replacing the batteries repeat the entire programming procedure...
Owners Guide
Page 38
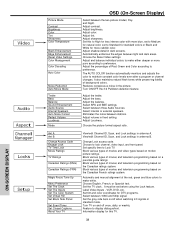
... Balance Sound Enhancement Audio Source Internal Speakers Auto Noise Cancel Perfect Volume Loudness Mode OSD (On-Screen Display) Select between light and dark areas. Turn ON/OFF the 3:2 Pulldown detection feature. Ant A Ant B Change Access Code Engage Lock TV Time Lock Movie Ratings TV Ratings Canadian Ratings (ENG) Canadian Ratings (FRN) Magic Focus Tune Up Menu Preference Set The Clock Set The Inputs Set The Color System Set Virtual HD Set Black Side Panel Set Event Timer Set Closed Captions About Your TV View/edit Channel ID, Scan, and Lock settings in fixed setting...
... Balance Sound Enhancement Audio Source Internal Speakers Auto Noise Cancel Perfect Volume Loudness Mode OSD (On-Screen Display) Select between light and dark areas. Turn ON/OFF the 3:2 Pulldown detection feature. Ant A Ant B Change Access Code Engage Lock TV Time Lock Movie Ratings TV Ratings Canadian Ratings (ENG) Canadian Ratings (FRN) Magic Focus Tune Up Menu Preference Set The Clock Set The Inputs Set The Color System Set Virtual HD Set Black Side Panel Set Event Timer Set Closed Captions About Your TV View/edit Channel ID, Scan, and Lock settings in fixed setting...

Owners Guide
Page 41
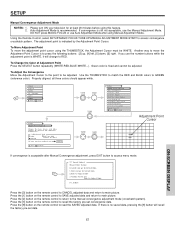
... Off ON-SCREEN DISPLAY Color Management Use this input to the original factory settings. Press THUMBSTICK to highlight and adjust individual colors. THUMB STICK SELECT Video Picture Mode Contrast Brightness Color Tint Sharpness Color Temperature Black Enhancement Edge Enhancement Reset Video Settings Move SEL Select ANT A/B Day 100% 50% 50% 50% High High High Night THUMB STICK SELECT Video Reset Video Settings Select "Reset" to Return the Video menu Settings on this function to adjust and balance the listed individual colors to make...
... Off ON-SCREEN DISPLAY Color Management Use this input to the original factory settings. Press THUMBSTICK to highlight and adjust individual colors. THUMB STICK SELECT Video Picture Mode Contrast Brightness Color Tint Sharpness Color Temperature Black Enhancement Edge Enhancement Reset Video Settings Move SEL Select ANT A/B Day 100% 50% 50% 50% High High High Night THUMB STICK SELECT Video Reset Video Settings Select "Reset" to Return the Video menu Settings on this function to adjust and balance the listed individual colors to make...
Owners Guide
Page 50
... to your key number. Video Audio Aspect Chan. To change the factory preset code (0000) to quit the menu. When SET CHANNEL LOCK is a four digit secret code number. Select CHANGE ACCESS CODE to change the secret code number, select Change Access Code. It can set . If MOVIE/TV Ratings Lock function settings are in the same signal source mode (see page 51). Use CURSOR ̆ or ̄ to keep the TV from being viewed for all buttons on the Front Panel will also be...
... to your key number. Video Audio Aspect Chan. To change the factory preset code (0000) to quit the menu. When SET CHANNEL LOCK is a four digit secret code number. Select CHANGE ACCESS CODE to change the secret code number, select Change Access Code. It can set . If MOVIE/TV Ratings Lock function settings are in the same signal source mode (see page 51). Use CURSOR ̆ or ̄ to keep the TV from being viewed for all buttons on the Front Panel will also be...
Owners Guide
Page 56
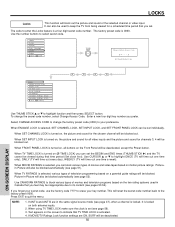
... "convergence". If this button is pressed during this process, no change in the proper proportion, the output of the red and blue tubes can produce any color. Adjustment Mode Auto Manual At turn ON your TV, or if, after 90 days) If you may also select MAGIC FOCUS TUNE UP from the Setup Menu. The process of the MAGIC FOCUS button is called MAGIC FOCUS located on control panel will be adjusted. ON-SCREEN DISPLAY MAGIC FOCUS...
... "convergence". If this button is pressed during this process, no change in the proper proportion, the output of the red and blue tubes can produce any color. Adjustment Mode Auto Manual At turn ON your TV, or if, after 90 days) If you may also select MAGIC FOCUS TUNE UP from the Setup Menu. The process of the MAGIC FOCUS button is called MAGIC FOCUS located on control panel will be adjusted. ON-SCREEN DISPLAY MAGIC FOCUS...
Owners Guide
Page 57
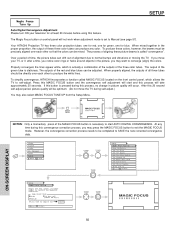
...-SCREEN DISPLAY 57 Video Aspect Audio Ch. If convergence is recommended. To Change the Color of Adjustment Point Press the SELECT button repeatedly (WHITE-RED-BLUE-WHITE...). Auto Adjustment Mode is still not acceptable, use Auto Adjustment Mode after Manual Convergence adjustment, press EXIT button to access menu mode. 117 Manual Adjust Please Enter Number. 0.Cancel and go to Normal Mode. 1.Done and go to access convergence crosshatch pattern. Use the THUMB STICK to match the RED and BLUE colors to correct for at least 20 minutes before using Manual Adjustment Mode...
...-SCREEN DISPLAY 57 Video Aspect Audio Ch. If convergence is recommended. To Change the Color of Adjustment Point Press the SELECT button repeatedly (WHITE-RED-BLUE-WHITE...). Auto Adjustment Mode is still not acceptable, use Auto Adjustment Mode after Manual Convergence adjustment, press EXIT button to access menu mode. 117 Manual Adjust Please Enter Number. 0.Cancel and go to Normal Mode. 1.Done and go to access convergence crosshatch pattern. Use the THUMB STICK to match the RED and BLUE colors to correct for at least 20 minutes before using Manual Adjustment Mode...
Owners Guide
Page 67
..., specifications in Picture • Magic Focus (Auto Digital Convergence and Manual Adjustment) • Dual Antenna Inputs • Video Input Sensor • 3 Dimensional Y/C Comb Filter • Full 1080i HDTV capable when used with a Set-Top Box. • High bandwidth Digital Content Protection V1.0 compatible. • Photo MC (view digital still pictures from a memory card) • Technology. • Technology. *SRS and the Labs, Inc. Manufactured under license from SRS *Licensed by Power 1.3W • Power Consumption...
..., specifications in Picture • Magic Focus (Auto Digital Convergence and Manual Adjustment) • Dual Antenna Inputs • Video Input Sensor • 3 Dimensional Y/C Comb Filter • Full 1080i HDTV capable when used with a Set-Top Box. • High bandwidth Digital Content Protection V1.0 compatible. • Photo MC (view digital still pictures from a memory card) • Technology. • Technology. *SRS and the Labs, Inc. Manufactured under license from SRS *Licensed by Power 1.3W • Power Consumption...


