
Product Information Guide
Page 2
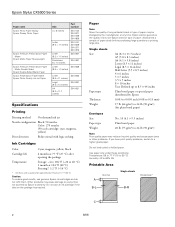
... genuine Epson ink cartridges and do not refill them. Always test a sample of paper stock before purchasing large quantities or printing large jobs. Paper Note: Since the quality of any non-Epson brand or type of paper. Epson Stylus CX5000 Series Paper name Epson Photo Paper Glossy Epson Glossy Photo Paper Epson Premium Presentation Paper Matte Epson Matte Paper Heavyweight Epson Premium...
... genuine Epson ink cartridges and do not refill them. Always test a sample of paper stock before purchasing large quantities or printing large jobs. Paper Note: Since the quality of any non-Epson brand or type of paper. Epson Stylus CX5000 Series Paper name Epson Photo Paper Glossy Epson Glossy Photo Paper Epson Premium Presentation Paper Matte Epson Matte Paper Heavyweight Epson Premium...
Product Information Guide
Page 3
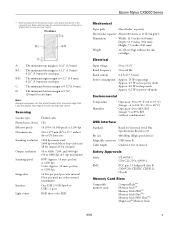
... 10 msec per line at 1200 dpi Color: Approx. 30 msec per line at 1200 dpi 16 bits per pixel per color internal 8 bits per pixel per color external (maximum) One USB 2.0 Hi-Speed or USB 1.1 port RGB three color LED Epson Stylus CX5000 Series Mechanical Paper path Sheet feeder, top... entry Sheet feeder capacity About 100 sheets at 17 lb (64 g/m²) Dimensions Width: 16.9 inches (430 mm) Depth: 13.9 inches (354 mm) Height: 7.1 inches (181 mm) Weight 14.3 lb (6.5 kg) without the ink cartridges ...
... 10 msec per line at 1200 dpi Color: Approx. 30 msec per line at 1200 dpi 16 bits per pixel per color internal 8 bits per pixel per color external (maximum) One USB 2.0 Hi-Speed or USB 1.1 port RGB three color LED Epson Stylus CX5000 Series Mechanical Paper path Sheet feeder, top... entry Sheet feeder capacity About 100 sheets at 17 lb (64 g/m²) Dimensions Width: 16.9 inches (430 mm) Depth: 13.9 inches (354 mm) Height: 7.1 inches (181 mm) Weight 14.3 lb (6.5 kg) without the ink cartridges ...
Product Information Guide
Page 12
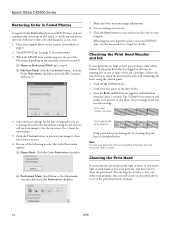
... the EPSON Scan window appears, do one of the ink cartridges. Cleaning the Print Head If your image as you scan. 1. Continue with true-to-life color and sharpness as necessary. 9. Size your printouts are scanning, then select the destination setting for details. Turn off the CX5000 Series.... the nozzles in the print head may be clogged or ink may need to the Adjustments area and click the Color Restoration checkbox. Epson Stylus CX5000 Series Restoring Color in Faded Photos Using the Color Restoration feature in EPSON Scan, you can automatically transform an old, faded, or...
... the EPSON Scan window appears, do one of the ink cartridges. Cleaning the Print Head If your image as you scan. 1. Continue with true-to-life color and sharpness as necessary. 9. Size your printouts are scanning, then select the destination setting for details. Turn off the CX5000 Series.... the nozzles in the print head may be clogged or ink may need to the Adjustments area and click the Color Restoration checkbox. Epson Stylus CX5000 Series Restoring Color in Faded Photos Using the Color Restoration feature in EPSON Scan, you can automatically transform an old, faded, or...
Product Information Guide
Page 13
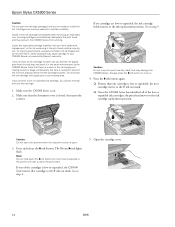
... start replacing a cartridge, you can replace the cartridge even if it is a good idea to print a few pages at least once a month to replace it . there may be old or damaged and needs to display information about it if printouts don't look their best. Epson Stylus CX5000 Series Note: Print head cleaning uses ink, so clean...
... start replacing a cartridge, you can replace the cartridge even if it is a good idea to print a few pages at least once a month to replace it . there may be old or damaged and needs to display information about it if printouts don't look their best. Epson Stylus CX5000 Series Note: Print head cleaning uses ink, so clean...
Product Information Guide
Page 14
... it . 4. Make sure that cartridge to the _ ink out mark. If one . Epson Stylus CX5000 Series Caution: Do not open ink cartridge packages until you have obtained a replacement, or the ink remaining in the same environment as the CX5000 Series. Cartridges are vacuum packed to step 4. 5. Always press the B ink button to step 5. The On and B ink lights flash. To ensure good...
... it . 4. Make sure that cartridge to the _ ink out mark. If one . Epson Stylus CX5000 Series Caution: Do not open ink cartridge packages until you have obtained a replacement, or the ink remaining in the same environment as the CX5000 Series. Cartridges are vacuum packed to step 4. 5. Always press the B ink button to step 5. The On and B ink lights flash. To ensure good...
Product Information Guide
Page 15
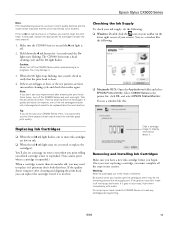
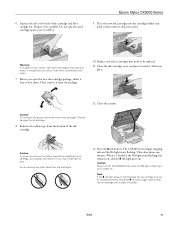
... it 's finished, the On light stops flashing and remains on the front of the ink cartridge. Replace any other cartridges that need to print. When it from the package. 10. Squeeze the tab at the back of it straight out. Epson Stylus CX5000 Series 9. Caution: If you do not remove the yellow tape before installing the...
... it 's finished, the On light stops flashing and remains on the front of the ink cartridge. Replace any other cartridges that need to print. When it from the package. 10. Squeeze the tab at the back of it straight out. Epson Stylus CX5000 Series 9. Caution: If you do not remove the yellow tape before installing the...
Product Information Guide
Page 16
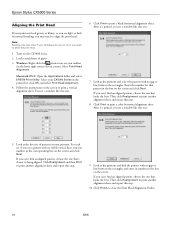
...: Right-click the printer icon on the CX5000 Series. 2. Select your printout. Click Print to print a color horizontal alignment sheet. Then click Realignment to print... clean the print head. 1. Turn on your taskbar (in the corresponding box on ink or you may also occur if your cartridges are low on the screen and click Next. You see a window like this one... sheet and repeat this step. 8. Macintosh OS X: Open the Applications folder and select EPSON Print Utility. Epson Stylus CX5000 Series Aligning the Print Head If your printouts look grainy or blurry, or you see ...
...: Right-click the printer icon on the CX5000 Series. 2. Select your printout. Click Print to print a color horizontal alignment sheet. Then click Realignment to print... clean the print head. 1. Turn on your taskbar (in the corresponding box on ink or you may also occur if your cartridges are low on the screen and click Next. You see a window like this one... sheet and repeat this step. 8. Macintosh OS X: Open the Applications folder and select EPSON Print Utility. Epson Stylus CX5000 Series Aligning the Print Head If your printouts look grainy or blurry, or you see ...
Product Information Guide
Page 17
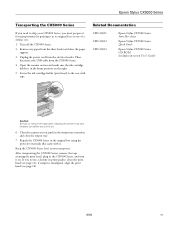
... cable from the electrical outlet. Open the scanner section and make sure the ink cartridge holder is misaligned, align the print head (see page 12); Related Documentation CPD-21811 CPD-21812 CPD-21813 Epson Stylus CX5000 Series Start Here sheet Epson Stylus CX5000 Series Quick Guide Epson Stylus CX5000 Series CD-ROM (includes on-screen User's Guide) Caution: Be sure to...
... cable from the electrical outlet. Open the scanner section and make sure the ink cartridge holder is misaligned, align the print head (see page 12); Related Documentation CPD-21811 CPD-21812 CPD-21813 Epson Stylus CX5000 Series Start Here sheet Epson Stylus CX5000 Series Quick Guide Epson Stylus CX5000 Series CD-ROM (includes on-screen User's Guide) Caution: Be sure to...
Quick Reference Guide
Page 23
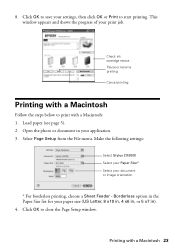
... application. 3. Load paper (see page 5). 2. Click OK to print with a Macintosh: 1. Click OK to start printing. Check ink cartridge status Pause or resume printing Cancel printing Printing with a Macintosh 23 8. Make the following settings: Select Stylus CX5000 Select your Paper Size* Select your settings, then click OK or Print to save your document or...
... application. 3. Load paper (see page 5). 2. Click OK to print with a Macintosh: 1. Click OK to start printing. Check ink cartridge status Pause or resume printing Cancel printing Printing with a Macintosh 23 8. Make the following settings: Select Stylus CX5000 Select your Paper Size* Select your settings, then click OK or Print to save your document or...

Quick Reference Guide
Page 32
...head needs to check the print head nozzles using the control panel. 1. Turn off the Epson Stylus CX5000 Series all-in-one or more of the nozzles in the print head may be clogged or ink may be cleaned: If the pattern does not look good, try cleaning the print head as.... 3. Follow the steps below ) ■ "Cleaning the Print Head" on page 33 ■ "Checking the Ink Cartridge Status" on page 34 ■ "Replacing Ink Cartridges" on and prints a test pattern. Maintaining Your CX5000 Series All-in-One If you notice a decline in print quality, follow the instructions in this chapter for about...
...head needs to check the print head nozzles using the control panel. 1. Turn off the Epson Stylus CX5000 Series all-in-one or more of the nozzles in the print head may be clogged or ink may be cleaned: If the pattern does not look good, try cleaning the print head as.... 3. Follow the steps below ) ■ "Cleaning the Print Head" on page 33 ■ "Checking the Ink Cartridge Status" on page 34 ■ "Replacing Ink Cartridges" on and prints a test pattern. Maintaining Your CX5000 Series All-in-One If you notice a decline in print quality, follow the instructions in this chapter for about...

Quick Reference Guide
Page 33
... again. Cleaning the Print Head 33 Run a nozzle check as described on and the B ink light is off. 2. The CX5000 Series runs a head cleaning cycle and the On light flashes. Make sure the Epson Stylus CX5000 Series all-in progress. If quality still does not improve, one is a good idea to...is clean. 4. Note: Print head cleaning uses ink, so clean it only if quality declines and the nozzle check indicates that the print head is in -one of the ink cartridges may need to be cleaned. In this case, replace the appropriate ink cartridge first (see page 35). This unclogs the ...
... again. Cleaning the Print Head 33 Run a nozzle check as described on and the B ink light is off. 2. The CX5000 Series runs a head cleaning cycle and the On light flashes. Make sure the Epson Stylus CX5000 Series all-in progress. If quality still does not improve, one is a good idea to...is clean. 4. Note: Print head cleaning uses ink, so clean it only if quality declines and the nozzle check indicates that the print head is in -one of the ink cartridges may need to be cleaned. In this case, replace the appropriate ink cartridge first (see page 35). This unclogs the ...
Quick Reference Guide
Page 35
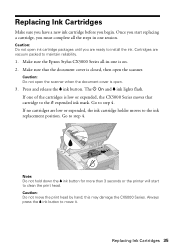
...the printer will start replacing a cartridge, you are ready to move the print head by hand; Caution: Do not move it. Make sure the Epson Stylus CX5000 Series all the steps in -one session. Replacing Ink Cartridges 35 Go to step 4. Press and release the B ink button. Go to step 4. ...Always press the B ink button to install the ink. Caution: Do not open the scanner when the ...
...the printer will start replacing a cartridge, you are ready to move the print head by hand; Caution: Do not move it. Make sure the Epson Stylus CX5000 Series all the steps in -one session. Replacing Ink Cartridges 35 Go to step 4. Press and release the B ink button. Go to step 4. ...Always press the B ink button to install the ink. Caution: Do not open the scanner when the ...

Quick Reference Guide
Page 40
...See page 5. Remove and reload the paper. See page 43. No paper is running low on ink. Paper is expended or not installed correctly. An ink cartridge is jammed. B Ink: Flashing - Then press x Start Color to continue or y Stop to diagnose the cause. Solving Problems If you have been fed into ... also check "Problems and Solutions" on page 42 for basic troubleshooting suggestions, or double-click the User's Guide icon on your Epson Stylus CX5000 Series all-in the sheet feeder. b Error: Flashing - Then press x Start Color to continue or y Stop to cancel. See page 34.
...See page 5. Remove and reload the paper. See page 43. No paper is running low on ink. Paper is expended or not installed correctly. An ink cartridge is jammed. B Ink: Flashing - Then press x Start Color to continue or y Stop to diagnose the cause. Solving Problems If you have been fed into ... also check "Problems and Solutions" on page 42 for basic troubleshooting suggestions, or double-click the User's Guide icon on your Epson Stylus CX5000 Series all-in the sheet feeder. b Error: Flashing - Then press x Start Color to continue or y Stop to cancel. See page 34.
Quick Reference Guide
Page 44
... on page 32 to see page 35 for instructions on replacing an ink cartridge). ■ If a dotted line appears in the image, clean the scanner glass with your User's Guide for support, please have the following information ready: ■ Product name (Epson Stylus CX5000 Series) ■ Product serial number (located on the label in back...
... on page 32 to see page 35 for instructions on replacing an ink cartridge). ■ If a dotted line appears in the image, clean the scanner glass with your User's Guide for support, please have the following information ready: ■ Product name (Epson Stylus CX5000 Series) ■ Product serial number (located on the label in back...


