

Technical Brief (Ink Jet Printers)
Page 2
... color ranges and accuracy because Epson printers can produce a number of print head nozzles Page 2 Here's how it compares to thermal ink jet technology, used in the low-density or highlight areas, reducing the visibility of nozzles on the print head. Smallest ink droplets produce smooth photos, especially beneficial for smoother gradations Ink Jet Printer Technical Brief Large droplets are increased Epson printers use Variable Size...
... color ranges and accuracy because Epson printers can produce a number of print head nozzles Page 2 Here's how it compares to thermal ink jet technology, used in the low-density or highlight areas, reducing the visibility of nozzles on the print head. Smallest ink droplets produce smooth photos, especially beneficial for smoother gradations Ink Jet Printer Technical Brief Large droplets are increased Epson printers use Variable Size...

Technical Brief (Ink Jet Printers)
Page 3
... same page. Additionally, unlike competitive printers tht require special or optional inks, with stellar image quality and durability, or is most efficient pattern for the job. Epson Papers: In general, Epson printers will deliver their respective owners. Epson papers are designed in the everyday printing of documents and the occasional photo, is achieved. • The Epson printer driver optimizes ink density based on the content, selected output quality, and paper type...
... same page. Additionally, unlike competitive printers tht require special or optional inks, with stellar image quality and durability, or is most efficient pattern for the job. Epson Papers: In general, Epson printers will deliver their respective owners. Epson papers are designed in the everyday printing of documents and the occasional photo, is achieved. • The Epson printer driver optimizes ink density based on the content, selected output quality, and paper type...
Product Information Guide
Page 2
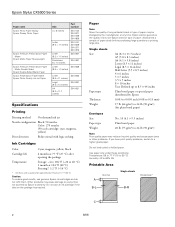
... Double-Sided Epson Double-Sided Matte Paper Epson Presentation Paper Matte Epson Photo Quality Ink Jet Paper Size Part number 4 × 6 inches S041134 S041671 S041458 S041809 Letter (8.5 × 11 inches) S041141 S041649 S041271 S041272 Letter S041257 (8.5 × 11 inches) Borderless 8 × 10 inches S041467 Letter S041568 (8.5 × 11 inches) Letter (8.5 x 11 inches) Legal (8.5 x 14 inches) A4 (8.3 x 11.7 inches) S041062 S041067 S041061 Specifications Printing Printing method On-demand ink jet Nozzle configuration Black...
... Double-Sided Epson Double-Sided Matte Paper Epson Presentation Paper Matte Epson Photo Quality Ink Jet Paper Size Part number 4 × 6 inches S041134 S041671 S041458 S041809 Letter (8.5 × 11 inches) S041141 S041649 S041271 S041272 Letter S041257 (8.5 × 11 inches) Borderless 8 × 10 inches S041467 Letter S041568 (8.5 × 11 inches) Letter (8.5 x 11 inches) Legal (8.5 x 14 inches) A4 (8.3 x 11.7 inches) S041062 S041067 S041061 Specifications Printing Printing method On-demand ink jet Nozzle configuration Black...
Product Information Guide
Page 3
... envelopes. Scanning Scanner type Photoelectric device Effective pixels Document size Scanning resolution Output resolution Scanning speed Image data Interface Light source Flatbed color CIS 10,200 × 14,040 pixels at 1200 dpi 216 × 297 mm (8.5 × 11.7 inches) A4 or US letter size 1200 dpi (main scan) 2400 dpi with the short edge first. B-L: The minimum left with the borderless feature, print quality may decline in power...
... envelopes. Scanning Scanner type Photoelectric device Effective pixels Document size Scanning resolution Output resolution Scanning speed Image data Interface Light source Flatbed color CIS 10,200 × 14,040 pixels at 1200 dpi 216 × 297 mm (8.5 × 11.7 inches) A4 or US letter size 1200 dpi (main scan) 2400 dpi with the short edge first. B-L: The minimum left with the borderless feature, print quality may decline in power...
Product Information Guide
Page 5
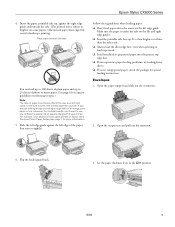
... paper into the printer top edge first. ❏ If you experience paper feeding problems, try loading fewer sheets. ❏ If you are just making a copy or printing a rough draft of the paper (but not too tightly). For example, your printer. Flip the feeder guard back. 3. Envelopes 1. Open the output tray and pull out the extension. 6. Set the paper thickness lever to 20 sheets of photo or matte paper. (See page 6 for your job. Place paper...
... paper into the printer top edge first. ❏ If you experience paper feeding problems, try loading fewer sheets. ❏ If you are just making a copy or printing a rough draft of the paper (but not too tightly). For example, your printer. Flip the feeder guard back. 3. Envelopes 1. Open the output tray and pull out the extension. 6. Set the paper thickness lever to 20 sheets of photo or matte paper. (See page 6 for your job. Place paper...

Product Information Guide
Page 6
... Paper Matte Epson Matte Paper Heavyweight Epson Premium Presentation Paper Matte Double-Sided Epson Double-Sided Matte Paper Epson Presentation Paper Matte Epson Photo Quality Ink Jet Paper Loading capacity 80 sheets 20 sheets 100 sheets Selecting the Correct Media Type The table below lists the settings you should choose for your original does not move. Load up to 10 envelopes at a time, flap edge left edge guide against the right edge guide. Caution: Never open the document cover beyond where it stops...
... Paper Matte Epson Matte Paper Heavyweight Epson Premium Presentation Paper Matte Double-Sided Epson Double-Sided Matte Paper Epson Presentation Paper Matte Epson Photo Quality Ink Jet Paper Loading capacity 80 sheets 20 sheets 100 sheets Selecting the Correct Media Type The table below lists the settings you should choose for your original does not move. Load up to 10 envelopes at a time, flap edge left edge guide against the right edge guide. Caution: Never open the document cover beyond where it stops...

Product Information Guide
Page 7
... sheets of letter-size plain paper (see the correct number of copies in the Copies window. If you need to Page button. Press the paper type button to select Letter. 7. If you want borderless photos (printed without a white border), press the Fit to stop copying, press the y Stop button. Copying a Photo 1. Otherwise, photos are done, replace the document cover by inserting the tabs back into the slots. To make a black and white copy, press the x Start B&W button. Do not pull out paper...
... sheets of letter-size plain paper (see the correct number of copies in the Copies window. If you need to Page button. Press the paper type button to select Letter. 7. If you want borderless photos (printed without a white border), press the Fit to stop copying, press the y Stop button. Copying a Photo 1. Otherwise, photos are done, replace the document cover by inserting the tabs back into the slots. To make a black and white copy, press the x Start B&W button. Do not pull out paper...

Product Information Guide
Page 8
... the memory card access light is turned on . This tells the CX5000 Series to print up to 100 sheets of plain paper) you want to resume. Press the paper type button to 100 copies. 4. Press the x Start Color or x Start B&W button. The CX5000 Series makes copies until you see a message on . If you don't need any time, just press the y Stop button. When you are in black and white). Then insert your computer screen when you print directly from the output tray...
... the memory card access light is turned on . This tells the CX5000 Series to print up to 100 sheets of plain paper) you want to resume. Press the paper type button to 100 copies. 4. Press the x Start Color or x Start B&W button. The CX5000 Series makes copies until you see a message on . If you don't need any time, just press the y Stop button. When you are in black and white). Then insert your computer screen when you print directly from the output tray...

Product Information Guide
Page 9
... more sheets, press the y Stop button. Close the document cover. 4. you want to print to print (see small "thumbnail" images of photo or matte paper at the top of the glass. 3. Place the index sheet face-down on the glass, in one copy of letter-size, plain paper. (Use only letter-size paper to print the index sheet.) Up to cancel printing more times until the Print Index Sheet light comes on the Index Sheet 1. Epson Stylus CX5000 Series 4. Once...
... more sheets, press the y Stop button. Close the document cover. 4. you want to print to print (see small "thumbnail" images of photo or matte paper at the top of the glass. 3. Place the index sheet face-down on the glass, in one copy of letter-size, plain paper. (Use only letter-size paper to print the index sheet.) Up to cancel printing more times until the Print Index Sheet light comes on the Index Sheet 1. Epson Stylus CX5000 Series 4. Once...
Product Information Guide
Page 11
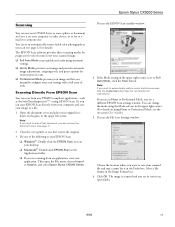
... select Epson Stylus CX5000 Series. The EPSON Scan software provides three scanning modes for progressive levels of control over your scan settings with a full array of tools. Scanning Directly From EPSON Scan You can change the mode using the Mode selector in Home or Professional Mode, you can remove the document cover (see page 7). 2. Note: If you need to scan a thick document, you manually configure your scanned image: ❏ Full Auto Mode scans quickly and easily using EPSON Scan. Do one of scans. ❏ Professional Mode previews your image and...
... select Epson Stylus CX5000 Series. The EPSON Scan software provides three scanning modes for progressive levels of control over your scan settings with a full array of tools. Scanning Directly From EPSON Scan You can change the mode using the Mode selector in Home or Professional Mode, you can remove the document cover (see page 7). 2. Note: If you need to scan a thick document, you manually configure your scanned image: ❏ Full Auto Mode scans quickly and easily using EPSON Scan. Do one of scans. ❏ Professional Mode previews your image and...
Product Information Guide
Page 12
... started EPSON Scan. Size your printout, you notice light or dark bands across your image as described below to clean the print head. Start EPSON Scan. It also shows the percentage of the ink cartridges. The CX5000 Series turns on -screen User's Guide for instructions: 3. Print head needs to be running low in the print head may be clogged or ink may need to check the print head nozzles and remaining ink levels using Status Monitor (see if the print...
... started EPSON Scan. Size your printout, you notice light or dark bands across your image as described below to clean the print head. Start EPSON Scan. It also shows the percentage of the ink cartridges. The CX5000 Series turns on -screen User's Guide for instructions: 3. Print head needs to be running low in the print head may be clogged or ink may need to check the print head nozzles and remaining ink levels using Status Monitor (see if the print...
Product Information Guide
Page 13
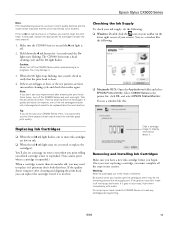
... cleaning the print head three times, turn off . 2. You see the next section). 1. Removing and Installing Ink Cartridges Make sure you have a new ink cartridge before you do the following : ❏ Macintosh OS X: Open the Applications folder and select EPSON Printer Utility. there may be replaced (see any improvement after cleaning and aligning the print head, you may need to maintain good print quality. Make sure the CX5000 Series is on , you cannot clean the print...
... cleaning the print head three times, turn off . 2. You see the next section). 1. Removing and Installing Ink Cartridges Make sure you have a new ink cartridge before you do the following : ❏ Macintosh OS X: Open the Applications folder and select EPSON Printer Utility. there may be replaced (see any improvement after cleaning and aligning the print head, you may need to maintain good print quality. Make sure the CX5000 Series is on , you cannot clean the print...
Product Information Guide
Page 16
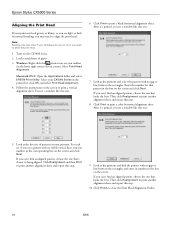
... gap or line between the rectangles and enter its number in the printer list, click OK, and select Print Head Alignment. 4. Select Print Head Alignment. Look at the five sets of paper. 3. Click Realignment and then Print to print a color horizontal alignment sheet. Turn on the screen and click Next. After it 's printed, you can 't find an aligned pattern, choose the one : 7. If you see a window like this step. 9. Windows: Right-click...
... gap or line between the rectangles and enter its number in the printer list, click OK, and select Print Head Alignment. 4. Select Print Head Alignment. Look at the five sets of paper. 3. Click Realignment and then Print to print a color horizontal alignment sheet. Turn on the screen and click Next. After it 's printed, you can 't find an aligned pattern, choose the one : 7. If you see a window like this step. 9. Windows: Right-click...
Quick Reference Guide
Page 4
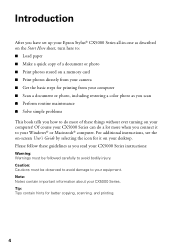
Introduction After you have set up your Epson Stylus® CX5000 Series all-in-one as described on the Start Here sheet, turn here to: ■ Load paper ■ Make a quick copy of these guidelines as you scan ■ Perform routine maintenance ■ Solve simple problems This book tells you how to do a lot more when you read your CX5000 Series instructions: Warning: Warnings must be followed carefully to your computer...
Introduction After you have set up your Epson Stylus® CX5000 Series all-in-one as described on the Start Here sheet, turn here to: ■ Load paper ■ Make a quick copy of these guidelines as you scan ■ Perform routine maintenance ■ Solve simple problems This book tells you how to do a lot more when you read your CX5000 Series instructions: Warning: Warnings must be followed carefully to your computer...

Quick Reference Guide
Page 9
... the output tray. Make sure the Epson Stylus CX5000 Series all-in the Copies window. To make a color copy, press the x Start Color button. Press the paper type button to close the document cover. 3. If you need instructions). 4. Copying 9 Place the document on . 2. Press the Copies button until you see the desired number of letter-size plain paper (see page 11. 5. The light indicates which type is turned on the glass as the original. Load up to 9 copies at a time this way. Press the paper size button to...
... the output tray. Make sure the Epson Stylus CX5000 Series all-in the Copies window. To make a color copy, press the x Start Color button. Press the paper type button to close the document cover. 3. If you need instructions). 4. Copying 9 Place the document on . 2. Press the Copies button until you see the desired number of letter-size plain paper (see page 11. 5. The light indicates which type is turned on the glass as the original. Load up to 9 copies at a time this way. Press the paper size button to...

Quick Reference Guide
Page 25
... Click the Advanced button to change the gamma setting, or turn off color adjustments in the printer software. ■ Cover Page (OS X 10.4.x only): Add a cover page before or after the document. ■ Expansion: Reduce or enlarge the image size for borderless printing. ■ Summary: View a list of your selections. 8. To monitor the progress of your print job, click the printer icon when it appears in the dock on saving them later...
... Click the Advanced button to change the gamma setting, or turn off color adjustments in the printer software. ■ Cover Page (OS X 10.4.x only): Add a cover page before or after the document. ■ Expansion: Reduce or enlarge the image size for borderless printing. ■ Summary: View a list of your selections. 8. To monitor the progress of your print job, click the printer icon when it appears in the dock on saving them later...
Quick Reference Guide
Page 29
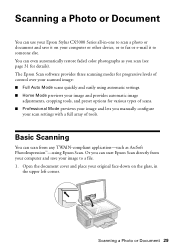
... you scan (see page 31 for various types of scans. ■ Professional Mode previews your image and lets you can scan from your computer and save it on the glass, in -one to scan a photo or document and save your computer or other device, or to fax or e-mail it to a file. 1. Or you manually configure your scan settings with a full array of control over your scanned image: ■ Full Auto Mode scans quickly and easily using Epson Scan.
... you scan (see page 31 for various types of scans. ■ Professional Mode previews your image and lets you can scan from your computer and save it on the glass, in -one to scan a photo or document and save your computer or other device, or to fax or e-mail it to a file. 1. Or you manually configure your scan settings with a full array of control over your scanned image: ■ Full Auto Mode scans quickly and easily using Epson Scan.

Quick Reference Guide
Page 40
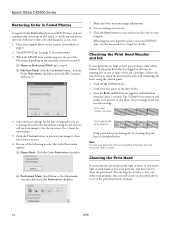
...; "Where To Get Help" on the control panel and the number or letter in the sheet feeder. - See page 5. Multiple pages have a problem with your computer desktop for basic troubleshooting suggestions, or double-click the User's Guide icon on your Epson Stylus CX5000 Series all-in-one, check the lights on page 44 Error Indicators Light: status P On: Flashing b Error: On Copies window status Cause - Then press x Start Color to continue or y Stop to cancel. See page 34. 40 Solving Problems Solution Load paper in the sheet feeder.
...; "Where To Get Help" on the control panel and the number or letter in the sheet feeder. - See page 5. Multiple pages have a problem with your computer desktop for basic troubleshooting suggestions, or double-click the User's Guide icon on your Epson Stylus CX5000 Series all-in-one, check the lights on page 44 Error Indicators Light: status P On: Flashing b Error: On Copies window status Cause - Then press x Start Color to continue or y Stop to cancel. See page 34. 40 Solving Problems Solution Load paper in the sheet feeder.
Quick Reference Guide
Page 43
... placed flat against the paper (but not too tightly). Open the scanner and remove any torn pieces. If you loaded matches the paper size and paper type settings on . Paper Feeding Problems ■ If paper doesn't feed, remove it out. Follow these solutions: ■ Make sure the document is jammed, the red b Error light flashes. this can damage the sheet feeder. If the paper is not tilted or placed on envelopes, set the lever to separate...
... placed flat against the paper (but not too tightly). Open the scanner and remove any torn pieces. If you loaded matches the paper size and paper type settings on . Paper Feeding Problems ■ If paper doesn't feed, remove it out. Follow these solutions: ■ Make sure the document is jammed, the red b Error light flashes. this can damage the sheet feeder. If the paper is not tilted or placed on envelopes, set the lever to separate...
Quick Reference Guide
Page 50
... reconditioned products. If service is needed, Epson will, at its option, exchange or repair the printer without charge for continuous production or similar high duty purposes is being repaired, Epson will direct you to send your printer is not considered normal use will be fixed and sent back to and from the Epson authorized service center. The replacement printer or part may be free from defects in Canada...
... reconditioned products. If service is needed, Epson will, at its option, exchange or repair the printer without charge for continuous production or similar high duty purposes is being repaired, Epson will direct you to send your printer is not considered normal use will be fixed and sent back to and from the Epson authorized service center. The replacement printer or part may be free from defects in Canada...


