Product Information Guide
Page 13
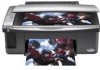
... damaged and needs to scan and restore the color in the sheet feeder. 3. Note: Print head cleaning uses ink, so clean it . 3. The Epson Stylus CX runs a head cleaning cycle and the P On light flashes. Size your printout, you need to check the print head nozzles and remaining ink levels using Status Monitor... or have gaps in each cartridge: Print head does not need to maintain good print quality. see the next section. You'll also see the on and prints a test pattern. Make any dried ink soften. Epson Stylus CX4200 Series/Epson Stylus CX4800 Series 7. If the red B ink light...
... damaged and needs to scan and restore the color in the sheet feeder. 3. Note: Print head cleaning uses ink, so clean it . 3. The Epson Stylus CX runs a head cleaning cycle and the P On light flashes. Size your printout, you need to check the print head nozzles and remaining ink levels using Status Monitor... or have gaps in each cartridge: Print head does not need to maintain good print quality. see the next section. You'll also see the on and prints a test pattern. Make any dried ink soften. Epson Stylus CX4200 Series/Epson Stylus CX4800 Series 7. If the red B ink light...
Product Information Guide
Page 14
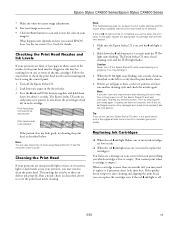
...the icon on your taskbar (in the printer list, click OK, and select EPSON StatusMonitor. Other products may cause damage to clean the print head. Make sure the Epson Stylus CX is on your hand inside the Epson Stylus CX all the steps in -one of children. Be careful when you must ... Caution: Do not open the scanner when the document cover is closed, then open . 3. Go to the ink replacement position. Epson Stylus CX4200 Series/Epson Stylus CX4800 Series Checking the Ink Supply To check your ink supply, do not refill them immediately with soap and water. Note that there is...
...the icon on your taskbar (in the printer list, click OK, and select EPSON StatusMonitor. Other products may cause damage to clean the print head. Make sure the Epson Stylus CX is on your hand inside the Epson Stylus CX all the steps in -one of children. Be careful when you must ... Caution: Do not open the scanner when the document cover is closed, then open . 3. Go to the ink replacement position. Epson Stylus CX4200 Series/Epson Stylus CX4800 Series Checking the Ink Supply To check your ink supply, do not refill them immediately with soap and water. Note that there is...

Product Information Guide
Page 16
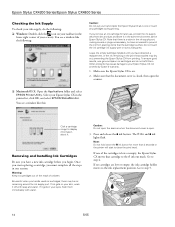
...and select the pattern with no gap or line between the rectangles. If you need to clean the print head. 1. Load several sheets of patterns in the printer list, click OK, and select Print Head Alignment. 4. This takes about one . 2. Follow the instructions on the screen and click ...this one : 12. Windows: Right-click the printer icon on (not flashing), the ink cartridge may need to align the print head. Epson Stylus CX4200 Series/Epson Stylus CX4800 Series 11. You see light or dark horizontal banding, you 'll waste ink. Look at the four sets of paper. 7.
...and select the pattern with no gap or line between the rectangles. If you need to clean the print head. 1. Load several sheets of patterns in the printer list, click OK, and select Print Head Alignment. 4. This takes about one . 2. Follow the instructions on the screen and click ...this one : 12. Windows: Right-click the printer icon on (not flashing), the ink cartridge may need to align the print head. Epson Stylus CX4200 Series/Epson Stylus CX4800 Series 11. You see light or dark horizontal banding, you 'll waste ink. Look at the four sets of paper. 7.
Product Information Guide
Page 17
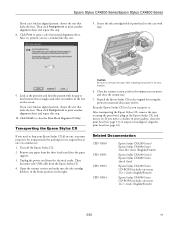
...If you can 't find an aligned pattern, choose the one that looks the best. Repack the Epson Stylus CX in print quality, clean the print head (see page 13); if output is in the output tray extension, and close the paper support....head, plug in -one, you must prepare it for transportation by packing it . English/French) Epson Stylus CX4800 Series CD-ROM (includes on -screen User's Guide; Then click Realignment to ship your Epson Stylus CX all-in the Epson Stylus CX, and turn it . Then disconnect the USB cable from the electrical outlet. Then click Realignment to print a color...
...If you can 't find an aligned pattern, choose the one that looks the best. Repack the Epson Stylus CX in print quality, clean the print head (see page 13); if output is in the output tray extension, and close the paper support....head, plug in -one, you must prepare it for transportation by packing it . English/French) Epson Stylus CX4800 Series CD-ROM (includes on -screen User's Guide; Then click Realignment to ship your Epson Stylus CX all-in the Epson Stylus CX, and turn it . Then disconnect the USB cable from the electrical outlet. Then click Realignment to print a color...
Quick Reference Guide
Page 2
... Paper 4 Copying a Photo or Document 6 Placing the Original on the Glass 6 Copying 8 Printing From a Memory Card (Epson Stylus CX4800 Series Only 11 Compatible Cards and Image Formats 12 Inserting the Card 13 Printing an Index Sheet to Select Photos 14 Printing All... Using Special Papers 25 Scanning a Photo or Document 26 Basic Scanning 26 Restoring Color in Faded Photos 28 Maintaining Your Epson Stylus CX All-in-One 29 Checking the Print Head Nozzles and Ink 29 Cleaning the Print Head 30 Replacing Ink Cartridges 31 Solving Problems 36 Error Indicators 36 Problems and Solutions...
... Paper 4 Copying a Photo or Document 6 Placing the Original on the Glass 6 Copying 8 Printing From a Memory Card (Epson Stylus CX4800 Series Only 11 Compatible Cards and Image Formats 12 Inserting the Card 13 Printing an Index Sheet to Select Photos 14 Printing All... Using Special Papers 25 Scanning a Photo or Document 26 Basic Scanning 26 Restoring Color in Faded Photos 28 Maintaining Your Epson Stylus CX All-in-One 29 Checking the Print Head Nozzles and Ink 29 Cleaning the Print Head 30 Replacing Ink Cartridges 31 Solving Problems 36 Error Indicators 36 Problems and Solutions...

Quick Reference Guide
Page 29
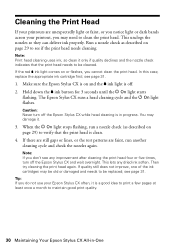
... in this chapter for about 3 seconds. Turn off the Epson Stylus CX. 2. Note: You can also check the ink level using the control panel. 1. see the on and prints a test pattern. Follow the steps below ) ■ "Cleaning the Print Head" on page 30 ■ "Replacing Ink Cartridges" on the... next page. The Epson Stylus CX turns on -screen User's Guide. Maintaining Your Epson Stylus CX All-in-One 29
... in this chapter for about 3 seconds. Turn off the Epson Stylus CX. 2. Note: You can also check the ink level using the control panel. 1. see the on and prints a test pattern. Follow the steps below ) ■ "Cleaning the Print Head" on page 30 ■ "Replacing Ink Cartridges" on the... next page. The Epson Stylus CX turns on -screen User's Guide. Maintaining Your Epson Stylus CX All-in-One 29
Quick Reference Guide
Page 30
...and wait overnight. If quality still does not improve, one of the ink cartridges may be old or damaged and needs to be cleaned. The Epson Stylus CX runs a head cleaning cycle and the P On light flashes. If there are still gaps or lines, or the test patterns are unexpectedly light or faint,... or you notice light or dark bands across your printout, you cannot clean the print head. This lets any improvement after cleaning the print head four or five times, turn off the Epson Stylus CX while head cleaning is in -One If the red B ink light comes on page 29) to verify...
...and wait overnight. If quality still does not improve, one of the ink cartridges may be old or damaged and needs to be cleaned. The Epson Stylus CX runs a head cleaning cycle and the P On light flashes. If there are still gaps or lines, or the test patterns are unexpectedly light or faint,... or you notice light or dark bands across your printout, you cannot clean the print head. This lets any improvement after cleaning the print head four or five times, turn off the Epson Stylus CX while head cleaning is in -One If the red B ink light comes on page 29) to verify...
Quick Reference Guide
Page 32
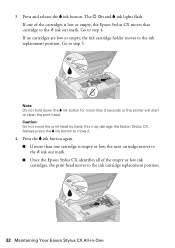
... position. Go to step 4. this may damage the Epson Stylus CX. Press and release the B ink button. Go to step 5. If no cartridges are low or empty, the ink cartridge holder moves to the _ ink out mark. Always press the B ink button to clean the print head. Note: Do not hold down the B ink... again. ■ If more than one of the cartridges is empty or low, the next cartridge moves to the _ ink out mark. ■ Once the Epson Stylus CX identifies all of the empty or low ink cartridges, the print head moves to the ink cartridge replacement position. 32 Maintaining Your...
... position. Go to step 4. this may damage the Epson Stylus CX. Press and release the B ink button. Go to step 5. If no cartridges are low or empty, the ink cartridge holder moves to the _ ink out mark. Always press the B ink button to clean the print head. Note: Do not hold down the B ink... again. ■ If more than one of the cartridges is empty or low, the next cartridge moves to the _ ink out mark. ■ Once the Epson Stylus CX identifies all of the empty or low ink cartridges, the print head moves to the ink cartridge replacement position. 32 Maintaining Your...
Quick Reference Guide
Page 39
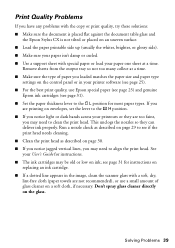
... the type of glass cleaner on a soft cloth, if necessary. Run a nozzle check as described on page 29 to see if the print head needs cleaning. ■ Clean the print head as described on page 30. ■ If you notice jagged vertical lines, you may be old or low on ink; This unclogs the... problems with the copy or print quality, try these solutions: ■ Make sure the document is placed flat against the document table glass and the Epson Stylus CX is not tilted or placed on an uneven surface. ■ Load the paper printable side up (usually the whiter, brighter, or glossy side). ■...
... the type of glass cleaner on a soft cloth, if necessary. Run a nozzle check as described on page 29 to see if the print head needs cleaning. ■ Clean the print head as described on page 30. ■ If you notice jagged vertical lines, you may be old or low on ink; This unclogs the... problems with the copy or print quality, try these solutions: ■ Make sure the document is placed flat against the document table glass and the Epson Stylus CX is not tilted or placed on an uneven surface. ■ Load the paper printable side up (usually the whiter, brighter, or glossy side). ■...


