Product Information Guide
Page 14
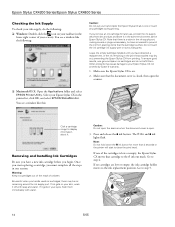
Epson Stylus CX4200 Series/Epson Stylus CX4800 Series Checking the Ink Supply To check your ink supply, do not refill them immediately with soap and water. Do not touch the ink cartridge ... cartridges during printing. Caution: Do not open the scanner when the document cover is low or empty, the Epson Stylus CX moves that the cartridge touches. Go to prevent the ink from printing. Removing and Installing Ink Cartridges Be sure you have obtained a replacement, or the ink remaining in your skin, wash it...
Epson Stylus CX4200 Series/Epson Stylus CX4800 Series Checking the Ink Supply To check your ink supply, do not refill them immediately with soap and water. Do not touch the ink cartridge ... cartridges during printing. Caution: Do not open the scanner when the document cover is low or empty, the Epson Stylus CX moves that the cartridge touches. Go to prevent the ink from printing. Removing and Installing Ink Cartridges Be sure you have obtained a replacement, or the ink remaining in your skin, wash it...

Product Information Guide
Page 16
...head. Click Realignment and then Print to print a black horizontal alignment sheet. Note: Banding may not be installed correctly. Macintosh OS X: Open the Applications folder and select EPSON Print Utility. Press the B ink button. If you see a pattern with no visible vertical lines, ... the pattern with no gap or line between the rectangles. Close the scanner. 3. Select your printout. The Epson Stylus CX begins charging ink and the P On light starts flashing. Epson Stylus CX4200 Series/Epson Stylus CX4800 Series 11. After it clicks into place. 5.
...head. Click Realignment and then Print to print a black horizontal alignment sheet. Note: Banding may not be installed correctly. Macintosh OS X: Open the Applications folder and select EPSON Print Utility. Press the B ink button. If you see a pattern with no visible vertical lines, ... the pattern with no gap or line between the rectangles. Close the scanner. 3. Select your printout. The Epson Stylus CX begins charging ink and the P On light starts flashing. Epson Stylus CX4200 Series/Epson Stylus CX4800 Series 11. After it clicks into place. 5.
Product Information Guide
Page 17
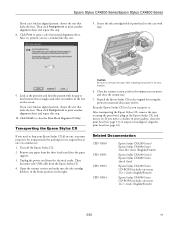
...Epson Stylus CX4200 Series/ Epson Stylus CX4800 Series Start Here sheet (English/French) Epson Stylus CX4200 Series/ Epson Stylus CX4800 Series Quick Guide Epson Stylus CX4200 Series CD-ROM (includes on the right. If you can 't find an aligned pattern, choose the one that looks the best. Click Finish to remove the tape after installing the printer in the Epson Stylus...new location. 6. Then click Realignment to print a color horizontal alignment sheet. Unplug the power cord from the electrical outlet. After transporting the Epson Stylus CX, remove the tape securing the print head, ...
...Epson Stylus CX4200 Series/ Epson Stylus CX4800 Series Start Here sheet (English/French) Epson Stylus CX4200 Series/ Epson Stylus CX4800 Series Quick Guide Epson Stylus CX4200 Series CD-ROM (includes on the right. If you can 't find an aligned pattern, choose the one that looks the best. Click Finish to remove the tape after installing the printer in the Epson Stylus...new location. 6. Then click Realignment to print a color horizontal alignment sheet. Unplug the power cord from the electrical outlet. After transporting the Epson Stylus CX, remove the tape securing the print head, ...
Quick Reference Guide
Page 19
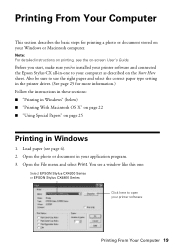
... and select Print. Note: For detailed instructions on printing, see page 4). 2. Before you start, make sure you've installed your printer software and connected the Epson Stylus CX all-in-one : Select EPSON Stylus CX4200 Series or EPSON Stylus CX4800 Series Click here to use the right paper and select the correct paper type setting in the printer...
... and select Print. Note: For detailed instructions on printing, see page 4). 2. Before you start, make sure you've installed your printer software and connected the Epson Stylus CX all-in-one : Select EPSON Stylus CX4200 Series or EPSON Stylus CX4800 Series Click here to use the right paper and select the correct paper type setting in the printer...
Quick Reference Guide
Page 31
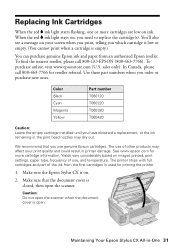
...please call 800-463-7766 for reseller referral. The printer ships with full cartridges and part of other products may dry out. Maintaining Your Epson Stylus CX All-in the print head nozzles may affect your screen when you print, telling you which cartridge is low or empty. (You... ink light stays on ink. Use these part numbers when you order or purchase new ones. Color Black Cyan Magenta Yellow Part number T060120 T060220 T060320 T060420 Caution: Leave the empty cartridge installed until you have obtained a replacement, or the ink remaining in -One 31 Yields vary considerably ...
...please call 800-463-7766 for reseller referral. The printer ships with full cartridges and part of other products may dry out. Maintaining Your Epson Stylus CX All-in the print head nozzles may affect your screen when you print, telling you which cartridge is low or empty. (You... ink light stays on ink. Use these part numbers when you order or purchase new ones. Color Black Cyan Magenta Yellow Part number T060120 T060220 T060320 T060420 Caution: Leave the empty cartridge installed until you have obtained a replacement, or the ink remaining in -One 31 Yields vary considerably ...
Quick Reference Guide
Page 35
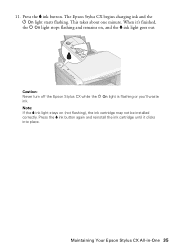
Maintaining Your Epson Stylus CX All-in-One 35 When it clicks into place. Press the B ink button again and reinstall the ink cartridge until it 's finished, the P On light stops flashing and remains on (not flashing), the ink cartridge may not be installed correctly. 11. This takes about one minute. Caution: Never turn off the Epson Stylus CX while the P On light is flashing or you'll waste ink. Note: If the B ink light stays on , and the B ink light goes out. Press the B ink button. The Epson Stylus CX begins charging ink and the P On light starts flashing.
Maintaining Your Epson Stylus CX All-in-One 35 When it clicks into place. Press the B ink button again and reinstall the ink cartridge until it 's finished, the P On light stops flashing and remains on (not flashing), the ink cartridge may not be installed correctly. 11. This takes about one minute. Caution: Never turn off the Epson Stylus CX while the P On light is flashing or you'll waste ink. Note: If the B ink light stays on , and the B ink light goes out. Press the B ink button. The Epson Stylus CX begins charging ink and the P On light starts flashing.
Quick Reference Guide
Page 36
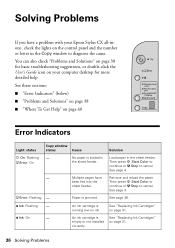
... paper. You can also check "Problems and Solutions" on page 38 for basic troubleshooting suggestions, or double-click the User's Guide icon on your Epson Stylus CX all-inone, check the lights on the control panel and the number or letter in the Copy window to sheet feeder. Then press x Start... Color to continue or y Stop to cancel. See "Replacing Ink Cartridges" on page 31. 36 Solving Problems An ink cartridge is jammed. B Ink: On - been ...
... paper. You can also check "Problems and Solutions" on page 38 for basic troubleshooting suggestions, or double-click the User's Guide icon on your Epson Stylus CX all-inone, check the lights on the control panel and the number or letter in the Copy window to sheet feeder. Then press x Start... Color to continue or y Stop to cancel. See "Replacing Ink Cartridges" on page 31. 36 Solving Problems An ink cartridge is jammed. B Ink: On - been ...

Quick Reference Guide
Page 42
...or surrounding area. 42 Notices If it off with water. ■ Do not put your hand inside the Epson Stylus CX or touch any cartridges during printing. ■ Install a new ink cartridge immediately after removing an empty one. if liquid has entered the product; there may ...prevent the Epson Stylus CX from printing. ■ If you handle used ink cartridges; ■ Unplug the Epson Stylus CX and refer servicing to qualified ...
...or surrounding area. 42 Notices If it off with water. ■ Do not put your hand inside the Epson Stylus CX or touch any cartridges during printing. ■ Install a new ink cartridge immediately after removing an empty one. if liquid has entered the product; there may ...prevent the Epson Stylus CX from printing. ■ If you handle used ink cartridges; ■ Unplug the Epson Stylus CX and refer servicing to qualified ...

Start Here Card
Page 2
.... 3 Shake the ink cartridges, then unpack them. Remarque : Ne chargez pas de papier avant d'installer les cartouches. 1 Lift up the scanner. Appuyez sur le bouton d'alimentation (On). 4 Install Ink Cartridges Installez les cartouches Note: Don't load paper before installing the ink cartridges. 3 Turn On the Stylus CX Allumez l'appareil Stylus CX 1 Connect the power cable.
.... 3 Shake the ink cartridges, then unpack them. Remarque : Ne chargez pas de papier avant d'installer les cartouches. 1 Lift up the scanner. Appuyez sur le bouton d'alimentation (On). 4 Install Ink Cartridges Installez les cartouches Note: Don't load paper before installing the ink cartridges. 3 Turn On the Stylus CX Allumez l'appareil Stylus CX 1 Connect the power cable.
Start Here Card
Page 7
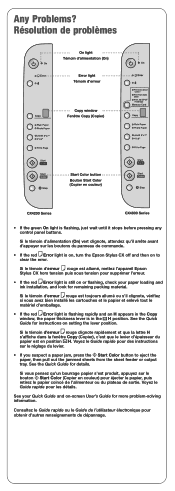
...bouton Start Color (Copier en couleur) pour éjecter le papier, puis retirez le papier coincé de l'alimenteur ou du plateau de sortie. See your paper loading and ink installation, and look for details. Si le témoin d'erreur rouge est allumé, mettez l'appareil Epson Stylus CX ...light Témoin d'alimentation (On) Error light Témoin d'erreur Copy window Fenêtre Copy (Copier) Start Color button Bouton Start Color (Copier en couleur) CX4200 Series CX4800 Series • If the green On light is still on or flashing, check your Quick Guide and on-screen User...
...bouton Start Color (Copier en couleur) pour éjecter le papier, puis retirez le papier coincé de l'alimenteur ou du plateau de sortie. See your paper loading and ink installation, and look for details. Si le témoin d'erreur rouge est allumé, mettez l'appareil Epson Stylus CX ...light Témoin d'alimentation (On) Error light Témoin d'erreur Copy window Fenêtre Copy (Copier) Start Color button Bouton Start Color (Copier en couleur) CX4200 Series CX4800 Series • If the green On light is still on or flashing, check your Quick Guide and on-screen User...


